How to create a Telegram bot using WCF service
Hello, Habr. Somehow it became necessary to make a bot assistant, but with two conditions - to use WCF service and Telegrams. Since I had to spend a fair amount of time on implementation, I decided to write an article, maybe it would be useful for someone.
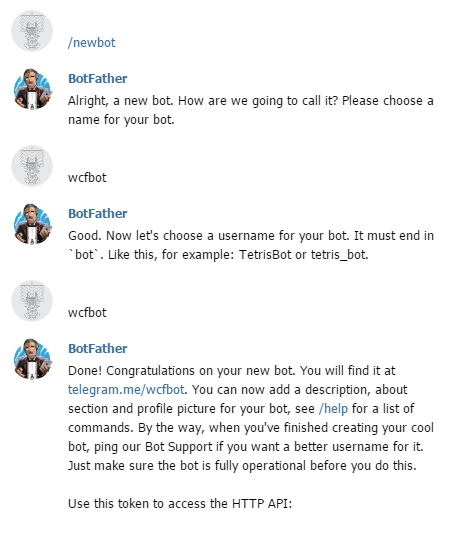
It’s very easy to create your own bot - we go in a telegram, we find a special bot @BotFather , we write it the command / newbot and follow its instructions, as a result we get the token of our bot.
Now we need to decide how we will receive updates from the bot. Telegram provides two ways - pull yourself using the getUpdates method, or use Webhook. With the first method, everything is clear, we are more interested in the second option. Using the setWebhook method, you can set the URL of the webhook, thus you kind of tell the Telegram servers where to send all the updates. Our WCF service will be in the role of webhuk
')
Let's create a new project “WCF service application” and call it “WcfBot”. The Telegram documentation says that in the updates we will get the Update object serialized in JSON, so we will create the class of this object in the new file. This helped us json2charp .
Now open the IService1.cs file, which contains the IService1 interface with the ServiceContract attribute — this is the service contract. Add a service operation to it and add the WebInvoke attribute to this operation, which determines which HTTP method the service operation responds to, what format it receives the data and what URL to access it.
IService1.cs
Next, open the file Service1.svc.cs and finish the implementation of our operation in the class Service1.
Service1.svc.cs
Now we need to send a response to the message on behalf of the bot. This will help us library Telegram.Bot . To install it, go to the package manager console (Tools -> NuGet Package Manager -> Package Manager Console) and write:
Now, in the method, we initialize the Telegram.Bot.Api object using our token, which we were given when creating the bot in the telegram, and implement the response to the “Hello” message.
Service1.svc.cs
It remains to edit the configuration file Web.config, adding in the behaviors:
and in system.serviceModel:
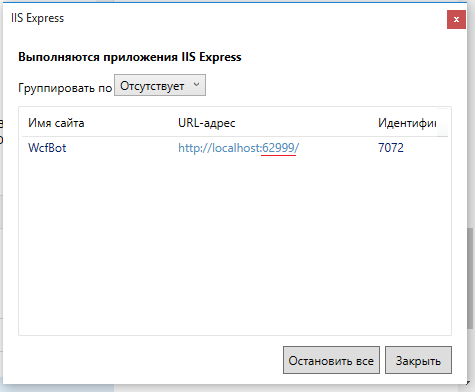
Now you can test. We start the service, go to the tray, find IIS Express, right-click, click "Show all applications", find our service, look at which port it is on
In order for telegram servers to have access to your service, you need to share localhost. For these purposes, suitable ngrok .
Download ngrok, unpack, run ngrok.exe and enter the command:
Instead of 1234 - the port of our service.
As a result, ngrok will give us the URL to our service.

It is important to copy the https version of the link, since Telegram only supports the secure HTTPS protocol. Now it remains only to tell our bot the address where to send messages. To do this, simply enter the link in the address bar of the browser:
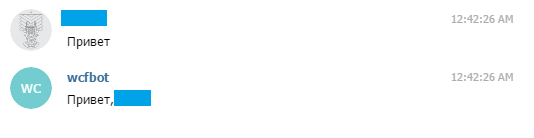
Everything, now you can write a bot and make sure that it really responds.
[ Sources ]
It’s very easy to create your own bot - we go in a telegram, we find a special bot @BotFather , we write it the command / newbot and follow its instructions, as a result we get the token of our bot.
Now we need to decide how we will receive updates from the bot. Telegram provides two ways - pull yourself using the getUpdates method, or use Webhook. With the first method, everything is clear, we are more interested in the second option. Using the setWebhook method, you can set the URL of the webhook, thus you kind of tell the Telegram servers where to send all the updates. Our WCF service will be in the role of webhuk
')
Let's create a new project “WCF service application” and call it “WcfBot”. The Telegram documentation says that in the updates we will get the Update object serialized in JSON, so we will create the class of this object in the new file. This helped us json2charp .
Update.cs
namespace WcfBot { public class From { public long id { get; set; } public string first_name { get; set; } public string last_name { get; set; } public string username { get; set; } } public class Chat { public long id { get; set; } public string first_name { get; set; } public string last_name { get; set; } public string username { get; set; } } public class ForwardFrom { public long id { get; set; } public string first_name { get; set; } public string last_name { get; set; } public string username { get; set; } } public class Audio { public string file_id { get; set; } public long duration { get; set; } public string performer { get; set; } public string title { get; set; } public string mime_type { get; set; } public long file_size { get; set; } } public class Thumb { public string file_id { get; set; } public long width { get; set; } public long height { get; set; } public long file_size { get; set; } } public class Document { public string file_id { get; set; } public Thumb thumb { get; set; } public string file_name { get; set; } public string mime_type { get; set; } public long file_size { get; set; } } public class Photo { public string file_id { get; set; } public long width { get; set; } public long height { get; set; } public long file_size { get; set; } } public class Sticker { public string file_id { get; set; } public string width { get; set; } public string height { get; set; } public Thumb thumb { get; set; } public long file_size { get; set; } } public class Video { public string file_id { get; set; } public long width { get; set; } public long height { get; set; } public long duration { get; set; } public Thumb thumb { get; set; } public string mime_type { get; set; } public long file_size { get; set; } } public class Voice { public string file_id { get; set; } public long duration { get; set; } public string mime_type { get; set; } public long file_size { get; set; } } public class Contact { public string phone_number { get; set; } public string first_name { get; set; } public string last_name { get; set; } public long user_id { get; set; } } public class Location { public double longitude { get; set; } public double latitude { get; set; } } public class NewChatParticipant { public long id { get; set; } public string first_name { get; set; } public string last_name { get; set; } public string username { get; set; } } public class LeftChatParticipant { public long id { get; set; } public string first_name { get; set; } public string last_name { get; set; } public string username { get; set; } } public class NewChatPhoto { public string file_id { get; set; } public long width { get; set; } public long height { get; set; } public long file_size { get; set; } } public class ReplyToMessage { public long message_id { get; set; } public From from { get; set; } public long date { get; set; } public Chat chat { get; set; } public ForwardFrom forward_from { get; set; } public long forward_date { get; set; } public object reply_to_message { get; set; } public string text { get; set; } public Audio audio { get; set; } public Document document { get; set; } public IList<Photo> photo { get; set; } public Sticker sticker { get; set; } public Video video { get; set; } public Voice voice { get; set; } public string caption { get; set; } public Contact contact { get; set; } public Location location { get; set; } public NewChatParticipant new_chat_participant { get; set; } public LeftChatParticipant left_chat_participant { get; set; } public string new_chat_title { get; set; } public IList<NewChatPhoto> new_chat_photo { get; set; } public bool delete_chat_photo { get; set; } public bool group_chat_created { get; set; } } public class Message { public long message_id { get; set; } public From from { get; set; } public long date { get; set; } public Chat chat { get; set; } public ForwardFrom forward_from { get; set; } public long forward_date { get; set; } public ReplyToMessage reply_to_message { get; set; } public string text { get; set; } public Audio audio { get; set; } public Document document { get; set; } public IList<Photo> photo { get; set; } public Sticker sticker { get; set; } public Video video { get; set; } public Voice voice { get; set; } public string caption { get; set; } public Contact contact { get; set; } public Location location { get; set; } public NewChatParticipant new_chat_participant { get; set; } public LeftChatParticipant left_chat_participant { get; set; } public string new_chat_title { get; set; } public IList<NewChatPhoto> new_chat_photo { get; set; } public bool delete_chat_photo { get; set; } public bool group_chat_created { get; set; } } public class Update { public long update_id { get; set; } public Message message { get; set; } } } Now open the IService1.cs file, which contains the IService1 interface with the ServiceContract attribute — this is the service contract. Add a service operation to it and add the WebInvoke attribute to this operation, which determines which HTTP method the service operation responds to, what format it receives the data and what URL to access it.
IService1.cs
namespace WcfBot { [ServiceContract] public interface IService1 { [OperationContract] [WebInvoke(Method = "POST", RequestFormat = WebMessageFormat.Json, ResponseFormat = WebMessageFormat.Json, UriTemplate = @"/Update")] void GetUpdate(Update update); } } Next, open the file Service1.svc.cs and finish the implementation of our operation in the class Service1.
Service1.svc.cs
namespace WcfBot { public class Service1 : IService1 { public void GetUpdate(Update update) { } } } Now we need to send a response to the message on behalf of the bot. This will help us library Telegram.Bot . To install it, go to the package manager console (Tools -> NuGet Package Manager -> Package Manager Console) and write:
Install-Package Telegram.Bot
Now, in the method, we initialize the Telegram.Bot.Api object using our token, which we were given when creating the bot in the telegram, and implement the response to the “Hello” message.
Service1.svc.cs
namespace WcfBot { public class Service1 : IService1 { public void GetUpdate(Update update) { var Bot = new Telegram.Bot.Api("<token>"); if(update.message.text == "") { Bot.SendTextMessage(update.message.chat.id, "," + update.message.from.first_name); } } } } It remains to edit the configuration file Web.config, adding in the behaviors:
<endpointBehaviors> <behavior name="web"> <webHttp /> </behavior> </endpointBehaviors> and in system.serviceModel:
<services> <service name="WcfBot.Service1"> <endpoint binding="webHttpBinding" contract="WcfBot.IService1" behaviorConfiguration="web"></endpoint> </service> </services> Now you can test. We start the service, go to the tray, find IIS Express, right-click, click "Show all applications", find our service, look at which port it is on
In order for telegram servers to have access to your service, you need to share localhost. For these purposes, suitable ngrok .
Download ngrok, unpack, run ngrok.exe and enter the command:
ngrok http 1234 -host-header=”localhost: 1234 ”
Instead of 1234 - the port of our service.
As a result, ngrok will give us the URL to our service.
It is important to copy the https version of the link, since Telegram only supports the secure HTTPS protocol. Now it remains only to tell our bot the address where to send messages. To do this, simply enter the link in the address bar of the browser:
https://api.telegram.org/bot <token> /setWebhook?url= <url> /Service1.svc/Update
Everything, now you can write a bot and make sure that it really responds.
[ Sources ]
Source: https://habr.com/ru/post/304822/
All Articles