First look at the new Cisco Firepower Threat Defense software (UPD 02.09.16)

Hello, Habr! Last fall, we shared with you the experience of implementing FirePOWER services on the Cisco ASA firewall. And in the New Year flashbacks they mentioned FirePOWER version 6.0, in which one of the main innovations was the management of all services using ASDM. Progress in Cisco does not stand still, and this spring there was an announcement of the new Cisco Firepower 4100 and 9300 lineup. These are, in fact, all the same modular ASAs, like the 5585-X, but with a new name (hello marketing department), more sophisticated, more productive and with the new centralized management software Firepower Threat Defense (FTD). FTD can be launched not only on devices of the new model range, but also on all ASA 5500-X models, except for 5585-X (at least for the time being). Just about this new software from Cisco and will be discussed in this article.
A little background. In FirePOWER version 5.4 everything was “simple”: there was a sensor located on the ASA SSD (either a separate piece of hardware or a virtual machine) and there was software for managing the FireSIGHT Management Center (also known as the Defense Center). ASA had its standard IOS image with control through CLI / ASDM. The sensor needed its own image, which was accessed through the same CLI ASA (or SSH to the mgmt port). Well, access to FireSIGHT was carried out through a browser. To this you need to add separate licenses + smart for ASA, separate subscriptions for the sensor and smart for FireSIGHT. It goes without saying that such a distributed approach to managing all services did not suit many. With the release of FirePOWER version 6.0, it is possible to manage all services using ASDM. A number of restrictions imposed by the ASDM itself, the lack of a centralized distribution of policies across different sensors and several other features did not please everyone, so many still have to wait for a complete solution for centralized management of everything at once.
')
Gossip. Gossip
Tsisk says that the development of a new ASDM for the Cisco ASA is in full swing and it will be written in HTML 5. It's time to go. Thank.
With the release of FTD, the centralized management received - one image on which the sensor software and Cisco ASA software is running. Both are managed through the Firepower Management Center (FMC is the same FireSIGHT, the third name of the same one, please stop). And everything would be fine, but if in the case of ASDM we received restrictions on FP services, then now we get restrictions on the functionality and configuration of the ASA. The main limitation is the "not working" VPN. And not that it does not work, it simply can not be set up by regular means. Currently, neither Site-to-Site VPN, nor Remote access VPN can be configured.
About Site-to-Site VPN
In the case of Site-to-Site VPN, everything is rather ambiguous: in the Release Notes to version 6.0.1, it says in black and white: “Devices running Firepower does n’t support VPN functionality through Version 6.0.1 but it doesn’t support switching routing functions. ", But at the same time, in the Configuration Guide for FMC 6.0.1 (in pdf format), it also says" The Firepower Threat Defense appliance provides a unified next-generation firewall and next-generation IPS device. In addition to the IPS, there are Site-to-Site VPNs , firewall and network routing, firewalls, network routing, firewalls, firewalls, firewalls and firewalls. I'm inclined to the release notes option, as attempts to set up a Site-to-Site VPN from FMC have failed.
FTD installation
An FTD image is available for installation on all ASA 5500-X and FP 4100/9300 platforms. Not without virtual performance - vFTD, on the basis of which, further narration will be built.
The first FTD image got version 6.0.1. In order to be able to connect FTD to FMC, you need to upgrade FireSIGHT to version 6.0.1 (requirements for FMC do not differ from requirements for previous versions of the product). The very process of preparing a virtual environment or Cisco ASA followed by the installation of an FTD image and its connection to FMC are described in detail in the Quick Start Guide ( VMware , Cisco ASA and just in case Firepower 4100 , Firepower 9300 ), so we will not dwell on it. Moreover, this process for ASA and VMware is not much different from installing a separate FP sensor on these platforms. In the end, the picture of the connected FTD (in our case vFTD) will look like this:

Figure 1 - Displaying vFTD in the FMC console
What you should pay attention to here:
1. Licensing
Licenses are now under the Smart License program -
Gossip. Gossip
Tsisk says that in the distant future, this scheme will replace all traditional licensing schemes, including the recently appeared Cisco ONE scheme.
The main message of this scheme is the automatic tracking of the subscription / license up to date by the device (the device itself periodically asks Cisco whether the installed license is relevant and whether the customized functionality meets the subscription conditions) and the ability to centrally manage all subscriptions / licenses via the Smart Software Manager portal created for it.

Figure 2 - Smart Licenses for vFTD
2. Routed Mode for Virtual FTD
Unlike the FP virtual sensor, vFTD can operate in routing mode. This is understandable, because now inside FTD we have an ASA software image. And in the case of virtualization, you need to run it on something, and this is something, of course, ASAv, and more specifically ASAv30. During the vFTD boot process, the console continually replete with messages about the launch of ASAv, or even asks which image to load:
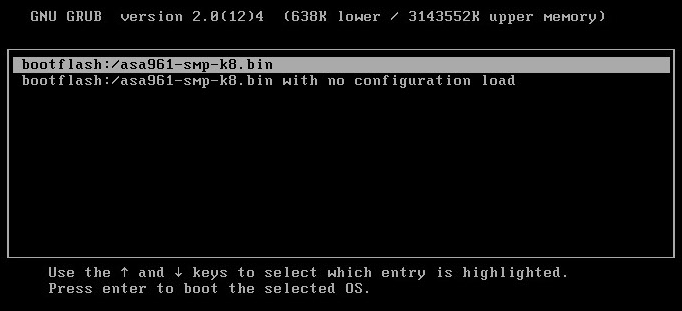
Figure 3 - Loading vFTD. Image selection for ASAv
By the way, the console at the time of loading vFTD is the only place where you can peek at the current licenses for the ASAv itself:
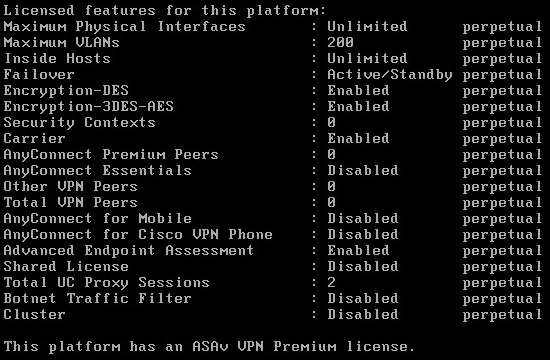
Figure 4 - “VPN Premium” license with activated 3des-aes and without Anyconnect
Since this is ASAv30, then with the installation of vFTD we get performance comparable to the iron ASA 5525-X, judging by the numbers in the vendor datasheets ( ASA 5500-X , ASAv pdf). Of course, it is not yet clear what the performance is there taking into account the functionality of the FP, but still nice.
Pro routed and transparent mode
According to the documentation, transparent mode is also available for FTD, but in the case of vFTD only the routing mode is available.
FTD Setup
The FTD setting can be divided into three points:
- System settings.
- Routing settings.
- Setting subscription functionality (NGFW, NGIPS, AMP).
System settings
These settings are configured / edited in the Devices tab -> Platform Settings. They look like this:
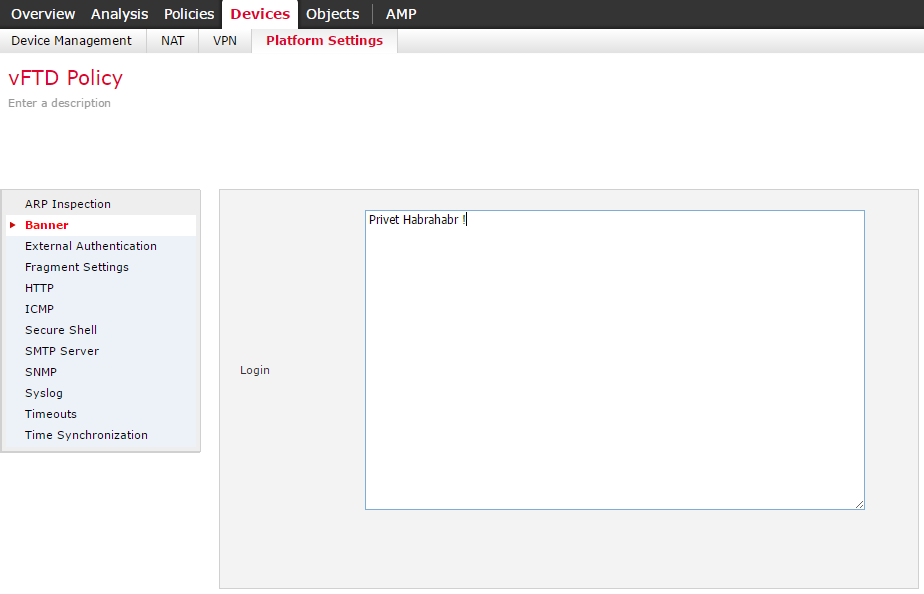
Figure 5 - Platform Settings for vFTD
In principle, it is clear from the names that he is responsible for what, so I’ll dwell only on one thing: on a bunch of External Authentication + Secure Shell / HTTP.
This bundle is needed so that we can get directly to the ASAv console. You cannot create local accounts, so you must use either LDAP or RADIUS (External Authentication) for authentication. Everything seems to be as usual: first, configure the authentication method, and then from which addresses, which interface and which protocol you can access. And if everything is fine with SSH, then HTTP is apparently made "for the future." HTTP on Cisco ASA is usually configured for access via ASDM, but in this case there is no ASDM image on ASAv and there are no options to load and configure it in the FMC, so we get that when accessing via the browser we have error 404, and when connecting via ASDM "Unable to launch device manager":
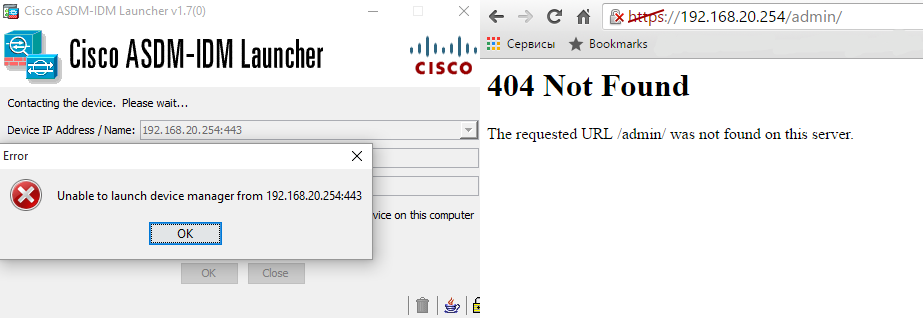
Figure 6 - Connecting to FTD via HTTP
Having got to the console on SSH, first of all we watch show version:
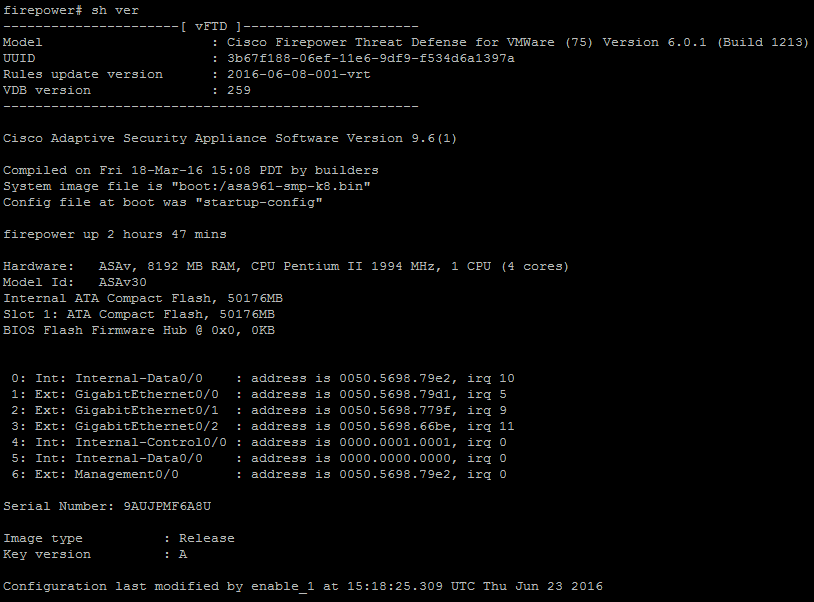
Figure 7 - Show version via SSH
Here and information on the version of vFTD and software / hardware ASAv.
Routing Settings
As a matter of fact, this is the very same setting of the ASA functionality through FMC. All settings are performed in two tabs: Devices -> Device Management and in the Objects tab. In the Objects tab, you can see the default settings for the ASA SLA, route-map, ACL and [AS path, community list, policy list] for BGP:
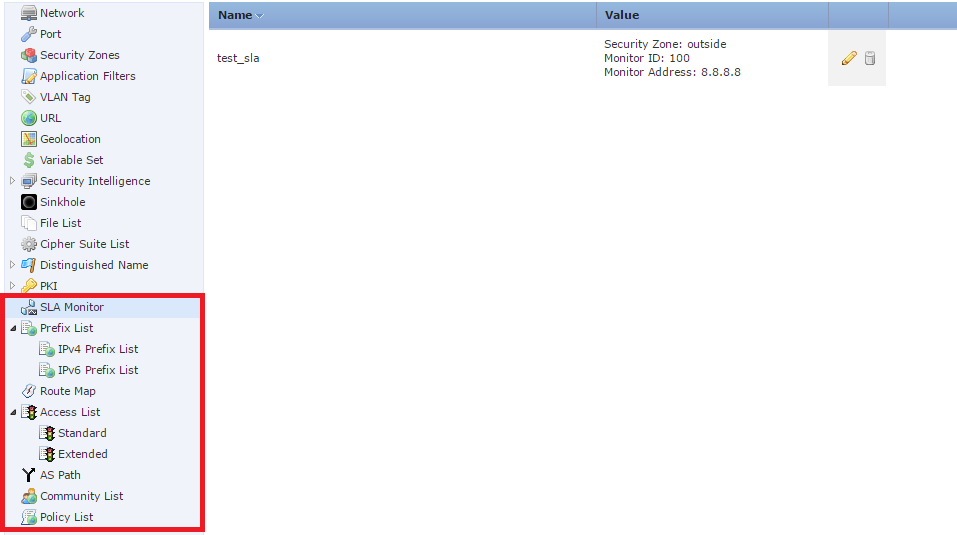
Figure 8 - Components of classic ASA settings
All customizable “objects” in the Objects tab are created for the purpose of their further use by various policies, in particular, the policy applied to the device in the Device Management tab.
CLI Objects
It is worth considering the fact that even if the setting of one or another “object” is present in the FMC, but it is not used in any of the policies, then such an “object” will not be displayed in the CLI.
Setting a policy in the Device Management tab includes:
1. Devices section.
Similar when setting up a separate FP sensor.
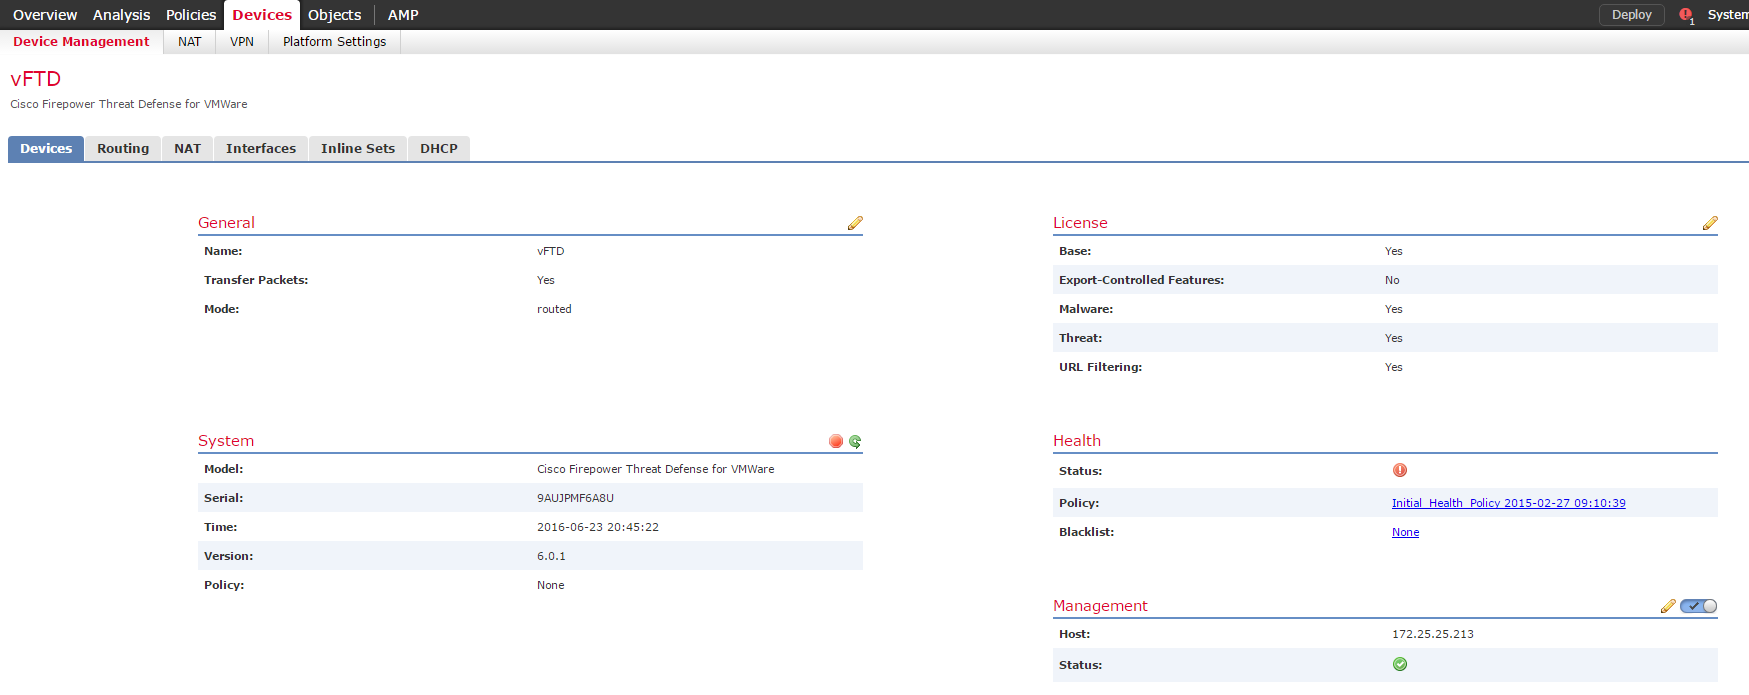
Figure 9 - Devices Section
2. Routing.
Static and dynamic (

Figure 10 - Configure Routing
Here is an example of using the “object” SLA for a static route and its display in the CLI:
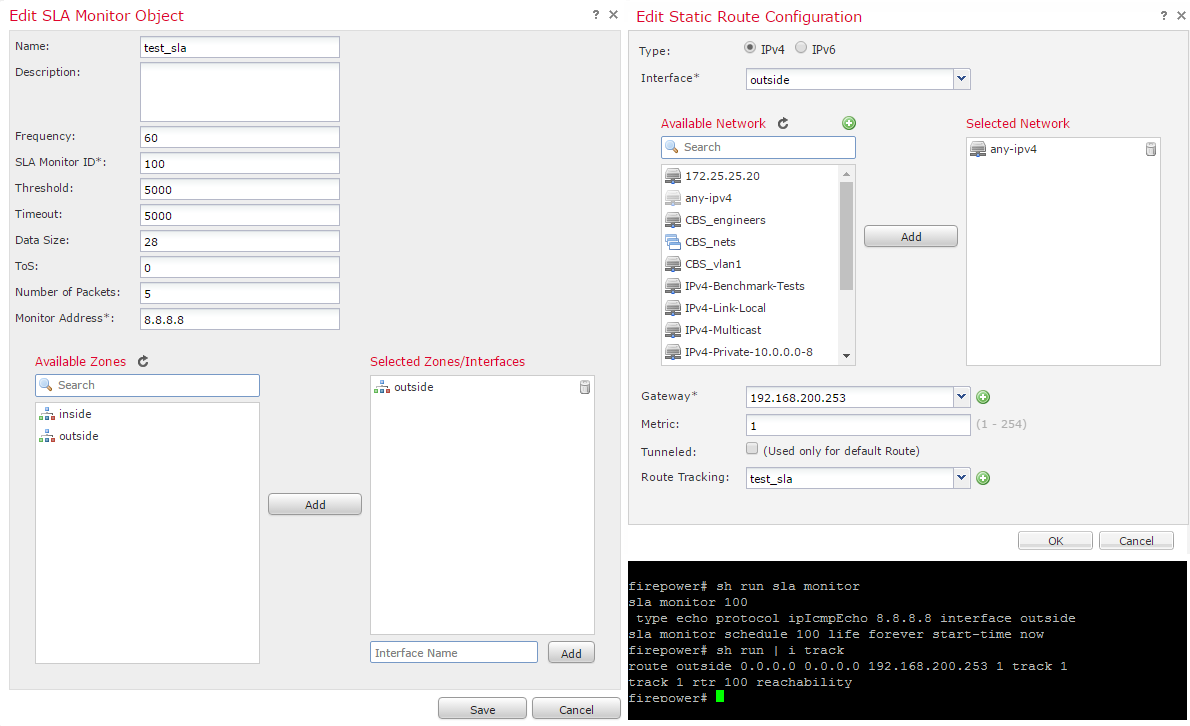
Figure 11 - SLA configuration example
3. NAT.
Here, without nuances and restrictions, all variants of NAT rules are available.

Figure 12 - Setting translation rules
4. Configuring interfaces.

Figure 13 - Interface settings
With interfaces, everything is quite standard, with the exception of one thing - the usual security-level cannot be defined, all interfaces come with a zero level of security. But despite the fact that in the configuration there is no permission to pass traffic between the interface with the same security level ( same-security-traffic permit inter-interface ), everything works fine.
Resolution same-security-traffic inter-interface
firepower# sh run inter g0/0 ! interface GigabitEthernet0/0 description inside interface nameif inside security-level 0 ip address 192.168.20.254 255.255.255.0 firepower# sh run inter g0/1 ! interface GigabitEthernet0/1 description outside interface nameif outside security-level 0 ip address 192.168.200.251 255.255.255.128 firepower# sh run same-security-traffic ^ ERROR: % Invalid input detected at '^' marker. firepower# sh run | i same firepower# 5. Setting up inline sets.
Tap mode - instead of passing all traffic through the sensor, only a copy of the traffic will be sent to the sensor, respectively, active actions will not be applied to traffic. But at the same time events (for example, IPS events) will be generated. A kind of monitoring mode for traffic on a selected pair of interfaces (“span mode”, when compared with a separate FP sensor). Propagate Link State - bypass mode, we skip all traffic without checking, while if one of the interfaces in the pair is sent in the down state, then the same happens with the second one (as soon as the problematic interface returns to its up state, the second one rises automatically). Strict TCP Enforcement - enable triple handshake control for TCP sessions. Tap mode and Strict TCP Enforcement cannot be enabled at the same time.

Figure 14 - Setting Inline Sets
6. Configure the DHCP service.
In three options: DHCP server, DHCP relay and DDNS.
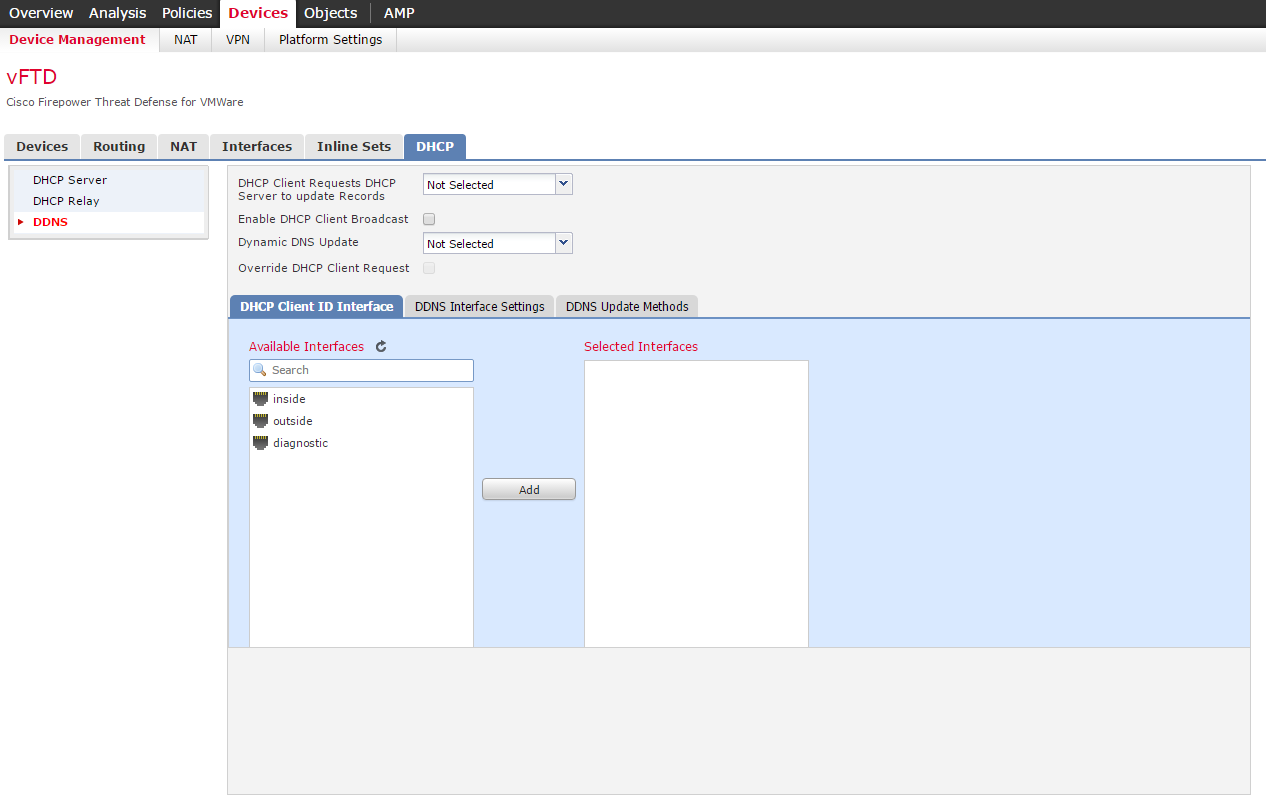
Figure 15 - DHCP Setting
On this, perhaps, everything. As for the parameters of the classic traffic inspection: they cannot be changed, although in the CLI they look quite standard with small additions in the form of ip options and additional options for tcp.
Classic Inspection Settings
firepower# sh run class-map ! class-map inspection_default match default-inspection-traffic ! firepower# sh run policy-map ! policy-map type inspect dns preset_dns_map parameters message-length maximum client auto message-length maximum 512 policy-map type inspect ip-options UM_STATIC_IP_OPTIONS_MAP parameters eool action allow nop action allow router-alert action allow policy-map global_policy class inspection_default inspect dns preset_dns_map inspect ftp inspect h323 h225 inspect h323 ras inspect rsh inspect rtsp inspect sqlnet inspect skinny inspect sunrpc inspect xdmcp inspect sip inspect netbios inspect tftp inspect icmp inspect icmp error inspect dcerpc inspect ip-options UM_STATIC_IP_OPTIONS_MAP class class-default set connection advanced-options UM_STATIC_TCP_MAP ! firepower# sh run tcp-map ! tcp-map UM_STATIC_TCP_MAP tcp-options range 6 7 allow tcp-options range 9 255 allow urgent-flag allow ! Setting subscription policies (NGFW, NGIPS, AMP)
All policies are configured in the same way as before. The main thing to remember is to choose the necessary device when deploying them. An interesting point is the NGFW (Access Control Policy) policies - all configured and applied rules can be viewed through the CLI. In CLI, they are displayed as an ACL that has a specific name and at least a specific syntax:
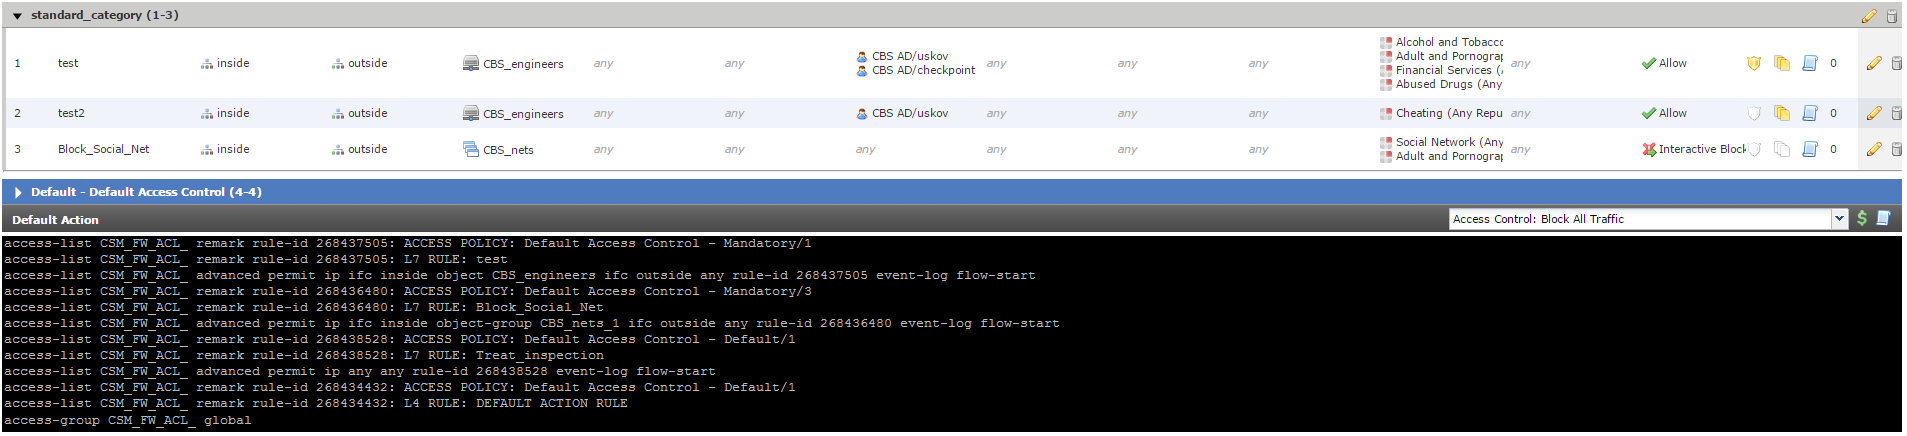
Figure 16 - Access Control Policy Rules.
And the main thing here is that such an ACL is applied globally ( access-group CSM_FW_ACL_ global ) and moreover the absence of the classical deny any any rule at the end of the ACL actually means its absence. All traffic that does not fall under the rules created (including in the direction outside-inside) is processed by the “default action” (Default Action, Figure 16). Therefore, it is necessary to carefully consider the drafting of the rules in order to avoid a situation where all incoming traffic is allowed. There were no nuances in the configuration of file policies or IPS policies.
Conclusion
At first glance, version 6.0.1 of FTD seemed
Site-to-Site VPN Cheats
You can configure the Site-to-Site VPN crutch . We have SSH access and, yes, we cannot edit the configuration. But we can download it - the copy command is available in full. All we need is to unload the running-config, for example, on the tftp server and edit it, download it back. All necessary lines for VPN can be added to the gap between the penultimate and last lines of the configuration file (Cryptochecksum and end):
You need to load the prepared configuration with the command, with a clear indication of the location of the configuration file on FTD:
After the file is copied, the SSH connection is broken, you will need to reconnect and save the configuration ( write memory ). By completing the appropriate configuration on the other side, we get a full-fledged, working Site-to-Site VPN.

And everything would be fine, but it would not be a “crutch” if it were not for one nuance: the access-list created for crypto cards created this way will be removed from the FTD configuration every time we apply any changes in the FMC console (we execute Deploy) . In this situation, to our aid, comes the Embedded Event Manager (EEM), added to the ASA from version 9.2 (1). In the same way as with the VPN configuration, we add to the EEM configuration:
This EEM will add every 5 seconds to the configuration the ACL we need. It is also necessary to add the ACL binding command to the crypto map, since removing the ACL from the configuration also removes the binding. Thus we get a fully functional VPN.
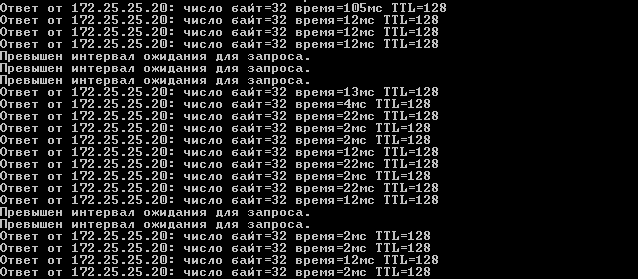
In such an implementation, we can expect packet loss at the time of deploying policies from FMC to FTD:
A possible alternative to the event timer in EEM is to perform actions when a message appears in the logs with a specific id ( event syslog id ). This option has not been tested, so I can’t say anything about its success (even in the case of a correctly selected id).
Cryptochecksum:073c34a024b2cff7f7303a5c888c2c61 crypto ikev1 policy 10 authentication pre-share encryption 3des hash sha group 2 lifetime 86400 crypto ikev1 enable outside crypto ipsec ikev1 transform-set ESP-AES-SHA esp-aes-256 esp-sha-hmac access-list crypto-acl extended permit ip host 192.168.20.5 host 172.25.25.20 crypto map CMAP 10 match address crypto-acl crypto map CMAP 10 set peer 192.168.200.252 crypto map CMAP 10 set ikev1 transform-set ESP-AES-SHA crypto map CMAP interface outside tunnel-group 192.168.200.252 type ipsec-l2l tunnel-group 192.168.200.252 ipsec-attributes ikev1 pre-shared-key 123456 : end You need to load the prepared configuration with the command, with a clear indication of the location of the configuration file on FTD:
copy tftp system:running-config After the file is copied, the SSH connection is broken, you will need to reconnect and save the configuration ( write memory ). By completing the appropriate configuration on the other side, we get a full-fledged, working Site-to-Site VPN.
And everything would be fine, but it would not be a “crutch” if it were not for one nuance: the access-list created for crypto cards created this way will be removed from the FTD configuration every time we apply any changes in the FMC console (we execute Deploy) . In this situation, to our aid, comes the Embedded Event Manager (EEM), added to the ASA from version 9.2 (1). In the same way as with the VPN configuration, we add to the EEM configuration:
event manager applet cryptoACL event timer watchdog time 5 action 0 cli command "access-list crypto-acl extended permit ip host 192.168.20.5 host 172.25.25.20" action 1 cli command "crypto map CMAP 10 match address crypto-acl" output none This EEM will add every 5 seconds to the configuration the ACL we need. It is also necessary to add the ACL binding command to the crypto map, since removing the ACL from the configuration also removes the binding. Thus we get a fully functional VPN.
In such an implementation, we can expect packet loss at the time of deploying policies from FMC to FTD:
A possible alternative to the event timer in EEM is to perform actions when a message appears in the logs with a specific id ( event syslog id ). This option has not been tested, so I can’t say anything about its success (even in the case of a correctly selected id).
UPD (09/02/2016):
On August 29th, Tsisk released updates to version 6.1. A complete list of updates, as usual, in the Release Notes on the official site.
There are a lot of updates and all of them are
- TS Agent for terminal servers (VDI Identity Support).
It is now possible to recognize users behind the terminals. The principle of operation is similar to how it works in Check Point — allocating to each user its own range of ports. I do not hint at anything, butwhy not do this before?Well done anyway. - Kerberos Authentication.
Can help with Single Sign-On. This was also expected, thank you. - Rate Limiting.
Now we can cut the bandwidth across networks, zones, users / groups, applications, ports and parameters received from ISE. - Site-to-Site VPN.
Now it should work without any cheats. - Enhanced Virtualization Support.
They waited for KVM, now it remains to wait for Hyper-V.
Everything looks cool, but we haven’t checked it in practice, so we cannot say anything about how things really are. At least for now.
Source: https://habr.com/ru/post/304794/
All Articles