Writing a text game in Python / Ren'Py Part 2: mini-games and pitfalls
Summary of the previous twenty-five thousand episodes : we are writing a text game about swimming in the sea and engaging in history. We write it on the Ren'Py engine, which was originally designed for visual novels, but after the minimum configuration is able to do everything we need. In the last article I explained how to make a simple interactive reader, and in this one we will add a couple more screens with more complex functions and finally work on the python.
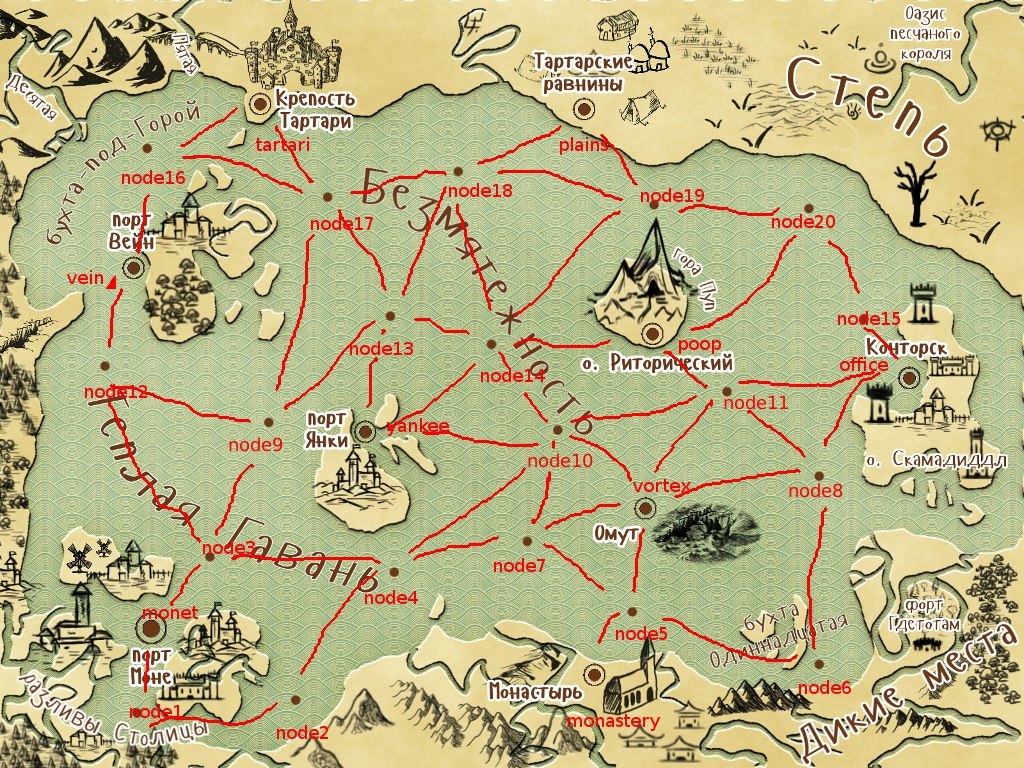
The last article ended with the fact that the player can read the text, look at the pictures and influence the development of the plot. If we were going to port Braslavsky game books or write CYOA in the spirit of Choice of Games , that would be enough. But in the game about navigation you need at least a simple interface of navigation itself. Assembling a full-fledged simulator, as in Sunless Sea, in Ren'Py is possible, but it is laborious and generally meaningless. In addition, we do not want to make our own Sunless Sea with Buryat and Buuz, so we will confine ourselves to something like a global map in “Space Rangers”: a dozen or so active points, from each of which you can go to several neighboring ones. Like this:
')
For the interface itself, we just need to display a bunch of buttons (one for each point) and a background image; one Displayable of type Imagemap is enough for this. In principle, it is not much different from its counterpart in HTML: this is a picture in which active zones are defined, each with its own action. However, working with bare Displayable is inconvenient, and from an architectural point of view it is ugly. Therefore, before you take up the code, it is worthwhile to deal with the hierarchy of elements that Ren'Py displays on the display.
The lowest level is Displayables, that is, widgets that are embedded or created by the developers of a particular game. Each of them performs some basic function: shows a picture, displays text, provides input, etc. Displayables are usually grouped into screens that provide already more abstract interactions: for example, text output and in-game menus are performed by the nvl screen, which includes the actual text, background, frame, and menu buttons. At the same time, you can display as many screens as you like: on one, for example, there can be text, on the other buttons that regulate the volume of the music, and on the third one some snowflakes flying over it all. As needed, you can show or remove individual screens with mini-games, save menu and everything else you need to play. And finally, there are layers . Working directly with layers is needed infrequently, but it is necessary to know about their existence. The background image, for example, is not related to the screen system and is displayed below them in the master layer.
So, the travel screen description looks like this:
First, the map_screen () screen is declared. Tag optional; it simply allows you to group screens for commands such as “Remove all screens related to movement”. Zorder is the “height” of the screen, by which it is decided which elements will overshadow each other. Since we set zorder = 2, and the default screen for the nvl is zorder = 1, the player will not see a window with text while traveling. But the most important thing is that this screen is modal, that is, no elements below it will receive input events. It turns out that the nvl screen with the appearance of the card is blocked, so we do not need to track the game state ourselves and make sure that the click on the map does not waste text at the same time.
Imagemap itself consists of two main elements: an auto tag and a list of active zones. Auto contains a link to a set of files to be used as a background. It is a set, not a single image: a file lies separately, in which all the buttons are drawn as inactive, separately - in which they are all pressed, and so on. And Ren'Py already chooses the necessary fragment from each file and makes a picture on the screen. And finally, the active zone (hotspot). They are described by a tuple of four integers (coordinates and size) and an action object. The tuple is not hard-code, but uses the attribute of the object; In the description of the screen, instead of a value, you can always insert a variable or an attribute. The action object describes what happens at the touch of a button and controls whether the button should be active at the moment. Ren'Py provides quite a few in-built actions for routine tasks such as navigating through a scenario or saving a game, but you can also make your own. Finally, the ship’s drawing and the transformation are added last, thanks to which it is not just displayed on the screen, but crawls from point A to point B. Transformations are described in a separate language ATL (Animation & Transformation Language) .
One pitfall is associated with screens: the screen code is executed not immediately before its display, but in advance. This happens whenever the engine wants it and as many times as it wants, so everything that is addressed in this code should be initialized before the game starts and should not affect the state of other important variables.
In the previous article, I promised to show two ways to make interfaces in Ren'Py. First we just saw: it is fairly simple, but not at all universal. I did not understand, for example, how to describe how to drag objects with the mouse in an on-screen language and handle collisions. Or how to typeset screens, if the number of elements on them is determined during the game. Fortunately, Displayables are full-fledged widgets: they can include other Displayables, catch input events and change if necessary. Consequently, it is possible to describe the entire mini-game in the same Displayable in almost the same way as we would have done for a separate application, and insert it into the project.
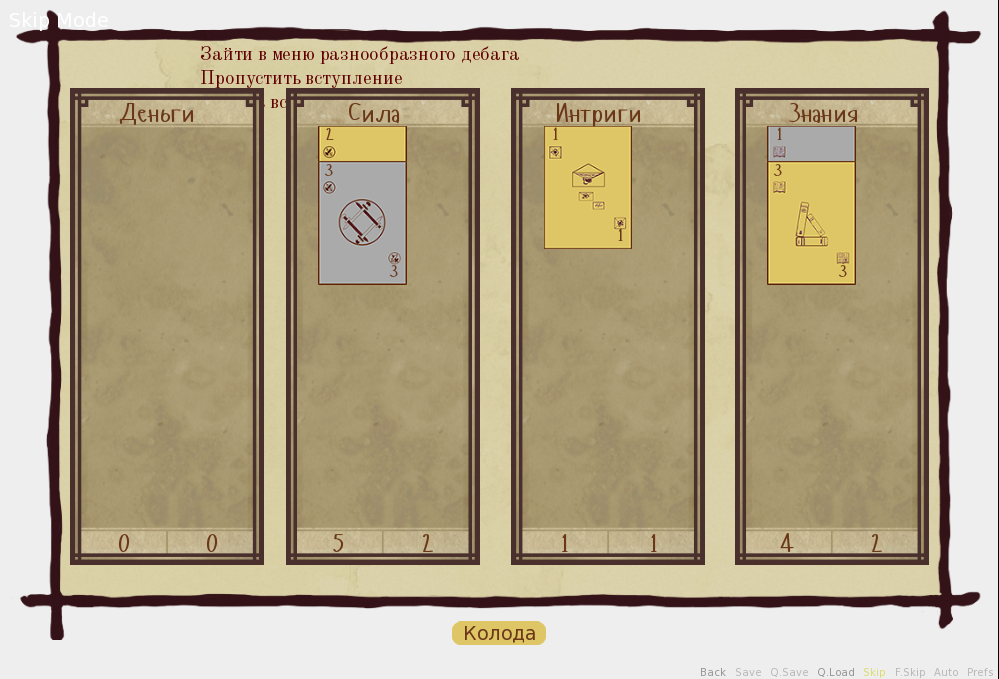
Mini-game, we will have a card. All potentially useful property and knowledge of the protagonist are presented in the form of a deck of cards of 1 to 10 in four suits: Strength, Knowledge, Intrigue and Money. Let us say, the power deuce is the invaluable knowledge of where the person is breathing, under which to beat, and the eight intrigues is a reliable list of the Office’s agents among smugglers. A simple game with bribes determines whether the player has coped with the problem facing him and what suit he won or lost. As a result, a conflict can have a maximum of eight outcomes: winning and losing each suit, in principle, can lead to different consequences.
A card game means cards appear in it. The Displayable code displaying a small map looks like this:
This is, in fact, the simplest possible Displayable. It consists of two others: a background image, selected depending on the suit, and a text with a denomination. Both methods (not counting the constructor) are necessary for the Displayable operation: self.render returns a texture, and self.visit -
list of all Displayables included in this. And she really draws a small card; Here are a few of these cards on the deck screen:
Not bad, but the map itself can only be on the screen, and that only if someone puts it there. In order to actually play the mini-game, you need to add an external Displayable that can handle input and cheat logic. Maps and other interface elements will be included in the same as text fields and background are parts of the map. This Displayable will be distinguished by the presence of the self.event () method, which receives the PyGame event as input. LINK TO PYGAME.EVENT Like this (the full code is available on the github in the Table class):
You should not worry about the event queue: the engine will distribute all events to all elements that are currently active. It only remains for the method to check whether the incident is of interest, respond to the event and complete the interaction. Interaction in Ren'Py is approximately equivalent to the tic of game logic in other engines, but is not limited in time. In general, this is one player’s team and the game’s response to it, although sometimes (for example, when scrolling text) interactions can end on their own.
This Displayable, like all the others, we will wrap in the screen:
conflict_table in this case is not the name of the class, but a global variable in which the corresponding Displayable is stored. It was mentioned above that, in principle, the screen code can be executed at any time, but before the show it will be executed without fail, otherwise the game will not know what to output. Therefore, it is completely safe to perform something like conflict_table.set_decks (player_deck, opponent_deck) immediately before the mini-game and rely on the fact that the player will be exactly what you need. Similarly, at the end of the mini-game, you can access the results that are stored in the same object.
I must say that the use of global variables is not a restriction of Ren'Py, but our own solution. Screens and Displayables are supported, which are able to take arguments and return values, but with them it is somewhat more complicated. First, the behavior of such screens is poorly documented. At the very least, it is quite difficult to figure out exactly at what point the screen begins its first interaction and when it returns control to the script. And this is a very important question, because without knowing the answer to it, it is difficult to guarantee that the entire text preceding the conflict will be shown before the conflict begins, and the text following the conflict will not be shown. Secondly, with the use of global variables, most of the objects needed for a mini-game are initialized only once, and then we change their attributes with each subsequent launch. Otherwise it would have to spend time with each conflict to load all the necessary files; the game noticeably lags if the HDD is simultaneously accessed in parallel, for example, torrent and antivirus. Finally, not only the conflict screen accesses the maps, but also several other screens, so it makes sense to use the same Displayables wherever they are needed.
This is where the actual software part of the development ends and the content of the game begins. I am mostly not involved in literature in the game, so I will not discuss the structure of the narrative and the style. On this subject I can advise you to read, for example, a classic article on the structure of CYOA . Or a good guide to writing a compelling independent NPC from a screenwriter 80 days .
More links (as well as reviews of recent English-language works and articles on related topics) can be found in Emily Short's blog .
The last article ended with the fact that the player can read the text, look at the pictures and influence the development of the plot. If we were going to port Braslavsky game books or write CYOA in the spirit of Choice of Games , that would be enough. But in the game about navigation you need at least a simple interface of navigation itself. Assembling a full-fledged simulator, as in Sunless Sea, in Ren'Py is possible, but it is laborious and generally meaningless. In addition, we do not want to make our own Sunless Sea with Buryat and Buuz, so we will confine ourselves to something like a global map in “Space Rangers”: a dozen or so active points, from each of which you can go to several neighboring ones. Like this:
')
Displayables, screens and layers
For the interface itself, we just need to display a bunch of buttons (one for each point) and a background image; one Displayable of type Imagemap is enough for this. In principle, it is not much different from its counterpart in HTML: this is a picture in which active zones are defined, each with its own action. However, working with bare Displayable is inconvenient, and from an architectural point of view it is ugly. Therefore, before you take up the code, it is worthwhile to deal with the hierarchy of elements that Ren'Py displays on the display.
The lowest level is Displayables, that is, widgets that are embedded or created by the developers of a particular game. Each of them performs some basic function: shows a picture, displays text, provides input, etc. Displayables are usually grouped into screens that provide already more abstract interactions: for example, text output and in-game menus are performed by the nvl screen, which includes the actual text, background, frame, and menu buttons. At the same time, you can display as many screens as you like: on one, for example, there can be text, on the other buttons that regulate the volume of the music, and on the third one some snowflakes flying over it all. As needed, you can show or remove individual screens with mini-games, save menu and everything else you need to play. And finally, there are layers . Working directly with layers is needed infrequently, but it is necessary to know about their existence. The background image, for example, is not related to the screen system and is displayed below them in the master layer.
So, the travel screen description looks like this:
screen map_screen(): tag map modal True zorder 2 imagemap: auto 'images/1129map_%s.png' # Main cities hotspot monet.hotspot action Travel(monet) hotspot tartari.hotspot action Travel(tartari) # … # More of the same boilerplate # … add 'images/1024ship.png': at shiptransform(old_coords, coords) anchor (0.5, 1.0) id 'ship' transform shiptransform(old_coords, coords): pos old_coords linear 0.5 pos coords First, the map_screen () screen is declared. Tag optional; it simply allows you to group screens for commands such as “Remove all screens related to movement”. Zorder is the “height” of the screen, by which it is decided which elements will overshadow each other. Since we set zorder = 2, and the default screen for the nvl is zorder = 1, the player will not see a window with text while traveling. But the most important thing is that this screen is modal, that is, no elements below it will receive input events. It turns out that the nvl screen with the appearance of the card is blocked, so we do not need to track the game state ourselves and make sure that the click on the map does not waste text at the same time.
Imagemap itself consists of two main elements: an auto tag and a list of active zones. Auto contains a link to a set of files to be used as a background. It is a set, not a single image: a file lies separately, in which all the buttons are drawn as inactive, separately - in which they are all pressed, and so on. And Ren'Py already chooses the necessary fragment from each file and makes a picture on the screen. And finally, the active zone (hotspot). They are described by a tuple of four integers (coordinates and size) and an action object. The tuple is not hard-code, but uses the attribute of the object; In the description of the screen, instead of a value, you can always insert a variable or an attribute. The action object describes what happens at the touch of a button and controls whether the button should be active at the moment. Ren'Py provides quite a few in-built actions for routine tasks such as navigating through a scenario or saving a game, but you can also make your own. Finally, the ship’s drawing and the transformation are added last, thanks to which it is not just displayed on the screen, but crawls from point A to point B. Transformations are described in a separate language ATL (Animation & Transformation Language) .
One pitfall is associated with screens: the screen code is executed not immediately before its display, but in advance. This happens whenever the engine wants it and as many times as it wants, so everything that is addressed in this code should be initialized before the game starts and should not affect the state of other important variables.
Playing cards
In the previous article, I promised to show two ways to make interfaces in Ren'Py. First we just saw: it is fairly simple, but not at all universal. I did not understand, for example, how to describe how to drag objects with the mouse in an on-screen language and handle collisions. Or how to typeset screens, if the number of elements on them is determined during the game. Fortunately, Displayables are full-fledged widgets: they can include other Displayables, catch input events and change if necessary. Consequently, it is possible to describe the entire mini-game in the same Displayable in almost the same way as we would have done for a separate application, and insert it into the project.
Mini-game, we will have a card. All potentially useful property and knowledge of the protagonist are presented in the form of a deck of cards of 1 to 10 in four suits: Strength, Knowledge, Intrigue and Money. Let us say, the power deuce is the invaluable knowledge of where the person is breathing, under which to beat, and the eight intrigues is a reliable list of the Office’s agents among smugglers. A simple game with bribes determines whether the player has coped with the problem facing him and what suit he won or lost. As a result, a conflict can have a maximum of eight outcomes: winning and losing each suit, in principle, can lead to different consequences.
A card game means cards appear in it. The Displayable code displaying a small map looks like this:
class CardSmallDisplayable(renpy.Displayable): """ Regular card displayable """ suit_bg = {u'': 'images/MoneySmall{0}Card.jpg', u'': 'images/KnowledgeSmall{0}Card.jpg', u'': 'images/IntrigueSmall{0}Card.jpg', u'': 'images/ForceSmall{0}Card.jpg'} def __init__(self, card, **kwargs): super(CardSmallDisplayable, self).__init__(xysize=(100, 140), xfill=False, yfill=False, **kwargs) self.bg = Image(self.suit_bg[card.suit].format((card.spendable and 'Spendable' or 'Permanent'))) self.text = Text(u'{0}'.format(card.number), color = '#6A3819', font='Hangyaboly.ttf') self.xpos = 0 self.ypos = 0 self.xsize = 100 self.ysize = 140 self.x_offset = 0 self.y_offset = 0 self.transform = Transform(child=self) def render(self, width, height, st, at): """ Return 100*140 render for a card """ bg_render = renpy.render(self.bg, self.xsize-4, self.ysize-4, st, at) text_render = renpy.render(self.text, width, height, st, at) render = renpy.Render(width, height, st, at) render.blit(bg_render, (2, 2)) render.blit(text_render, (15-int(text_render.width/2), 3)) render.blit(text_render, (88-int(text_render.width/2), 117)) return render def visit(self): return[self.bg, self.text] This is, in fact, the simplest possible Displayable. It consists of two others: a background image, selected depending on the suit, and a text with a denomination. Both methods (not counting the constructor) are necessary for the Displayable operation: self.render returns a texture, and self.visit -
list of all Displayables included in this. And she really draws a small card; Here are a few of these cards on the deck screen:
Not bad, but the map itself can only be on the screen, and that only if someone puts it there. In order to actually play the mini-game, you need to add an external Displayable that can handle input and cheat logic. Maps and other interface elements will be included in the same as text fields and background are parts of the map. This Displayable will be distinguished by the presence of the self.event () method, which receives the PyGame event as input. LINK TO PYGAME.EVENT Like this (the full code is available on the github in the Table class):
def event(self, ev, x, y, st): if ev.type == pygame.MOUSEBUTTONDOWN and ev.button == 1: # … # Process click at x, y # … elif ev.type == pygame.MOUSEMOTION and self.dragged is not None: # … # Process dragging card to x, y # … renpy.restart_interaction() You should not worry about the event queue: the engine will distribute all events to all elements that are currently active. It only remains for the method to check whether the incident is of interest, respond to the event and complete the interaction. Interaction in Ren'Py is approximately equivalent to the tic of game logic in other engines, but is not limited in time. In general, this is one player’s team and the game’s response to it, although sometimes (for example, when scrolling text) interactions can end on their own.
This Displayable, like all the others, we will wrap in the screen:
screen conflict_table_screen(): modal True zorder 9 add conflict_table conflict_table in this case is not the name of the class, but a global variable in which the corresponding Displayable is stored. It was mentioned above that, in principle, the screen code can be executed at any time, but before the show it will be executed without fail, otherwise the game will not know what to output. Therefore, it is completely safe to perform something like conflict_table.set_decks (player_deck, opponent_deck) immediately before the mini-game and rely on the fact that the player will be exactly what you need. Similarly, at the end of the mini-game, you can access the results that are stored in the same object.
I must say that the use of global variables is not a restriction of Ren'Py, but our own solution. Screens and Displayables are supported, which are able to take arguments and return values, but with them it is somewhat more complicated. First, the behavior of such screens is poorly documented. At the very least, it is quite difficult to figure out exactly at what point the screen begins its first interaction and when it returns control to the script. And this is a very important question, because without knowing the answer to it, it is difficult to guarantee that the entire text preceding the conflict will be shown before the conflict begins, and the text following the conflict will not be shown. Secondly, with the use of global variables, most of the objects needed for a mini-game are initialized only once, and then we change their attributes with each subsequent launch. Otherwise it would have to spend time with each conflict to load all the necessary files; the game noticeably lags if the HDD is simultaneously accessed in parallel, for example, torrent and antivirus. Finally, not only the conflict screen accesses the maps, but also several other screens, so it makes sense to use the same Displayables wherever they are needed.
Afterword
This is where the actual software part of the development ends and the content of the game begins. I am mostly not involved in literature in the game, so I will not discuss the structure of the narrative and the style. On this subject I can advise you to read, for example, a classic article on the structure of CYOA . Or a good guide to writing a compelling independent NPC from a screenwriter 80 days .
More links (as well as reviews of recent English-language works and articles on related topics) can be found in Emily Short's blog .
Source: https://habr.com/ru/post/304530/
All Articles