Intel Edison, Windows Phone and Microsoft Azure: Cloud Console and LED Union
The capabilities of modern technologies are most clearly manifested when they are used together. For example, what can be done if Intel Edison, Microsoft Azure and Windows Phone are combined? In fact, a lot of things. Here we look at one of the options - remotely turning on and off the LED connected to one of the Edison digital outputs with an Arduino switch board.

The Azure mobile service connects Edison and the “control panel”, which is the application running on the Windows Phone platform. Edison reads the attribute value from the mobile service table and performs some actions in accordance with the received data. The application for the smartphone changes the value in the table, which allows it to influence the board.
We assume that the reader has the basic skills to develop applications for the Windows Phone platform and is able to associate such an application with the Azure mobile service. If you do not know how to create the server part of the application, take a look at this material .
')
The project will require the following hardware and software:
First, create an Azure mobile service. How this is done is covered in many publications. For example, you can use this guide and create a mobile service that contains one table. Name this table controltable . It should have two columns. One - with the name “ status ”, the second - “ name ”. The “ status ” value will be either 1 or 0. In the “ name ” will be “Edison / Arduino”.
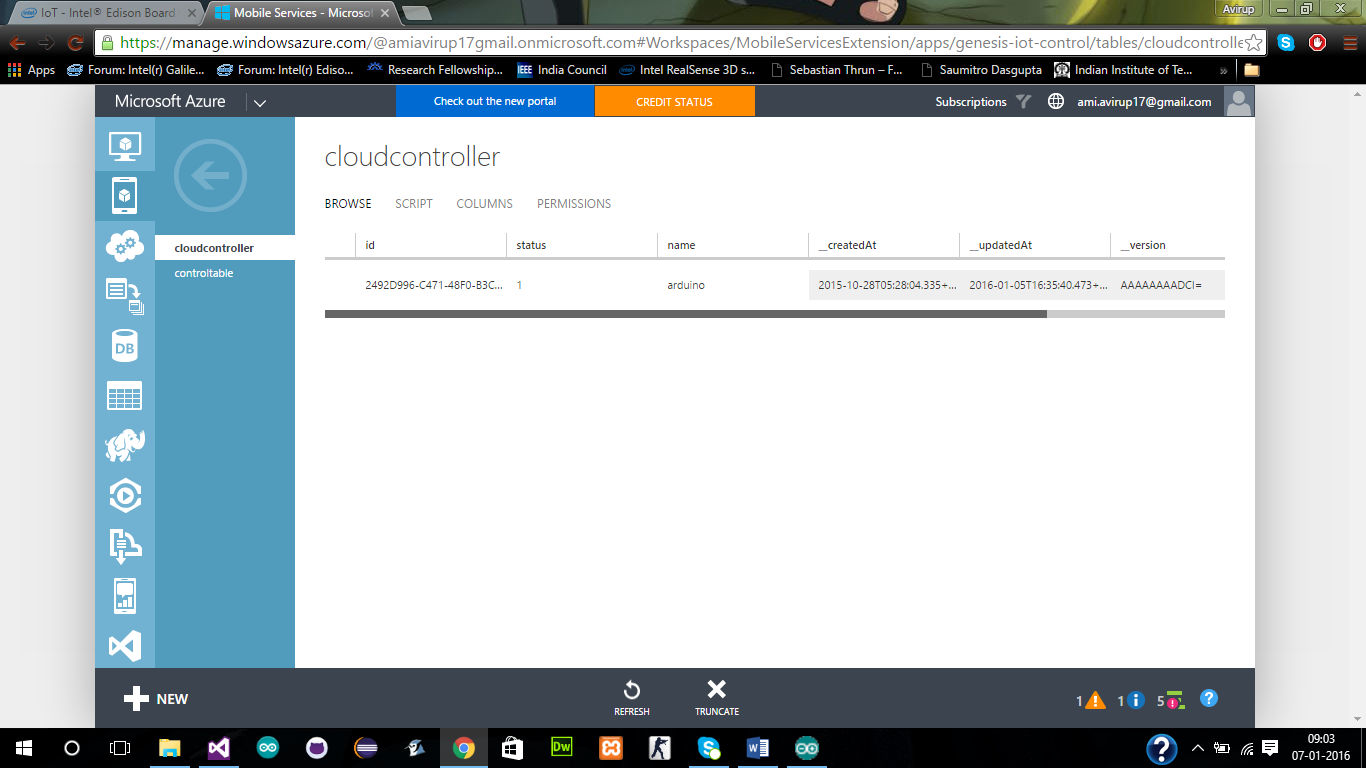
Azure Mobile Service
Notice that the “device” attribute in the Azure SQL table does not matter. You can easily delete it if you want.
Now let's develop an application for Windows Phone that will add or modify the attribute value.
Here we do not go into the details of the development for Windows Phone. If you need more information about this, take a look at the materials posted on this resource .
In our application there will be only two buttons: " on " and " off ". This is how it all looks.
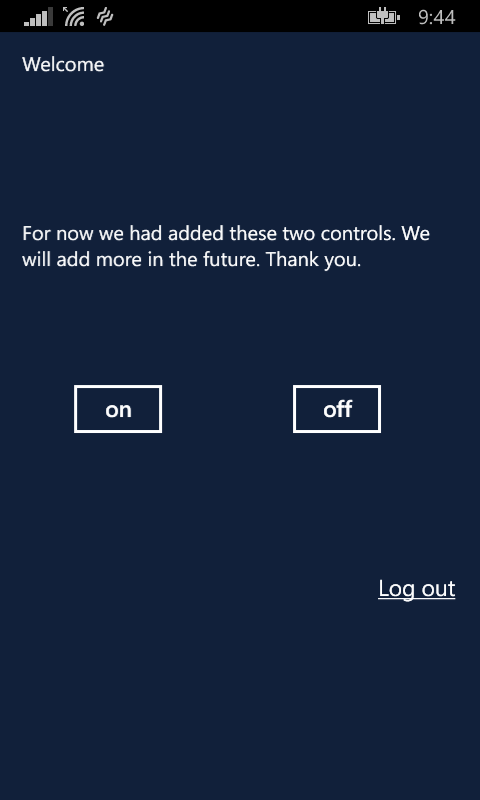
Application Screen for Windows Phone
You can not pay attention to the button-link “ Log out ”.
So how does the app work? When you click on the “ on ” and “ off ” buttons, the “ status ” attribute in the Azure table changes, it is set to either 1 or 0.
However, here we face a problem. The fact is that in order to write 1 or 0 into a field, you must first create this field. Therefore, the application performs a dual function. When you first connect to the cloud, it creates a table and fills it with some default values, and the next time it just updates the data.
When the application is ready, it will need to be tested, to check whether button presses really update the “status” field. When everything works as planned, you can go on.
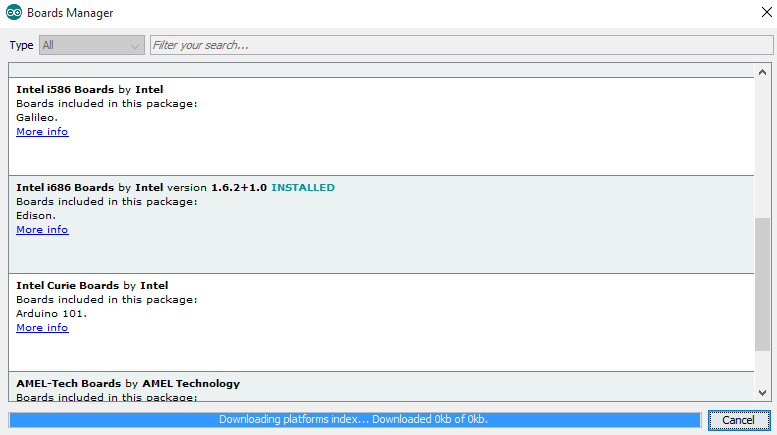
Let's do the development for Edison. Before you begin, you need to configure the board. After connecting Edison to the computer, find out the COM port number that corresponds to the board. Then launch the Arduino IDE and, from the list of supported devices, select Edison. If the required board cannot be found in the list, you need to download the necessary files using the Boards Manager tool.
Uploading files for Edison in IDE Arduino
After you open the Arduino IDE, there are a couple of functions at your service —
This code snippet allows you to connect Edison to the Internet via Wi-Fi. In addition, we set PIN 13 to output mode and turned it off. We will use the serial port to monitor the process in the Arduino IDE.
Now let's do the
These functions will load data from the cloud service table. But, before we consider the function code, we need to add a few global constants to the project that will store the data necessary to connect Edison to Azure.
The application key (
We executed the HTTP request and called GET, where we first entered the table name, server name and key code. This is necessary to successfully receive data from the cloud. Then we specified in which format we want to receive data, in our case it is JSON. Now let's
Once the data is received, they must be read. Since we are dealing with the JSON format, we need to parse the resulting string in order to extract from it what we need. Here is how such a line might look like:
For parsing JSON there is a very efficient library, ArduinoJson. She performs the bulk of the work. But the resulting string with JSON data is enclosed in square brackets "[]". Before passing a string to the library, these brackets must be removed. So, first include the library in our code and add the following global variables:
Now, in the
The above code reads the response. The
In this code, the variable
It is likely that after compiling this program you will encounter unexpected errors. They need to understand. The cause of the errors is described here . The fact is that some necessary code is missing in the WString.h file. Here you can evaluate the differences between right and wrong files. The working file must be placed in this way:
After this, the errors disappear, you can achieve the correct compilation of the code and flash it on Edison. Now connect the LED to the board by connecting the longer leg (here you can also add a 233 Ohm resistor) to PIN 13 , and a short one to GND . Now the system, consisting of a board of Intel Edison, a cloud service of Microsoft Azure and Windows Phone, is ready for testing.
Recall: we are going to manage the LED connected to Edison using a device on Windows Phone, using the Azure cloud service, which is the link of the project. Take a look at the debug information window that comes from Edison. The first stage of work is an attempt to connect to a Wi-Fi network.

Edison connects to a Wi-Fi network
The next step is to connect to the Azure mobile service. After connecting, Edison loads the data in JSON format, then it is parsed using the corresponding library, the indicator of interest is extracted from the data. The LED connected to PIN 13 is turned on or off in accordance with the value of this indicator.

Intel Edison connected to the cloud and received data
From this material, you learned how to organize the management of the Intel Edison board using Microsoft Azure mobile services. In our case, the mobile service is a link. It allows the application running on Windows Phone and the Intel Edison board to communicate. This is done due to the fact that the application running on the smartphone writes data to the table, and Edison reads this data and responds to it accordingly.
In our project, everything is arranged very simply: the LED lights up or goes out in response to pressing the on-screen button. But it is easy to see that using the same model, it is possible to implement much more complex interaction schemes for Internet-connected intellectual “things” and modules for managing them.
The Azure mobile service connects Edison and the “control panel”, which is the application running on the Windows Phone platform. Edison reads the attribute value from the mobile service table and performs some actions in accordance with the received data. The application for the smartphone changes the value in the table, which allows it to influence the board.
Prerequisites
We assume that the reader has the basic skills to develop applications for the Windows Phone platform and is able to associate such an application with the Azure mobile service. If you do not know how to create the server part of the application, take a look at this material .
')
The project will require the following hardware and software:
- Intel Edison Board with Arduino Switchboard
- Light-emitting diode
- Visual studio
- Arduino IDE
- Azure Mobile Service
First, create an Azure mobile service. How this is done is covered in many publications. For example, you can use this guide and create a mobile service that contains one table. Name this table controltable . It should have two columns. One - with the name “ status ”, the second - “ name ”. The “ status ” value will be either 1 or 0. In the “ name ” will be “Edison / Arduino”.
Azure Mobile Service
Notice that the “device” attribute in the Azure SQL table does not matter. You can easily delete it if you want.
Now let's develop an application for Windows Phone that will add or modify the attribute value.
Application for Windows Phone
Here we do not go into the details of the development for Windows Phone. If you need more information about this, take a look at the materials posted on this resource .
In our application there will be only two buttons: " on " and " off ". This is how it all looks.
Application Screen for Windows Phone
You can not pay attention to the button-link “ Log out ”.
So how does the app work? When you click on the “ on ” and “ off ” buttons, the “ status ” attribute in the Azure table changes, it is set to either 1 or 0.
However, here we face a problem. The fact is that in order to write 1 or 0 into a field, you must first create this field. Therefore, the application performs a dual function. When you first connect to the cloud, it creates a table and fills it with some default values, and the next time it just updates the data.
When the application is ready, it will need to be tested, to check whether button presses really update the “status” field. When everything works as planned, you can go on.
Edison Development
Let's do the development for Edison. Before you begin, you need to configure the board. After connecting Edison to the computer, find out the COM port number that corresponds to the board. Then launch the Arduino IDE and, from the list of supported devices, select Edison. If the required board cannot be found in the list, you need to download the necessary files using the Boards Manager tool.
Uploading files for Edison in IDE Arduino
After you open the Arduino IDE, there are a couple of functions at your service —
void setup() and void loop() . Edison is equipped with a built-in Wi-Fi-adapter. We will use it to connect the device to the Internet. Therefore, the first thing we import into the project library to support Wi-Fi. To do this, run the command Sketch-> include library-> Wi-Fi . Now let's add the code below to the project, which will allow the device to be connected to a Wi-Fi network. #include <SPI.h> #include <WiFi.h> WiFiClient client; char ssid[] = "networkssid"; // SSID () char pass[] = "password"; // ( WPA), ( WEP) int keyIndex = 0; // ( WEP) int status = WL_IDLE_STATUS; void setup() { pinMode(13,OUTPUT); digitalWrite(13,HIGH); Serial.begin(115200); while (!Serial) { ; // . Leonardo } // : if (WiFi.status() == WL_NO_SHIELD) { Serial.println("WiFi shield not present"); // : while(true); } String fv = WiFi.firmwareVersion(); if( fv != "1.1.0" ) Serial.println("Please upgrade the firmware"); // Wi-Fi-: while (status != WL_CONNECTED) { Serial.print("Attempting to connect to SSID: "); Serial.println(ssid); // WPA/WPA2. , WEP: status = WiFi.begin(ssid, pass); } } This code snippet allows you to connect Edison to the Internet via Wi-Fi. In addition, we set PIN 13 to output mode and turned it off. We will use the serial port to monitor the process in the Arduino IDE.
Now let's do the
void loop() method. Data retrieval from Azure is performed using the GET method. void loop() { send_request(); wait_response(); read_response(); end_request(); delay(100); } These functions will load data from the cloud service table. But, before we consider the function code, we need to add a few global constants to the project that will store the data necessary to connect Edison to Azure.
const char* server= "YourAzureService.azure-mobile.net"; const char* table_name= "TableName"; const char* ams_key="YourApplicationKey"; char buffer[64]; The application key (
ams_key ) can be found in the key management section of your Azure account. Now consider the code of the methods used in void loop() . void send_request() { Serial.println("\nconnecting..."); if (client.connect(server, 80)) { sprintf(buffer, "GET /tables/%s HTTP/1.1", table_name); client.println(buffer); // sprintf(buffer, "Host: %s", server); client.println(buffer); // Azure Mobile Services sprintf(buffer, "X-ZUMO-APPLICATION: %s", ams_key); client.println(buffer); // – JSON client.println("Content-Type: application/json"); // client.print("Content-Length: "); client.println(strlen(buffer)); // client.println(); // client.println(buffer); } else { Serial.println("connection failed"); } } We executed the HTTP request and called GET, where we first entered the table name, server name and key code. This is necessary to successfully receive data from the cloud. Then we specified in which format we want to receive data, in our case it is JSON. Now let's
wait_response() function code wait_response() . void wait_response() { while (!client.available()) { if (!client.connected()) { return; } } } Once the data is received, they must be read. Since we are dealing with the JSON format, we need to parse the resulting string in order to extract from it what we need. Here is how such a line might look like:
{"id":"2492D996-C471-48F0-B3C9-F33E3B37477F","status":"0","name":"arduino"} For parsing JSON there is a very efficient library, ArduinoJson. She performs the bulk of the work. But the resulting string with JSON data is enclosed in square brackets "[]". Before passing a string to the library, these brackets must be removed. So, first include the library in our code and add the following global variables:
#include <ArduinoJson.h> #define RESPONSE_JSON_DATA_LINENNO 10 int charIndex=0; StaticJsonBuffer<200> jsonbuffer; Now, in the
read_response() method, we write the following: void read_response() { boolean bodyStarted; int jsonStringLength; int jsonBufferCntr=0; int numline=RESPONSE_JSON_DATA_LINENNO; // while (client.available()) { //Serial.println("Reading:"); char c = client.read(); if (c == '\n') { numline -=1; } else { if (numline == 0 && (c!='[')&& (c!=']') ) { buffer[jsonBufferCntr++] = c; buffer[jsonBufferCntr] = '\0'; } } } Serial.println("Received:"); Serial.println(buffer); Serial.println(""); parse(); } The above code reads the response. The
parse method is responsible for parsing the string. Here is the code for this method. Here we change the state of the PIN 13 output on the board in accordance with the received data. void parse() { StaticJsonBuffer<150> jsonbuffer; JsonObject& root = jsonbuffer.parseObject(buffer); if(!root.success()) { Serial.println("PARSING FAILED!!!"); return; } int f= root["status"]; Serial.println("Decoded: "); Serial.println(f); if(f==0) digitalWrite(13,LOW); else digitalWrite(13,HIGH); } In this code, the variable
f stores the value of the status attribute. We check this value and, depending on whether 0 or 1 is in a variable, we translate the output on the board to the HIGH or LOW state. We end_request() consider the code of only one method, end_request() . Here he is. void end_request() { client.stop(); } It is likely that after compiling this program you will encounter unexpected errors. They need to understand. The cause of the errors is described here . The fact is that some necessary code is missing in the WString.h file. Here you can evaluate the differences between right and wrong files. The working file must be placed in this way:
C:\Users\Username\AppData\Roaming\Arduino15\packages\Intel\hardware\i686\1.6.2+1.0\cores\arduino\WString.h After this, the errors disappear, you can achieve the correct compilation of the code and flash it on Edison. Now connect the LED to the board by connecting the longer leg (here you can also add a 233 Ohm resistor) to PIN 13 , and a short one to GND . Now the system, consisting of a board of Intel Edison, a cloud service of Microsoft Azure and Windows Phone, is ready for testing.
Recall: we are going to manage the LED connected to Edison using a device on Windows Phone, using the Azure cloud service, which is the link of the project. Take a look at the debug information window that comes from Edison. The first stage of work is an attempt to connect to a Wi-Fi network.
Edison connects to a Wi-Fi network
The next step is to connect to the Azure mobile service. After connecting, Edison loads the data in JSON format, then it is parsed using the corresponding library, the indicator of interest is extracted from the data. The LED connected to PIN 13 is turned on or off in accordance with the value of this indicator.
Intel Edison connected to the cloud and received data
Results
From this material, you learned how to organize the management of the Intel Edison board using Microsoft Azure mobile services. In our case, the mobile service is a link. It allows the application running on Windows Phone and the Intel Edison board to communicate. This is done due to the fact that the application running on the smartphone writes data to the table, and Edison reads this data and responds to it accordingly.
In our project, everything is arranged very simply: the LED lights up or goes out in response to pressing the on-screen button. But it is easy to see that using the same model, it is possible to implement much more complex interaction schemes for Internet-connected intellectual “things” and modules for managing them.
Source: https://habr.com/ru/post/304506/
All Articles