Shake Detector for Android on RxJava

Introduction
It all started with the fact that the task was set to cancel the last action in the application when shaking the device. But how to understand what happened this shaking? After a couple of minutes of studying the issue, it became clear that we had to subscribe to events from the accelerometer and then try to somehow determine that the device had been shaken.
Ready solutions were also found. They were all quite similar, but in their pure form they did not suit me, and I wrote my own “bicycle”. It was a class that subscribed to events from the sensor and changed its state as they arrived. Then a couple of times my colleagues and I twirled the gears of this bike, and as a result, it began to resemble something from Mad Max. I promised that, as the free time will stand out, I will bring this outrage in order.
And here, reading recently articles on RxJava, I remembered about this task. “Hmm,” I thought, “RxJava looks like a very suitable tool for this kind of problem.” Without delay, he took and wrote a solution on RxJava. The result struck me: all the logic took 8 (eight!) Lines! I decided to share my experience with other developers. So this article was born.
')
I hope this simple example will help those who are thinking about using RxJava in their projects to make a decision.
The article is aimed at readers with basic experience in developing for Android. The source code of the finished application can be viewed on GitHub .
Let's get started!
Project Setup
We connect RxJava to the project
To connect RxJava, just add to build.gradle
dependencies { ... compile 'io.reactivex:rxjava:1.1.3' compile 'io.reactivex:rxandroid:1.1.0' } Note: RxAndroid gives us a Scheduler that is tied to a UI thread.
We include support lambda
RxJava is best used with lambdas, without them the code becomes hard to read. At the moment there are two options to enable lambda support in the Android project: use the Jack compiler from the Android N Developer Preview or use the Retrolambda library.
In both cases, you must first make sure that JDK 8 is installed. Personally, I used Retrolambda.
Android N Developer Preview
To use Jack from the Android N Developer Preview, follow the instructions from here.
Add to build.gradle line:
android { ... defaultConfig { ... jackOptions { enabled true } } compileOptions { sourceCompatibility JavaVersion.VERSION_1_8 targetCompatibility JavaVersion.VERSION_1_8 } } Retrolambda
To connect retrolambda follow the instructions from Evan Tatarka (eng. Evan Tatarka):
buildscript { ... dependencies { classpath 'me.tatarka:gradle-retrolambda:3.2.5' } } apply plugin: 'com.android.application' apply plugin: 'me.tatarka.retrolambda' android { compileOptions { sourceCompatibility JavaVersion.VERSION_1_8 targetCompatibility JavaVersion.VERSION_1_8 } } Please note that in the original instructions it is recommended to connect the Maven Central repository. In your project, most likely, jcenter is already used, since this repository is specified by default when creating a project in Android Studio. It already contains the dependencies we need, and additionally connecting Maven Central is not required.
Observable
So, we have all the necessary tools connected to the project, we can begin development.
When using RxJava, it all starts with getting Observable .
Let's write a factory that creates an Observable, subscribing to the events of a passed sensor using the Observable.create method:
public class SensorEventObservableFactory { public static Observable<SensorEvent> createSensorEventObservable(@NonNull Sensor sensor, @NonNull SensorManager sensorManager) { return Observable.create(subscriber -> { MainThreadSubscription.verifyMainThread(); SensorEventListener listener = new SensorEventListener() { @Override public void onSensorChanged(SensorEvent event) { if (subscriber.isUnsubscribed()) { return; } subscriber.onNext(event); } @Override public void onAccuracyChanged(Sensor sensor, int accuracy) { // NO-OP } }; sensorManager.registerListener(listener, sensor, SensorManager.SENSOR_DELAY_GAME); // unregister listener in main thread when being unsubscribed subscriber.add(new MainThreadSubscription() { @Override protected void onUnsubscribe() { sensorManager.unregisterListener(listener); } }); }); } } Now we have a tool to convert events from any sensor into Observable. But which sensor is best suited for our purposes? In the screenshot below, the first chart displays the readings of the TYPE_GRAVITY sensor , the second chart shows the TYPE_ACCELEROMETER , and the third shows the TYPE_LINEAR_ACCELERATION . It is seen that at first the device was turned smoothly, and then sharply shaken.
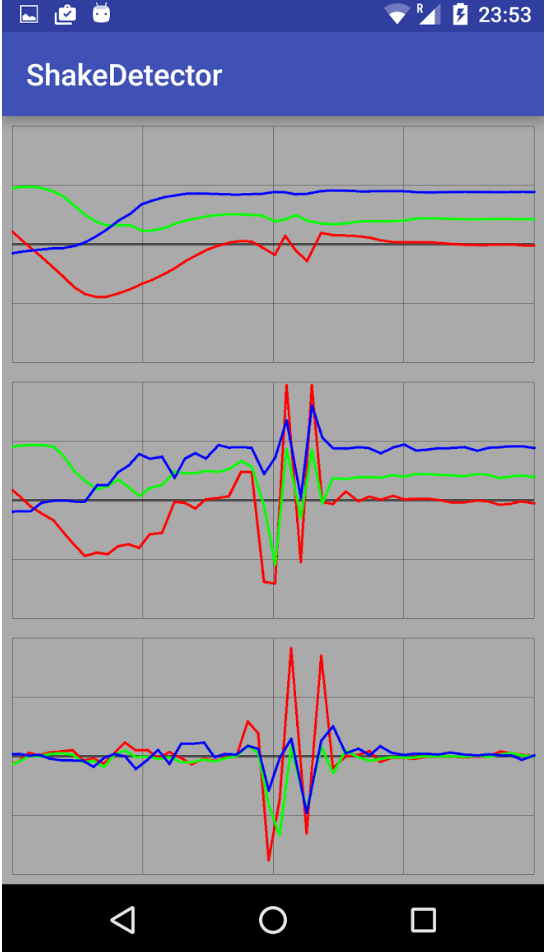
We are interested in sensor events with the type Sensor.TYPE_LINEAR_ACCELERATION. It contains acceleration values from which the component of terrestrial gravity has already been subtracted.
Curiously, many solutions use Sensor.TYPE_ACCELEROMETER and apply high pass filtering to remove the gravitational component. If you guess why - please share your knowledge in the comments.
@NonNull private static Observable<SensorEvent> createAccelerationObservable(@NonNull Context context) { SensorManager mSensorManager = (SensorManager) context.getSystemService(Context.SENSOR_SERVICE); List<Sensor> sensorList = mSensorManager.getSensorList(Sensor.TYPE_LINEAR_ACCELERATION); if (sensorList == null || sensorList.isEmpty()) { throw new IllegalStateException("Device has no linear acceleration sensor"); } return SensorEventObservableFactory.createSensorEventObservable(sensorList.get(0), mSensorManager); } Reactive magic
Now that we have an Observable with accelerometer events, we can use the full power of the RxJava operators.
Let's see what the raw sequence of events looks like:
createAccelerationObservable(context) .subscribe(event -> Log.d(TAG, formatTime(event) + " " + Arrays.toString(event.values))); 29.398 [0.0016835928, 0.014868498, 0.0038280487] 29.418 [-0.026405454, -0.017675579, 0.024353027] 29.438 [-0.032944083, -0.0029007196, 0.011956215] 29.458 [0.03226435, 0.022876084, 0.032211304] 29.478 [-0.0011371374, 0.022291958, -0.054023743] We see that every 20 milliseconds an event arrives from the sensor. This frequency corresponds to the value of SensorManager.SENSOR_DELAY_GAME, which was sent as the samplingPeriodUs parameter during the registration of SensorEventListener.
As a payload comes the value of acceleration in all three axes.
We are only interested in the values on the X axis. They correspond to the movement that we want to track. Some solutions use acceleration values along all three axes, so they work, for example, when the device is placed on the table (significant acceleration along the Z axis when in contact with the table).
Create a data class with values of interest to us:
private static class XEvent { public final long timestamp; public final float x; private XEvent(long timestamp, float x) { this.timestamp = timestamp; this.x = x; } } We convert SensorEvent to XEvent and filter events for which the magnitude of the acceleration modulo exceeds a certain threshold:
createAccelerationObservable(context) .map(sensorEvent -> new XEvent(sensorEvent.timestamp, sensorEvent.values[0])) .filter(xEvent -> Math.abs(xEvent.x) > THRESHOLD) .subscribe(xEvent -> Log.d(TAG, formatMsg(xEvent))); To see events in the log, you have to shake the device for the first time.
In general, the process of debugging Shake Detection from the outside looks pretty funny: the developer is sitting and the phone is shaking all the time. I do not know what others think about this :)
55.347 19.030302 55.367 13.084376 55.388 -15.775546 55.408 -14.443999 Only events with significant acceleration along the X axis are left in the log.
Now the most interesting: we track the moments when the acceleration has changed the sign. Let's try to understand what this moment is. For example, at first we accelerate the hand with the phone to the left, while acceleration has a negative projection on the X axis. Then we stop the hand - at this moment the projection on the X axis changes the sign to a positive one. That is, on one stroke, there is one change of the sign of the projection.
To do this, we first create a sliding window that will contain each event with an event preceding it:
createAccelerationObservable(context) .map(sensorEvent -> new XEvent(sensorEvent.timestamp, sensorEvent.values[0])) .filter(xEvent -> Math.abs(xEvent.x) > THRESHOLD) .buffer(2, 1) .subscribe(buf -> Log.d(TAG, getLogMsg(buf))); We look at the log:
[43.977 -15.497713; 44.017 21.000145] [44.017 21.000145; 44.037 19.947767] [44.037 19.947767; 44.057 19.836182] [44.057 19.836182; 44.077 20.659754] [44.077 20.659754; 44.098 -16.811298] [44.098 -16.811298; 44.118 -15.6345 Fine! We see that each event is grouped with the previous one; now it is easy to filter out pairs of events with different acceleration signs:
createAccelerationObservable(context) .map(sensorEvent -> new XEvent(sensorEvent.timestamp, sensorEvent.values[0])) .filter(xEvent -> Math.abs(xEvent.x) > THRESHOLD) .buffer(2, 1) .filter(buf -> buf.get(0).x * buf.get(1).x < 0) .subscribe(buf -> Log.d(TAG, getLogMsg(buf))); [53.888 -16.762777; 53.928 20.83315] [53.988 19.87952; 54.028 -16.735554] [54.089 -16.46596; 54.109 21.682497] [54.169 20.355597; 54.209 -16.634022] [54.269 -16.122211; 54.309 21.806463] Each event now corresponds to one stroke. Only 4 operators, and we are already able to track the sharp movements! But let's not stop, because if the detector triggers on one stroke, then false alarms are possible. For example, the user was not going to shake the device, but simply shifted it into his other hand. The solution is simple - you need to force the user to shake the device several times within a short period of time. Enter the parameters SHAKES_COUNT = number of strokes and SHAKES_PERIOD = time interval for which it is necessary to have time to make the required number of strokes. Experimentally it turned out that the comfort parameters are 3 strokes in 1 second. Otherwise, random triggers are possible, or you just have to shake the phone very violently.
So, we want to track the moment when 3 strokes occurred in one second.
Note that we no longer need the acceleration values, leave only the time the event occurred, at the same time we translate the time from nanoseconds to seconds:
.map(buf -> buf.get(1).timestamp / 1000000000f) Then apply the already familiar technique with a sliding window. For each event we will return an array containing this event and two previous ones:
.buffer(SHAKES_COUNT, 1) And finally, we will leave only those triples of events that happened in 1 second:
.filter(buf -> buf.get(SHAKES_COUNT - 1) - buf.get(0) < SHAKES_PERIOD) If the event passed the last filter, it means that the user waved the device 3 times in the last second.
But suppose that our user is carried away and continues to shake the phone diligently. Then we will receive events for each next wave, and we want to receive an event only for every 3 strokes. A simple solution would be to ignore events for 1 second after the gesture was defined.
.throttleFirst(SHAKES_PERIOD, TimeUnit.SECONDS) Done! Now the Observable obtained can be used where we want to wait for a shake event.
Here is the final code for creating an Observable:
public class ShakeDetector { public static final int THRESHOLD = 13; public static final int SHAKES_COUNT = 3; public static final int SHAKES_PERIOD = 1; @NonNull public static Observable<?> create(@NonNull Context context) { return createAccelerationObservable(context) .map(sensorEvent -> new XEvent(sensorEvent.timestamp, sensorEvent.values[0])) .filter(xEvent -> Math.abs(xEvent.x) > THRESHOLD) .buffer(2, 1) .filter(buf -> buf.get(0).x * buf.get(1).x < 0) .map(buf -> buf.get(1).timestamp / 1000000000f) .buffer(SHAKES_COUNT, 1) .filter(buf -> buf.get(SHAKES_COUNT - 1) - buf.get(0) < SHAKES_PERIOD) .throttleFirst(SHAKES_PERIOD, TimeUnit.SECONDS); } @NonNull private static Observable<SensorEvent> createAccelerationObservable(@NonNull Context context) { SensorManager mSensorManager = (SensorManager) context.getSystemService(Context.SENSOR_SERVICE); List<Sensor> sensorList = mSensorManager.getSensorList(Sensor.TYPE_LINEAR_ACCELERATION); if (sensorList == null || sensorList.isEmpty()) { throw new IllegalStateException("Device has no linear acceleration sensor"); } return SensorEventObservableFactory.createSensorEventObservable(sensorList.get(0), mSensorManager); } private static class XEvent { public final long timestamp; public final float x; private XEvent(long timestamp, float x) { this.timestamp = timestamp; this.x = x; } } } Using
In the example, I play the sound when an event occurs.
In Activity, where we want to listen to shaking, add a field:
private Observable<?> mShakeObservable; Initialize it to onCreate:
@Override protected void onCreate(Bundle savedInstanceState) { super.onCreate(savedInstanceState); setContentView(R.layout.activity_main); mShakeObservable = ShakeDetector.create(this); } Sign up for events in onResume:
@Override protected void onResume() { super.onResume(); mShakeSubscription = mShakeObservable.subscribe((object) -> Utils.beep()); } And don't forget to unsubscribe in onPause:
@Override protected void onPause() { super.onPause(); mShakeSubscription.unsubscribe(); } Conclusion
As you can see, we were able to write a solution in several lines that reliably determines the gesture we specified. The code is compact, easy to read and maintain. Compare with the solution without RxJava, say, Seismic from Jake Wharton (Eng. Jake Wharton). RxJava is a great tool, and if applied skillfully and to the point, you can get excellent results. I hope that this article will push you to learn RxJava and apply reactive programming approaches in your projects.
Be with you at stackoverflow.com !
Arkady Gamza, Android Developer.
Source: https://habr.com/ru/post/304488/
All Articles