SBC + VPN + Tor + obfsproxy in your pocket
This article will discuss one of the options for getting a portable solution with Tor, VPN and obfuscation, to which you can connect your mobile devices, PC or laptop.
Task setting : get a single-board computer that can be connected to your laptop / PC / mobile device and which will wrap traffic first in a VPN, then in Tor, obfusts using obfs-proxy and sent to a remote VPN server.
Initial data:
1) Single board computer. In my case, this is the Raspberry Pi model B +;
2) Raspbian OS. For this article was used Raspbian Jessie, build from 03/18/2016;
3) Memory Card (Micro SD);
4) card reader;
5) Wireless adapter or ethernet to usb adapter;
6) Remote OpenVPN server.
')
Connection diagrams:
1) eth-eth

2) wlan-eth

3) wlan-wlan

4) eth-wlan

Legend:
1. SBC - single board computer;
2. CR - a device through which access to the Internet. The device may not necessarily be connected directly to the SBC port;
3. PC - any computer (or mobile device) connected to the SBC;
4. VPN-server - target VPN server;
5. The input interface is the physical interface where the client traffic enters;
6. The output interface is the physical interface from which traffic goes to the Internet.
Assumptions:
The article deals with the case when the parameters for a link to the Internet come via DHCP or are set statically. For cases with obtaining parameters for a link on L2TP, PPPoE or other situations, the setting will be different. We will also assume that for convenient operation the VPN server acts as a DNS-relay.
The official Rasbian website contains very detailed instructions for capturing an image for Linux, Mac OS, and Windows, so I will not describe the process of capturing an OS image on a memory card in order not to clutter the article. According to my observations, I can say that it is better to take a card from 16 GB in order to avoid problems with lack of memory in the future.
With the connection to the board after the image is recorded and turned on there can be several options:
1) If you have a special screen / monitor / TV with hdmi support, then it is enough to connect it via hdmi;
2) If there is no screen, but the parameters to the physical interface come via DHCP, then you can scan the network nmap-ohm from another computer and connect via ssh. User pi, password raspberry;
3) If there is no DHCP, then you can edit the / etc / network / interfaces file and set the addresses there manually.
In order for traffic to be sent from one interface to another, it is necessary that the corresponding parameter of the Linux kernel be enabled. This can be done with the command:
or
To check you can use the command:
She must return "1."
In order to simplify the routing of traffic, we include masking for the tunnel interface using iptables:
Instead, one could register static routes and a static address for the client. Or use ccd.
Update repositories and get updates:
Installing from repositories:
If you want a scheme with an access point, then in addition we will install the hostapd and DHCP server:
Instead of isc-dhcp-server, any other can be used. The repositories often contain not the most recent versions, so you can build packages from source, but if you need to get a quick solution, then installing from the repository is also suitable.
Eth-eth scheme
This option is the easiest. On the physical interface of the Raspberry Pi, to which the PC is connected, it suffices to configure a static address. On the PC, also set the parameters manually. You can also configure isc-dhcp-server to display parameters. On the client computer on Linux, for the initial setup, it is enough to execute the commands:
Add an entry to the /etc/resolv.conf file:
Wlan-eth scheme
In this scheme, the input interface will be a wireless interface operating in the access point mode. Instead of the full access point mode, you can configure Ad-hoc mode.
To organize a wi-fi access point with DHCP, I used a bunch of hostapd and isc-dhcp-server, but it is not necessary to use this particular bundle. On Habré there are several very detailed articles on setting up various options in Linux. Links I cited in the sources.
I give an example of my settings:
Immediately it is worth mentioning that some may have problems with the drivers and the operation of the wireless card in the access point mode. It is better to ask such things in advance. I had such a problem for one of my maps when working with hostapd from the repository. The problem was solved by the hostapd patch.
Wlan-wlan schema
The part with the input interface setting is no different from the previous scheme. The output interface must be connected to the access point. Connection example using the nmcli utility:
Eth-wlan schema
The input interface is configured as in the eth-eth scheme, the output is as in wlan-wlan.
To mask Tor traffic, we will use obfsproxy .
I give an example of setting up Tor:
Data for connection to obfsproxy servers can be found here .
For the organization of VPN we will use OpenVPN via TCP and in L3 mode (tap interface). TCP is used because Tor only works with TCP traffic. In the VPN tunnel itself, you can start any traffic. In order to send VPN traffic to Tor, we will “proxy” all VPN traffic through Tor. OpenVPN supports this feature.
I give an example of setting up the client part of OpenVPN with detailed comments:
There are a lot of instructions on the Internet for setting up a server. Links I cited in the "sources" at the end of the article. The key in the configuration is the coincidence of the parameters and the presence in the server config of the line "push" redirect-gateway def "". It is necessary for the client to establish a default route for passing traffic that points to the VPN server.
To test the correct operation, we will ping from the connected PC to the tun-interface of the VPN server, we will remove traffic using tcpdump and analyze it in Wireshark for clarity.
1) An ICMP request arrives at the Raspberry Pi input interface.
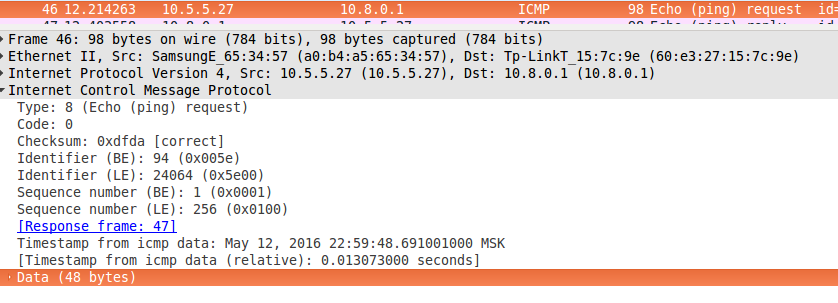
You should pay attention to the identifiers BE, LE and timestamp. Then they will be needed in order to identify the ICMP request on the server side.
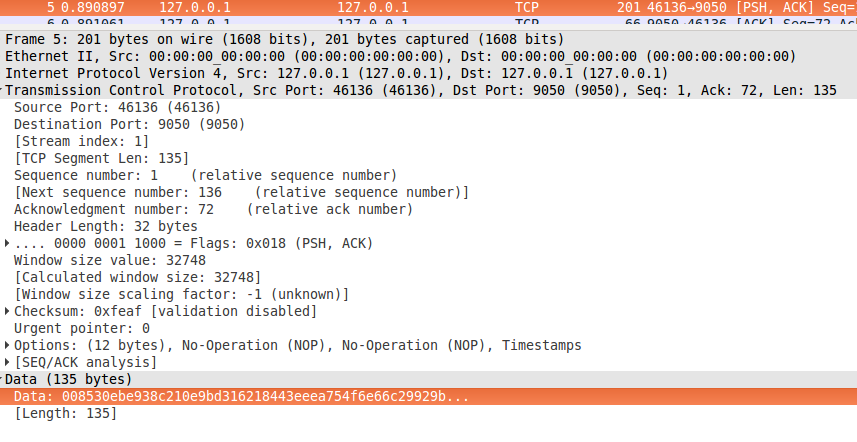
2) The ICMP packet passed the processing procedure in OpenVPN and headed to port 9050, which Tor listens to. A snapshot of the traffic occurs on the loopback interface of the Raspberry Pi.
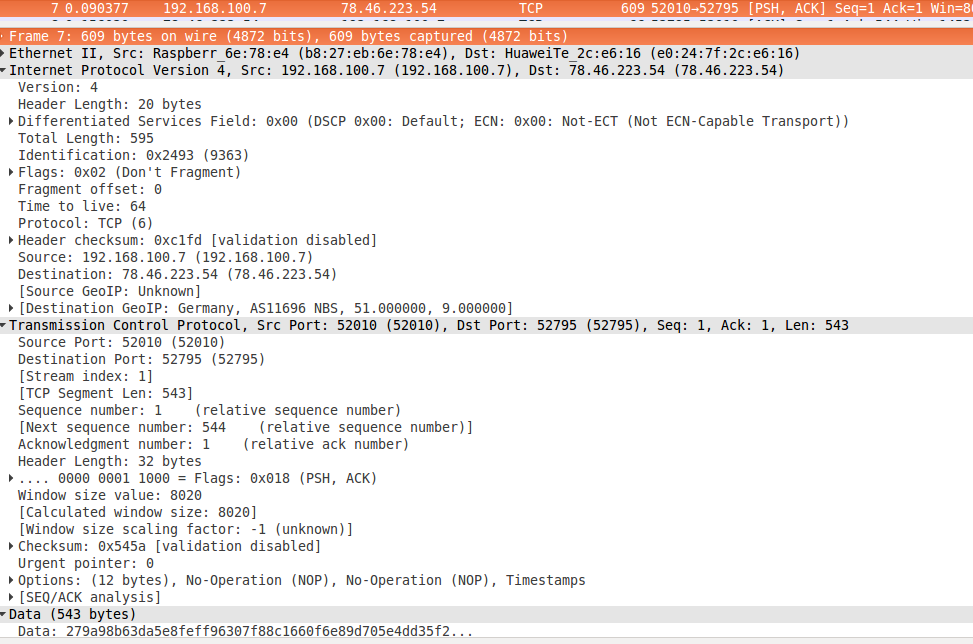
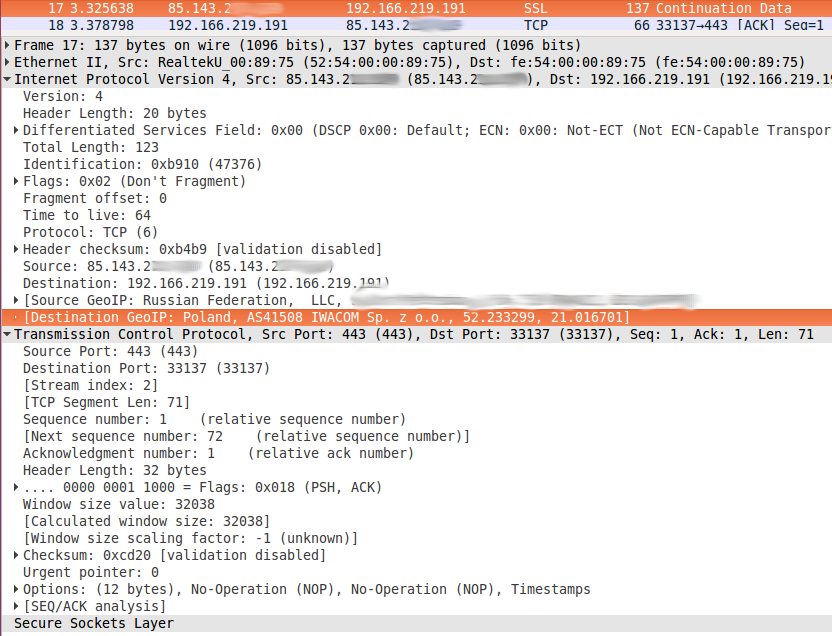
3) The package leaves Raspberry Pi and is sent to one of the Tor nodes with the obfsproxy server side:
4) And a snapshot of the traffic is already on the VPN server's tunnel interface. Immediately you will notice that the server sent a response.
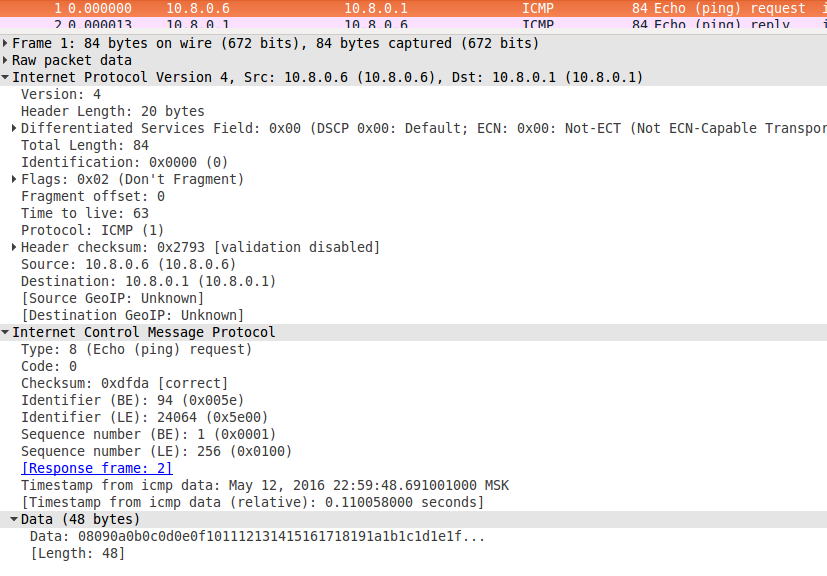
The BE, LE, and timestamp identifiers are the same as those in the sent packet.
5) This screenshot shows the packet coming out of the VPN server, which contains ICMP-reply.
I also tested the bandwidth of this solution using iperf for TCP and UDP traffic to the server. Testing was conducted using Raspberry Pi model B + and Raspbian OS in the home network, so the numbers for other single-board computers with other OS or other network environment may differ.
Results:
 - a bunch of Tor + VPN + obfsproxy
 - VPN only
 - clean channel


Potential pitfalls:
1) Synchronize time. Since tor performs crypto operations with timestamps, the time must be synchronized. Unfortunately, the time will need to be synchronized every time after turning off the board.
2) Size mtu. DF-bits in the sent packets can lead to the fact that traffic will be "cut", if somewhere along the way packet fragmentation is prohibited, and the value of mtu is less than yours.
3) Using VPN throught Tor and obfsproxy is not a panacea for everything.
If you find or have already encountered any other problems, then write in the comments - I will add to the article.
1. habrahabr.ru/post/89420 , habrahabr.ru/post/188274 - AP Linux
2. habrahabr.ru/post/88281 - Adhoc on Linux
3. www.torproject.org - the official site of the Tor Project.
4. openvpn.net/index.php/open-source/documentation/manuals.html , help.ubuntu.ru/wiki/openvpn - Configuring OpenVPN.
Task setting : get a single-board computer that can be connected to your laptop / PC / mobile device and which will wrap traffic first in a VPN, then in Tor, obfusts using obfs-proxy and sent to a remote VPN server.
Initial data:
1) Single board computer. In my case, this is the Raspberry Pi model B +;
2) Raspbian OS. For this article was used Raspbian Jessie, build from 03/18/2016;
3) Memory Card (Micro SD);
4) card reader;
5) Wireless adapter or ethernet to usb adapter;
6) Remote OpenVPN server.
')
Connection diagrams:
1) eth-eth
2) wlan-eth
3) wlan-wlan
4) eth-wlan
Legend:
1. SBC - single board computer;
2. CR - a device through which access to the Internet. The device may not necessarily be connected directly to the SBC port;
3. PC - any computer (or mobile device) connected to the SBC;
4. VPN-server - target VPN server;
5. The input interface is the physical interface where the client traffic enters;
6. The output interface is the physical interface from which traffic goes to the Internet.
Assumptions:
The article deals with the case when the parameters for a link to the Internet come via DHCP or are set statically. For cases with obtaining parameters for a link on L2TP, PPPoE or other situations, the setting will be different. We will also assume that for convenient operation the VPN server acts as a DNS-relay.
System installation and connection
The official Rasbian website contains very detailed instructions for capturing an image for Linux, Mac OS, and Windows, so I will not describe the process of capturing an OS image on a memory card in order not to clutter the article. According to my observations, I can say that it is better to take a card from 16 GB in order to avoid problems with lack of memory in the future.
With the connection to the board after the image is recorded and turned on there can be several options:
1) If you have a special screen / monitor / TV with hdmi support, then it is enough to connect it via hdmi;
2) If there is no screen, but the parameters to the physical interface come via DHCP, then you can scan the network nmap-ohm from another computer and connect via ssh. User pi, password raspberry;
3) If there is no DHCP, then you can edit the / etc / network / interfaces file and set the addresses there manually.
Traffic forwarding
In order for traffic to be sent from one interface to another, it is necessary that the corresponding parameter of the Linux kernel be enabled. This can be done with the command:
sysctl -w net.ipv4.ip_forward=1 or
echo 1 > /proc/sys/net/ipv4/ip_forward To check you can use the command:
cat /proc/sys/net/ipv4/ip_forward She must return "1."
iptables
In order to simplify the routing of traffic, we include masking for the tunnel interface using iptables:
iptables -t nat -A POSTROUTING -s 10.5.5.0/24 -o tun0 -j MASQUERADE Instead, one could register static routes and a static address for the client. Or use ccd.
Package installation
Update repositories and get updates:
sudo apt-get update sudo apt-get upgrade Installing from repositories:
sudo apt-get install python2.7 python-pip python-dev build-essential tor openvpn obfs-proxy If you want a scheme with an access point, then in addition we will install the hostapd and DHCP server:
sudo apt-get install hostapd isc-dhcp-server Instead of isc-dhcp-server, any other can be used. The repositories often contain not the most recent versions, so you can build packages from source, but if you need to get a quick solution, then installing from the repository is also suitable.
Network Connection Setup
Eth-eth scheme
This option is the easiest. On the physical interface of the Raspberry Pi, to which the PC is connected, it suffices to configure a static address. On the PC, also set the parameters manually. You can also configure isc-dhcp-server to display parameters. On the client computer on Linux, for the initial setup, it is enough to execute the commands:
ip a add 10.5.5.2/24 dev <> ip route add default gw 10.5.5.1 Add an entry to the /etc/resolv.conf file:
nameserver 10.8.0.1 Wlan-eth scheme
In this scheme, the input interface will be a wireless interface operating in the access point mode. Instead of the full access point mode, you can configure Ad-hoc mode.
To organize a wi-fi access point with DHCP, I used a bunch of hostapd and isc-dhcp-server, but it is not necessary to use this particular bundle. On Habré there are several very detailed articles on setting up various options in Linux. Links I cited in the sources.
I give an example of my settings:
/etc/hostapd/hostapd.conf
interface=wlan0 # driver=rtl871xdrv # ssid=AP # hw_mode=g # channel=6 # macaddr_acl=0 # auth_algs=1 # WPA wpa=2 # wpa_passphrase=raspberry # wpa_key_mgmt=WPA-PSK # wpa_pairwise=TKIP # rsn_pairwise=CCMP /etc/dhcp/dhcpd.conf
# DHCP subnet 10.5.5.0 netmask 255.255.255.0 { range 10.5.5.2 10.5.5.4; # option broadcast-address 10.5.5.255; # option routers 10.5.5.1; # default-lease-time 600; # max-lease-time 7200; # option domain-name "local"; # option domain-name-servers 10.8.0.1;} # DNS-. Immediately it is worth mentioning that some may have problems with the drivers and the operation of the wireless card in the access point mode. It is better to ask such things in advance. I had such a problem for one of my maps when working with hostapd from the repository. The problem was solved by the hostapd patch.
Wlan-wlan schema
The part with the input interface setting is no different from the previous scheme. The output interface must be connected to the access point. Connection example using the nmcli utility:
nmcli d wifi connect <SSID > password <> iface <> Eth-wlan schema
The input interface is configured as in the eth-eth scheme, the output is as in wlan-wlan.
Tor + obfsproxy
To mask Tor traffic, we will use obfsproxy .
I give an example of setting up Tor:
/ etc / tor / torrc
SocksPort 9050 RunAsDaemon 1 VirtualAddrNetwork 172.16.0.0/12 DNSPort 53 DNSListenAddress 127.0.0.1 AutomapHostsOnResolve 1 BridgeRelay 1 Exitpolicy reject *:* ServerTransportPlugin obfs3 exec /usr/bin/obfsproxy managed obfs3 <1:1> <1> obfs3 <2:2> <2> obfs3 <3:3> <3> Data for connection to obfsproxy servers can be found here .
Openvpn
For the organization of VPN we will use OpenVPN via TCP and in L3 mode (tap interface). TCP is used because Tor only works with TCP traffic. In the VPN tunnel itself, you can start any traffic. In order to send VPN traffic to Tor, we will “proxy” all VPN traffic through Tor. OpenVPN supports this feature.
I give an example of setting up the client part of OpenVPN with detailed comments:
/etc/openvpn/client.conf
lient # dev tun # L3- proto tcp # TCP socks-proxy 127.0.0.1 9050 # Tor Socks-proxy. socks-proxy-retry # # IP, OpenVPN ( , ) remote 1.1.1.1 443 # , , https. resolv-retry infinite # , . ca /etc/openvpn/keys/ca.crt # cert /etc/openvpn/keys/client.crt # key /etc/openvpn/keys/client.key # tls-client # TLS tls-auth /etc/openvpn/keys/ta.key 1 # TLS auth SHA1 # SHA1 cipher AES-128-CBC # AES 128 . There are a lot of instructions on the Internet for setting up a server. Links I cited in the "sources" at the end of the article. The key in the configuration is the coincidence of the parameters and the presence in the server config of the line "push" redirect-gateway def "". It is necessary for the client to establish a default route for passing traffic that points to the VPN server.
Testing
To test the correct operation, we will ping from the connected PC to the tun-interface of the VPN server, we will remove traffic using tcpdump and analyze it in Wireshark for clarity.
1) An ICMP request arrives at the Raspberry Pi input interface.
You should pay attention to the identifiers BE, LE and timestamp. Then they will be needed in order to identify the ICMP request on the server side.
2) The ICMP packet passed the processing procedure in OpenVPN and headed to port 9050, which Tor listens to. A snapshot of the traffic occurs on the loopback interface of the Raspberry Pi.
3) The package leaves Raspberry Pi and is sent to one of the Tor nodes with the obfsproxy server side:
4) And a snapshot of the traffic is already on the VPN server's tunnel interface. Immediately you will notice that the server sent a response.
The BE, LE, and timestamp identifiers are the same as those in the sent packet.
5) This screenshot shows the packet coming out of the VPN server, which contains ICMP-reply.
I also tested the bandwidth of this solution using iperf for TCP and UDP traffic to the server. Testing was conducted using Raspberry Pi model B + and Raspbian OS in the home network, so the numbers for other single-board computers with other OS or other network environment may differ.
Results:
- a bunch of Tor + VPN + obfsproxy - VPN only - clean channelConclusion
Potential pitfalls:
1) Synchronize time. Since tor performs crypto operations with timestamps, the time must be synchronized. Unfortunately, the time will need to be synchronized every time after turning off the board.
2) Size mtu. DF-bits in the sent packets can lead to the fact that traffic will be "cut", if somewhere along the way packet fragmentation is prohibited, and the value of mtu is less than yours.
3) Using VPN throught Tor and obfsproxy is not a panacea for everything.
If you find or have already encountered any other problems, then write in the comments - I will add to the article.
Sources
1. habrahabr.ru/post/89420 , habrahabr.ru/post/188274 - AP Linux
2. habrahabr.ru/post/88281 - Adhoc on Linux
3. www.torproject.org - the official site of the Tor Project.
4. openvpn.net/index.php/open-source/documentation/manuals.html , help.ubuntu.ru/wiki/openvpn - Configuring OpenVPN.
Source: https://habr.com/ru/post/304446/
All Articles