How to quickly connect google proto3 to your spring (boot) web project
Brief description of how to connect Google Protocol Buffers / Proto3 to your Spring project
Spring Boot: allows you to quickly develop stand-alone web applications that you can “just” run with a minimum of settings.
Google proto3: a lightweight, flexible, automatic data serialization mechanism.
')
This article will explain how to quickly combine these technologies together. You can familiarize yourself with the technologies by following the links in the materials.
To create a new spring-boot project, you can use the Spring Initializr web site .
I chose the Web as a dependency project generated for maven.
Configure module models
In the module of models there will be only files with the extension * .proto and automatically generated java classes. Proto * files are placed in src / main / proto.
For example, I created health.proto:
package demo.domain; option java_package = "demo.domain"; option java_outer_classname = "HealthCheckProtos"; message HealthCheck { required string response = 1; required string timestamp = 2; required string version = 3; } Based on which will be generated java class HealthCheckProtos which I will use in Spring controller.
Required pom.xml configuration:
<?xml version="1.0" encoding="UTF-8"?> <project xmlns="http://maven.apache.org/POM/4.0.0" xmlns:xsi="http://www.w3.org/2001/XMLSchema-instance" xsi:schemaLocation="http://maven.apache.org/POM/4.0.0 http://maven.apache.org/xsd/maven-4.0.0.xsd"> <modelVersion>4.0.0</modelVersion> <parent> <groupId>demo</groupId> <artifactId>spring-boot-proto3</artifactId> <version>0.0.1-SNAPSHOT</version> </parent> <artifactId>spring-boot-proto3-domain</artifactId> <packaging>jar</packaging> <name>spring-boot-proto3-domain</name> <description>Domain module</description> <properties> <protobuf.input.directory>${project.basedir}/src/main/proto</protobuf.input.directory> <protobuf.output.directory>${project.build.directory}/generated-sources</protobuf.output.directory> </properties> <dependencies> <dependency> <groupId>com.google.protobuf</groupId> <artifactId>protobuf-java</artifactId> </dependency> <dependency> <groupId>com.googlecode.protobuf-java-format</groupId> <artifactId>protobuf-java-format</artifactId> </dependency> </dependencies> <build> <plugins> <!-- copy protoc binary into build directory --> <plugin> <groupId>org.apache.maven.plugins</groupId> <artifactId>maven-dependency-plugin</artifactId> <version>2.10</version> <executions> <execution> <id>copy-protoc</id> <phase>generate-sources</phase> <goals> <goal>copy</goal> </goals> <configuration> <artifactItems> <artifactItem> <groupId>com.google.protobuf</groupId> <artifactId>protoc</artifactId> <version>${protobuf.version}</version> <classifier>windows-x86_64</classifier> <type>exe</type> <overWrite>true</overWrite> <outputDirectory>${project.build.directory}</outputDirectory> </artifactItem> </artifactItems> </configuration> </execution> </executions> </plugin> <!-- compile proto buffer files using copied protoc binary --> <plugin> <groupId>org.apache.maven.plugins</groupId> <artifactId>maven-antrun-plugin</artifactId> <version>1.8</version> <executions> <execution> <id>exec-protoc</id> <phase>generate-sources</phase> <configuration> <target> <property name="protoc.filename" value="protoc-${protobuf.version}-windows-x86_64.exe"/> <property name="protoc.filepath" value="${project.build.directory}/${protoc.filename}"/> <chmod file="${protoc.filepath}" perm="ugo+rx"/> <mkdir dir="${protobuf.output.directory}" /> <path id="protobuf.input.filepaths.path"> <fileset dir="${protobuf.input.directory}"> <include name="**/*.proto"/> </fileset> </path> <pathconvert pathsep=" " property="protobuf.input.filepaths" refid="protobuf.input.filepaths.path"/> <exec executable="${protoc.filepath}" failonerror="true"> <arg value="-I"/> <arg value="${protobuf.input.directory}"/> <arg value="--java_out"/> <arg value="${protobuf.output.directory}"/> <arg line="${protobuf.input.filepaths}"/> </exec> </target> </configuration> <goals> <goal>run</goal> </goals> </execution> </executions> </plugin> <plugin> <groupId>org.codehaus.mojo</groupId> <artifactId>build-helper-maven-plugin</artifactId> <version>1.9.1</version> <executions> <execution> <id>add-classes</id> <phase>generate-sources</phase> <goals> <goal>add-source</goal> </goals> <configuration> <sources> <$ource>${protobuf.output.directory}</$ource> </sources> </configuration> </execution> </executions> </plugin> </plugins> </build> </project> Here, in principle, everything is standard, except for: classifier for protoc and protoc.filename for maven-antrun-plugin, they unfortunately are tied to the system on the build machine, I compiled on Win X64.
Web module setup
Spring boot and domain module with proto3 classes are connected to the mol:
<?xml version="1.0" encoding="UTF-8"?> <project xmlns="http://maven.apache.org/POM/4.0.0" xmlns:xsi="http://www.w3.org/2001/XMLSchema-instance" xsi:schemaLocation="http://maven.apache.org/POM/4.0.0 http://maven.apache.org/xsd/maven-4.0.0.xsd"> <modelVersion>4.0.0</modelVersion> <parent> <groupId>demo</groupId> <artifactId>spring-boot-proto3</artifactId> <version>0.0.1-SNAPSHOT</version> </parent> <artifactId>spring-boot-proto3-web</artifactId> <packaging>jar</packaging> <name>spring-boot-proto3-web</name> <description>Web module</description> <dependencies> <dependency> <groupId>org.springframework.boot</groupId> <artifactId>spring-boot-starter-web</artifactId> </dependency> <dependency> <groupId>demo</groupId> <artifactId>spring-boot-proto3-domain</artifactId> </dependency> </dependencies> <build> <plugins> <plugin> <groupId>org.springframework.boot</groupId> <artifactId>spring-boot-maven-plugin</artifactId> </plugin> </plugins> </build> </project> After that, you need to add ProtobufHttpMessageConverter to the HttpMessageConverter.
package demo.config; import java.util.HashMap; import java.util.List; import org.springframework.context.annotation.Bean; import org.springframework.context.annotation.Configuration; import org.springframework.http.converter.HttpMessageConverter; import org.springframework.http.converter.protobuf.ProtobufHttpMessageConverter; import org.springframework.web.servlet.config.annotation.ContentNegotiationConfigurer; import org.springframework.web.servlet.config.annotation.EnableWebMvc; import org.springframework.web.servlet.config.annotation.WebMvcConfigurerAdapter; @Configuration @EnableWebMvc public class WebConfiguration extends WebMvcConfigurerAdapter { /** * {@inheritDoc} */ @Override public void configureMessageConverters(List<HttpMessageConverter<?>> converters) { converters.add(protobufHttpMessageConverter()); } /** * {@inheritDoc} */ @Override public void configureContentNegotiation(ContentNegotiationConfigurer configurer) { configurer.replaceMediaTypes(new HashMap<>()) // .favorPathExtension(false) // .defaultContentType(ProtobufHttpMessageConverter.PROTOBUF); } @Bean ProtobufHttpMessageConverter protobufHttpMessageConverter() { return new ProtobufHttpMessageConverter(); } } For example, I created a controller that would show the status of the application using the model generated using proto3:
package demo.web; import java.time.LocalDateTime; import demo.domain.HealthCheckProtos; import org.springframework.beans.factory.annotation.Value; import org.springframework.web.bind.annotation.RequestMapping; import org.springframework.web.bind.annotation.RestController; @RestController public class HealthCheckController { @Value("${health.controller.response}") private String response; @Value("${health.controller.version}") private String version; @RequestMapping("/ping") public HealthCheckProtos.HealthCheck get() { return HealthCheckProtos.HealthCheck.newBuilder() // .setResponse(response) // .setTimestamp(LocalDateTime.now().toString()) // .setVersion(version) // .build(); } } When generating classes, proto3 also generates builders that you can use to create a model.
Sample request to the controller
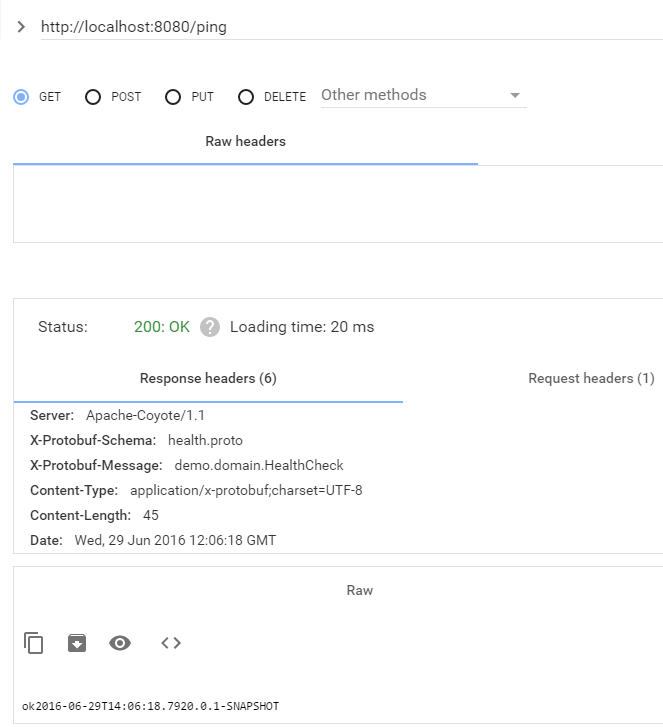 "alt =" image "/>
Also by adding the “Accept” header: “application / json”, you can get the same answer serialized in json.
The following material was used:
The source code of the project can be downloaded here: bitbucket.org/wickiup/spring-boot-proto3
Quick start from spring boot: projects.spring.io/spring-boot
Quick start with proto3: developers.google.com/protocol-buffers/docs/javatutorial
Source: https://habr.com/ru/post/304396/
All Articles