We launch a simple blog on Wagtail CMS (Django) - part 1
Being a big fan of Python and the Django framework, I was constantly looking for a solution on how to make the development of new web projects faster and more convenient.
Everyone who is familiar with the development of Django, knows how inconvenient to build on it an intuitive admin.panel. The megapopular WordPress is very far away, which makes the threshold for entering the development of sites higher than that of PHP frameworks and CMS.
After a long search and testing of various solutions, I found the best option for me - Wagtail CMS.
Wagtail is a full-featured CMS written on Django by Torchbox. For which many thanks to them. The project is open source, supported by a community of enthusiasts and released under the BSD license.
')
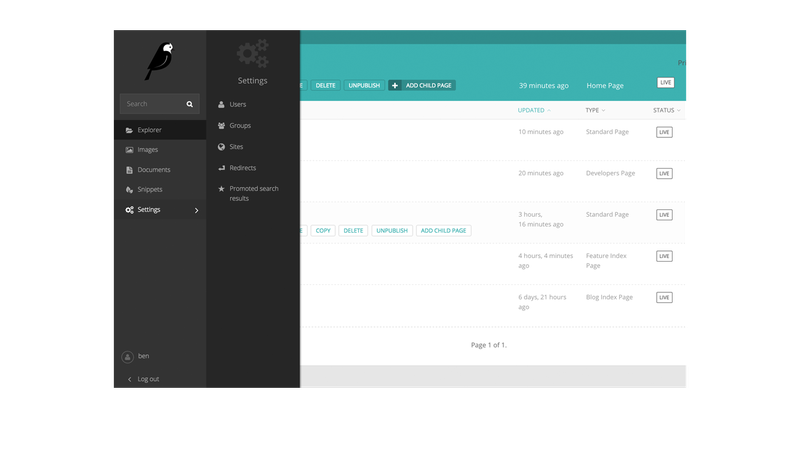
Here is a typical Wagtail interface:
In wagtail it is very convenient to work with content, create new publications, sections, work with images. Inside this project are many interesting technologies. But today is not about that.
I'll tell you an example of a quick launch of a simple blog for newbies in Django development, given the many difficulties that may await on the way.
We will need:
1. VPS with at least 1gb of memory
2. Basic familiarity with django
3. Skills in remote Ubuntu setup
Step 1:
You have launched a VPS server for development. Use Putty to connect remotely via SSH.
Setup is performed on a server running Ubuntu 14.04.
- Login and start basic setting:
As a rule, the server already has Python 2 and 3 versions. Check with the following commands:
For the project we will use Python 3, since Pillow and some libraries that we need will work better with it.
If somehow you did not have python3 on your server, then put it with the command:
We also need python3-setuptools and python3-dev:
Considering that everything is put on a clean system, we install PIP (to install the latest version “8.1.2”, it’s better to do this via easy_install3):
You can check the PIP version with the command:
If the version is not the latest, then update the pip with the command:
So that in the future we will not have various errors when installing Wagtail, we immediately put all the necessary libraries for Pillow:
Now we need a virtual environment for the project, set virtualenv
Create a virtual machine:
Go to the / opt / myenv folder and launch the virtual environment:
You should see a line with the name (myenv), meaning that the virtual machine is running:
Step 2: Pre-configuration is done, proceed to installing the Wagtail CMS and setting up the database:
1. we put Wagtail and Gunicorn:
2. Create our future blog with a team
3. Go to the blog folder (mysite) and install all the dependencies for the project from the file requirements.txt
4. At this stage, you can migrate and immediately start the test server of your future blog. But since we plan to do everything right, our blog will run on PostgreSQL (for django, you can use different databases, including MySQL, PostgreSQL, Oracle DB, etc.). So we are setting up the database:
5. At this point, you already have postgresql running on port 5432. But for the database to communicate with Wagtail, you need to install psycopg2:
6. Now we need to create the database itself for the project, for this we log in as a postgres user and make some additional settings:
7. Since postgresql creates a user without asking you about the password, we need to assign it a password via psql:
Now you can execute the password change command:
Exit psql and close the session under the postgres user:
Check that you are still in a virtual environment, if not then activate the virtual machine again.
8. Now we need to configure Wagtail to interact with postgresql, for this we go to base.py:
The settings file opens, we need the DATABASES entry. We delete what we have and put the following there:
By the way, there is Russian in wagtail, so you can at the same time in the settings correct the parameter LANGUAGE_CODE.
Actually, we have all the necessary settings, and now you can run the migration.
Step 3. First launch
Go to the root folder of your blog (cd / opt / myenv / mysite /) and start your first data migration in this project:
Now create a user under which you will enter the Wagtail admin panel:
Enter a name (for example, admin), password, and mail.
We check that everything works:
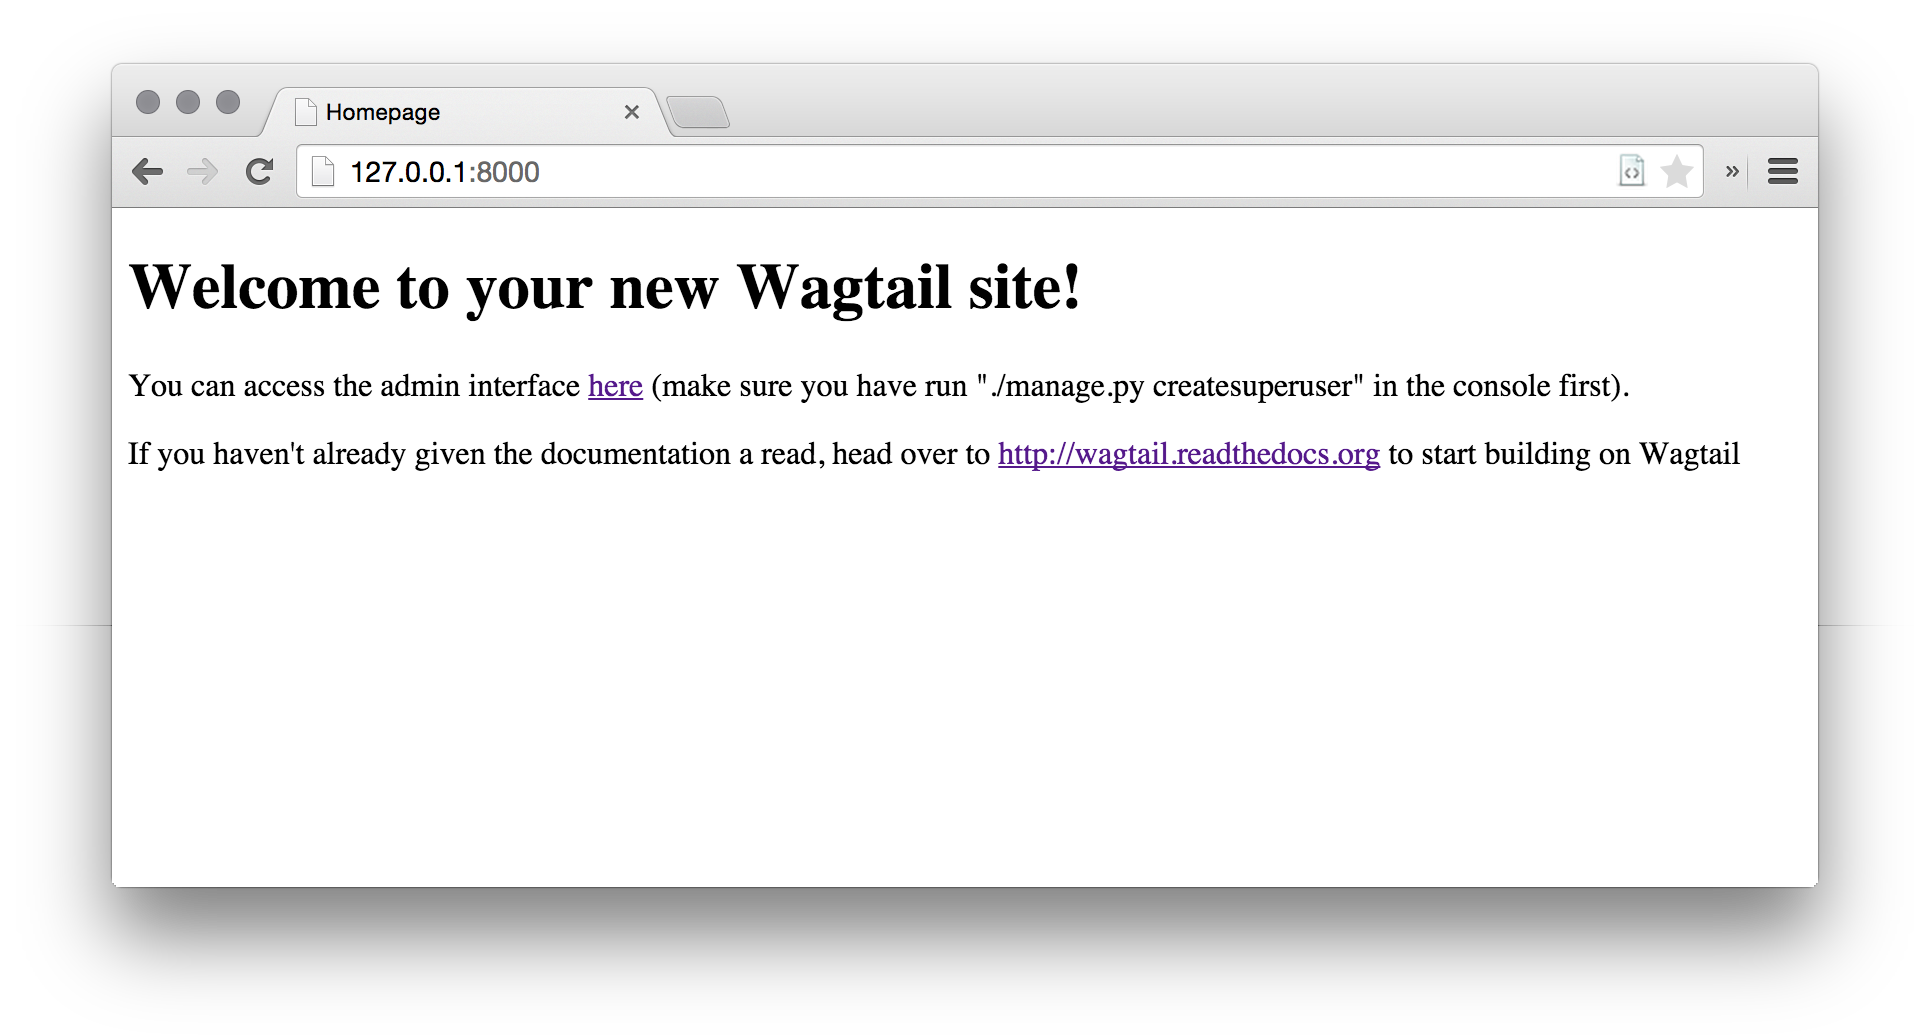
Go to the browser at the ip address of your VPS on port 8000 (example 199.199.32.32:8000) and see the wagtail start page.
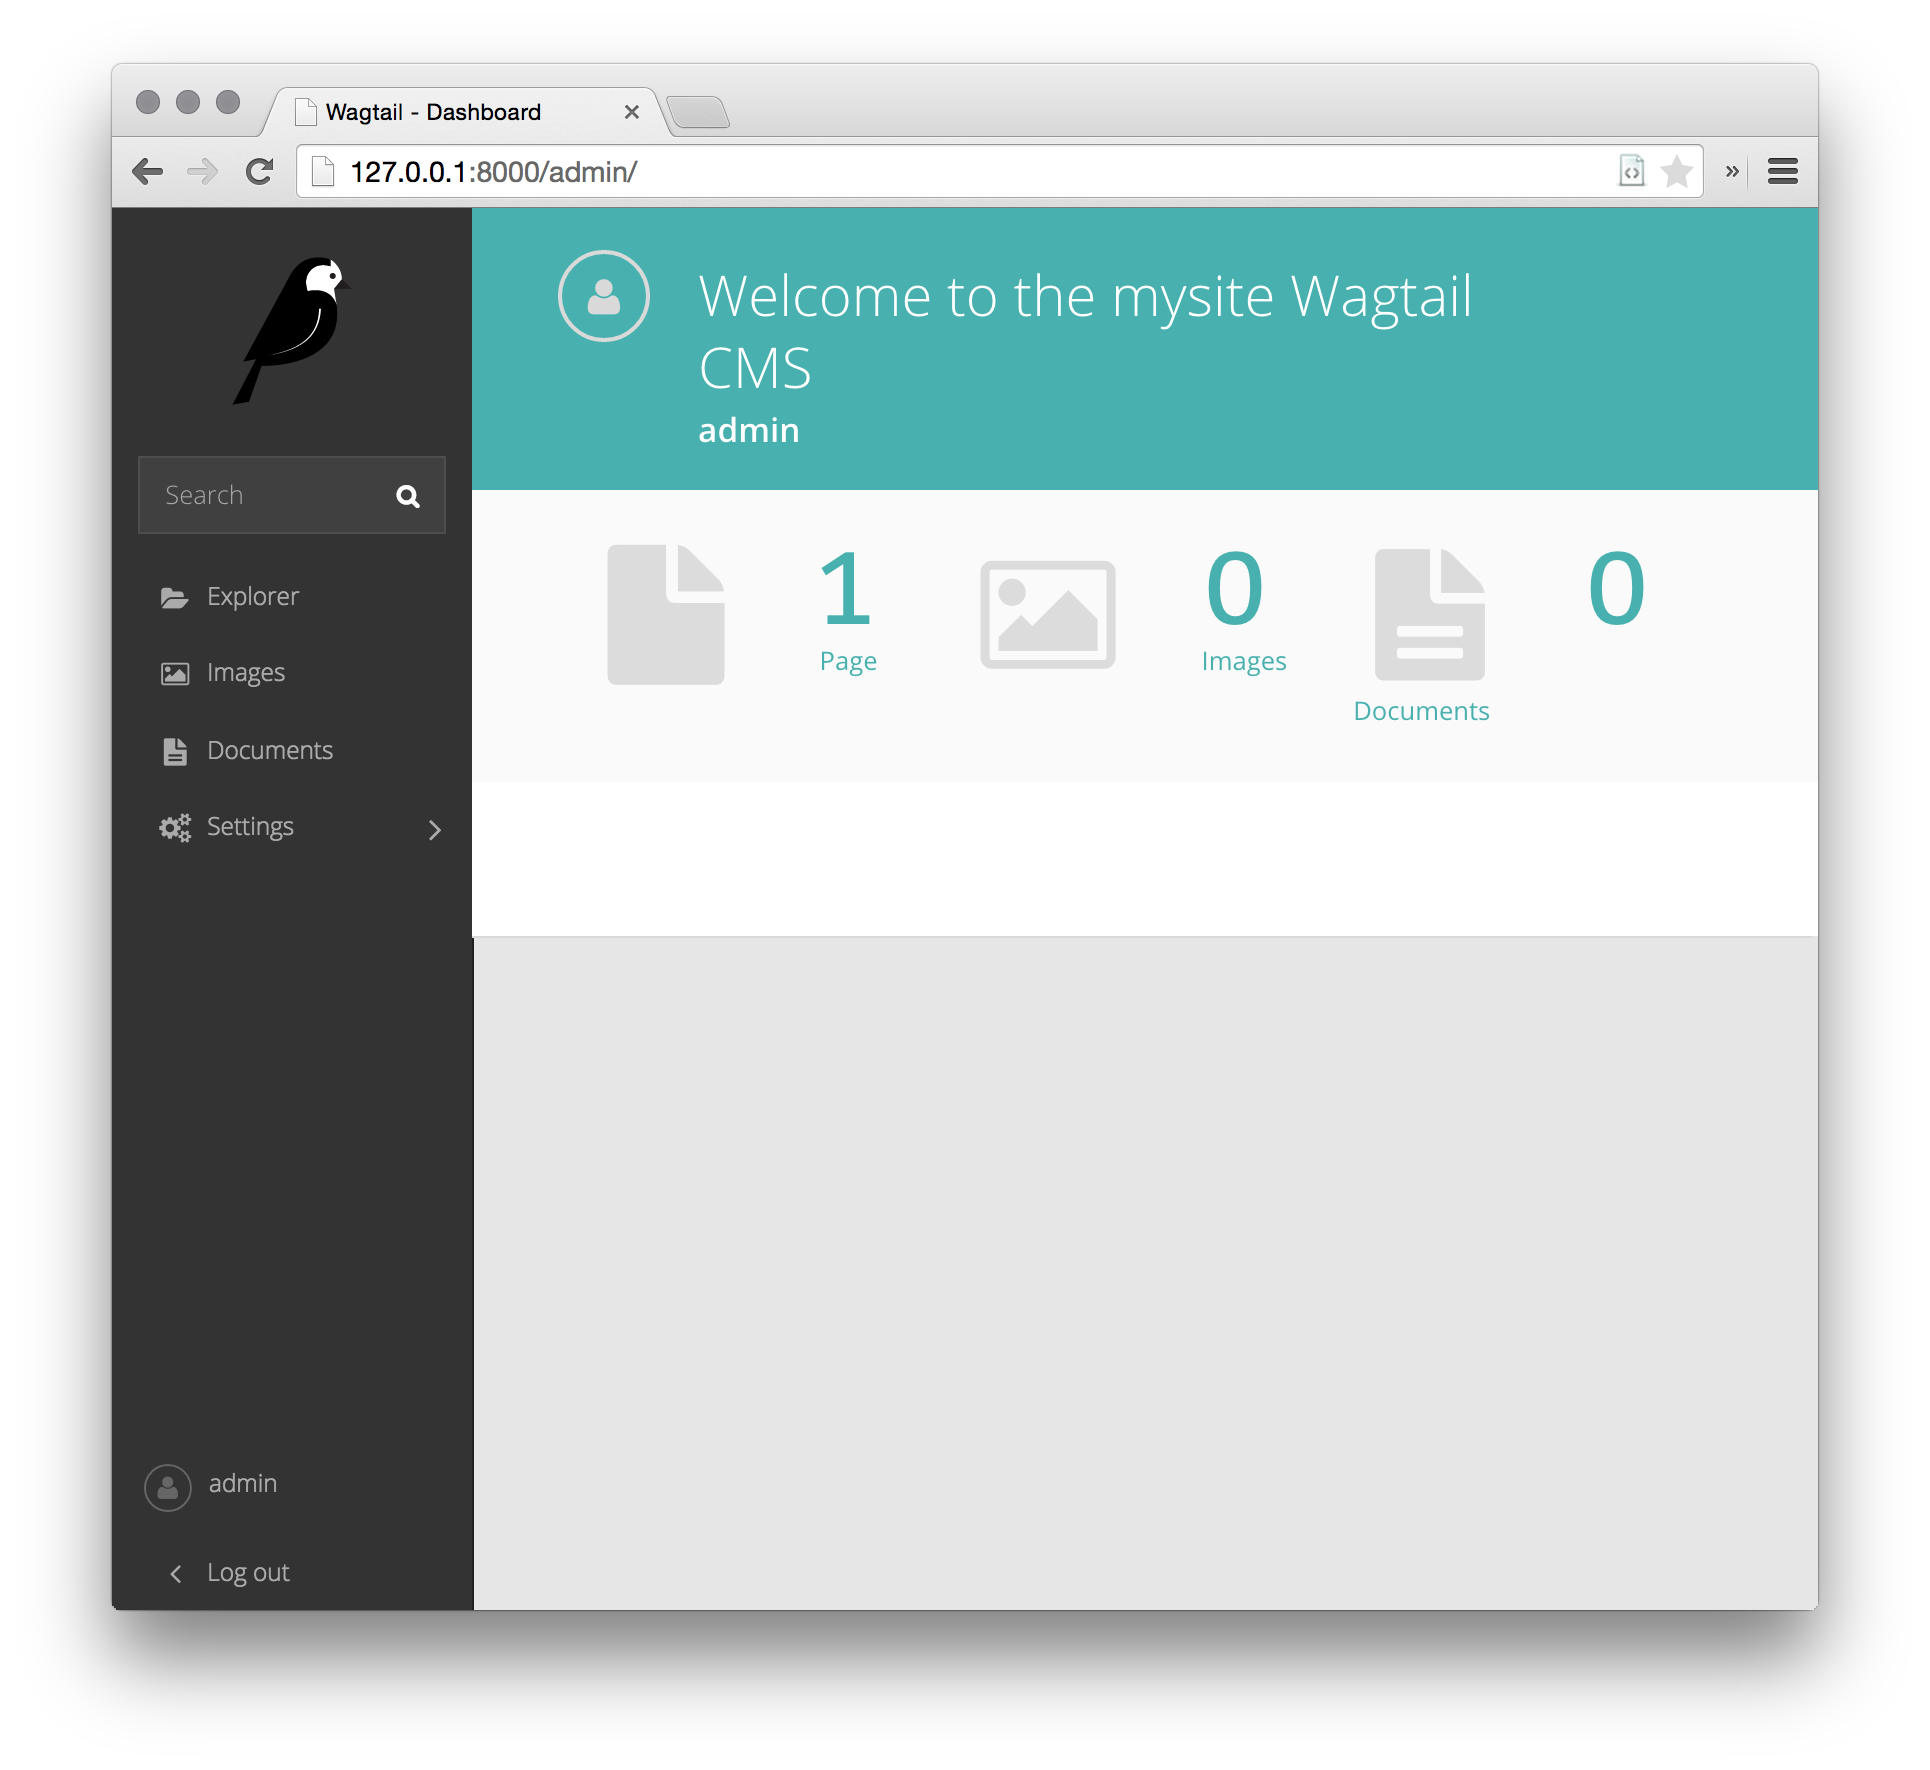
Great, now let's move to the admin panel 199.199.32.32:8000/admin, enter the username and password of the user we created earlier and get into the convenient Wagtail CMS interface:
So far, our site does not know how, but soon we will teach him everything necessary for a blog.
Step 4. Setting up the start page of the site
The home application is responsible for the home application that runs out of the box. For the start page to be like this, you need to make some changes to the code.
The structure of your site looks like this:
Edit the "home / models.py" file as follows:
Also edit the home / templates / home / home_page.html file:
Now, to make the new changes work, migrate:
After that you can go to the admin panel and edit the text on your start page.
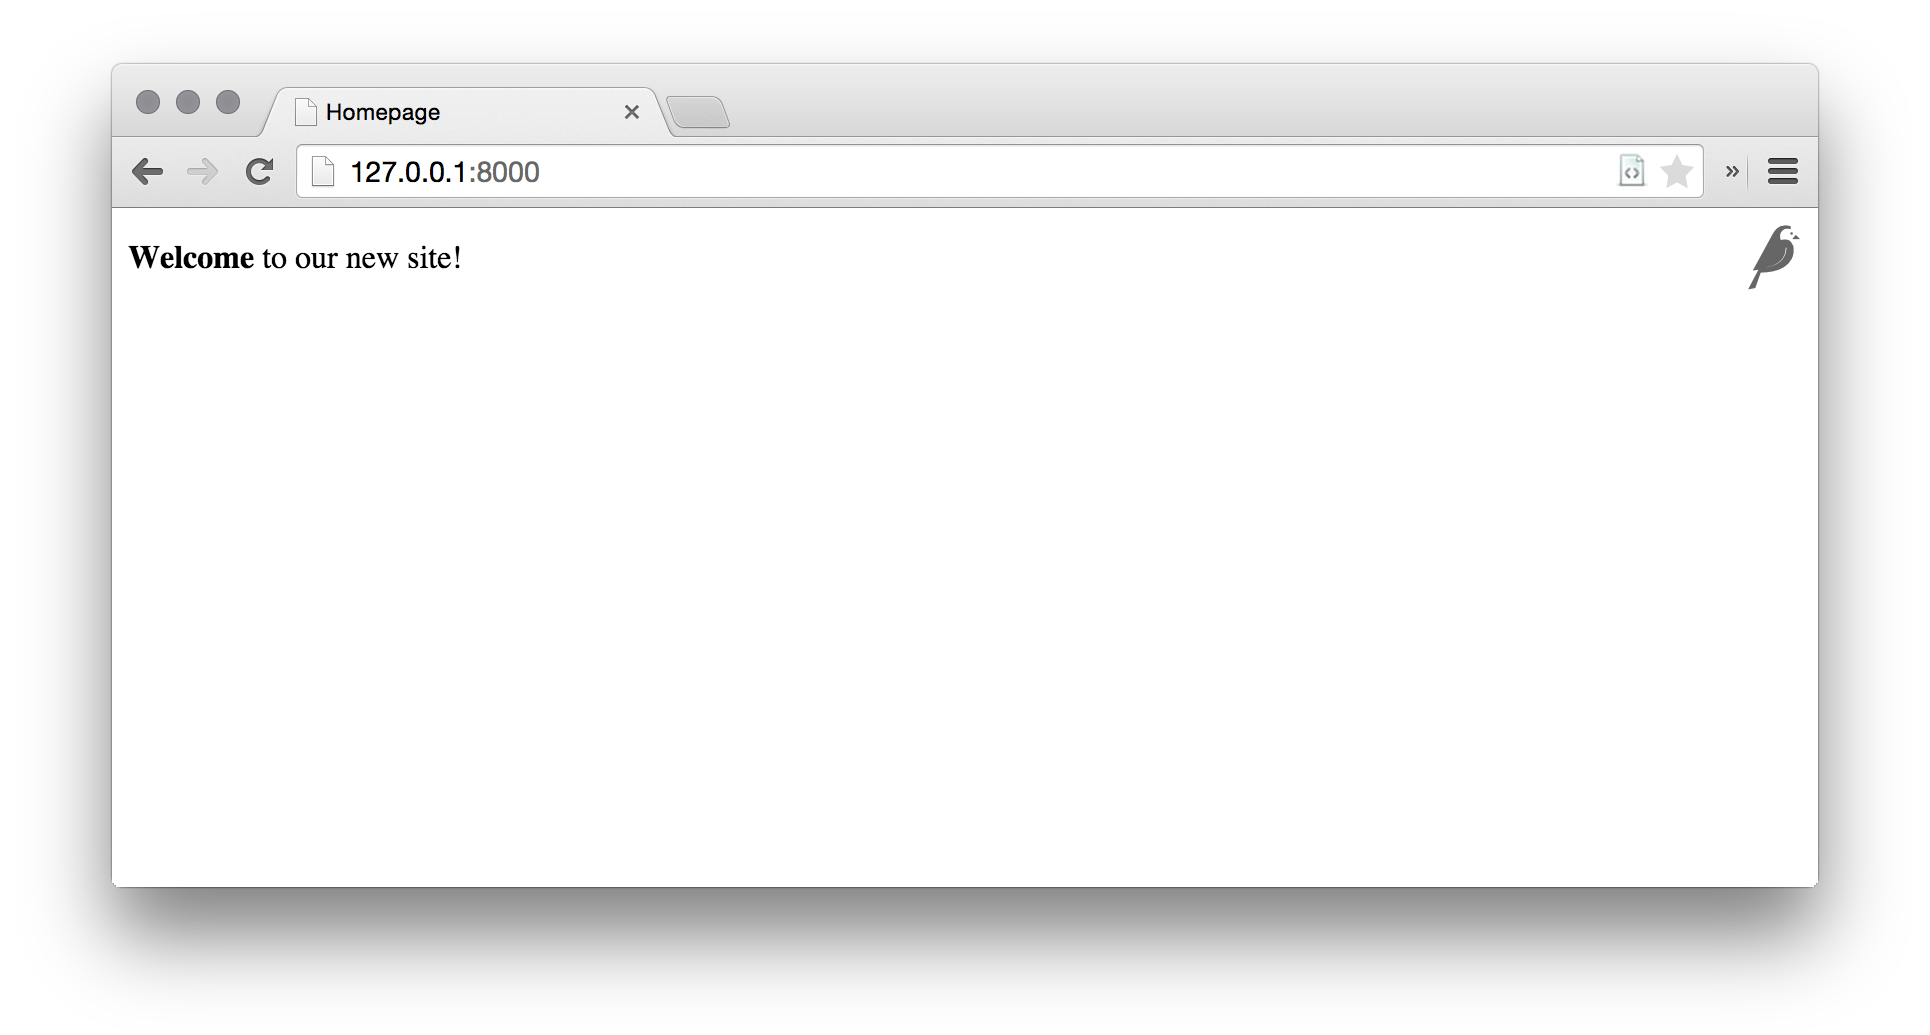
Save the changes and open your site again. You will see your text, like this:
Not bad for a start, but you need to add css markup and beauty.
The base.html file located in mysite / settings / base.py is responsible for the base template;
Responsible for css is “mysite.css” located in mysite / static / css / mysite.css;
Responsible for js is “mysite.js” located in mysite / static / js / mysite.js;
I am a fan of materializecss and for our site we will take from them a template and a library.
Watch here http://materializecss.com/getting-started.html
We make the following changes to base.html:
Save and reopen our site. It should be something like this picture:
Already better. Now we need to create a blog for which everything was started.
Step 5. Creating a blog.
Go back to the root of our project and execute the following command:
After that, add a new “blog” application to INSTALLED_APPS in mysite / settings / base.py.
For each post of our blog there will be standard fields - heading, date, picture, introduction and main text. To make it all work, make the following changes to blog / models.py.
Now create the very page on which all this will be displayed in blog / templates / blog / blog_page.html:
So far, nothing works, so we execute commands
Now you can create the first entry in our blog, through the convenient wagtail interface.
Go to admin.panel, open "Explorer", select the main one, and click "add child page", the following window will appear with the choice of templates for the page being created:
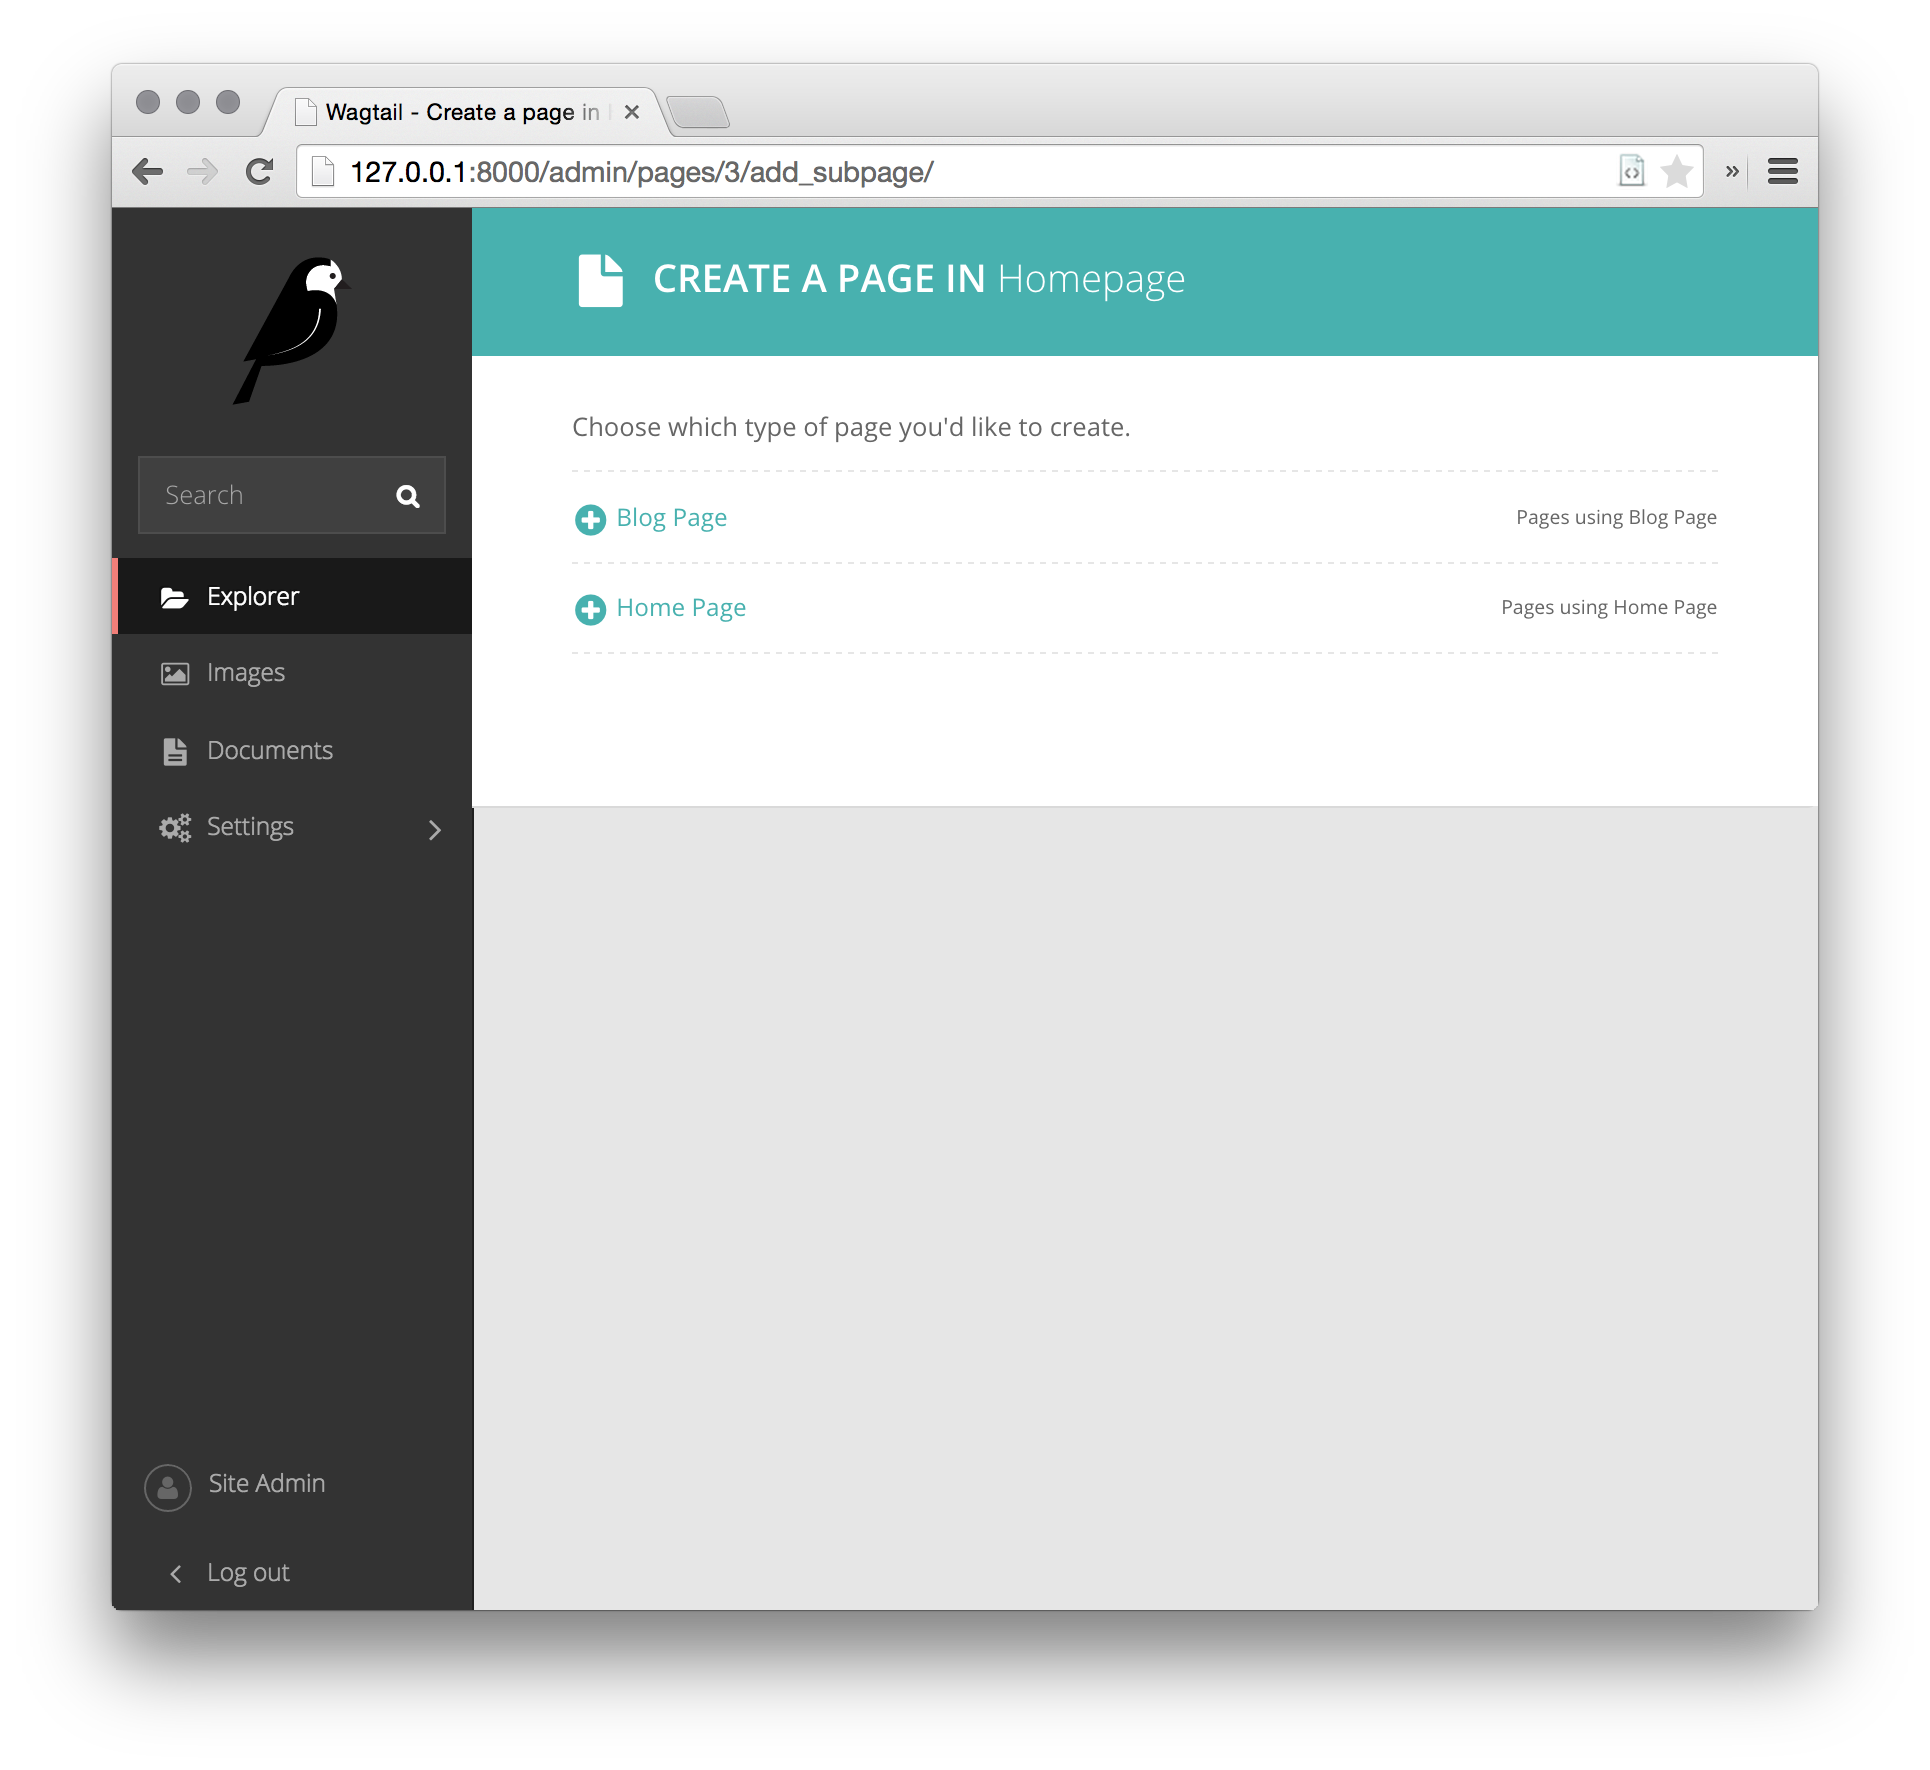
Select "Blog Page" and fill the page with information.
Here is an example of editing a blog page in the wagtail admin panel:
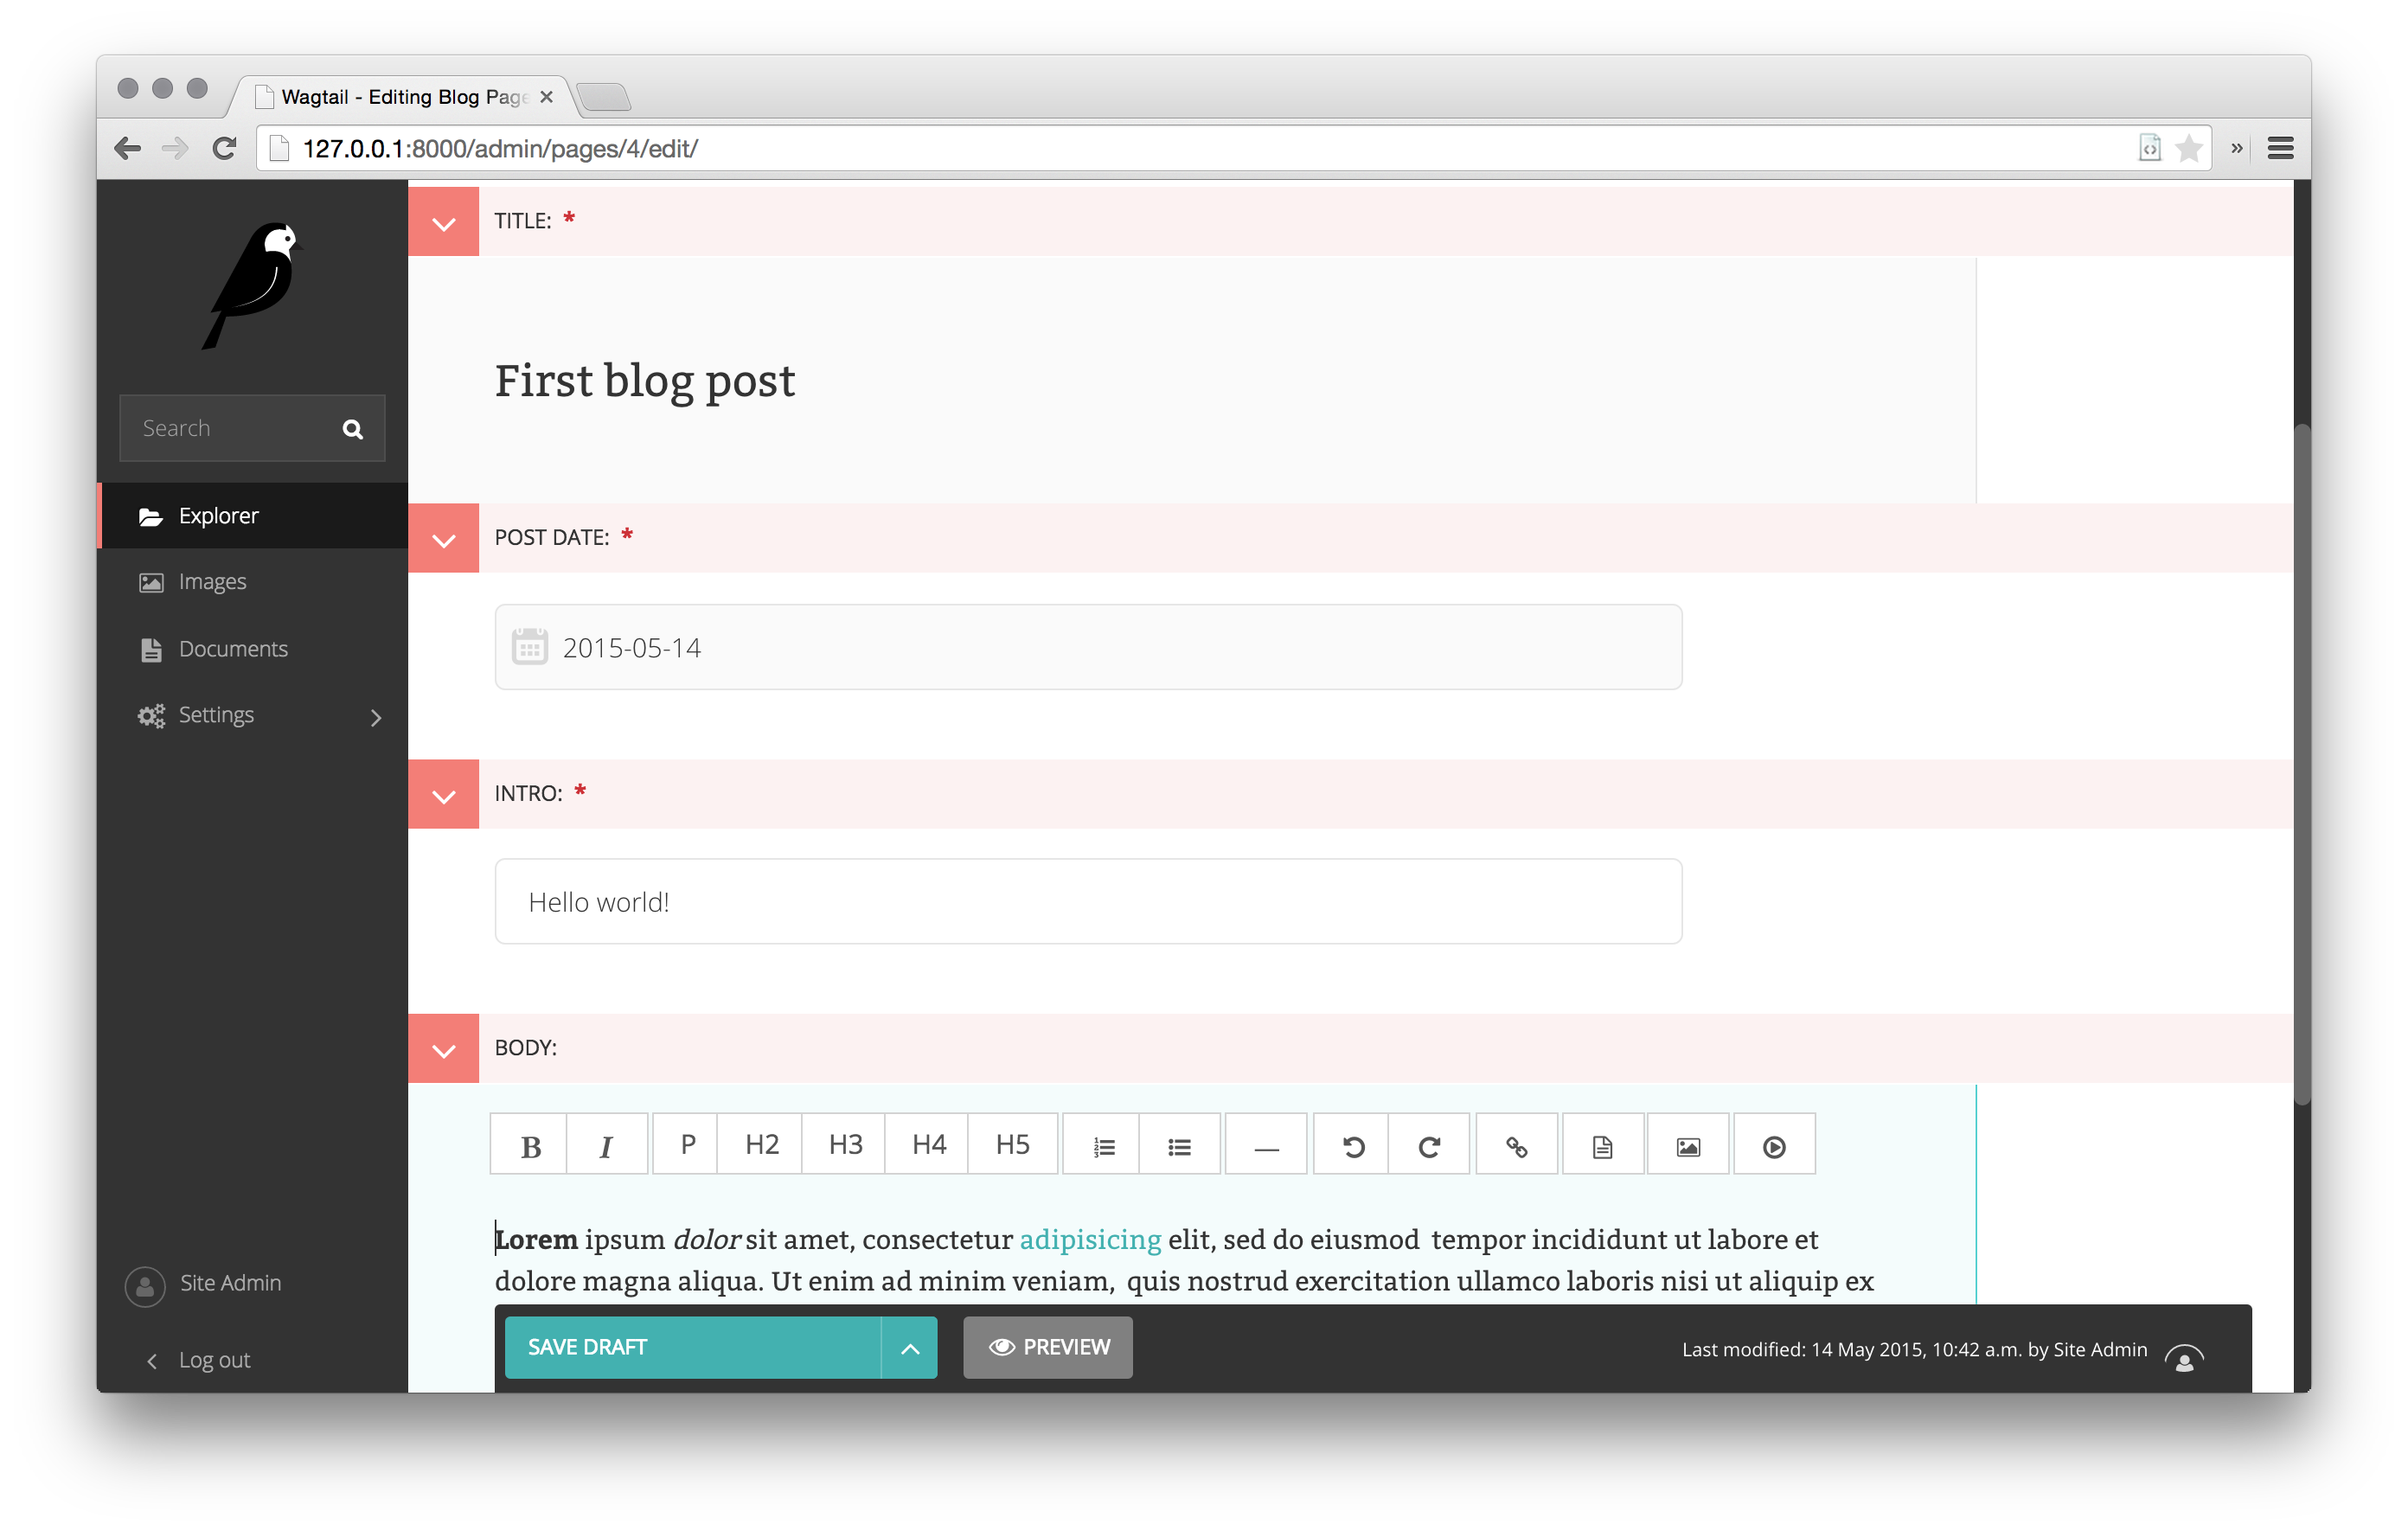
Pretty convenient and fast.
Save the record and open it in the browser. The first entry of your blog is ready.
If at least someone will find this post useful, then I will continue to publish posts on the topic of wagtail, in which I will tell you more about the various possibilities of this CMS.
Part 2
Part 3
For all interested Wagtail CMS:
Official site https://wagtail.io/
Github of the project https://github.com/torchbox/wagtail/
Documentation http://docs.wagtail.io/en/latest/index.html
Demosite for study http://docs.wagtail.io/en/latest/getting_started/demo_site.html
Https://groups.google.com/forum/#!forum/wagtail User Support Group
Everyone who is familiar with the development of Django, knows how inconvenient to build on it an intuitive admin.panel. The megapopular WordPress is very far away, which makes the threshold for entering the development of sites higher than that of PHP frameworks and CMS.
After a long search and testing of various solutions, I found the best option for me - Wagtail CMS.
Wagtail is a full-featured CMS written on Django by Torchbox. For which many thanks to them. The project is open source, supported by a community of enthusiasts and released under the BSD license.
')
Here is a typical Wagtail interface:
In wagtail it is very convenient to work with content, create new publications, sections, work with images. Inside this project are many interesting technologies. But today is not about that.
I'll tell you an example of a quick launch of a simple blog for newbies in Django development, given the many difficulties that may await on the way.
We will need:
1. VPS with at least 1gb of memory
2. Basic familiarity with django
3. Skills in remote Ubuntu setup
Step 1:
You have launched a VPS server for development. Use Putty to connect remotely via SSH.
Setup is performed on a server running Ubuntu 14.04.
- Login and start basic setting:
sudo apt-get update sudo apt-get upgrade As a rule, the server already has Python 2 and 3 versions. Check with the following commands:
Python -V Python3 -V For the project we will use Python 3, since Pillow and some libraries that we need will work better with it.
If somehow you did not have python3 on your server, then put it with the command:
sudo apt-get install python3 We also need python3-setuptools and python3-dev:
sudo apt-get install python3-setuptools sudo apt-get install python3-dev Considering that everything is put on a clean system, we install PIP (to install the latest version “8.1.2”, it’s better to do this via easy_install3):
sudo easy_install3 pip You can check the PIP version with the command:
pip -V If the version is not the latest, then update the pip with the command:
sudo pip install --upgrade pip So that in the future we will not have various errors when installing Wagtail, we immediately put all the necessary libraries for Pillow:
sudo apt-get install libtiff5-dev libjpeg8-dev zlib1g-dev \ libfreetype6-dev liblcms2-dev libwebp-dev tcl8.6-dev tk8.6-dev python-tk Now we need a virtual environment for the project, set virtualenv
sudo pip3 install virtualenv Create a virtual machine:
virtualenv /opt/myenv Go to the / opt / myenv folder and launch the virtual environment:
source bin/activate You should see a line with the name (myenv), meaning that the virtual machine is running:
(myenv) alex@local.develop.server:/opt/myenv$ Step 2: Pre-configuration is done, proceed to installing the Wagtail CMS and setting up the database:
1. we put Wagtail and Gunicorn:
sudo pip3 install wagtail gunicorn 2. Create our future blog with a team
wagtail start mysite 3. Go to the blog folder (mysite) and install all the dependencies for the project from the file requirements.txt
cd mysite pip install -r requirements.txt 4. At this stage, you can migrate and immediately start the test server of your future blog. But since we plan to do everything right, our blog will run on PostgreSQL (for django, you can use different databases, including MySQL, PostgreSQL, Oracle DB, etc.). So we are setting up the database:
sudo apt-get install libpq-dev sudo apt-get install postgresql postgresql-contrib 5. At this point, you already have postgresql running on port 5432. But for the database to communicate with Wagtail, you need to install psycopg2:
pip install psycopg2 6. Now we need to create the database itself for the project, for this we log in as a postgres user and make some additional settings:
sudo su – postgres createdb myblog 7. Since postgresql creates a user without asking you about the password, we need to assign it a password via psql:
psql Now you can execute the password change command:
\password postgres Exit psql and close the session under the postgres user:
\q exit Check that you are still in a virtual environment, if not then activate the virtual machine again.
8. Now we need to configure Wagtail to interact with postgresql, for this we go to base.py:
cd /opt/myenv/mysite/mysite/settings/ nano base.py The settings file opens, we need the DATABASES entry. We delete what we have and put the following there:
DATABASES = {
'default': {
'ENGINE': 'django.db.backends.postgresql_psycopg2', # , postgresql
'NAME': 'myblog', #
'USER': 'postgres',
'PASSWORD': '******',
'HOST': 'localhost',
'PORT': '',
}
}
By the way, there is Russian in wagtail, so you can at the same time in the settings correct the parameter LANGUAGE_CODE.
LANGUAGE_CODE = 'ru-ru'
Actually, we have all the necessary settings, and now you can run the migration.
Step 3. First launch
Go to the root folder of your blog (cd / opt / myenv / mysite /) and start your first data migration in this project:
python manage.py migrate Now create a user under which you will enter the Wagtail admin panel:
python manage.py createsuperuser Enter a name (for example, admin), password, and mail.
We check that everything works:
python manage.py runserver 0.0.0.0:8000 Go to the browser at the ip address of your VPS on port 8000 (example 199.199.32.32:8000) and see the wagtail start page.
Great, now let's move to the admin panel 199.199.32.32:8000/admin, enter the username and password of the user we created earlier and get into the convenient Wagtail CMS interface:
So far, our site does not know how, but soon we will teach him everything necessary for a blog.
Step 4. Setting up the start page of the site
The home application is responsible for the home application that runs out of the box. For the start page to be like this, you need to make some changes to the code.
The structure of your site looks like this:
mysite/
home/
migrations/
__init__.py
0001_initial.py
0002_create_homepage.py
templates/
home/
home_page.html
__init__.py
models.py
search/
templates/
search/
search.html
__init__.py
views.py
mysite/
settings/
__init__.py
base.py
dev.py
production.py
static/
css/
mysite.css
js/
mysite.js
templates/
404.html
500.html
base.html
__init__.py
urls.py
wsgi.py
manage.py
requirements.txt
Edit the "home / models.py" file as follows:
from __future__ import unicode_literals from django.db import models from wagtail.wagtailcore.models import Page from wagtail.wagtailcore.fields import RichTextField from wagtail.wagtailadmin.edit_handlers import FieldPanel class HomePage(Page): body = RichTextField(blank=True) content_panels = Page.content_panels + [ FieldPanel('body', classname="full") ] Also edit the home / templates / home / home_page.html file:
{% extends "base.html" %}

{% load wagtailcore_tags %}

{% block body_class %} template-homepage {% endblock %}

{% block content %}
{{ page.body | richtext }}
{% endblock %}
Now, to make the new changes work, migrate:
python manage.py makemigrations python manage.py migrate After that you can go to the admin panel and edit the text on your start page.
Save the changes and open your site again. You will see your text, like this:
Not bad for a start, but you need to add css markup and beauty.
The base.html file located in mysite / settings / base.py is responsible for the base template;
Responsible for css is “mysite.css” located in mysite / static / css / mysite.css;
Responsible for js is “mysite.js” located in mysite / static / js / mysite.js;
I am a fan of materializecss and for our site we will take from them a template and a library.
Watch here http://materializecss.com/getting-started.html
We make the following changes to base.html:
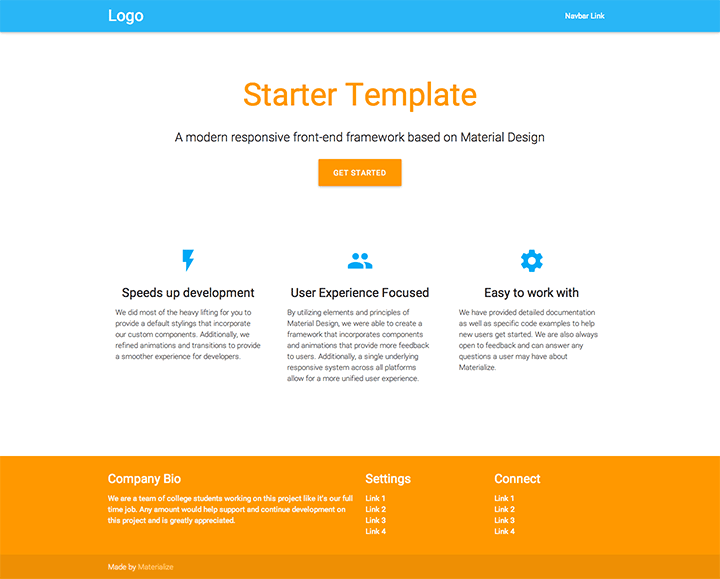
{% load static wagtailuserbar %} <!DOCTYPE html> <!--[if lt IE 7]> <html class="no-js lt-ie9 lt-ie8 lt-ie7"> <![endif]--> <!--[if IE 7]> <html class="no-js lt-ie9 lt-ie8"> <![endif]--> <!--[if IE 8]> <html class="no-js lt-ie9"> <![endif]--> <!--[if gt IE 8]><!--> <html class="no-js"> <!--<![endif]--> <head> <meta charset="utf-8" /> <meta http-equiv="X-UA-Compatible" content="IE=edge" /> <title>{% block title %}{% if self.seo_title %}{{ self.seo_title }}{% else %}{{ self.title }}{% endif %}{% endblock %}{% block title_suffix %}{% endblock %}</title> <meta name="description" content="" /> <meta name="viewport" content="width=device-width, initial-scale=1" /> {# Global stylesheets #} <link rel="stylesheet" type="text/css" href="{% static 'css/mysite.css' %}"> <link rel="stylesheet" href="https://cdnjs.cloudflare.com/ajax/libs/materialize/0.97.6/css/materialize.min.css"> {% block extra_css %} {# Override this in templates to add extra stylesheets #} {% endblock %} </head> <body class="{% block body_class %}{% endblock %}"> <nav class="light-blue lighten-1" role="navigation"> <div class="nav-wrapper container"><a id="logo-container" href="#" class="brand-logo">Logo</a> <ul class="right hide-on-med-and-down"> <li><a href="#">Navbar Link</a></li> </ul> <ul id="nav-mobile" class="side-nav"> <li><a href="#">Navbar Link</a></li> </ul> <a href="#" data-activates="nav-mobile" class="button-collapse"><i class="material-icons">menu</i></a> </div> </nav> {% wagtailuserbar %} <div class="container"> {% block content %}{% endblock %} </div> <footer class="page-footer orange"> <div class="container"> <div class="row"> <div class="col l6 s12"> <h5 class="white-text">Company Bio</h5> <p class="grey-text text-lighten-4">We are a team of college students working on this project like it's our full time job. Any amount would help support and continue development on this project and is greatly appreciated.</p> </div> <div class="col l3 s12"> <h5 class="white-text">Settings</h5> <ul> <li><a class="white-text" href="#!">Link 1</a></li> <li><a class="white-text" href="#!">Link 2</a></li> <li><a class="white-text" href="#!">Link 3</a></li> <li><a class="white-text" href="#!">Link 4</a></li> </ul> </div> <div class="col l3 s12"> <h5 class="white-text">Connect</h5> <ul> <li><a class="white-text" href="#!">Link 1</a></li> <li><a class="white-text" href="#!">Link 2</a></li> <li><a class="white-text" href="#!">Link 3</a></li> <li><a class="white-text" href="#!">Link 4</a></li> </ul> </div> </div> </div> <div class="footer-copyright"> <div class="container"> Made by <a class="orange-text text-lighten-3" href="http://materializecss.com">Materialize</a> </div> </div> </footer> <!-- Scripts--> <script src="https://code.jquery.com/jquery-2.1.1.min.js"></script> <script src="https://cdnjs.cloudflare.com/ajax/libs/materialize/0.97.6/js/materialize.min.js"></script> {# Global javascript #} <script type="text/javascript" src="{% static 'js/mysite.js' %}"></script> {% block extra_js %} {# Override this in templates to add extra javascript #} {% endblock %} </body> </html> Save and reopen our site. It should be something like this picture:
Already better. Now we need to create a blog for which everything was started.
Step 5. Creating a blog.
Go back to the root of our project and execute the following command:
python manage.py startapp blog After that, add a new “blog” application to INSTALLED_APPS in mysite / settings / base.py.
For each post of our blog there will be standard fields - heading, date, picture, introduction and main text. To make it all work, make the following changes to blog / models.py.
from django.db import models from wagtail.wagtailcore.models import Page from wagtail.wagtailcore.fields import RichTextField from wagtail.wagtailadmin.edit_handlers import FieldPanel from wagtail.wagtailimages.edit_handlers import ImageChooserPanel from wagtail.wagtailsearch import index class BlogPage(Page): main_image = models.ForeignKey( 'wagtailimages.Image', null=True, blank=True, on_delete=models.SET_NULL, related_name='+' ) date = models.DateField("Post date") intro = models.CharField(max_length=250) body = RichTextField(blank=True) search_fields = Page.search_fields + [ index.SearchField('intro'), index.SearchField('body'), ] content_panels = Page.content_panels + [ FieldPanel('date'), ImageChooserPanel('main_image'), FieldPanel('intro'), FieldPanel('body'), ] Now create the very page on which all this will be displayed in blog / templates / blog / blog_page.html:
{% extends "base.html" %}

{% load wagtailcore_tags wagtailimages_tags %}

{% block body_class %}template-blogpage{% endblock %}

{% block content %}
{{ page.title }}
{{ page.date }}

{% if page.main_image %}
{% image page.main_image width-500 %}
{% endif %}

{{ page.intro }}

{{ page.body|richtext }}
{% endblock %}
{% load wagtailcore_tags wagtailimages_tags %}
{% block body_class %}template-blogpage{% endblock %}
{% block content %}
{{ page.title }}
{{ page.date }}
{% if page.main_image %}
{% image page.main_image width-500 %}
{% endif %}
{{ page.intro }}
{{ page.body|richtext }}
{% endblock %}
{% extends "base.html" %}

{% load wagtailcore_tags wagtailimages_tags %}

{% block body_class %}template-blogpage{% endblock %}

{% block content %}
{{ page.title }}
{{ page.date }}

{% if page.main_image %}
{% image page.main_image width-500 %}
{% endif %}

{{ page.intro }}

{{ page.body|richtext }}
{% endblock %}
So far, nothing works, so we execute commands
python manage.py makemigrations python manage.py migrate Now you can create the first entry in our blog, through the convenient wagtail interface.
Go to admin.panel, open "Explorer", select the main one, and click "add child page", the following window will appear with the choice of templates for the page being created:
Select "Blog Page" and fill the page with information.
Here is an example of editing a blog page in the wagtail admin panel:
Pretty convenient and fast.
Save the record and open it in the browser. The first entry of your blog is ready.
If at least someone will find this post useful, then I will continue to publish posts on the topic of wagtail, in which I will tell you more about the various possibilities of this CMS.
Part 2
Part 3
For all interested Wagtail CMS:
Official site https://wagtail.io/
Github of the project https://github.com/torchbox/wagtail/
Documentation http://docs.wagtail.io/en/latest/index.html
Demosite for study http://docs.wagtail.io/en/latest/getting_started/demo_site.html
Https://groups.google.com/forum/#!forum/wagtail User Support Group
Source: https://habr.com/ru/post/303900/
All Articles