Core Data + Swift for the smallest: minimum necessary (part 2)
This is the second part of the Core Data trilogy, the first is available here: Core Data + Swift for the smallest: the minimum necessary (part 1) .
In the first part, we introduced general information about Core Data, the main components (NSManagedObjectModel, NSPersistentStoreCoordinator, NSManagedObjectContext), the Data Model Editor, and created our data model.
In this part we will work with objects, get acquainted with NSEntityDescription and NSManagedObject, autogeneration of classes, and also write an auxiliary class that significantly improves the usability of working with Core Data.
')
Let's start with NSEntityDescription - as the name suggests, this is an object that contains a description of our entity. Everything that we have imagined with an entity in the Data Model Editor (attributes, relationships, deletion rules, etc.) is contained in this object. The only thing we will do with it is to receive it and pass it somewhere as a parameter, nothing else.
NSManagedObject is the managed object itself, an entity instance. Continuing the analogy with the DBMS (started in the last article), we can say that NSManagedObject is a record (row) in a database table.
To understand how to work with this, let's create a new customer. Since we do not yet have a ready-made interface part (we will deal with this in the next article), then let's program a little directly in the application delegate module (
Creating a managed object (in this case, the Customer) is as follows:
First we get a description of the entity ( entityDescription ) by passing to the appropriate constructor a string with the name of the entity we need and a link to the context. How it works: the managed object context, as we remember from the first part, is associated with the coordinator of the persistent storage, and the coordinator, in turn, is associated with the object data model, where the entity will be searched by the specified name. Note that this function returns an optional value.
Then, based on the obtained description of the entity, we create the managed object itself ( managedObject ). The second parameter is the context in which this object should be created (in general, as you remember, there can be several contexts).
Well, we created an object, how do we set its attribute values now? For this, the Key-Value coding is used, the essence of which is that there are two universal methods, one that sets the specified value by the specified name, and the second retrieves the value by the specified name. It sounds much harder than it looks.
Console output:
As you can see, everything is quite simple. Go ahead. Now we need to save this object in our database. Is the fact that we created an object is not enough? No, any object “lives” in a particular specific context and only there . You can create, modify and even delete it there, but this will all happen within a specific context. Unless you explicitly save all changes to the context, you will not change the real data. You can draw an analogy with the file on the disk that you open for editing - until you clicked the "Save" button, no changes are recorded. In fact, it is very convenient and great optimizes the whole process of working with data.
Saving context changes is done elementarily:
We even have a ready-made function in the delegate module for more "smart" saving (we talked about it in passing in the last article), the recording occurs only if the data is really changed:
Thus, all the code for creating and writing an object will look like this:
We created an object and wrote it into our database. How do we get it back now? It is not much more complicated. Let's take a look at the code.
Here we create an object request NSFetchRequest , passing in the constructor as a parameter the name of the entity the data of which we want to receive. Then we call the context method, passing this request as a parameter. This is the easiest way to retrieve records; in general, NSFetchRequest is very flexible and provides ample opportunities to extract data under certain conditions. We will consider an example of filtering and sorting data with its help in the next part of the article.
Important note: the managedObjectContext.executeFetchRequest function always returns an array of objects, even if there is only one object — an array will be returned, if there are no objects at all, an empty array.
In view of the above, we will have the following function text:
Console output:
As soon as you receive an object, in the listing above, it is the result variable inside the loop, then you can edit it arbitrarily (there are no differences from setting attributes for a new object), or delete it. Deletion is performed by calling the corresponding method of the context variable, to which the deleted object is passed as a parameter
After deletion, it is also necessary to force the saving of the context, do not forget about it.
The Key-Value method is good because it is simple, versatile and works out of the box. But there are two points that spoil the impression: first, the code is more than we would like, and secondly, passing the name of the props each time as a string, it is easy to make a mistake (there is no auto-completion). And how can we be if we want a bit more functionality from managed objects, for example, calculated fields or our own constructors? Core Data has a solution! We can easily create our own class (even more - Core Data will do it for us), inheriting it from NSManagedObject and adding everything we need. As a result, we will be able to work with managed objects as with an ordinary OOP object, creating it by calling its constructor and accessing its fields “through the point” using auto-completion (that is, all the power of the OOP is in your hands).
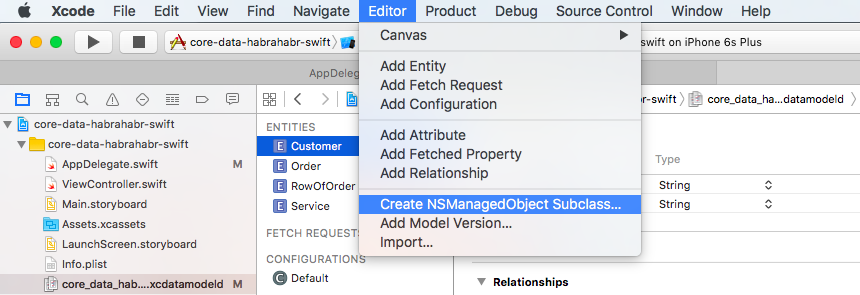
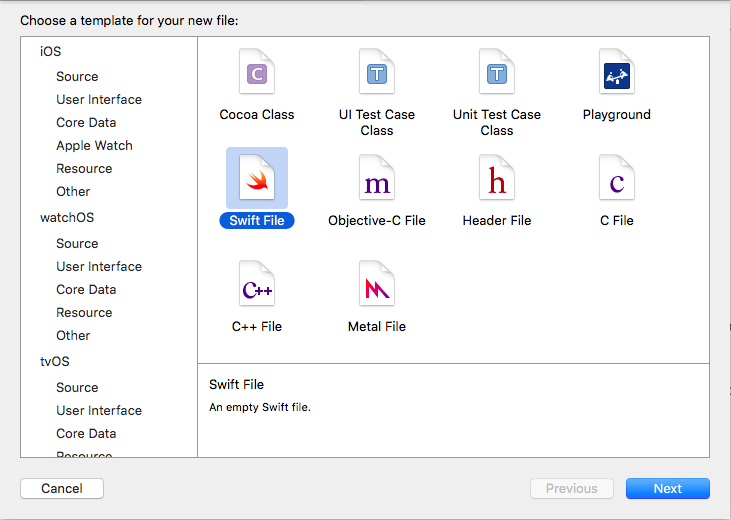
Open the Data Model Editor and select any entity. Select in the menu (it is context-sensitive, so you need to select an entity) Editor \ Create NSManagedObject Subclass ...
The data model selection window will open; Yes, in general, there may be several independent data models, but we have one, so the choice is obvious.

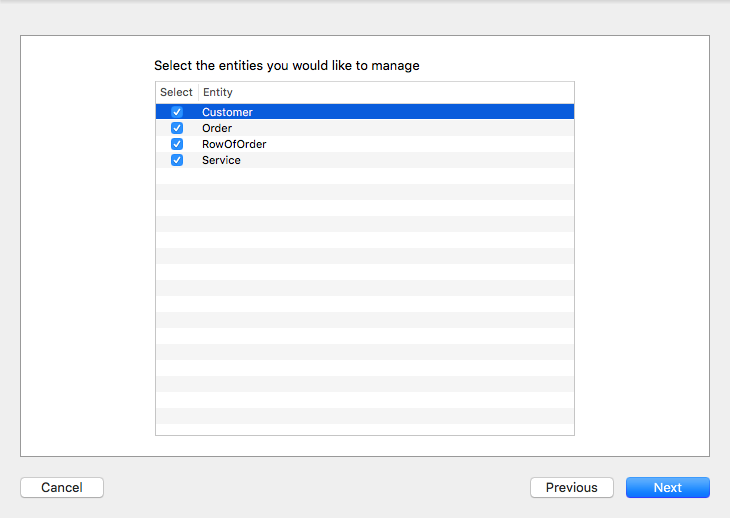
In the next window, we are offered to choose entities for which we need to generate classes, let's select everything at once.
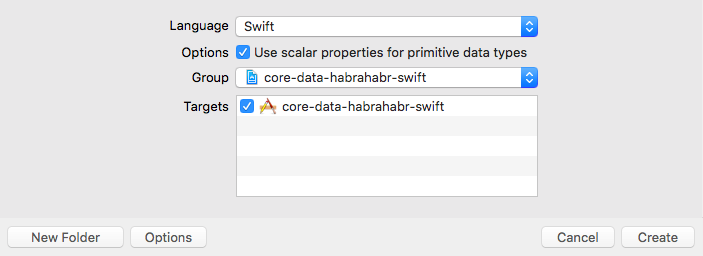
The following standard window should be familiar to you, the only thing that can be alerted here is the option "Use scalar properties for primitive data types" . What is the meaning of this option: if this option is not selected, then instead of primitive data types (Float, Double, Int, etc.) a kind of “wrapper” will be used, containing the value inside it. This is more relevant for Objective-C , since there is no such thing as Optional . But we use Swift , so I see no reason not to choose this option (perhaps more experienced colleagues in the comments will correct me).
As a result, Core Data will create several files for us, let's see what these files are.
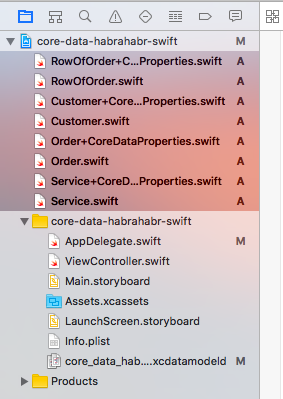
Each entity is represented by a pair of files, for example:
Also, if for some reason you decide to change the data model, then you can re-create these generated classes. In this case, the first file (
Well, we have created classes for our entities, now we can access the “through point” class fields, let's give our example a more familiar look.
So much better. But the creation of the object looks a bit heavy. It would be possible to hide all this in the constructor, but for this we need a reference to the managed context in which the object should be created. By the way, we are still writing code in the delegate module, since this is where we define the Core Data Stack. Maybe you can think of something better?
The most common practice when working with Core Data is to use the Singleton pattern based on the Core Data Stack. Let me remind you if someone does not know or has forgotten that Singleton guarantees the presence of only one instance of a class with a global access point. That is, a class always has one and only one object, regardless of who, when and where it is accessed. We will now implement this approach; we will have a Singleton for global access and management of the Core Data Stack.
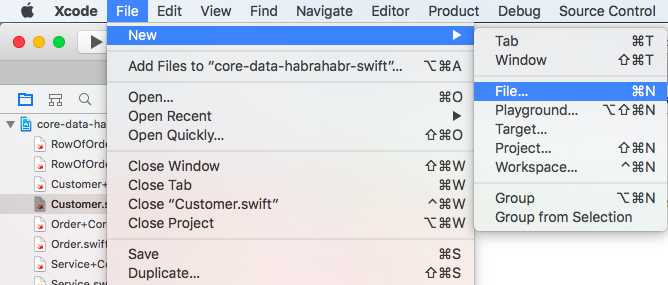
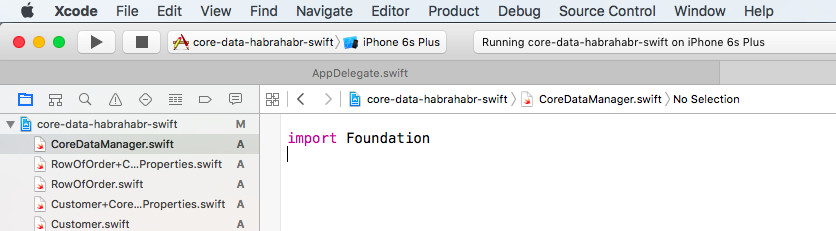
Create a new empty file named CoreDataManager.swift
First, let's add the Core Data import directive and create Singleton itself.
Now, let's move all the functions and definitions associated with Core Data from the application delegate module.
Now we have a Singleton and we can access the Core Data Stack from anywhere in our application. For example, accessing a managed context would look like this:
Let's now transfer everything needed to create a managed object into its constructor.
Let's go back to the application delegate module and make a few changes. Firstly, the creation of a managed object is simplified here to one line (calling a new constructor of our class), and secondly, such a link to the managed context
need to replace the next
Now the code will look quite familiar, and work with managed objects will differ little from ordinary OOP objects.
Not bad, is it? All we have to do is create similar constructors for the rest of our entities. But first, let's make another improvement in order to reduce the amount of code - we move the function that returns the entity description to
Let's go back to the
Now let's go back to the
Now everything is exactly, duplication of the code is minimized. Let's create similar constructors for other entities. I will give only one for an example, it is simple and should not cause any difficulties (absolutely everything is the same, except for the name of the entity).
Note that the CoreDataManager that we created is fairly versatile, in the sense that it can be used in any application based on Core Data. The only thing that connects it with our project is the name of the data model file. Nothing else. That is, having written this module once, you can use it constantly in different projects.
In the next, final part , we will work a lot with the
This project is on github
In the first part, we introduced general information about Core Data, the main components (NSManagedObjectModel, NSPersistentStoreCoordinator, NSManagedObjectContext), the Data Model Editor, and created our data model.
In this part we will work with objects, get acquainted with NSEntityDescription and NSManagedObject, autogeneration of classes, and also write an auxiliary class that significantly improves the usability of working with Core Data.
')
NSEntityDescription and NSManagedObject
Let's start with NSEntityDescription - as the name suggests, this is an object that contains a description of our entity. Everything that we have imagined with an entity in the Data Model Editor (attributes, relationships, deletion rules, etc.) is contained in this object. The only thing we will do with it is to receive it and pass it somewhere as a parameter, nothing else.
NSManagedObject is the managed object itself, an entity instance. Continuing the analogy with the DBMS (started in the last article), we can say that NSManagedObject is a record (row) in a database table.
To understand how to work with this, let's create a new customer. Since we do not yet have a ready-made interface part (we will deal with this in the next article), then let's program a little directly in the application delegate module (
AppDelegate.swift ). Do not worry, this is only a demonstration that is important for understanding, a little later we will move everything from here to another place. I will use to demonstrate the following function: func application(application: UIApplication, didFinishLaunchingWithOptions launchOptions: [NSObject: AnyObject]?) -> Bool { // // … return true } Creating a managed object (in this case, the Customer) is as follows:
func application(application: UIApplication, didFinishLaunchingWithOptions launchOptions: [NSObject: AnyObject]?) -> Bool { // let entityDescription = NSEntityDescription.entityForName("Customer", inManagedObjectContext: self.managedObjectContext) // let managedObject = NSManagedObject(entity: entityDescription!, insertIntoManagedObjectContext: self.managedObjectContext) return true } First we get a description of the entity ( entityDescription ) by passing to the appropriate constructor a string with the name of the entity we need and a link to the context. How it works: the managed object context, as we remember from the first part, is associated with the coordinator of the persistent storage, and the coordinator, in turn, is associated with the object data model, where the entity will be searched by the specified name. Note that this function returns an optional value.
Then, based on the obtained description of the entity, we create the managed object itself ( managedObject ). The second parameter is the context in which this object should be created (in general, as you remember, there can be several contexts).
Well, we created an object, how do we set its attribute values now? For this, the Key-Value coding is used, the essence of which is that there are two universal methods, one that sets the specified value by the specified name, and the second retrieves the value by the specified name. It sounds much harder than it looks.
func application(application: UIApplication, didFinishLaunchingWithOptions launchOptions: [NSObject: AnyObject]?) -> Bool { // let entityDescription = NSEntityDescription.entityForName("Customer", inManagedObjectContext: self.managedObjectContext) // let managedObject = NSManagedObject(entity: entityDescription!, insertIntoManagedObjectContext: self.managedObjectContext) // managedObject.setValue(" «»", forKey: "name") // let name = managedObject.valueForKey("name") print("name = \(name)") return true } Console output:
name = Optional( «») As you can see, everything is quite simple. Go ahead. Now we need to save this object in our database. Is the fact that we created an object is not enough? No, any object “lives” in a particular specific context and only there . You can create, modify and even delete it there, but this will all happen within a specific context. Unless you explicitly save all changes to the context, you will not change the real data. You can draw an analogy with the file on the disk that you open for editing - until you clicked the "Save" button, no changes are recorded. In fact, it is very convenient and great optimizes the whole process of working with data.
Saving context changes is done elementarily:
managedObjectContext.save() We even have a ready-made function in the delegate module for more "smart" saving (we talked about it in passing in the last article), the recording occurs only if the data is really changed:
func saveContext () { if managedObjectContext.hasChanges { do { try managedObjectContext.save() } catch { let nserror = error as NSError NSLog("Unresolved error \(nserror), \(nserror.userInfo)") abort() } } } Thus, all the code for creating and writing an object will look like this:
func application(application: UIApplication, didFinishLaunchingWithOptions launchOptions: [NSObject: AnyObject]?) -> Bool { // let entityDescription = NSEntityDescription.entityForName("Customer", inManagedObjectContext: self.managedObjectContext) // let managedObject = NSManagedObject(entity: entityDescription!, insertIntoManagedObjectContext: self.managedObjectContext) // managedObject.setValue(" «»", forKey: "name") // let name = managedObject.valueForKey("name") print("name = \(name)") // self.saveContext() return true } We created an object and wrote it into our database. How do we get it back now? It is not much more complicated. Let's take a look at the code.
let fetchRequest = NSFetchRequest(entityName: "Customer") do { let results = try self.managedObjectContext.executeFetchRequest(fetchRequest) } catch { print(error) } Here we create an object request NSFetchRequest , passing in the constructor as a parameter the name of the entity the data of which we want to receive. Then we call the context method, passing this request as a parameter. This is the easiest way to retrieve records; in general, NSFetchRequest is very flexible and provides ample opportunities to extract data under certain conditions. We will consider an example of filtering and sorting data with its help in the next part of the article.
Important note: the managedObjectContext.executeFetchRequest function always returns an array of objects, even if there is only one object — an array will be returned, if there are no objects at all, an empty array.
In view of the above, we will have the following function text:
func application(application: UIApplication, didFinishLaunchingWithOptions launchOptions: [NSObject: AnyObject]?) -> Bool { // let entityDescription = NSEntityDescription.entityForName("Customer", inManagedObjectContext: self.managedObjectContext) // let managedObject = NSManagedObject(entity: entityDescription!, insertIntoManagedObjectContext: self.managedObjectContext) // managedObject.setValue(" «»", forKey: "name") // let name = managedObject.valueForKey("name") print("name = \(name)") // self.saveContext() // let fetchRequest = NSFetchRequest(entityName: "Customer") do { let results = try self.managedObjectContext.executeFetchRequest(fetchRequest) for result in results as! [NSManagedObject] { print("name - \(result.valueForKey("name")!)") } } catch { print(error) } return true } Console output:
name = Optional( «») name - «» name - «» As soon as you receive an object, in the listing above, it is the result variable inside the loop, then you can edit it arbitrarily (there are no differences from setting attributes for a new object), or delete it. Deletion is performed by calling the corresponding method of the context variable, to which the deleted object is passed as a parameter
self.managedObjectContext.deleteObject(result) After deletion, it is also necessary to force the saving of the context, do not forget about it.
Small optional supplement
If you want to “touch” Core Data closer, at the table level, then this is easier than it might seem. If you are using Simulator, then the database file is somewhere here:
Do not rush to look for this file manually, wondering what is the ID of your application. There is a wonderful utility that does it all for you - SimSim (I take this opportunity to thank the authors).
After launch, it hangs in the menu bar and looks like this (bat icon):

Actually, the purpose is obvious: the utility shows a list of the repositories installed on the simulator of applications and allows you to go directly to them:

To view the SQLite file itself, you can use any free browser, for example, Datum Free
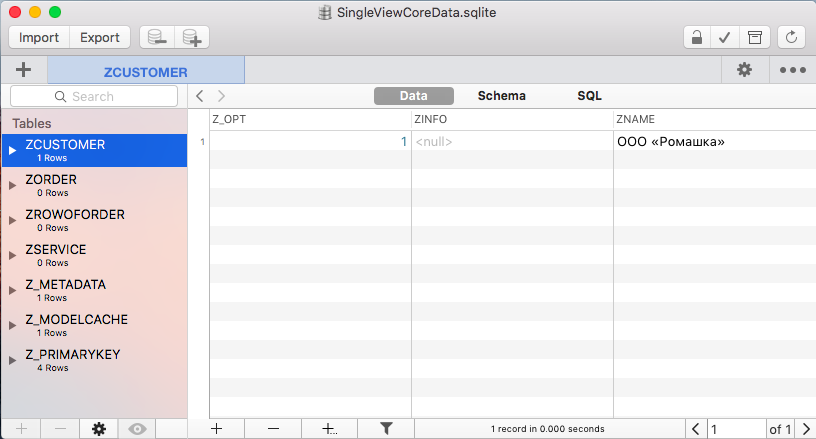
/Users/<USER>/Library/Developer/CoreSimulator/Devices/<DEVICE_ID>/data/Containers/Data/Application/<APPLICATION_ID>/Documents/<FileName>.sqlite Do not rush to look for this file manually, wondering what is the ID of your application. There is a wonderful utility that does it all for you - SimSim (I take this opportunity to thank the authors).
After launch, it hangs in the menu bar and looks like this (bat icon):
Actually, the purpose is obvious: the utility shows a list of the repositories installed on the simulator of applications and allows you to go directly to them:
To view the SQLite file itself, you can use any free browser, for example, Datum Free
Auto Generation Core Data Classes
The Key-Value method is good because it is simple, versatile and works out of the box. But there are two points that spoil the impression: first, the code is more than we would like, and secondly, passing the name of the props each time as a string, it is easy to make a mistake (there is no auto-completion). And how can we be if we want a bit more functionality from managed objects, for example, calculated fields or our own constructors? Core Data has a solution! We can easily create our own class (even more - Core Data will do it for us), inheriting it from NSManagedObject and adding everything we need. As a result, we will be able to work with managed objects as with an ordinary OOP object, creating it by calling its constructor and accessing its fields “through the point” using auto-completion (that is, all the power of the OOP is in your hands).
Open the Data Model Editor and select any entity. Select in the menu (it is context-sensitive, so you need to select an entity) Editor \ Create NSManagedObject Subclass ...
The data model selection window will open; Yes, in general, there may be several independent data models, but we have one, so the choice is obvious.
In the next window, we are offered to choose entities for which we need to generate classes, let's select everything at once.
The following standard window should be familiar to you, the only thing that can be alerted here is the option "Use scalar properties for primitive data types" . What is the meaning of this option: if this option is not selected, then instead of primitive data types (Float, Double, Int, etc.) a kind of “wrapper” will be used, containing the value inside it. This is more relevant for Objective-C , since there is no such thing as Optional . But we use Swift , so I see no reason not to choose this option (perhaps more experienced colleagues in the comments will correct me).
As a result, Core Data will create several files for us, let's see what these files are.
Each entity is represented by a pair of files, for example:
Customer.swift- this file is for you, you can add any functionality you need there, which we will now do.Customer+CoreDataProperties.swiftis a Core Data file, it’s better not to touch it and here’s why: this file contains a description of the attributes and relationships of your entity, that is, if you make changes to this part, then you have the entity and its representing class not will be agreed.
Also, if for some reason you decide to change the data model, then you can re-create these generated classes. In this case, the first file (
Customer.swift ) will remain untouched, and the second ( Customer+CoreDataProperties.swift ) will be completely replaced by a new one.Well, we have created classes for our entities, now we can access the “through point” class fields, let's give our example a more familiar look.
func application(application: UIApplication, didFinishLaunchingWithOptions launchOptions: [NSObject: AnyObject]?) -> Bool { // let entityDescription = NSEntityDescription.entityForName("Customer", inManagedObjectContext: self.managedObjectContext) // let managedObject = Customer(entity: entityDescription!, insertIntoManagedObjectContext: self.managedObjectContext) // managedObject.name = " «»" // let name = managedObject.name print("name = \(name)") // self.saveContext() // let fetchRequest = NSFetchRequest(entityName: "Customer") do { let results = try self.managedObjectContext.executeFetchRequest(fetchRequest) for result in results as! [Customer] { print("name - \(result.name!)") } } catch { print(error) } return true } So much better. But the creation of the object looks a bit heavy. It would be possible to hide all this in the constructor, but for this we need a reference to the managed context in which the object should be created. By the way, we are still writing code in the delegate module, since this is where we define the Core Data Stack. Maybe you can think of something better?
Core data manager
The most common practice when working with Core Data is to use the Singleton pattern based on the Core Data Stack. Let me remind you if someone does not know or has forgotten that Singleton guarantees the presence of only one instance of a class with a global access point. That is, a class always has one and only one object, regardless of who, when and where it is accessed. We will now implement this approach; we will have a Singleton for global access and management of the Core Data Stack.
Create a new empty file named CoreDataManager.swift
First, let's add the Core Data import directive and create Singleton itself.
import CoreData import Foundation class CoreDataManager { // Singleton static let instance = CoreDataManager() private init() {} } Now, let's move all the functions and definitions associated with Core Data from the application delegate module.
import CoreData import Foundation class CoreDataManager { // Singleton static let instance = CoreDataManager() private init() {} // MARK: - Core Data stack lazy var applicationDocumentsDirectory: NSURL = { let urls = NSFileManager.defaultManager().URLsForDirectory(.DocumentDirectory, inDomains: .UserDomainMask) return urls[urls.count-1] }() lazy var managedObjectModel: NSManagedObjectModel = { let modelURL = NSBundle.mainBundle().URLForResource("core_data_habrahabr_swift", withExtension: "momd")! return NSManagedObjectModel(contentsOfURL: modelURL)! }() lazy var persistentStoreCoordinator: NSPersistentStoreCoordinator = { let coordinator = NSPersistentStoreCoordinator(managedObjectModel: self.managedObjectModel) let url = self.applicationDocumentsDirectory.URLByAppendingPathComponent("SingleViewCoreData.sqlite") var failureReason = "There was an error creating or loading the application's saved data." do { try coordinator.addPersistentStoreWithType(NSSQLiteStoreType, configuration: nil, URL: url, options: nil) } catch { var dict = [String: AnyObject]() dict[NSLocalizedDescriptionKey] = "Failed to initialize the application's saved data" dict[NSLocalizedFailureReasonErrorKey] = failureReason dict[NSUnderlyingErrorKey] = error as NSError let wrappedError = NSError(domain: "YOUR_ERROR_DOMAIN", code: 9999, userInfo: dict) NSLog("Unresolved error \(wrappedError), \(wrappedError.userInfo)") abort() } return coordinator }() lazy var managedObjectContext: NSManagedObjectContext = { let coordinator = self.persistentStoreCoordinator var managedObjectContext = NSManagedObjectContext(concurrencyType: .MainQueueConcurrencyType) managedObjectContext.persistentStoreCoordinator = coordinator return managedObjectContext }() // MARK: - Core Data Saving support func saveContext () { if managedObjectContext.hasChanges { do { try managedObjectContext.save() } catch { let nserror = error as NSError NSLog("Unresolved error \(nserror), \(nserror.userInfo)") abort() } } } } Now we have a Singleton and we can access the Core Data Stack from anywhere in our application. For example, accessing a managed context would look like this:
CoreDataManager.instance.managedObjectContext Let's now transfer everything needed to create a managed object into its constructor.
// Customer.swift // core-data-habrahabr-swift import Foundation import CoreData class Customer: NSManagedObject { convenience init() { // let entity = NSEntityDescription.entityForName("Customer", inManagedObjectContext: CoreDataManager.instance.managedObjectContext) // self.init(entity: entity!, insertIntoManagedObjectContext: CoreDataManager.instance.managedObjectContext) } } Let's go back to the application delegate module and make a few changes. Firstly, the creation of a managed object is simplified here to one line (calling a new constructor of our class), and secondly, such a link to the managed context
self.managedObjectContext need to replace the next
CoreDataManager.instance.managedObjectContext Now the code will look quite familiar, and work with managed objects will differ little from ordinary OOP objects.
func application(application: UIApplication, didFinishLaunchingWithOptions launchOptions: [NSObject: AnyObject]?) -> Bool { // let managedObject = Customer() // managedObject.name = " «»" // let name = managedObject.name print("name = \(name)") // CoreDataManager.instance.saveContext() // let fetchRequest = NSFetchRequest(entityName: "Customer") do { let results = try CoreDataManager.instance.managedObjectContext.executeFetchRequest(fetchRequest) for result in results as! [Customer] { print("name - \(result.name!)") } } catch { print(error) } return true } Not bad, is it? All we have to do is create similar constructors for the rest of our entities. But first, let's make another improvement in order to reduce the amount of code - we move the function that returns the entity description to
CoreDataManager .Let's go back to the
CoreDataManager.swift module and add the entityForName function. import CoreData import Foundation class CoreDataManager { // Singleton static let instance = CoreDataManager() private init() {} // Entity for Name func entityForName(entityName: String) -> NSEntityDescription { return NSEntityDescription.entityForName(entityName, inManagedObjectContext: self.managedObjectContext)! } Now let's go back to the
Customer.swift module and change the code in the following way. import Foundation import CoreData class Customer: NSManagedObject { convenience init() { self.init(entity: CoreDataManager.instance.entityForName("Customer"), insertIntoManagedObjectContext: CoreDataManager.instance.managedObjectContext) } } Now everything is exactly, duplication of the code is minimized. Let's create similar constructors for other entities. I will give only one for an example, it is simple and should not cause any difficulties (absolutely everything is the same, except for the name of the entity).
// Order.swift // core-data-habrahabr-swift import Foundation import CoreData class Order: NSManagedObject { convenience init() { self.init(entity: CoreDataManager.instance.entityForName("Order"), insertIntoManagedObjectContext: CoreDataManager.instance.managedObjectContext) } } Instead of conclusion
Note that the CoreDataManager that we created is fairly versatile, in the sense that it can be used in any application based on Core Data. The only thing that connects it with our project is the name of the data model file. Nothing else. That is, having written this module once, you can use it constantly in different projects.
In the next, final part , we will work a lot with the
Storyboard and the UITableViewController , become familiar with NSFetchedResultsController and once again recall NSFetchRequest .This project is on github
Source: https://habr.com/ru/post/303798/
All Articles