Node.js web scraping and bot protection
 This is the third article in the series on creating and using scripts for web scraping using Node.js:
- Web scraping with Node.js
- Web scraping on Node.js and problem sites
- Node.js web scraping and bot protection
- Web scraping updated data with Node.js
The first article dealt with the basic aspects of web-scraping, such as getting and parsing pages, recursive passage through links, and queuing queries. The second article dealt with the analysis of the site, working through Ajax, fine-tuning the request queue and handling some server errors.
The second article also touched upon the topic of session initialization, but it dealt with a very simple case, when it is enough to execute one additional request and save cookies.
This article deals with a more complicated case - initialization of sessions with authorization by login and password and with the overcoming of a rather sophisticated protection against bots. As usual, using the example of a real (and very popular among the scraper) tasks.
In most cases, protection from bots on the site is not directed against scrippers, but against such things as fraud, cheating or comment spam. However, it is always an extra reason to think about the legality and ethics of scrapping of this particular site. In this article, for example, a site was chosen, about which it is well known that its owners normally refer to scraping (although they prefer it to be performed through a special API). Simple rules: if the site has an open API, then its owners are happy with the scraper, and if the site is large and ultra-visited, the load from scraping around the API will not disturb it.
In past articles, the goal was to show the entire process of creating and using a script, from setting the task to obtaining the final result. In this article, most aspects of web scraping are bypassed, and instead, a variety of approaches to solving a single, rather narrow problem are shown. Various methods and tools, their pros and cons, subjective assessments, code examples, this is all.
Formulation of the problem
 This time the customer is another web scraper who needed the help of a colleague. He wants to get (for his customer) data from a well-known Amazon site. Some of the data he needs is given only to authorized users. Of course, the customer has an account on Amazon, but the problem is that this site is protected against automatic authorization. The customer needs a module on Node.js, which passes this protection. Naturally, we are talking about a tool to automatically authorize your account at your own risk, and not about hacking someone else's account, for example.
The customer has already performed an analysis of his part of the task. He made sure that the data he needed is available if one header and two cookies are set in the http request (or all, if it’s too lazy to separate these two from the authorized session). The header is always the same, and cookies can be easily obtained in the browser from the page of an authorized Amazon user (using DevTools or a similar tool). Cookies do not become outdated immediately, so that once you receive them, you can run quite a few authorized requests.
For example, this code should display an email address that is accessible only to authorized Amazon users:
var needle = require('needle'); var testURL = 'http://www.amazon.com/gp/profile/A14ZQ17DIPJ6UB/customer_email'; var cookies = { 'session-id': '111-2222222-3333333', // session-id 'ubid-main': '444-5555555-6666666', // ubid-main }; work(cookies); function work(cookies){ var options = { headers: { 'X-Requested-With': 'XMLHttpRequest' }, cookies: cookies }; needle.get(testURL, options, function(err, res){ if (err) throw err; console.log(res.body.data.email); }); } Accordingly, the customer needs a module that receives the login and password from the account as input, and at the output gives the necessary cookies. Something like that:
module.exports = function(email, password, work){ // magic work(cookies); } The customer will use this module in his own script for Amazon web scraping. It can even be screwed to its own scrapping framework. It doesn't matter to us.
Before proceeding to the analysis of the authorization interface on the Amazon site, it is worth noting one important point. The fact is that this site works with money. It is constantly attacked by intruders, and they are usually interested in not obtaining legal data to bypass the API, as our customer. Not surprisingly, the protective mechanisms of this site are constantly being improved. I still remember the times when automatic authorization on Amazon was carried out with one POST request. This was long before Node.js appeared (I was then scraping on Perl). Then there were gradually added such things as redirects, hidden form fields, one-time addresses and the like. On the network, you can still find examples of authorization on Amazon (using, for example, PHP Curl), which implements approximately the following algorithm:
- We get a page with a one-time link to the page with the login form;
- We save cookies (which are suitable for this one-time link);
- Parsim the page and get the desired link;
- Make a request for this link (using the saved cookies) and get the page;
- We save cookies (they are already different, yes);
- Parsim the page and get the values of all hidden login form fields;
- Add email and password fields;
- We imitate a POST request from the form (using the last saved cookies);
- We receive the answer with the code 302 and the address in the Location header;
- Save cookies (third option already)
- We get the page to the address from the Location (again using cookies)
- Finally, we get the cookies we need and use them for authorized requests.
Experienced scrippers may notice that this algorithm is simple. Such a task can force to work two hours where it is paid for one, but it is unlikely to break the deadline.
Unfortunately, this algorithm is outdated. Since he last worked, the protection against automatic authorization has changed at least twice on Amazon. Now, at the eighth step, before sending the form, the script changes its data, so the simple analysis of http-traffic and the creation of requests does not solve the problem. After these changes, the topic of automatic authorization on Amazon is gradually moving from amateur forums to professional freelancing exchanges.
It's hard to say when and how the protection of Amazon will change again, but you can definitely say that this will certainly happen. Therefore, when considering this task, a specific working code is less valuable than understanding the relevant approaches and tools.
Overview of Methods
All methods for solving such problems can be divided into three categories:
- Browser imitation: execution of requests based on data obtained by hacking methods, such as traffic analysis, reverse engineering of scripts, and so on.
- Automatic use of the browser. This includes control from the script with real browsers (for example, Chrome) through a special API (for example, using Selenium WD), as well as the use of headless browsers (for example, PhantomJS).
- Use the browser manually. This does not necessarily mean a complete abandonment of scrapping automation, but implies that the live operator will see real pages and perform real actions on them through the user interface.
The choice of these three points is not obvious and at least subjective. All three categories have their pros and cons, and each of them allows us to solve our problem, so we consider them in turn.
Browser imitation
Something similar is described in the two previous articles. To perform the scrapping we send the correct http requests to the server. “Correct” are those that would be sent by the browser if the scraping was done entirely by hand. To find out exactly what to send in each individual request, we analyze the headers of requests and responses in the browser, as well as look at the source pages. The task from this article is not fundamentally different from the two previous ones except for one thing: in this case, the concept of “page sources” also means connected scripts. We need to understand how much of the code adds data to requests, where this data comes from, and so on. Regular reverse engineering in relation to site scripts.
The main advantage of this approach is its versatility. If the protection is passed through a standard bundle from a person and a browser, then an algorithm for its passage can be found by reverse engineering. Theoretically, there are no exceptions to this rule. In the world of web scraping, there are problems that can be solved exclusively by reverse engineering.
The main disadvantage of this approach is its unlimited labor input. This is the way for the strong in spirit and not particularly limited in time. In real life, reverse engineering of a single complex website can take time, in which you can write scripts for scrapping thousands of “regular” websites. In theory, a protection manufacturer can spend as much time on it, and his qualification may require that an experienced and talented hacker engage in reverse engineering. Simply put, at a certain level of complexity, it becomes more profitable for the customer to hire a copy-clerk instead of a cool hacker. Or refuse the order altogether and do without this data.
It is worth noting that not every scraper has hacker skills at all or has a hacker team. Having met with the need to understand the scripts on the site, most refuse to order or choose a method from another category. Well, or hires another professional.
In the case when the protection algorithm is not viewed when analyzing traffic and HTML, it is worth starting with other approaches. If the algorithm may change unexpectedly at any time (like on Amazon), I recommend considering reverse engineering as the last thing to consider. Besides, it seems to me that if the Amazon security code, obtained by reverse engineering, is laid out, for example, on Habr, then you can write next to it that this code is outdated - this will quickly become true.
In this article, code examples will describe other methods.
Automatic use of the browser
This approach is popular with novice scrippers so much that they switch to it every time they encounter difficulties when analyzing a site. Hard Deadline Professionals also love this approach.
The main advantage of this approach is the simplicity of scripting protection, since there is no need to understand the site scripts - they will simply be executed in the browser and do the same thing as if the user did not run your code, but the user with the mouse and keyboard. Your code will resemble instructions for a close-up copy-clerk. It will be easy to read and edit when necessary.
The main disadvantage of this approach is that you run someone else’s code on your computer. This code may, for example, contain additional protection from very different types of automation, from detectors of headless browsers to intelligent analysis of user behavior. Of course, you can use, for example, a proxy server that replaces the script with the detector, but this will require the same reverse engineering, and then it’s not at all clear why bother with browsers.
(Note: an example of the technology for analyzing user behavior can be viewed on AreYouaHuman website, and you can learn more about headless browser detectors from the excellent presentation that kirill3333 has in the commentary to the article before.)
Another disadvantage of this approach is that browsers consume much more resources than regular scraper scripts. For scraping thousands (and even more so, millions) of pages is a bad idea. Our customer wants a module whose code will be executed once and send only a few requests, so we don’t have to worry about resources.
To automatically use the browser from a script on Node.JS there are many popular tools. Here I briefly go through the main ones (if I have forgotten someone for nothing, please tell me in the comments):
Selenium WD - the most famous and popular tool for automatic use of the browser. Does not need additional presentation. The network has a lot of examples and tips. Anyone who even thinks about scrapping professionally is worth trying Selenium WD.
Unfortunately, Selenium WD is not suitable for solving our problem. In order to work with it, you will need to install and configure Java, Selenium WD itself (Java application), browser, browser driver and module for accessing Selenium WD from the selected programming language (in our case, from Node.js). This is not the easiest way, given that our customer needs a simple Node.js module that works out of the box (well, in the extreme case, it requires something like ' npm install ').
PhantomJS is a WebKit -based headless browser. It runs the sites in a real browser, only does not show the user the pages, and instead of the user interface uses scripts in Javascript. The browser in PhantomJS is so complete that it even has a driver for Selenium WD and this bundle works fine.
From the point of view of our task, the main thing to know about PhantomJS is that even though it uses the same Javascript language as Node.js, it is NOT Node.js. It looks like, but not that. You cannot make a module on Node.js that directly uses PhantomJS. You can make a separate script on PhantomJS, and for it to make a module wrapper that will run a separate process and receive its data through stdout . In the simplest case, it looks like this:
var sys = require('sys'), exec = require('child_process').exec; module.exports = function(callback) { exec('phantomjs script.js', function(err, stdout){ callback(err === null ? stdout : false); }); }; In order not to bother with stdout and work through a convenient interface, it makes sense to use one of the ready (and carefully tested by someone) wrappers over PhantomJS.
SlimerJS - roughly speaking, this is the same PhantomJS, just not on WebKit, but on Gecko . In our case, it is important that SlimerJS is supported by fewer wrappers than PhantomJS.
CasperJS is the most famous Node.js wrapper over PhantomJS and SlimerJS. About why CasperJS is better than naked PhantomJS is well written, for example, in this article (in English). But in this article (also in English) you can see an example of authorization passing on Amazon using CasperJS. It is a working solution, but this is not the best option (estimate, at least, the amount of code in the example). I recommend instead of CasperJS to pay attention to the following list item:
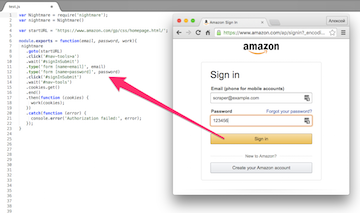
Horseman.js is a very good wrapper over PhantomJS. Ideal for writing modules like ours. Does not require any complicated installation and configuration steps. It is enough to add phantomjs-prebuilt and node-horseman to our dependencies in our module and that's it. Horseman.js interface is extremely concise, flexible and easy to read. This is how the working code of our module written using Horseman.js will look like:
var Horseman = require('node-horseman'); var horseman = new Horseman(); var startURL = 'https://www.amazon.com/gp/css/homepage.html/'; module.exports = function(email, password, work){ horseman .userAgent('Mozilla/5.0 (Macintosh; Intel Mac OS X 10_11_5) AppleWebKit/537.36 (KHTML, like Gecko) Chrome/51.0.2704.84 Safari/537.36') .open(startURL) .click('#nav-tools>a') .waitForNextPage() .type('form [name=email]', email) .type('form [name=password]', password) .click('#signInSubmit') .waitForNextPage() .cookies() .then((cookies)=>{ work(cookies); }) .close(); } This code can be read without looking at the documentation. And it works.
NW is another managed browser (formerly node-webkit). Allows you to control the Blink engine from scripts on Node.js. The main purpose is to create desktop applications using web technologies, but it can also work as headless. On NW, you can make full applications for scraping. For example, such as in this article from vmb . Tools like NW are especially good when the customer is afraid of the command line and wants a window with buttons. In our case, NW is not the best choice.
Electron is another tool for creating desktop applications based on web technologies. In fact, this is a young and promising competitor to NW and with its help you can also make scrapping applications with excellent indication. In addition, Electron can easily be used as a headless browser, but connecting it to our module is better not directly, but through a wrapper.
Nightmare is the most famous wrapper over Electron. Despite the name makes a very good impression. Designed so smoothly that some novice scrippers manage to use Nightmare without knowing anything about Electron. The interface is very similar to Horseman.js (and almost as good). This is how the working code of our module written using Nightmare will look like:
var Nightmare = require('nightmare'); var nightmare = Nightmare() var startURL = 'https://www.amazon.com/gp/css/homepage.html/'; module.exports = function(email, password, work){ nightmare .goto(startURL) .click('#nav-tools>a') .wait('#signInSubmit') .type('form [name=email]', email) .type('form [name=password]', password) .click('#signInSubmit') .wait('#nav-tools') .cookies.get() .end() .then(function (cookies) { work(cookies); }) .catch(function (error) { console.error('Authorization failed:', error); }); } In principle, everything is the same as in the case of Horseman.js. Under the hood, Electron instead of PhantomJS, but it does not catch the eye.
Chimera is a regular module for Node.js with a minimum of dependencies (in fact, only request ). It allows you to load the page, execute the script in its context and process its result in the context of Node.js. Among those who came to scraping from the frontend, there are lovers of this module, but in my opinion it is too minimalist. At least, if the customer rests and demands the module without the browser engine attached to it, then you can use not the Chimera, but the following option:
ZombieJS - this module is often positioned as an analogue of PhantomJS, which can be run directly from Node.js. ZombieJS does not use any browser engines, dispensing with such usual tools as request , jsdom or ws . Compared to Horseman.js, the ZombieJS code looks cumbersome, but after Chimera it is a sample of convenience and brevity:
var Browser = require('zombie'); var browser = new Browser(); var startURL = 'https://www.amazon.com/gp/css/homepage.html/'; module.exports = function(email, password, work){ browser.visit(startURL, function(){ browser.clickLink('#nav-tools>a', function() { browser.fill('email', email); browser.fill('password', password); browser.pressButton('#signInSubmit', function(){ var cookies = browser.saveCookies().split('\n'); var newCookies = {}; for (var i = 0; i < cookies.length; i++) { var cookie = cookies[i].split(';')[0].split('='); newCookies[cookie[0]] = cookie[1]; } browser.tabs.closeAll(); work(cookies); }); }); }); } The obvious disadvantages of ZombieJS include bad documentation. Previously, it was good, but then the developer has greatly changed it for the worse. I will not build conspiracy theories about why he did it, but here are a couple of links to you on which you can figure out ZombieJS: examples and API .
Interestingly, many sites perceive PhantomJS, Electron and ZombieJS differently, so that one tool is protected and the other is blocked. This is a serious reason to be ready to use any of these three tools. Although, of course, such complex cases are rare. With the Amazon site, for example, all three scripts work. Well ... while working.
Using the browser manually
It may seem that this paragraph is given here for fun, but it is not. There are situations when this approach is not only justified, but also optimal. For example, when you need to perform an operation that is difficult to automate once, and then many times automatically perform something simple. For example, log in to Amazon, and then scrap it for a long time.
The main disadvantage of this approach is the need for a live user for each script run. That is, you can't just start scrapping on cron , you need someone to look at the pages and do something with them.
The main advantage of this approach is the visibility of the process. The user sees what is happening on the page and will notice if something goes wrong. And maybe he can fix it. For example, if a site suddenly starts asking for a captcha (as Amazon does, if you strain it for a long time with automatic authorization).
The easiest way to manually add a browser to your script is to write instructions for the user. Clear text explaining, for example, how to take cookies from the browser and place them in the text of the script is the same program, but not for a computer, but for a person. Many programmers are able to write such programs well, and many customers are easy to make such a compromise to save time and money. Unfortunately, our customer needs a module that does not require user instructions.
Another way is to write your own browser, which will be launched only for authorization on Amazon, and then closed. For example, based on Electron. It is not so difficult to do. If in our script on Nightmare to make a small change, the script will show the pages with which it works. The user will see the script fill out the form fields and submit it. You just need to initialize Nightmare with an additional parameter. Like this:
var nightmare = Nightmare({ show: true }) For example, you can see that the site began to request a captcha, which is not so rare. Moreover, the user can enter the captcha directly in the Electron window and everything will work. Only the waiting time in the script is worth putting more, otherwise the user may not have time. In general, you can remove the automatic filling of form fields and provide it to the user. Then you can not store the password in the text of the script. Moreover, then it will be possible at different times to grab on behalf of different users.
On the other hand, Nightmare can be taught to recognize a captcha request and pass it using services such as Death by Captcha , but we have no such requirement in the task.
Conclusion
, - . , , , . , , . , , . , ( ), “” .
, , , . .
')
Source: https://habr.com/ru/post/303726/
All Articles