Experience in automating server REST API testing with Jmeter
This article focuses on the experience of automating the functional and load testing API protocol RTLSCP. The server part of the local positioning system RealTrac consists of a main (core) server that communicates with devices using the INCP (InterNanoCom Protocol) protocol and an application server (appserver). The application server communicates with external clients and the main server via RTLSCP (Real Track Location System Communication Protocol). Clients can also directly access the core server via RTLSCP.
RTLSCP implements the REST architecture and allows you to send data in JSON, KML and PNG formats in requests and responses. Moreover, communication over it can occur both over HTTP / HTTPS and WS / WSS (Websocket). This protocol provides an external client with extensive functionality:
It is important that the protocol from the side of the application server acquires additional client-specific functionality from project to project. How to test all this? Manually it turns out long and dreary, the tester would rather hate the whole world while going through all the commands of the RTLSCP API specification to more than 120 pages. Obviously, this process needs to be automated.
')
System testing is conducted under Linux. Initially we tried to write autotests “on the knee“. We tried several options. Generate queries with random data and send them to the input utility for load testing Siege . In this case, we get only load testing without the ability to analyze the content of the response from the server. Implement auto-tests in Python and simply send requests via urllib. It's all more fun with the analysis of the answer, but it turns out a cumbersome code that is difficult for a third person to delve into and modify for a long time.
The solution to all of our problems was the unexpectedly found Jmeter from Apache. Although at first glance its graphical interface causes fear among the average person, in fact this tool has helped to find a large number of bugs and save a lot of time on testing the RTLSCP API.

Fig. 1. Jmeter graphical interface.
In just a month, it was possible to cover with autotests almost all available RTLSCP commands. In the process of creating scripts, naturally, errors and inaccuracies were found and corrected both on the server side and in the protocol itself. Since the basic work in Jmeter does not require any special knowledge, it was surprisingly quick to introduce a new employee into test automation.
There are already a number of articles about the tool (you should pay attention to this one ) at habr, so we will not describe all its functions in detail. Let us dwell only on the most interesting moments that were remembered during the use of Jmeter.
Automation of the verification of the authorization service and access rights differentiation for different users went off with a bang. Without any difficulties in a few dozen clicks, it turned out to organize the creation of accounts and the assignment of access rights to random resources.
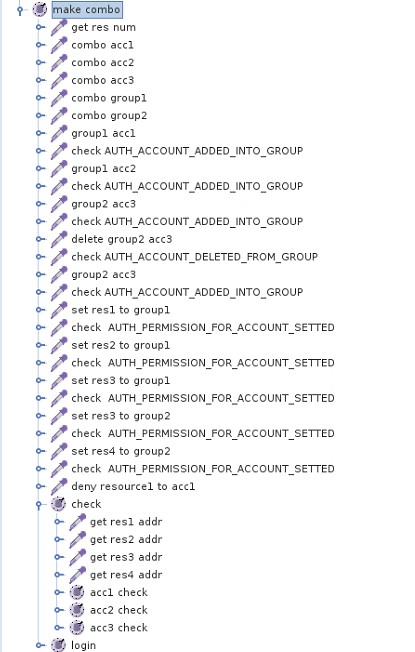
Fig. 2. This is how the implementation of checking account creation looks like.
Using the BeanShell PostProcessor (Post here means that the script is run after the request is executed) we process the response to the request of all resources available in the system. We get their number and generate random Id resources for the subsequent assignment of access rights to them to the created accounts. This is done with the following BeanShell code:
Then from the response to the request for information about the resource by its Id we get its URL using the Regular Expression Extractor :

Fig. 3. Use Regular Expression Extractor.
Everything is obvious here, the content of the response, cut by a regular expression, is placed in the variable res1Addr. At the end, we check all created accounts and their access rights to resources. By the way, the processing of cookies for authorization in Jmeter is implemented by simply adding the HTTP Cookie Manager element.
Elements of the type AUTH_ACCOUNT_ADDED_INTO_GROUP in figure 2 are needed to check that every user action performed on accounts has recorded a corresponding event in the event history (also obtained via RTLSCP).
During the development of autotests, the built-in random number generator was extremely useful. You can use this feature anywhere in Jmeter. Play the number in the specified range:
Or generate a string of a certain size and random content:
I liked that in Jmeter any action can be implemented both in the BeanShell code and using the built-in tools. For example, you can get the number of resources available in the system (above we do this via BeanShell PostProcessor) by implementing Regular Expression Extractor, which is in the Match No. field. you just need to specify -1. In this case, the variable {Reference Name} _matchNr is created, containing the number of strings found in the response for the regular expression. So, the answer to any request can be analyzed in the BeanShell code and set the status flags of the item:
The ability to comment on each element makes the autotest readable and allows you to refer to the ticket in the bug tracker, for example, Redmine:

Fig. 4. Commenting elements.
Disabling resource-intensive checks and adding a user autotest to the Thread Group in the Number of Treads (users) field turns our functional auto test into a load one. Now the project starts simultaneously from the specified number of threads and loads the server.

Fig. 5 Load testing.
The results of the AutoTest can be obtained in any convenient form, both viewed in the graphical shell through the View Results Tree , and log files with various settings:


Fig. 6 Getting results.
Also worth noting is the ability to send real-time results or any other information about the status of the autotest to various services (JDBC, JMS, Webservice). For example, on Graphite with the subsequent display in Grafana :

Fig. 7 Sending results.
Naturally, Jmeter has a number of negative properties. For example, it is not always convenient graphical interface and bugs in it. But in our situation, when it is urgent (and most importantly, free of charge) it is required to cover a large number of client-server communication functions via the protocol with automatic tests, Jmeter has proven to be an indispensable tool for the tester.
RTLSCP implements the REST architecture and allows you to send data in JSON, KML and PNG formats in requests and responses. Moreover, communication over it can occur both over HTTP / HTTPS and WS / WSS (Websocket). This protocol provides an external client with extensive functionality:
- obtaining various information about devices - location, status, status, etc .;
- sending control commands to the server — changing device settings, server settings, sending alerts to devices, loading a map, and so on;
- receiving reports on devices, system status from Quality of Service.
- many other useful features.
It is important that the protocol from the side of the application server acquires additional client-specific functionality from project to project. How to test all this? Manually it turns out long and dreary, the tester would rather hate the whole world while going through all the commands of the RTLSCP API specification to more than 120 pages. Obviously, this process needs to be automated.
')
System testing is conducted under Linux. Initially we tried to write autotests “on the knee“. We tried several options. Generate queries with random data and send them to the input utility for load testing Siege . In this case, we get only load testing without the ability to analyze the content of the response from the server. Implement auto-tests in Python and simply send requests via urllib. It's all more fun with the analysis of the answer, but it turns out a cumbersome code that is difficult for a third person to delve into and modify for a long time.
The solution to all of our problems was the unexpectedly found Jmeter from Apache. Although at first glance its graphical interface causes fear among the average person, in fact this tool has helped to find a large number of bugs and save a lot of time on testing the RTLSCP API.
Fig. 1. Jmeter graphical interface.
In just a month, it was possible to cover with autotests almost all available RTLSCP commands. In the process of creating scripts, naturally, errors and inaccuracies were found and corrected both on the server side and in the protocol itself. Since the basic work in Jmeter does not require any special knowledge, it was surprisingly quick to introduce a new employee into test automation.
There are already a number of articles about the tool (you should pay attention to this one ) at habr, so we will not describe all its functions in detail. Let us dwell only on the most interesting moments that were remembered during the use of Jmeter.
Automation of the verification of the authorization service and access rights differentiation for different users went off with a bang. Without any difficulties in a few dozen clicks, it turned out to organize the creation of accounts and the assignment of access rights to random resources.
Fig. 2. This is how the implementation of checking account creation looks like.
Using the BeanShell PostProcessor (Post here means that the script is run after the request is executed) we process the response to the request of all resources available in the system. We get their number and generate random Id resources for the subsequent assignment of access rights to them to the created accounts. This is done with the following BeanShell code:
import java.util.regex.*; import java.util.*; import java.util.Random; String response = prev.getResponseDataAsString(); Pattern pattern = Pattern.compile("id"); Matcher matcher = pattern.matcher(response); int count = 0; while (matcher.find()) count++; Random rd=new Random(); Set resSet = new HashSet(); while (resSet.size()<4) resSet.add(rd.nextInt(count)); int i=1; Iterator iterator = resSet.iterator(); while (iterator.hasNext()) { vars.put("resForCombo"+i,iterator.next().toString()); i++; } Then from the response to the request for information about the resource by its Id we get its URL using the Regular Expression Extractor :
Fig. 3. Use Regular Expression Extractor.
Everything is obvious here, the content of the response, cut by a regular expression, is placed in the variable res1Addr. At the end, we check all created accounts and their access rights to resources. By the way, the processing of cookies for authorization in Jmeter is implemented by simply adding the HTTP Cookie Manager element.
Elements of the type AUTH_ACCOUNT_ADDED_INTO_GROUP in figure 2 are needed to check that every user action performed on accounts has recorded a corresponding event in the event history (also obtained via RTLSCP).
During the development of autotests, the built-in random number generator was extremely useful. You can use this feature anywhere in Jmeter. Play the number in the specified range:
${__Random(300,180000)} Or generate a string of a certain size and random content:
${__RandomString(${__Random(3,30)},ABCDEFGHIJKLMNOPQRSTUVWXYZabcdefghijklmnopqrstuvwxyz0123456789,)} I liked that in Jmeter any action can be implemented both in the BeanShell code and using the built-in tools. For example, you can get the number of resources available in the system (above we do this via BeanShell PostProcessor) by implementing Regular Expression Extractor, which is in the Match No. field. you just need to specify -1. In this case, the variable {Reference Name} _matchNr is created, containing the number of strings found in the response for the regular expression. So, the answer to any request can be analyzed in the BeanShell code and set the status flags of the item:
//Get response response = prev.getResponseDataAsString(); //Check login if (!response.contains("\"login\":\"${ulogin_g1}\"")) { log.error("### login NOK!"); Failure= true; //Check timestamp } else if(!response.contains("\"create_ts\":${createTS_g1}")) { log.error("### create_ts NOK!"); Failure= true; The ability to comment on each element makes the autotest readable and allows you to refer to the ticket in the bug tracker, for example, Redmine:
Fig. 4. Commenting elements.
Disabling resource-intensive checks and adding a user autotest to the Thread Group in the Number of Treads (users) field turns our functional auto test into a load one. Now the project starts simultaneously from the specified number of threads and loads the server.
Fig. 5 Load testing.
The results of the AutoTest can be obtained in any convenient form, both viewed in the graphical shell through the View Results Tree , and log files with various settings:
Fig. 6 Getting results.
Also worth noting is the ability to send real-time results or any other information about the status of the autotest to various services (JDBC, JMS, Webservice). For example, on Graphite with the subsequent display in Grafana :
Fig. 7 Sending results.
Naturally, Jmeter has a number of negative properties. For example, it is not always convenient graphical interface and bugs in it. But in our situation, when it is urgent (and most importantly, free of charge) it is required to cover a large number of client-server communication functions via the protocol with automatic tests, Jmeter has proven to be an indispensable tool for the tester.
Source: https://habr.com/ru/post/303584/
All Articles