Core Data + Swift for the smallest: the minimum necessary (part 1)
About Core Data and Swift is not written as much as we would like, especially this concerns the Russian-speaking segment of the Internet. At the same time, most articles and examples use rather primitive data models to show only the very essence of Core Data, without going into details. With this article, I would like to fill this gap by showing a little more about Core Data on a practical example. Initially, I planned to fit all the material into one article, but in the process of writing it became clear that for one publication the volume is clearly too large, and since you cannot throw out the words from the song, I will still break this material into three parts.
Core Data is a powerful and flexible framework for storing and managing the graph of your model, which deservedly takes its place in the arsenal of any iOS developer. Surely you, at least, have heard about this framework, and more than once, and if for some reason you are not using it yet, then it's time to start doing it.
Since the bare theory, as a rule, is rather boring and poorly absorbed, we will consider the work with Core Data on a practical example, creating an application. Such common examples of working with Core Data as “To-do list” and the like, in my opinion, are not very suitable, since they use only one entity and do not use relationships, which is a significant simplification of work with this framework. In this article, we will develop an application where several entities and relationships between them will be used.
It is assumed that the reader is familiar with the basics of development for iOS: knows Storyboard and understands MVC, knows how to use basic controls. I myself switched to iOS recently, so perhaps there are errors in the article, inaccuracies or ignoring the best practices , please do not kick for this, it’s better to stick a argument with a nose than help me and other novice iOS developers. I will use Xcode 7.3.1 and iOS 9.3.2, but everything should work in other versions.
')
As mentioned above, Core Data is a framework for storing and managing the object graph of your data model. Of course, you can manage and, moreover, store data without Core Data, but with this framework it is much nicer and more convenient.
In my opinion, it is important to understand the main components and how Core Data works at once. That is, the learning curve assumes an entry threshold, slightly above average, so to speak. The core components of Core Data, which are always used, are the following:
Of course, Core Data is not limited only by these components (we will consider some others below), but these three form the basis of the framework and it is very important to understand their purpose and principle of operation.
Let's continue the consideration of Core Data by example.
Create a new project based on the Single View Application template and on the option selection page of the new project check the box “Use Core Data” .

When this box is checked, Xcode will add to the project an empty data model and a certain amount of program code for working with Core Data. Of course, you can start using Core Data already in an existing project: in this case, you need to create a data model yourself and write the corresponding program code.
By default, Xcode adds code to work with Core Data in the application delegate class (
Here are four variables, all of which are initialized using a closure. However, the first of these,
The following definition -
The logic of the program code is straightforward - we get a kind of file with the
Go ahead -
Here, the persistent storage coordinator is created based on the object-driven model. Then we determine exactly where the data should be stored. And finally, we connect the repository itself (
The last definition —
Here we create a new managed object context and assign it a link to our persistent storage coordinator, with which it will read and write the data we need. A noteworthy detail is the argument to the
We also have one helper function here for easy context preservation. Its meaning is obvious - data recording occurs only in the case, if they were really changed.
It is important to note here: all work with data (creation, modification, deletion) always occurs within a context . The actual write to the repository will be performed only when the context saving function is explicitly called .
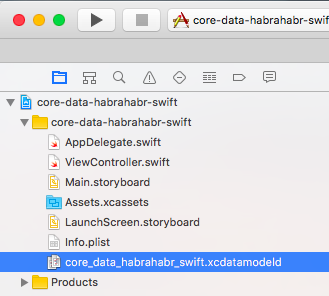
To create a data model using the built-in editor. Since we checked the box “Use Core Data” when creating a new project, we already have an empty data model, automatically creating Xcode. Let's open it and create a data model for our application.

We will create an application for recording orders from counterparties to perform certain services. This application will not be very difficult, but there will be several different entities that are closely related to each other. This will allow you to show various aspects and techniques for working with Core Data. So, we will have two directories: "Customers" and "Services" , and one document "Order" in which there can be several services.
Let's start with customers. In the model editor, add new entity data (button with “Add Entity” caption below) and name it
You can draw the following analogy with the DBMS:
Our
The next important part is the Data Model Inspector , you see it to the right of the data model editor. With it, you can set various attributes and parameters for entities, attributes of entities (forgive the tautology), relationships and other objects. For example, an entity can be noted as abstract, or you can set a parent entity for it (the principles are the same as in the OOP as a whole).
For an entity attribute, the list of available parameters varies depending on the type of attribute. For example, for numerical values, you can set a lower and / or upper limit, for a date, you can set a valid range. Also, for most types of values, you can set a default value.
An important attribute attribute is Optional . Its meaning is exactly the same as in the Swift software code: if the attribute is marked as Optional, its value may be absent, and vice versa, if there is no such mark, the entity will not be recorded. By default, all attributes are marked as optional. In our case, the
At this point, the creation of the

Go to the document "Order" - here everything is a little more complicated. Since we can have several different services in one document, and each service will have its own amount, we will have two documents to represent the document:
Do not worry if you did not understand anything from the last paragraph. Now we will do all this together in the data model editor and, at the end, we will look at the graphical representation of our model - after that everything should fall into place.
Let's start with the “header” of the document - we will create a new
Now go to Relationships . Add a new connection named
Note that the default relationships are also Optional . In addition, the following very important properties are present in the Attributes Inspector , which we will now consider in detail:
If you have worked with any databases, then this concept is probably familiar to you. Here we are offered a choice of two options: To One and To Many . To One - means that our Order is connected to one specific Customer, To Many - with several customers. In our case, you must leave the default value - To One .
A very important property, here you have to choose one of the possible behaviors of the entity at the moment when the connection is for some reason removed. The following options are possible:
Actually, what behavior to choose is determined solely by the logic of the program. Now we will not bother with this and leave the default value - Nullify , it suits us perfectly.
We have added the link between “Order” and “Customer”, but “Customer” does not know anything about the “Orders” in which he participates. Warning also warns us about this.
In order to fix this, it is necessary to create a reverse relationship with the entity "Customer" and indicate it as a reverse. It should be noted that the official documentation on Core Data strongly recommends making always reversible links - this is what we will do. Strictly speaking, you can not do this (after all, this is Warning, not Error), but you must clearly understand why and why you are doing this.
Let's fix this, create a new relationship for the
If you return to the
Let's now make the tabular part of our document. Add a new entity named
Now go back to the Order entity to create feedback. Add a new link named
It remains to add to the essence of RowOfOrder only the link with the essence of the Service . In view of the foregoing, this should not be difficult, all following the same scenario. Add a new relationship for the
Important note! After creating the data model, it cannot be changed - when the Core Data application is first launched, it creates storage in accordance with the data model, and in subsequent ones it checks the storage structure for compliance. If for any reason the storage structure does not correspond to the data model, then a critical runtime error occurs (that is, the application will be inoperative). What if there is a need to change the data model - for this you need to use the Core Data migration mechanism, this is a separate topic of increased complexity, and we will not consider it in this article. There is another option - you can simply remove the application from the device (or emulator), and when you start the application, Core Data will simply create a new storage with a new structure. Obviously, this method is appropriate only at the stage of application development.
To conclude this article, let's take a look at its graphical representation. To do this, switch the Editor Style of the data model editor (located below) to the Graph position.
You see the entities created by us with attributes and all their interrelations in the form of graphic structure. The line with the usual arrow on the end means the connection To One , with the double arrow - To Many . Graphic view is good to navigate in bulk models.
This is the first part, the next article will contain a lot of code, we will create the objects themselves, link them together, learn about
This project is on github
Instead of Introduction
Core Data is a powerful and flexible framework for storing and managing the graph of your model, which deservedly takes its place in the arsenal of any iOS developer. Surely you, at least, have heard about this framework, and more than once, and if for some reason you are not using it yet, then it's time to start doing it.
Since the bare theory, as a rule, is rather boring and poorly absorbed, we will consider the work with Core Data on a practical example, creating an application. Such common examples of working with Core Data as “To-do list” and the like, in my opinion, are not very suitable, since they use only one entity and do not use relationships, which is a significant simplification of work with this framework. In this article, we will develop an application where several entities and relationships between them will be used.
It is assumed that the reader is familiar with the basics of development for iOS: knows Storyboard and understands MVC, knows how to use basic controls. I myself switched to iOS recently, so perhaps there are errors in the article, inaccuracies or ignoring the best practices , please do not kick for this, it’s better to stick a argument with a nose than help me and other novice iOS developers. I will use Xcode 7.3.1 and iOS 9.3.2, but everything should work in other versions.
')
Core Data Overview
As mentioned above, Core Data is a framework for storing and managing the object graph of your data model. Of course, you can manage and, moreover, store data without Core Data, but with this framework it is much nicer and more convenient.
In my opinion, it is important to understand the main components and how Core Data works at once. That is, the learning curve assumes an entry threshold, slightly above average, so to speak. The core components of Core Data, which are always used, are the following:
- managed object model (managed object model) - in fact, this is your model (in the MVC paradigm), which contains all the entities, their attributes and relationships;
- managed object contexts ( managed object context) - used to manage collections of model objects (in general, there may be several contexts);
- persistent store coordinator — the intermediary between the data store and the context in which this data is used is responsible for storing and caching data
Of course, Core Data is not limited only by these components (we will consider some others below), but these three form the basis of the framework and it is very important to understand their purpose and principle of operation.
Let's continue the consideration of Core Data by example.
Create a new project based on the Single View Application template and on the option selection page of the new project check the box “Use Core Data” .
When this box is checked, Xcode will add to the project an empty data model and a certain amount of program code for working with Core Data. Of course, you can start using Core Data already in an existing project: in this case, you need to create a data model yourself and write the corresponding program code.
By default, Xcode adds code to work with Core Data in the application delegate class (
AppDelegate.swift ). Let's look at it in more detail, it starts with a comment: // MARK: - Core Data stack Here are four variables, all of which are initialized using a closure. However, the first of these,
applicationDocumentsDirectory is simply a helper method that returns a directory to store data. By default, this is a Document Directory , you can change it, but it is unlikely that you really need it. The implementation is simple and should not be difficult to understand. lazy var applicationDocumentsDirectory: NSURL = { let urls = NSFileManager.defaultManager().URLsForDirectory(.DocumentDirectory, inDomains: .UserDomainMask) return urls[urls.count-1] }() The following definition -
managedObjectModel - is more interesting, since it is directly related to Core Data: lazy var managedObjectModel: NSManagedObjectModel = { let modelURL = NSBundle.mainBundle().URLForResource("core_data_habrahabr_swift", withExtension: "momd")! return NSManagedObjectModel(contentsOfURL: modelURL)! }() The logic of the program code is straightforward - we get a kind of file with the
momd extension from the application assembly and create its object data model based on it. It remains to find out what kind of file it is. Look at the files in the Project Navigator (Project navigator) , there you will find the file with the xdatamodel extension - this is our Core Data data model (we will look at how to work with it a little later), which when compiling the project is included in the application build file with the momd extension.Go ahead -
persistentStoreCoordinator is the most voluminous definition, but, despite the somewhat intimidating look, you shouldn’t be afraid of it — exception handling takes up most of the code: lazy var persistentStoreCoordinator: NSPersistentStoreCoordinator = { let coordinator = NSPersistentStoreCoordinator(managedObjectModel: self.managedObjectModel) let url = self.applicationDocumentsDirectory.URLByAppendingPathComponent("SingleViewCoreData.sqlite") var failureReason = "There was an error creating or loading the application's saved data." do { try coordinator.addPersistentStoreWithType(NSSQLiteStoreType, configuration: nil, URL: url, options: nil) } catch { var dict = [String: AnyObject]() dict[NSLocalizedDescriptionKey] = "Failed to initialize the application's saved data" dict[NSLocalizedFailureReasonErrorKey] = failureReason dict[NSUnderlyingErrorKey] = error as NSError let wrappedError = NSError(domain: "YOUR_ERROR_DOMAIN", code: 9999, userInfo: dict) NSLog("Unresolved error \(wrappedError), \(wrappedError.userInfo)") abort() } return coordinator }() Here, the persistent storage coordinator is created based on the object-driven model. Then we determine exactly where the data should be stored. And finally, we connect the repository itself (
coordinator.addPersistentStoreWithType ), passing the repository type and location to the corresponding method. The default is SQLite . In the other two parameters, additional parameters and options can be passed, but at this stage we don’t need it, so we simply pass nil .The last definition —
managedObjectContext — is sure there will be no problems with it: lazy var managedObjectContext: NSManagedObjectContext = { let coordinator = self.persistentStoreCoordinator var managedObjectContext = NSManagedObjectContext(concurrencyType: .MainQueueConcurrencyType) managedObjectContext.persistentStoreCoordinator = coordinator return managedObjectContext }() Here we create a new managed object context and assign it a link to our persistent storage coordinator, with which it will read and write the data we need. A noteworthy detail is the argument to the
NSManagedObjectContext constructor. In general, there may be several working contexts performed in different threads (for example, one for interactive work, the other for background data loading). Passing the MainQueueConcurrencyType as an argument, we indicate that this context should be created in the main thread.We also have one helper function here for easy context preservation. Its meaning is obvious - data recording occurs only in the case, if they were really changed.
func saveContext () { if managedObjectContext.hasChanges { do { try managedObjectContext.save() } catch { let nserror = error as NSError NSLog("Unresolved error \(nserror), \(nserror.userInfo)") abort() } } } It is important to note here: all work with data (creation, modification, deletion) always occurs within a context . The actual write to the repository will be performed only when the context saving function is explicitly called .
Creating a data model
To create a data model using the built-in editor. Since we checked the box “Use Core Data” when creating a new project, we already have an empty data model, automatically creating Xcode. Let's open it and create a data model for our application.
We will create an application for recording orders from counterparties to perform certain services. This application will not be very difficult, but there will be several different entities that are closely related to each other. This will allow you to show various aspects and techniques for working with Core Data. So, we will have two directories: "Customers" and "Services" , and one document "Order" in which there can be several services.
Lyrical digression
The terms "Reference" and "Document" I took from the terminology "1C: Enterprise", because this system very much reminds me of Core Data. Similar logic for constructing entities (reference books / documents), similar attribute parameters, encapsulating data read / write operations, caching, and much more. I would say that “1C: Enterprise” is the next level of abstraction of working with data in relation to Core Data.
Okay, let's write our “1C: Enterprise”with blackjack and with a normal design!
Okay, let's write our “1C: Enterprise”
Creating directories
Let's start with customers. In the model editor, add new entity data (button with “Add Entity” caption below) and name it
«Customer» . This entity will personify the Customer (one). An entity can have attributes, relationships, and received properties (fetch properties). Having a little simplified, we can say that the difference between attributes and relationships in the type of possible values: attributes only support simple data types (string, number, date, etc.), relationships are a link to another entity (we'll talk more about relationships in a few minutes) Fetch properties are analogous to computed properties, that is, the value is calculated dynamically (and cached) based on a predefined query.You can draw the following analogy with the DBMS:
- data model - database schemas
- entity - database table
- attributes and relationships - table fields
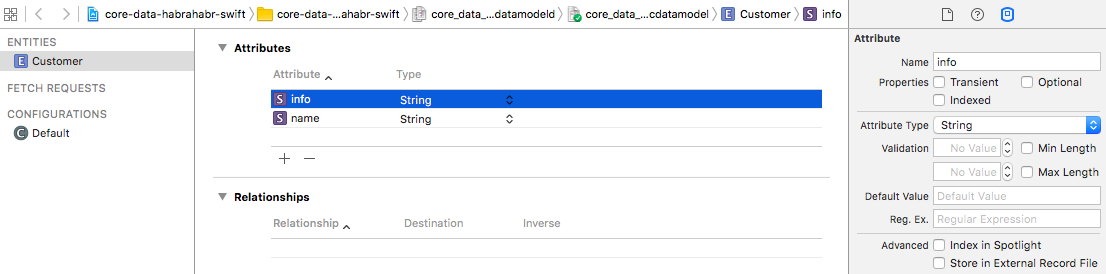
Our
«Customer» entity will have two attributes: “Name” ( name ) and “Add. information »( info ) . Let's add them and set them to the type of the String value. Note that in the data model editor there are certain requirements for naming objects - the name of an entity must necessarily begin with a capital letter, and the name of the attribute and the relationship - with a small one.The next important part is the Data Model Inspector , you see it to the right of the data model editor. With it, you can set various attributes and parameters for entities, attributes of entities (forgive the tautology), relationships and other objects. For example, an entity can be noted as abstract, or you can set a parent entity for it (the principles are the same as in the OOP as a whole).
For an entity attribute, the list of available parameters varies depending on the type of attribute. For example, for numerical values, you can set a lower and / or upper limit, for a date, you can set a valid range. Also, for most types of values, you can set a default value.
An important attribute attribute is Optional . Its meaning is exactly the same as in the Swift software code: if the attribute is marked as Optional, its value may be absent, and vice versa, if there is no such mark, the entity will not be recorded. By default, all attributes are marked as optional. In our case, the
name attribute should not be optional (the Optional flag must be unchecked), since the Customer without a name is deprived of any practical meaning.At this point, the creation of the
Customer entity can be considered complete. Let's create and configure the following entity - Services . Create a new entity - Services and add two attributes: name (service name) and info (additional information). The data type in both cases is String , the name attribute must not be optional. In general, everything is the same as with the previous entity, no problems should arise here.Creating an Order Document
Go to the document "Order" - here everything is a little more complicated. Since we can have several different services in one document, and each service will have its own amount, we will have two documents to represent the document:
- "Header" of the document , which will contain the date of the document, the customer and a link to the tabular part
- a line of the table part of the document where the Service and its cost will be contained, as well as a link to the document “header”.
Do not worry if you did not understand anything from the last paragraph. Now we will do all this together in the data model editor and, at the end, we will look at the graphical representation of our model - after that everything should fall into place.
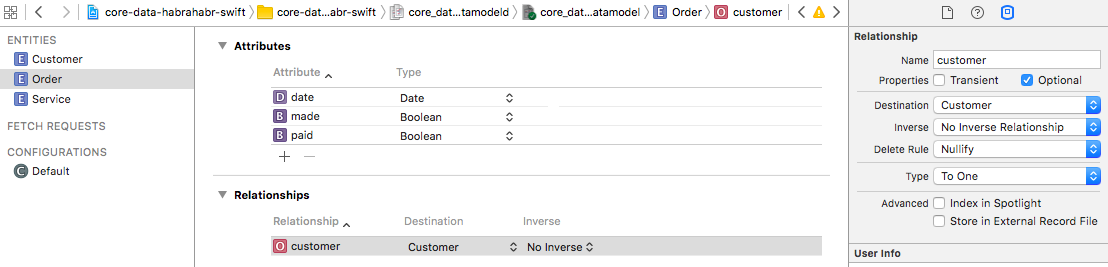
Let's start with the “header” of the document - we will create a new
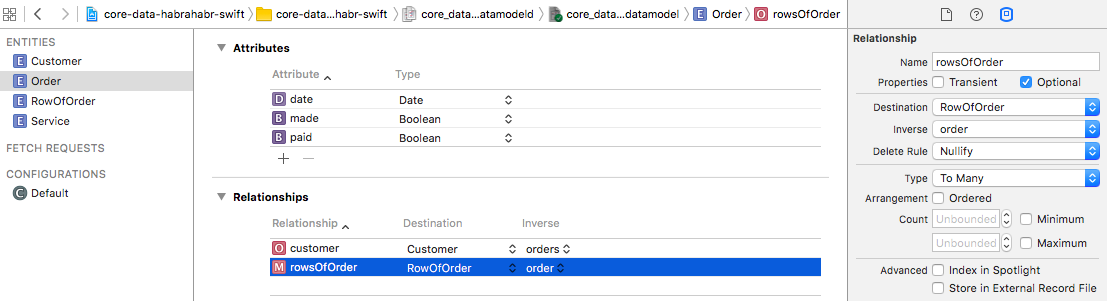
«Order» entity and add three attributes (here everything is already familiar with the creation of the previous entities):date- documentdate, date type, not optionalpaid- payment flag, typeBoolean, not optional, default value -NOmade- sign of order fulfillment, typeBoolean, not optional, default value isNO
Now go to Relationships . Add a new connection named
«customer» and set its destination ( Destination ) to the value Customer . With some stretch, but, continuing the analogy, we can say that we have added a new column with the type «Customer» to the Order table.Note that the default relationships are also Optional . In addition, the following very important properties are present in the Attributes Inspector , which we will now consider in detail:
- Type (type of connection)
- Delete Rule (delete rule)
- Inverse (feedback)
Type (type of connection)
If you have worked with any databases, then this concept is probably familiar to you. Here we are offered a choice of two options: To One and To Many . To One - means that our Order is connected to one specific Customer, To Many - with several customers. In our case, you must leave the default value - To One .
Delete Rule (delete rule)
A very important property, here you have to choose one of the possible behaviors of the entity at the moment when the connection is for some reason removed. The following options are possible:
- No Action - Core Data will not perform any actions, including notifying of such deletion; the entity “will think” that there was no deletion. In this case, you must self-implement the necessary behavior of the application. It is unlikely that you will want to use it.
- Nullify — when a link is removed, its value will be set to
nil. The most common option is the default. - Cascade (Cascade Delete) - when you delete a link, all customers that link to it will be automatically deleted (obviously not our case)
- Deny (Failure) - the opposite of the previous rule, its essence is that you can not delete an object while at least one link to it. This approach, for example, is applied to all objects in 1C: Enterprise.
Actually, what behavior to choose is determined solely by the logic of the program. Now we will not bother with this and leave the default value - Nullify , it suits us perfectly.
Inverse (feedback)
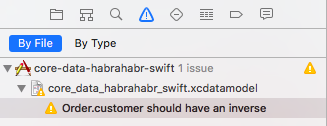
We have added the link between “Order” and “Customer”, but “Customer” does not know anything about the “Orders” in which he participates. Warning also warns us about this.
In order to fix this, it is necessary to create a reverse relationship with the entity "Customer" and indicate it as a reverse. It should be noted that the official documentation on Core Data strongly recommends making always reversible links - this is what we will do. Strictly speaking, you can not do this (after all, this is Warning, not Error), but you must clearly understand why and why you are doing this.
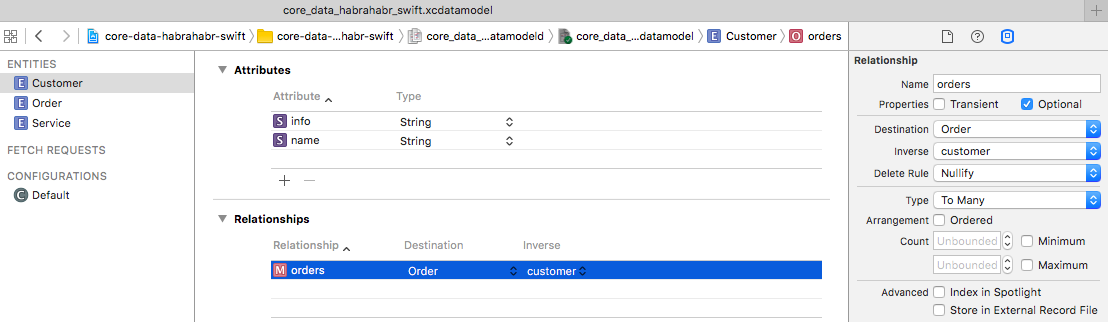
Let's fix this, create a new relationship for the
Customer entity with the name orders , select Destination = Order and select the customer relationship we created earlier as a feedback. One more thing - since one Customer may have, in general, many documents - change the type of connection to To Many .If you return to the
«Order» entity, you will see that the feedback has already been set to orders .Let's now make the tabular part of our document. Add a new entity named
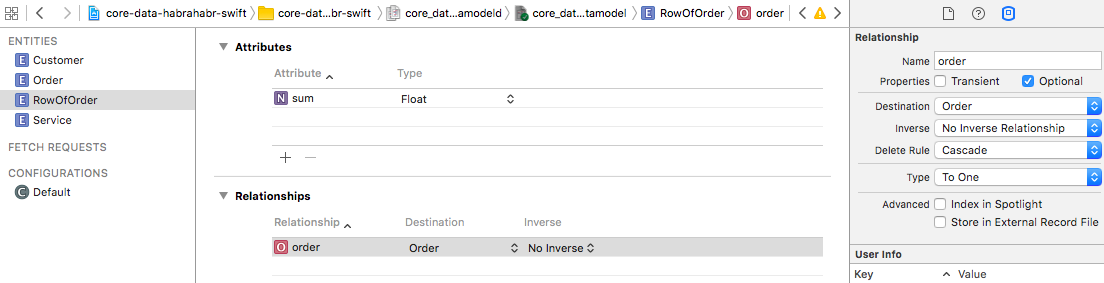
«RowOfOrder» . We will have one attribute - «sum» (“Amount for the service”) with the Float type (you already know how to do this, I will not describe it in detail) and two interrelations ( “Service” and “Order” ). Let's start with the Order - add a new relationship with the name order and the destination ( Destination ) equal to Order . Since the document string can belong to only one document, the type of communication ( Type ) must be To One . Well, if we decide to delete a document, then it is logical that its lines should also be deleted, because we will have a Delete Rule Cascade .Now go back to the Order entity to create feedback. Add a new link named
rowsOfOrder (Destination = RowOfOrder, Inverse = order) . Do not forget to change the type of connection to To Many (as there may be several lines in one document).It remains to add to the essence of RowOfOrder only the link with the essence of the Service . In view of the foregoing, this should not be difficult, all following the same scenario. Add a new relationship for the
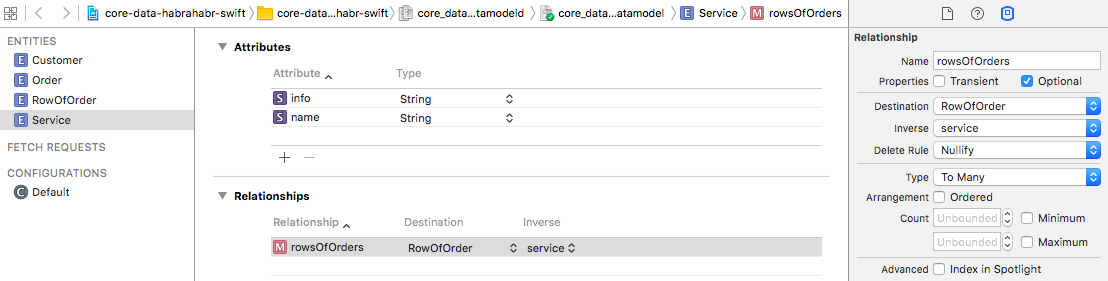
«RowOfOrder» entity called service (Destination = Service) , the rest is left by default. Then, for the Service entity, we add a new relationship «rowsOfOrders» (Destination = rowOfOrder, Inverse = service) and set the type of connection to To Many .Important note! After creating the data model, it cannot be changed - when the Core Data application is first launched, it creates storage in accordance with the data model, and in subsequent ones it checks the storage structure for compliance. If for any reason the storage structure does not correspond to the data model, then a critical runtime error occurs (that is, the application will be inoperative). What if there is a need to change the data model - for this you need to use the Core Data migration mechanism, this is a separate topic of increased complexity, and we will not consider it in this article. There is another option - you can simply remove the application from the device (or emulator), and when you start the application, Core Data will simply create a new storage with a new structure. Obviously, this method is appropriate only at the stage of application development.
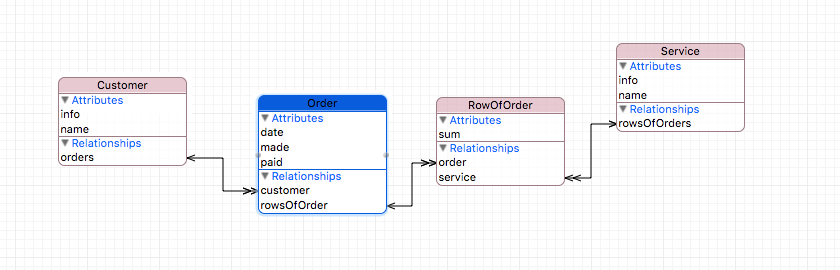
To conclude this article, let's take a look at its graphical representation. To do this, switch the Editor Style of the data model editor (located below) to the Graph position.
You see the entities created by us with attributes and all their interrelations in the form of graphic structure. The line with the usual arrow on the end means the connection To One , with the double arrow - To Many . Graphic view is good to navigate in bulk models.
This is the first part, the next article will contain a lot of code, we will create the objects themselves, link them together, learn about
NSEntityDescription and NSManagedObject , and also write an auxiliary class that significantly improves the usability of Core Data.This project is on github
Source: https://habr.com/ru/post/303512/
All Articles