Create a JavaScript application with React Native
In this tutorial, we will learn React Native - a framework from Facebook for creating native iOS and Android applications. It has a lot in common with another very popular Facebook framework - React Javascript , which is designed to build declarative user interfaces.

Note: This is an updated version of a lesson written by Colin Ebergard of the iOS Team, containing a number of edits for React Native 0.22.
')
But at the moment there are already enough frameworks that use JavaScript to create iOS applications, such as PhoneGap or Titanium . What makes React Native special?
1. Unlike PhoneGap, in React Native, the application logic is written and works in JavaScript, while its interface remains completely native. Thus, no compromises characteristic of the HTML5 UI are required.
2. Unlike Titanium, React introduces a new original and extremely effective approach to creating user interfaces. In short, the application UI is expressed as a function of the current state of the application.
A key feature of React Native is that its developers intend to bring the React programming model into the development of mobile applications. An important clarification: it is not about such a cross-platform tool with which you can write software once and use it everywhere, but about one that can be studied once and write on it everywhere. This lesson is designed for the iOS platform, but, having studied all the material presented, you can also easily create Android applications.
If you have experience writing applications on Objective-C or Swift, you probably will not be happy with the idea of switching to JavaScript. But at the same time, the second point obviously should have interested Swift-developers.
Undoubtedly, working with Swift, you had to learn many new and more efficient ways to encrypt algorithms, as well as techniques that facilitate transformation and immutability. However, the way to build a UI here is very similar to that used when working with Objective-C: it is also based on UIKit and is imperative.
React at the expense of such unusual concepts as Virtual DOM and coordination transfers functional programming to the user interface layer.
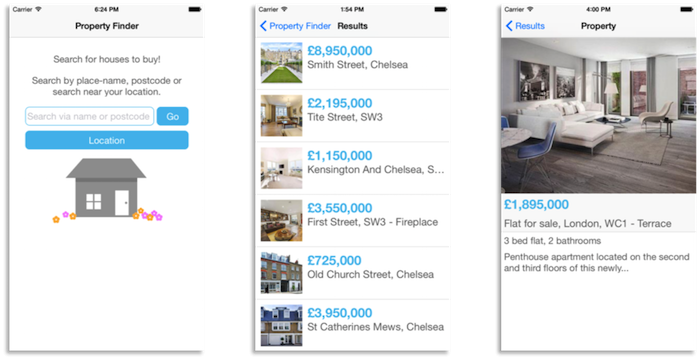
In this lesson on React Native, we will create a real estate search application in the UK:
If you've never worked with JavaScript before, don't worry. We will analyze each development step in detail. React uses syntax like CSS for styling that is easy to read and understand, but in which case you can always refer to the Mozilla Developer Network .
Interesting? Go ahead.
Getting Started
React Native uses Node.js , a JavaScript runtime environment to generate JavaScript code. If you haven't installed Node.js yet, it's time to do it.
First, install Homebrew , following the instructions on the site, and then Node.js, by doing the following in a terminal window:
Then, using homebrew, install watchman , a service for tracking changes and searching files from Facebook:
React Native uses it to track code changes and make appropriate edits. This is something like Xcode, but it builds every time a file is saved.
Next, install the React Native Command Line Interface (CLI) using npm:
It uses the Node Package Manager to call and globally install the CLI tool; npm comes with Node.js, its function is similar to CocoaPods or Carthage .
For those who want to get deeper into React Native, its source code is publicly available on GitHub .
Navigate to the folder in which you want to save the project, and use the CLI tool to create it:
This line creates the initial project, which contains everything you need to develop and run the application on React Native.
If you see a notification about an outdated version of Node.js, make sure that the one that brew installed is up to date. To do this, execute the brew link --overwrite node command in the terminal.
Looking at the created folders and files, you will find the node_modules folder, which contains the React Native framework. The index.ios.js file is an application layout created by a CLI tool. Also note the ios folder - it contains the Xcode project and a small code for integration with Bootstrap. Finally, there are components for Android, but we will not consider them here.
Open the project file, build it and run it. The simulator will display the following message:

Note : At the time of writing the lesson, the initial project created by the React Native CLI tool was displaying three warnings at build time. So don’t worry about seeing any notifications from Xcode for the first time. The developers of React Native are aware of this small issue, and we are working with them to fix it in the next release of React Native.
You probably also noticed a terminal pop-up window with the following message:
This is a React Native packager running Node.js. Soon you will know what it is for.
Do not close the terminal window, let it work on the background. If you accidentally shut it down, simply stop and restart the project using Xcode.
Note : before we get into the jungle of code, you need to decide on the choice of a text editor. You have to write a lot of JavaScript code, and Xcode is clearly not suitable for this. I use Sublime Text , it is an inexpensive and very convenient tool. But Atom , Brackets or any other lightweight editor is also great.
Hello React Native
Before we begin work on a real estate search application, we will create the Hello World! Application. As I go, I will introduce new components and concepts.
Open the index.ios.js file in a text editor and delete all its contents, since we will create the application from scratch. Add the following to the beginning of the file:
This directive declares strict mode , which adds improved error handling and imposes restrictions on certain elements of JavaScript. Simply put, it improves JavaScript.
Note : For more information on strict mode, see John Resig's article, ECMAScript 5 Strict Mode, JSON, and More .
Then add this line:
It loads the react-native module and assigns it to the React variable. React Native uses the same module loading technology as Node.js with the require function, which is roughly equivalent to connecting and importing libraries into Swift.
Note : For more information on JavaScript modules, see Eddie Osmani’s article on modular JavaScript .
Next, add the following:
This code sets a single style, which we will soon apply to the Hello World text! .. If you already have any web development experience, you probably learned these properties. The appearance of the StyleSheet class used to style the interface resembles the syntax of Cascading Style Sheets (CSS) , which is widely used on the web.
So, let's do the application directly. Add the following code directly below the styles variable:
Yes, this is a JavaScript class.
Classes have been added to ECMAScript 6 (ES6). As JavaScript is constantly evolving, developers are forced to limit themselves to the tools they use in order to maintain compatibility with older systems or browsers. And while iOS 9 does not fully support ES6, React Native uses a tool called Babel that automatically translates modern JavaScript into compatible with outdated versions of JavaScript where it is needed.
Note : if you are a web developer, you can also use Babel in a browser. So now there really is no excuse for working with old versions of JavaScript - even to support outdated versions of browsers.
PropertyFinderApp extends React.Component , the main structural element of the React interface. Components contain immutable properties and variable state variables; they provide a method for rendering. The application we are working on is very simple and needs only a rendering method.
The components of React Native are not UIKit classes, but their lightweight equivalents. The framework converts the React component tree to the required native interface.
Finally, add this line to the end of the file:
AppRegistry defines the entry point into the application and provides the root component.
Save the changes to index.ios.js and go back to Xcode. Make sure the PropertyFinder scheme is selected with one of the iPhone simulators, and then build and run your project. After a few seconds, your Hello World! Application will appear on the screen:

This is a JavaScript application running on a simulator that displays a native UI - and this without the help of a browser.
Still not believing? See for yourself: select the Xcode Debug \ View Debugging \ Capture View Hierarchy and you will see the native view hierarchy. You'll also notice UIWebView entities everywhere. The application test is displayed in RCTText . But what is it? Go back to Xcode, select File \ Open Quickly ... and enter RCTView.h. Please note that RCTView inherits directly from UIView. So everything works fine.

Want to know how it works? Open AppDelegate.m in Xcode and determine the location of the application: didFinishLaunchingWithOptions:. This method creates the RCTRootView , which loads the JavaScript application and renders the resulting view.
When the application starts, RCTRootView downloads the application from this URL:
Remember the terminal window that was open when you started this application. It starts the packer and the server that processes the request above.
Open this URL in Safari and you will see the JavaScript code of your application. You should also find the Hello World! Code embedded in the React Native framework there.
When your application starts up, this code is loaded and executed by the JavaScriptCore framework. In our case, it loads the PropertyFinderApp component and then builds the native UIKit view. Further in the lesson we will talk about this in more detail.
Hello World JSX
The created application uses React.createElement to build a simple interface that is converted to a native equivalent using React. And although the current JavaScript code is easy to read, in the case of a more complex UI with nested elements, it can turn into a mess.
Make sure the application still works, then go back to editing the index.ios.js file and change the return statement as follows:
This is JSX , a JavaScript syntax extension that adds syntax like HTML to JavaScript code. Those who already have experience in web development will notice similarities with the latter. We will use JSX throughout the lesson.
Save the changes to index.ios.js and return to the simulator. Press Cmd + R to refresh the message on the screen:

Restarting the application on React Native is as easy as refreshing the browser page. Please note that in this case, only those changes that affect the JavaScript files will be displayed. In all other cases, you will need to rebuild the application in Xcode.
Since in this tutorial we will work with the same set of JavaScript components, you can leave the application running and update it after saving the changes to index.ios.js .
Note : if you are interested in what JSX is being converted into, look at the 'bundle' in the browser.
I guess we played enough with Hello World! Now it's time to create a real application.
Add navigation
The Property Finder application uses the standard stack navigation provided by the UIKit navigation controller. Add this behavior.
In the index.ios.js file , rename the PropertyFinderApp class to HelloWorld:
Let's leave the Hello World! Text for now, but it will no longer be the root component of the application.
Then add the following class below the HelloWorld component:
It creates the navigation controller, applies the style, and sets the initial route to the HelloWorld component. In web development, routing is a way of determining the navigation structure of an application, where pages — or routes — are tied to the corresponding URLs.
Next, adjust the styles by adding container parameters there, as shown below:
You will learn about flex: 1 later.
Save the changes, return to the simulator and press Cmd + R to see the updated interface:

The root representation of the navigation controller corresponds to the text Hello World! .. Now we have the basic navigation structure of the current application. It's time to add a real UI.
Create a search page
Add a new file called SearchPage.js to the project and place it in the same folder as the index.ios.js file. Add this code to the new file:
We have already considered strict mode and import into react-native, but the next assignment operator is something else.
This is a destructuring assignment that allows you to retrieve many properties of an object and assign them to variables with one operator. As a result, in the remaining code, you can drop the React prefix. For example, you can refer directly to StyleSheet , and not to React.StyleSheet . Destructuring is also very useful for managing arrays. More information about him can be found in this article .
Without closing the SearchPage.js file, add this style below:
These are also standard CSS properties. This way of defining styles may seem less convenient than using Interface Builder, but this approach is definitely better than setting view properties one by one in the viewDidLoad () methods.
Insert the component itself directly below the styles:
render perfectly demonstrates JSX and its structure. Along with the style, you can very simply visualize the interface created by this component: a container with two text captions.
Finally, add the following line to the end of the file:
It exports the SearchPage class, which allows it to be used in other files.
The next step is to update the application's routing to establish a different initial route.
Open index.ios.js and add this line immediately after require at the beginning of the file:
In the render function of the PropertyFinderApp class, update the initialRoute to bind the newly created page, as shown below:
Now, if you want, you can delete the HelloWorld class and its styles. You won't need them anymore.
Save the changes, return to the simulator and press Cmd + R to see the updated interface:

This uses the new SearchPage component.
Styling with Flexbox
In this tutorial, we have already dealt with some basic CSS properties that set color options, as well as internal and external padding. However, you probably have not heard of flexbox yet . This technology has only recently been added to the CSS specification, it is very useful when building user interface layouts.
React Native uses the css-layout library, which is a JavaScript implementation of a flexbox standard compiled in C (for iOS) and Java (for Android).
It is very good that React Native was created as a separate project aimed at several programming languages, as it allows you to develop applications using the latest approaches, such as applying flexbox layouts to SVG .
By default, the container in your application has the direction of data flow in the form of a column, which corresponds to the column parameter - which means that the entire contents of the container will be arranged vertically:
This is the so-called main axis, or main axis , it can have both horizontal and vertical direction.
The vertical position of each child of the container is calculated based on its external and internal indents, as well as its height. The container also sets the alignItems property to center , which determines the position of the children on the main axis. In this case, we get the text with the alignment in the center.
Now add an input field and buttons. Open the SearchPage.js file and enter the following code immediately after the closing tag of the second Text element:
We added two top-level views: in one of them there is a text input field and a button, and in the other - another button. Now you will learn how to style these elements.
Return to the style parameters, put a comma after the container block and add new styles below:
Pay attention to formatting: each property of a style or selector should be separated by a comma.
These styles are for newly added input fields and buttons.
Save the changes, return to the simulator and press Cmd + R to see the updated interface:

The text field and the 'Go' button are on the same line, since you placed them in a container with a flowRight style, the elements of which are lined up in a row by the flexDirection: 'row' property. Instead of rigidly setting the width of each of these elements, we set their relative width using the values of the flex property. Thus, in the selector of the searchInput text field we have flex: 4 , and in the selector of a button - flex: 1 , as a result of which their ratio is 4: 1.
You may also have noticed that the elements that we call buttons are not, in fact, such. In fact, buttons in UIKit are just interactive text labels. The buttons of your application use a React Native component called TouchableHighlight , which when clicked becomes transparent and shows the underlying color.
Finally, add an image to the search page. You can download it in several resolutions in one archive . After downloading, unpack the archive.
Next, create a directory called 'Resources' in the root project and place all three images in it.
Subject Catalogs : As you know, Apple experts recommend, if possible, placing images in subject catalogs. However, for React Native, this is the opposite . Storing the digital objects of an application near its components provides several advantages. First, it allows you to maintain the independence of the components. Secondly, adding new images does not require re-loading the application. And thirdly, when developing an application for iOS and Android, this makes it possible to store images for two platforms in one place.
Go back to the SearchPage.js file and add this line under the closing tag of the TouchableHighlight component responsible for the location button:
Now add the appropriate image style in the block with styles, without forgetting to put a comma after the previous selector:
Save the changes. Return to the simulator and click Cmd + R to see the new interface:

Note : If the image with the house is not displayed, and a notification is displayed instead that the image was not found, try restarting the packer using the npm start command in the terminal.
Our application already looks pretty, but still something is missing. You need to add an application state and perform some actions.
Add a component state
Each component in React has its own state object, which is used as a key-value repository. Before the component is displayed, you need to set the initial state.
SearchPage.js SearchPage , render() :
state , searchString london .
. TextInput render , :
TextInput – – searchString . , . , ?
, , . SearchPage constructor :
text . , .
, TextInput render onChange . :
, , onChange ( onSearchTextChanged ).
: , , bind(this) . JavaScript this , . Swift self . bind , this onSearchTextChanged . this MDN .
, log render() , return :
.
, Cmd+R. , 'london', Xcode - :

, , :
1. render() , .
2. onSearchTextChanged() .
3. , , render .
4. onSearchTextChanged() , .
React, , , , render . , , UI.
UI- , - , UI. , MVVM ReactiveCocoa .
React , UI , .
, , . , .
, , - . React - . , , , render, UIKit. , React . , , .
, iOS- , ReactJS : virtual-DOM ( , -) ?
, . , , .
, 'Go', API- , .
SearchPage.js , constructor :
isLoading , .
render :
if , , – isLoading . , JSX JavaScript.
, JSX, return , Image :
SearchPage :
_executeQuery() , isLoading , .
: JavaScript , 'private' . , , private.
onSearchPressed() . 'Go'. , render TouchableHighlight , 'Go':
, SearchPage:
SearchPage , , . , . , : name=value, . => , JavaScript . .
, , Cmd+R 'Go'. . Xcode:

, URL . URL , : JSON-. , . .
: Nestoria API . JSON-, API, . , URL- .
– .
API-
SearchPage.js , , message :
render :
.
SearchPage _executeQuery() :
fetch , Web API API XMLHttpRequest. promise , JSON-, _handleResponse ( ).
, SearchPage :
isLoading .
: Nestoria API . , 202 200 , . ?
, Cmd+R. 'london'. , 20 ( ). , 'narnia'. :
.
SearchResults.js :
, require , react-native .
:
– ListView , , UITableView . ListView ListView.DataSource , UI .
, , . ListView , . Nestoria API guid , .
:
SearchPage.js , require React:
SearchResults SearchPage :
_handleResponse , console.log :
SearchResults API-. push- , 'Back', .
, , Cmd+R . :
- . , . .
React Native , .
SearchResults.js :
.
renderRow() :
, '300,000 GBP' GBP. , , , , . ( Image ) URL ( rowData.img_url ), React Native , .
onPress TouchableHighlight . guid .
– , :
, . , , . .
, Cmd+R, :

… .
, .
PropertyView.js :
, .
:
:
, API . render() .
: .
:
SearchResults.js require , React require :
rowPressed() , PropertyView :
: , Cmd+R. , :

, !
, .
Xcode Info.plist NSLocationWhenInUseUsageDescription :
plist- :

, .
SearchPage.js, TouchableHighlight , 'Location', :
onLocationPressed ( ).
SearchPage :
navigator.geolocation . Web API , , . React Native API, iOS.
. Nestoria. - , .
plist, , . , , Cmd+R. Xcode . .
, , Nestoria . Debug\Location\Custom Location … : , 55.02 -1.42 . , .
Location, .

: . , , , . . , React Native. - , , .
, , .
What's next?
React Native. , .
-, , , JavaScript React. , , React Native, , JavaScript CSS.
, ? , Swift Objective-C? , , - .
, .
Note: This is an updated version of a lesson written by Colin Ebergard of the iOS Team, containing a number of edits for React Native 0.22.
')
But at the moment there are already enough frameworks that use JavaScript to create iOS applications, such as PhoneGap or Titanium . What makes React Native special?
1. Unlike PhoneGap, in React Native, the application logic is written and works in JavaScript, while its interface remains completely native. Thus, no compromises characteristic of the HTML5 UI are required.
2. Unlike Titanium, React introduces a new original and extremely effective approach to creating user interfaces. In short, the application UI is expressed as a function of the current state of the application.
A key feature of React Native is that its developers intend to bring the React programming model into the development of mobile applications. An important clarification: it is not about such a cross-platform tool with which you can write software once and use it everywhere, but about one that can be studied once and write on it everywhere. This lesson is designed for the iOS platform, but, having studied all the material presented, you can also easily create Android applications.
If you have experience writing applications on Objective-C or Swift, you probably will not be happy with the idea of switching to JavaScript. But at the same time, the second point obviously should have interested Swift-developers.
Undoubtedly, working with Swift, you had to learn many new and more efficient ways to encrypt algorithms, as well as techniques that facilitate transformation and immutability. However, the way to build a UI here is very similar to that used when working with Objective-C: it is also based on UIKit and is imperative.
React at the expense of such unusual concepts as Virtual DOM and coordination transfers functional programming to the user interface layer.
In this lesson on React Native, we will create a real estate search application in the UK:
If you've never worked with JavaScript before, don't worry. We will analyze each development step in detail. React uses syntax like CSS for styling that is easy to read and understand, but in which case you can always refer to the Mozilla Developer Network .
Interesting? Go ahead.
Getting Started
React Native uses Node.js , a JavaScript runtime environment to generate JavaScript code. If you haven't installed Node.js yet, it's time to do it.
First, install Homebrew , following the instructions on the site, and then Node.js, by doing the following in a terminal window:
brew install node Then, using homebrew, install watchman , a service for tracking changes and searching files from Facebook:
brew install watchman React Native uses it to track code changes and make appropriate edits. This is something like Xcode, but it builds every time a file is saved.
Next, install the React Native Command Line Interface (CLI) using npm:
npm install -g react-native-cli It uses the Node Package Manager to call and globally install the CLI tool; npm comes with Node.js, its function is similar to CocoaPods or Carthage .
For those who want to get deeper into React Native, its source code is publicly available on GitHub .
Navigate to the folder in which you want to save the project, and use the CLI tool to create it:
react-native init PropertyFinder This line creates the initial project, which contains everything you need to develop and run the application on React Native.
If you see a notification about an outdated version of Node.js, make sure that the one that brew installed is up to date. To do this, execute the brew link --overwrite node command in the terminal.
Looking at the created folders and files, you will find the node_modules folder, which contains the React Native framework. The index.ios.js file is an application layout created by a CLI tool. Also note the ios folder - it contains the Xcode project and a small code for integration with Bootstrap. Finally, there are components for Android, but we will not consider them here.
Open the project file, build it and run it. The simulator will display the following message:
Note : At the time of writing the lesson, the initial project created by the React Native CLI tool was displaying three warnings at build time. So don’t worry about seeing any notifications from Xcode for the first time. The developers of React Native are aware of this small issue, and we are working with them to fix it in the next release of React Native.
You probably also noticed a terminal pop-up window with the following message:
┌──────────────────────────────────────────────┐ │ Running packager on port 8081. │ │ │ │ Keep this packager running while developing on any JS projects. Feel │ │ free to close this tab and run your own packager instance if you │ │ prefer. │ │ │ │ https://github.com/facebook/react-native │ │ │ └──────────────────────────────────────────────┘ Looking for JS files in /Users/tomelliott/Desktop/Scratch/PropertyFinder [6:15:40 PM] <START> Building Dependency Graph [6:15:40 PM] <START> Crawling File System [6:15:40 PM] <START> Loading bundles layout [6:15:40 PM] <END> Loading bundles layout (0ms) [Hot Module Replacement] Server listening on /hot React packager ready. [6:15:41 PM] <END> Crawling File System (747ms) [6:15:41 PM] <START> Building in-memory fs for JavaScript [6:15:42 PM] <END> Building in-memory fs for JavaScript (653ms) [6:15:42 PM] <START> Building in-memory fs for Assets [6:15:42 PM] <END> Building in-memory fs for Assets (277ms) [6:15:42 PM] <START> Building Haste Map [6:15:42 PM] <START> Building (deprecated) Asset Map [6:15:42 PM] <END> Building (deprecated) Asset Map (49ms) [6:15:42 PM] <END> Building Haste Map (400ms) [6:15:42 PM] <END> Building Dependency Graph (2094ms) This is a React Native packager running Node.js. Soon you will know what it is for.
Do not close the terminal window, let it work on the background. If you accidentally shut it down, simply stop and restart the project using Xcode.
Note : before we get into the jungle of code, you need to decide on the choice of a text editor. You have to write a lot of JavaScript code, and Xcode is clearly not suitable for this. I use Sublime Text , it is an inexpensive and very convenient tool. But Atom , Brackets or any other lightweight editor is also great.
Hello React Native
Before we begin work on a real estate search application, we will create the Hello World! Application. As I go, I will introduce new components and concepts.
Open the index.ios.js file in a text editor and delete all its contents, since we will create the application from scratch. Add the following to the beginning of the file:
'use strict'; This directive declares strict mode , which adds improved error handling and imposes restrictions on certain elements of JavaScript. Simply put, it improves JavaScript.
Note : For more information on strict mode, see John Resig's article, ECMAScript 5 Strict Mode, JSON, and More .
Then add this line:
var React = require('react-native'); It loads the react-native module and assigns it to the React variable. React Native uses the same module loading technology as Node.js with the require function, which is roughly equivalent to connecting and importing libraries into Swift.
Note : For more information on JavaScript modules, see Eddie Osmani’s article on modular JavaScript .
Next, add the following:
var styles = React.StyleSheet.create({ text: { color: 'black', backgroundColor: 'white', fontSize: 30, margin: 80 } }); This code sets a single style, which we will soon apply to the Hello World text! .. If you already have any web development experience, you probably learned these properties. The appearance of the StyleSheet class used to style the interface resembles the syntax of Cascading Style Sheets (CSS) , which is widely used on the web.
So, let's do the application directly. Add the following code directly below the styles variable:
class PropertyFinderApp extends React.Component { render() { return React.createElement(React.Text, {style: styles.text}, "Hello World!"); } } Yes, this is a JavaScript class.
Classes have been added to ECMAScript 6 (ES6). As JavaScript is constantly evolving, developers are forced to limit themselves to the tools they use in order to maintain compatibility with older systems or browsers. And while iOS 9 does not fully support ES6, React Native uses a tool called Babel that automatically translates modern JavaScript into compatible with outdated versions of JavaScript where it is needed.
Note : if you are a web developer, you can also use Babel in a browser. So now there really is no excuse for working with old versions of JavaScript - even to support outdated versions of browsers.
PropertyFinderApp extends React.Component , the main structural element of the React interface. Components contain immutable properties and variable state variables; they provide a method for rendering. The application we are working on is very simple and needs only a rendering method.
The components of React Native are not UIKit classes, but their lightweight equivalents. The framework converts the React component tree to the required native interface.
Finally, add this line to the end of the file:
React.AppRegistry.registerComponent('PropertyFinder', function() { return PropertyFinderApp }); AppRegistry defines the entry point into the application and provides the root component.
Save the changes to index.ios.js and go back to Xcode. Make sure the PropertyFinder scheme is selected with one of the iPhone simulators, and then build and run your project. After a few seconds, your Hello World! Application will appear on the screen:
This is a JavaScript application running on a simulator that displays a native UI - and this without the help of a browser.
Still not believing? See for yourself: select the Xcode Debug \ View Debugging \ Capture View Hierarchy and you will see the native view hierarchy. You'll also notice UIWebView entities everywhere. The application test is displayed in RCTText . But what is it? Go back to Xcode, select File \ Open Quickly ... and enter RCTView.h. Please note that RCTView inherits directly from UIView. So everything works fine.
Want to know how it works? Open AppDelegate.m in Xcode and determine the location of the application: didFinishLaunchingWithOptions:. This method creates the RCTRootView , which loads the JavaScript application and renders the resulting view.
When the application starts, RCTRootView downloads the application from this URL:
http://localhost:8081/index.ios.bundle Remember the terminal window that was open when you started this application. It starts the packer and the server that processes the request above.
Open this URL in Safari and you will see the JavaScript code of your application. You should also find the Hello World! Code embedded in the React Native framework there.
When your application starts up, this code is loaded and executed by the JavaScriptCore framework. In our case, it loads the PropertyFinderApp component and then builds the native UIKit view. Further in the lesson we will talk about this in more detail.
Hello World JSX
The created application uses React.createElement to build a simple interface that is converted to a native equivalent using React. And although the current JavaScript code is easy to read, in the case of a more complex UI with nested elements, it can turn into a mess.
Make sure the application still works, then go back to editing the index.ios.js file and change the return statement as follows:
return <React.Text style={styles.text}>Hello World (Again)</React.Text>; This is JSX , a JavaScript syntax extension that adds syntax like HTML to JavaScript code. Those who already have experience in web development will notice similarities with the latter. We will use JSX throughout the lesson.
Save the changes to index.ios.js and return to the simulator. Press Cmd + R to refresh the message on the screen:
Restarting the application on React Native is as easy as refreshing the browser page. Please note that in this case, only those changes that affect the JavaScript files will be displayed. In all other cases, you will need to rebuild the application in Xcode.
Since in this tutorial we will work with the same set of JavaScript components, you can leave the application running and update it after saving the changes to index.ios.js .
Note : if you are interested in what JSX is being converted into, look at the 'bundle' in the browser.
I guess we played enough with Hello World! Now it's time to create a real application.
Add navigation
The Property Finder application uses the standard stack navigation provided by the UIKit navigation controller. Add this behavior.
In the index.ios.js file , rename the PropertyFinderApp class to HelloWorld:
class HelloWorld extends React.Component { Let's leave the Hello World! Text for now, but it will no longer be the root component of the application.
Then add the following class below the HelloWorld component:
class PropertyFinderApp extends React.Component { render() { return ( <React.NavigatorIOS style={styles.container} initialRoute={{ title: 'Property Finder', component: HelloWorld, }}/> ); } } It creates the navigation controller, applies the style, and sets the initial route to the HelloWorld component. In web development, routing is a way of determining the navigation structure of an application, where pages — or routes — are tied to the corresponding URLs.
Next, adjust the styles by adding container parameters there, as shown below:
var styles = React.StyleSheet.create({ text: { color: 'black', backgroundColor: 'white', fontSize: 30, margin: 80 }, container: { flex: 1 } }); You will learn about flex: 1 later.
Save the changes, return to the simulator and press Cmd + R to see the updated interface:
The root representation of the navigation controller corresponds to the text Hello World! .. Now we have the basic navigation structure of the current application. It's time to add a real UI.
Create a search page
Add a new file called SearchPage.js to the project and place it in the same folder as the index.ios.js file. Add this code to the new file:
'use strict'; var React = require('react-native'); var { StyleSheet, Text, TextInput, View, TouchableHighlight, ActivityIndicatorIOS, Image, Component } = React; We have already considered strict mode and import into react-native, but the next assignment operator is something else.
This is a destructuring assignment that allows you to retrieve many properties of an object and assign them to variables with one operator. As a result, in the remaining code, you can drop the React prefix. For example, you can refer directly to StyleSheet , and not to React.StyleSheet . Destructuring is also very useful for managing arrays. More information about him can be found in this article .
Without closing the SearchPage.js file, add this style below:
var styles = StyleSheet.create({ description: { marginBottom: 20, fontSize: 18, textAlign: 'center', color: '#656565' }, container: { padding: 30, marginTop: 65, alignItems: 'center' } }); These are also standard CSS properties. This way of defining styles may seem less convenient than using Interface Builder, but this approach is definitely better than setting view properties one by one in the viewDidLoad () methods.
Insert the component itself directly below the styles:
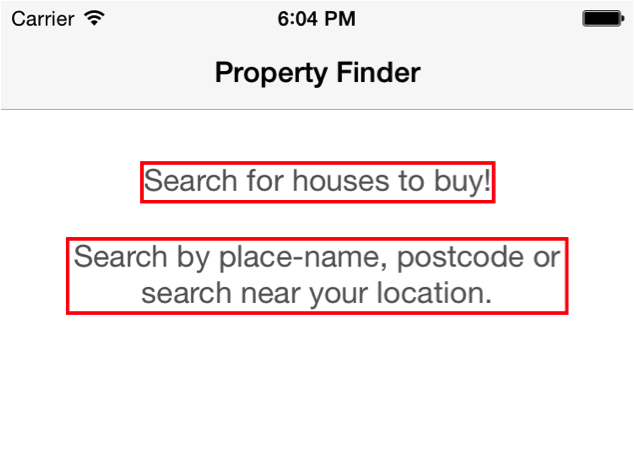
class SearchPage extends Component { render() { return ( <View style={styles.container}> <Text style={styles.description}> Search for houses to buy! </Text> <Text style={styles.description}> Search by place-name, postcode or search near your location. </Text> </View> ); } } render perfectly demonstrates JSX and its structure. Along with the style, you can very simply visualize the interface created by this component: a container with two text captions.
Finally, add the following line to the end of the file:
module.exports = SearchPage; It exports the SearchPage class, which allows it to be used in other files.
The next step is to update the application's routing to establish a different initial route.
Open index.ios.js and add this line immediately after require at the beginning of the file:
var SearchPage = require('./SearchPage'); In the render function of the PropertyFinderApp class, update the initialRoute to bind the newly created page, as shown below:
component: SearchPage Now, if you want, you can delete the HelloWorld class and its styles. You won't need them anymore.
Save the changes, return to the simulator and press Cmd + R to see the updated interface:
This uses the new SearchPage component.
Styling with Flexbox
In this tutorial, we have already dealt with some basic CSS properties that set color options, as well as internal and external padding. However, you probably have not heard of flexbox yet . This technology has only recently been added to the CSS specification, it is very useful when building user interface layouts.
React Native uses the css-layout library, which is a JavaScript implementation of a flexbox standard compiled in C (for iOS) and Java (for Android).
It is very good that React Native was created as a separate project aimed at several programming languages, as it allows you to develop applications using the latest approaches, such as applying flexbox layouts to SVG .
By default, the container in your application has the direction of data flow in the form of a column, which corresponds to the column parameter - which means that the entire contents of the container will be arranged vertically:
This is the so-called main axis, or main axis , it can have both horizontal and vertical direction.
The vertical position of each child of the container is calculated based on its external and internal indents, as well as its height. The container also sets the alignItems property to center , which determines the position of the children on the main axis. In this case, we get the text with the alignment in the center.
Now add an input field and buttons. Open the SearchPage.js file and enter the following code immediately after the closing tag of the second Text element:
<View style={styles.flowRight}> <TextInput style={styles.searchInput} placeholder='Search via name or postcode'/> <TouchableHighlight style={styles.button} underlayColor='#99d9f4'> <Text style={styles.buttonText}>Go</Text> </TouchableHighlight> </View> <TouchableHighlight style={styles.button} underlayColor='#99d9f4'> <Text style={styles.buttonText}>Location</Text> </TouchableHighlight> We added two top-level views: in one of them there is a text input field and a button, and in the other - another button. Now you will learn how to style these elements.
Return to the style parameters, put a comma after the container block and add new styles below:
flowRight: { flexDirection: 'row', alignItems: 'center', alignSelf: 'stretch' }, buttonText: { fontSize: 18, color: 'white', alignSelf: 'center' }, button: { height: 36, flex: 1, flexDirection: 'row', backgroundColor: '#48BBEC', borderColor: '#48BBEC', borderWidth: 1, borderRadius: 8, marginBottom: 10, alignSelf: 'stretch', justifyContent: 'center' }, searchInput: { height: 36, padding: 4, marginRight: 5, flex: 4, fontSize: 18, borderWidth: 1, borderColor: '#48BBEC', borderRadius: 8, color: '#48BBEC' } Pay attention to formatting: each property of a style or selector should be separated by a comma.
These styles are for newly added input fields and buttons.
Save the changes, return to the simulator and press Cmd + R to see the updated interface:
The text field and the 'Go' button are on the same line, since you placed them in a container with a flowRight style, the elements of which are lined up in a row by the flexDirection: 'row' property. Instead of rigidly setting the width of each of these elements, we set their relative width using the values of the flex property. Thus, in the selector of the searchInput text field we have flex: 4 , and in the selector of a button - flex: 1 , as a result of which their ratio is 4: 1.
You may also have noticed that the elements that we call buttons are not, in fact, such. In fact, buttons in UIKit are just interactive text labels. The buttons of your application use a React Native component called TouchableHighlight , which when clicked becomes transparent and shows the underlying color.
Finally, add an image to the search page. You can download it in several resolutions in one archive . After downloading, unpack the archive.
Next, create a directory called 'Resources' in the root project and place all three images in it.
Subject Catalogs : As you know, Apple experts recommend, if possible, placing images in subject catalogs. However, for React Native, this is the opposite . Storing the digital objects of an application near its components provides several advantages. First, it allows you to maintain the independence of the components. Secondly, adding new images does not require re-loading the application. And thirdly, when developing an application for iOS and Android, this makes it possible to store images for two platforms in one place.
Go back to the SearchPage.js file and add this line under the closing tag of the TouchableHighlight component responsible for the location button:
<Image source={require('./Resources/house.png')} style={styles.image}/> Now add the appropriate image style in the block with styles, without forgetting to put a comma after the previous selector:
image: { width: 217, height: 138 } Save the changes. Return to the simulator and click Cmd + R to see the new interface:
Note : If the image with the house is not displayed, and a notification is displayed instead that the image was not found, try restarting the packer using the npm start command in the terminal.
Our application already looks pretty, but still something is missing. You need to add an application state and perform some actions.
Add a component state
Each component in React has its own state object, which is used as a key-value repository. Before the component is displayed, you need to set the initial state.
SearchPage.js SearchPage , render() :
constructor(props) { super(props); this.state = { searchString: 'london' }; } state , searchString london .
. TextInput render , :
<TextInput style={styles.searchInput} value={this.state.searchString} placeholder='Search via name or postcode'/> TextInput – – searchString . , . , ?
, , . SearchPage constructor :
onSearchTextChanged(event) { console.log('onSearchTextChanged'); this.setState({ searchString: event.nativeEvent.text }); console.log(this.state.searchString); } text . , .
, TextInput render onChange . :
<TextInput style={styles.searchInput} value={this.state.searchString} onChange={this.onSearchTextChanged.bind(this)} placeholder='Search via name or postcode'/> , , onChange ( onSearchTextChanged ).
: , , bind(this) . JavaScript this , . Swift self . bind , this onSearchTextChanged . this MDN .
, log render() , return :
console.log('SearchPage.render'); .
, Cmd+R. , 'london', Xcode - :
, , :
1. render() , .
2. onSearchTextChanged() .
3. , , render .
4. onSearchTextChanged() , .
React, , , , render . , , UI.
UI- , - , UI. , MVVM ReactiveCocoa .
React , UI , .
, , . , .
, , - . React - . , , , render, UIKit. , React . , , .
, iOS- , ReactJS : virtual-DOM ( , -) ?
, . , , .
, 'Go', API- , .
SearchPage.js , constructor :
this.state = { searchString: 'london', isLoading: false }; isLoading , .
render :
var spinner = this.state.isLoading ? ( <ActivityIndicatorIOS size='large'/> ) : ( <View/>); if , , – isLoading . , JSX JavaScript.
, JSX, return , Image :
{spinner} SearchPage :
_executeQuery(query) { console.log(query); this.setState({ isLoading: true }); } onSearchPressed() { var query = urlForQueryAndPage('place_name', this.state.searchString, 1); this._executeQuery(query); } _executeQuery() , isLoading , .
: JavaScript , 'private' . , , private.
onSearchPressed() . 'Go'. , render TouchableHighlight , 'Go':
onPress={this.onSearchPressed.bind(this)} , SearchPage:
function urlForQueryAndPage(key, value, pageNumber) { var data = { country: 'uk', pretty: '1', encoding: 'json', listing_type: 'buy', action: 'search_listings', page: pageNumber }; data[key] = value; var querystring = Object.keys(data) .map(key => key + '=' + encodeURIComponent(data[key])) .join('&'); return 'http://api.nestoria.co.uk/api?' + querystring; }; SearchPage , , . , . , : name=value, . => , JavaScript . .
, , Cmd+R 'Go'. . Xcode:
, URL . URL , : JSON-. , . .
: Nestoria API . JSON-, API, . , URL- .
– .
API-
SearchPage.js , , message :
this.state = { searchString: 'london', isLoading: false, message: '' }; render :
<Text style={styles.description}>{this.state.message}</Text> .
SearchPage _executeQuery() :
fetch(query) .then(response => response.json()) .then(json => this._handleResponse(json.response)) .catch(error => this.setState({ isLoading: false, message: 'Something bad happened ' + error })); fetch , Web API API XMLHttpRequest. promise , JSON-, _handleResponse ( ).
, SearchPage :
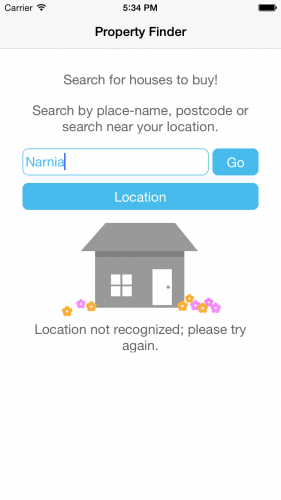
_handleResponse(response) { this.setState({ isLoading: false , message: '' }); if (response.application_response_code.substr(0, 1) === '1') { console.log('Properties found: ' + response.listings.length); } else { this.setState({ message: 'Location not recognized; please try again.'}); } } isLoading .
: Nestoria API . , 202 200 , . ?
, Cmd+R. 'london'. , 20 ( ). , 'narnia'. :
.
SearchResults.js :
'use strict'; var React = require('react-native'); var { StyleSheet, Image, View, TouchableHighlight, ListView, Text, Component } = React; , require , react-native .
:
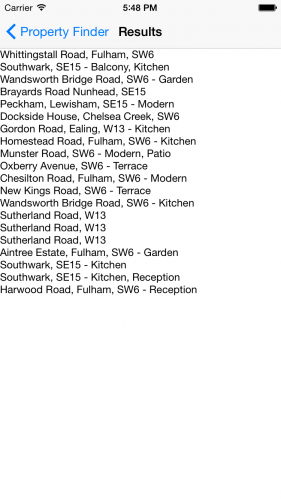
class SearchResults extends Component { constructor(props) { super(props); var dataSource = new ListView.DataSource( {rowHasChanged: (r1, r2) => r1.guid !== r2.guid}); this.state = { dataSource: dataSource.cloneWithRows(this.props.listings) }; } renderRow(rowData, sectionID, rowID) { return ( <TouchableHighlight underlayColor='#dddddd'> <View> <Text>{rowData.title}</Text> </View> </TouchableHighlight> ); } render() { return ( <ListView dataSource={this.state.dataSource} renderRow={this.renderRow.bind(this)}/> ); } } – ListView , , UITableView . ListView ListView.DataSource , UI .
, , . ListView , . Nestoria API guid , .
:
module.exports = SearchResults; SearchPage.js , require React:
var SearchResults = require('./SearchResults'); SearchResults SearchPage :
_handleResponse , console.log :
this.props.navigator.push({ title: 'Results', component: SearchResults, passProps: {listings: response.listings} }); SearchResults API-. push- , 'Back', .
, , Cmd+R . :
- . , . .
React Native , .
SearchResults.js :
var styles = StyleSheet.create({ thumb: { width: 80, height: 80, marginRight: 10 }, textContainer: { flex: 1 }, separator: { height: 1, backgroundColor: '#dddddd' }, price: { fontSize: 25, fontWeight: 'bold', color: '#48BBEC' }, title: { fontSize: 20, color: '#656565' }, rowContainer: { flexDirection: 'row', padding: 10 } }); .
renderRow() :
renderRow(rowData, sectionID, rowID) { var price = rowData.price_formatted.split(' ')[0]; return ( <TouchableHighlight onPress={() => this.rowPressed(rowData.guid)} underlayColor='#dddddd'> <View> <View style={styles.rowContainer}> <Image style={styles.thumb} source={{ uri: rowData.img_url }} /> <View style={styles.textContainer}> <Text style={styles.price}>£{price}</Text> <Text style={styles.title} numberOfLines={1}>{rowData.title}</Text> </View> </View> <View style={styles.separator}/> </View> </TouchableHighlight> ); } , '300,000 GBP' GBP. , , , , . ( Image ) URL ( rowData.img_url ), React Native , .
onPress TouchableHighlight . guid .
– , :
rowPressed(propertyGuid) { var property = this.props.listings.filter(prop => prop.guid === propertyGuid)[0]; } , . , , . .
, Cmd+R, :
… .
, .
PropertyView.js :
'use strict'; var React = require('react-native'); var { StyleSheet, Image, View, Text, Component } = React; , .
:
var styles = StyleSheet.create({ container: { marginTop: 65 }, heading: { backgroundColor: '#F8F8F8', }, separator: { height: 1, backgroundColor: '#DDDDDD' }, image: { width: 400, height: 300 }, price: { fontSize: 25, fontWeight: 'bold', margin: 5, color: '#48BBEC' }, title: { fontSize: 20, margin: 5, color: '#656565' }, description: { fontSize: 18, margin: 5, color: '#656565' } }); :
class PropertyView extends Component { render() { var property = this.props.property; var stats = property.bedroom_number + ' bed ' + property.property_type; if (property.bathroom_number) { stats += ', ' + property.bathroom_number + ' ' + (property.bathroom_number > 1 ? 'bathrooms' : 'bathroom'); } var price = property.price_formatted.split(' ')[0]; return ( <View style={styles.container}> <Image style={styles.image} source={{uri: property.img_url}} /> <View style={styles.heading}> <Text style={styles.price}>£{price}</Text> <Text style={styles.title}>{property.title}</Text> <View style={styles.separator}/> </View> <Text style={styles.description}>{stats}</Text> <Text style={styles.description}>{property.summary}</Text> </View> ); } } , API . render() .
: .
:
module.exports = PropertyView; SearchResults.js require , React require :
var PropertyView = require('./PropertyView'); rowPressed() , PropertyView :
rowPressed(propertyGuid) { var property = this.props.listings.filter(prop => prop.guid === propertyGuid)[0]; this.props.navigator.push({ title: "Property", component: PropertyView, passProps: {property: property} }); } : , Cmd+R. , :
, !
, .
Xcode Info.plist NSLocationWhenInUseUsageDescription :
PropertyFinder would like to use your location to find nearby properties – plist- :
, .
SearchPage.js, TouchableHighlight , 'Location', :
onPress={this.onLocationPressed.bind(this)} onLocationPressed ( ).
SearchPage :
onLocationPressed() { navigator.geolocation.getCurrentPosition( location => { var search = location.coords.latitude + ',' + location.coords.longitude; this.setState({ searchString: search }); var query = urlForQueryAndPage('centre_point', search, 1); this._executeQuery(query); }, error => { this.setState({ message: 'There was a problem with obtaining your location: ' + error }); }); } navigator.geolocation . Web API , , . React Native API, iOS.
. Nestoria. - , .
plist, , . , , Cmd+R. Xcode . .
, , Nestoria . Debug\Location\Custom Location … : , 55.02 -1.42 . , .
Location, .
: . , , , . . , React Native. - , , .
, , .
What's next?
React Native. , .
-, , , JavaScript React. , , React Native, , JavaScript CSS.
, ? , Swift Objective-C? , , - .
, .
Source: https://habr.com/ru/post/303328/
All Articles