Using webrtc to interact with the asterisk server or how to make the radio talk to the browser
Good day, habravchane.
Today I will tell you about the work of sip telephony, namely about how I organized a sound session between mobile radios (or TSC) about which you heard earlier from other articles of our company and web client via webRTC using sipML5 as a library and asterisk 11 as a PBX.

Everyone who cares about this topic is welcome under cat.
Our department received a quick task to develop a sip-client that would work on asterisk, and at least google chrome (both mobile and desktop versions). Since then, and spun.
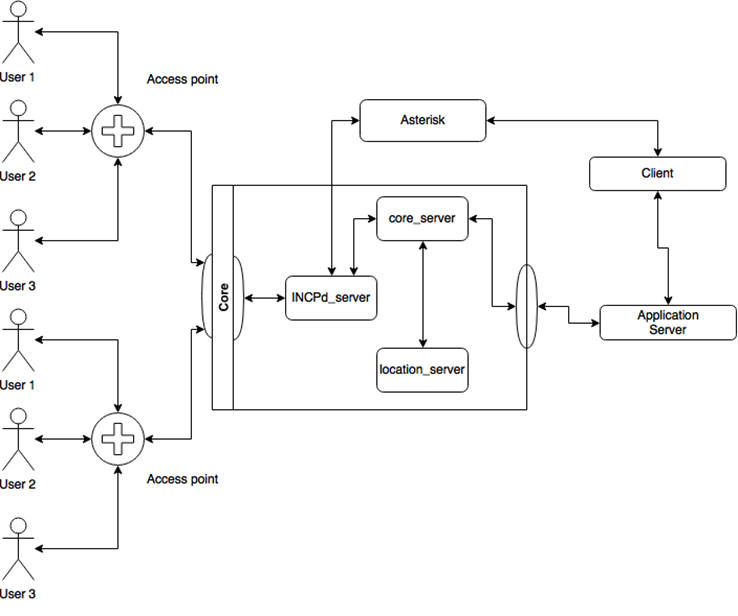
In the local positioning system RealTrac, there are mobile devices such as a walkie-talkie, or, as we call them, TSC (Intercom Portable), which provides the use of both full-duplex and half-duplex broadcast communications with other devices. These devices interact with the INCPd communication server, whose main task is the processing of INCP protocol packets, through which information is exchanged with RealTrac system devices. Including, this server handles incoming voice traffic, and repacks it into sip-packages, for further work with third-party software.
Asterisk acts as a switch.
')
SipML5 was chosen by us by chance. First, this library is well suited for integration with asterisk. Secondly, we already had experience with similar systems, however, due to the fact that our company supported Debian 7 as an OS for our software, there were certain difficulties. In the Debian 7 distribution, only asterisk 1.8 is available, while webRTC without dancing with a tambourine, in the form of webrtc2sip, works only with version 11 of asterisk, which was not very convenient for us, since this could be a testing ground for future installations.
With the release of Debian 8, it was decided to continue moving in the direction of this functionality.
React.js was a tool for creating ui-parts, since it is convenient for displaying various dynamic objects with a large number of internal states.
The client is based on two main entities, SIPml.Stack and SIPml.Session.
SIPml.Stack is a flow control. This object will act as the main one when creating sessions with the server.
SIPml.Session is a sip session stream with a server. It is used directly for data transfer between the server and the client part.
Algorithm for working with sipML5:
Library initialization:
Create Stack
Stack is a key data source for client work.
When creating a stack, it is necessary to specify a large amount of configuration data, some of which is optional. Full stack information can be found here.
After creating the stack object, you need to run it:
It is important to note that the start () function is asynchronous, therefore, before starting to make calls, you must wait for the stack start event.
The full list of events is presented here a lot , and it does not make sense to list them all.
After the stack creation event you need to create a registration session:
During this operation, a sip request occurs for the user to log in to the system.
After performing these actions, we are ready to make or receive calls from users.
Receive calls
An incoming call to sipML5 initiates the event "i_new_call" of the SIPml.Stack object.
In general, the call handler looks like this:
e.newSession - contains an additional session object, for the event “i_new_call” it will be a SIPml.Session.Call object.
The accept () function is required to accept a call. As parameter accepts object SIPml.Session.Configuration
Call Initialization
Initializing a call comes down to creating a new session like SIPml.Session.Call
After initialization, you can start calling the subscriber via his ID, number or url (eg 'sip: johndoe@example.com' or 'johndoe' or '+33600000000') .:
Call control
Call control are methods of the SIPml.Session.Call class.
The main ones are:
● .hangup () - call termination
● .hold () / .resume () - call hold / resume
● .mute (media, mute) - mute the incoming sound, where media is the type of content to mute; mute - boolean - activate / deactivate mute.
RtlsSip.callSession.mute ('audio', true);
There are also many other features that you can find information on here .
The application scheme has a fairly simple architecture. As an ideology, data is one-pointed and there is no interdependence between the elements.

I will not describe the settings for the asterisk server here, as they are easy to find on the network.
For subscribers like web-client, their own list of numbers was allocated. Numbers from the pool are assigned to dispatchers when creating a user account.
The dispatcher can make calls in both half-duplex and full-duplex mode, as well as communicate with other dispatchers if necessary.
The default device calls in half duplex mode. The dispatcher to whom the device is calling is selected depending on the geo-segment in which the device is located at the current time.
All this allows to achieve maximum comfort in using the system.
Results:
At the moment, this technology is undergoing the process of integration and testing. I am sure that in the process of work there will be a lot of hindrances and problems.
It is possible that in the future we will try a solution based on other technologies that provide the same functionality.
by Sinires
Today I will tell you about the work of sip telephony, namely about how I organized a sound session between mobile radios (or TSC) about which you heard earlier from other articles of our company and web client via webRTC using sipML5 as a library and asterisk 11 as a PBX.
Everyone who cares about this topic is welcome under cat.
A bit of background
Our department received a quick task to develop a sip-client that would work on asterisk, and at least google chrome (both mobile and desktop versions). Since then, and spun.
In the local positioning system RealTrac, there are mobile devices such as a walkie-talkie, or, as we call them, TSC (Intercom Portable), which provides the use of both full-duplex and half-duplex broadcast communications with other devices. These devices interact with the INCPd communication server, whose main task is the processing of INCP protocol packets, through which information is exchanged with RealTrac system devices. Including, this server handles incoming voice traffic, and repacks it into sip-packages, for further work with third-party software.
Asterisk acts as a switch.
')
Tools
SipML5 was chosen by us by chance. First, this library is well suited for integration with asterisk. Secondly, we already had experience with similar systems, however, due to the fact that our company supported Debian 7 as an OS for our software, there were certain difficulties. In the Debian 7 distribution, only asterisk 1.8 is available, while webRTC without dancing with a tambourine, in the form of webrtc2sip, works only with version 11 of asterisk, which was not very convenient for us, since this could be a testing ground for future installations.
With the release of Debian 8, it was decided to continue moving in the direction of this functionality.
React.js was a tool for creating ui-parts, since it is convenient for displaying various dynamic objects with a large number of internal states.
A little introduction on sipML5
The client is based on two main entities, SIPml.Stack and SIPml.Session.
SIPml.Stack is a flow control. This object will act as the main one when creating sessions with the server.
SIPml.Session is a sip session stream with a server. It is used directly for data transfer between the server and the client part.
Algorithm for working with sipML5:
Library initialization:
SIPml.init(readyCallback, errorCallback); Create Stack
Stack is a key data source for client work.
RtlsSip.stack = new SIPml.Stack({ realm: Data.property.realm, impi: Data.property.impi, impu: Data.property.impu, password: Data.property.password, display_name: Data.property.display_name, websocket_proxy_url: Data.property.websocket_proxy_url, events_listener: { events: '*', listener: eventsListener }, sip_headers: [ { name: 'User-Agent', value: 'IM-client/OMA1.0 sipML5-v1.0.0.0' }, { name: 'Organization', value: 'RTLS' } ] }) When creating a stack, it is necessary to specify a large amount of configuration data, some of which is optional. Full stack information can be found here.
After creating the stack object, you need to run it:
RtlsSip.stack.start(); It is important to note that the start () function is asynchronous, therefore, before starting to make calls, you must wait for the stack start event.
The full list of events is presented here a lot , and it does not make sense to list them all.
After the stack creation event you need to create a registration session:
RtlsSip.stack.newSession('register', { events_listener: { events: '*', listener: registerListeners} }); RtlsSip.sessions.register(); During this operation, a sip request occurs for the user to log in to the system.
After performing these actions, we are ready to make or receive calls from users.
Receive calls
An incoming call to sipML5 initiates the event "i_new_call" of the SIPml.Stack object.
In general, the call handler looks like this:
var eventCallback = function(){ RtlsSip.callSession = e.newSession; RtlsSip.callSession.events_listener({events: '*', listener: RtlsSip.sessionEventListener}) RtlsSip.callSession.accept( {audio_remote: document.getElementById('audio_remote'), events_listener: { events: '*', listener: RtlsSip.sessionEventListener}}) } e.newSession - contains an additional session object, for the event “i_new_call” it will be a SIPml.Session.Call object.
The accept () function is required to accept a call. As parameter accepts object SIPml.Session.Configuration
Call Initialization
Initializing a call comes down to creating a new session like SIPml.Session.Call
RtlsSip.callSession = RtlsSip.stack.newSession('call-audio', { audio_remote: document.querySelector('#audio_remote'), events_listener: { events: '*', listener: RtlsSip.sessionEventListener } }); After initialization, you can start calling the subscriber via his ID, number or url (eg 'sip: johndoe@example.com' or 'johndoe' or '+33600000000') .:
RtlsSip.callSession.call(number); Call control
Call control are methods of the SIPml.Session.Call class.
The main ones are:
● .hangup () - call termination
● .hold () / .resume () - call hold / resume
● .mute (media, mute) - mute the incoming sound, where media is the type of content to mute; mute - boolean - activate / deactivate mute.
RtlsSip.callSession.mute ('audio', true);
There are also many other features that you can find information on here .
Scheme of the application:
The application scheme has a fairly simple architecture. As an ideology, data is one-pointed and there is no interdependence between the elements.
System integration
I will not describe the settings for the asterisk server here, as they are easy to find on the network.
For subscribers like web-client, their own list of numbers was allocated. Numbers from the pool are assigned to dispatchers when creating a user account.
The dispatcher can make calls in both half-duplex and full-duplex mode, as well as communicate with other dispatchers if necessary.
The default device calls in half duplex mode. The dispatcher to whom the device is calling is selected depending on the geo-segment in which the device is located at the current time.
All this allows to achieve maximum comfort in using the system.
Results:
At the moment, this technology is undergoing the process of integration and testing. I am sure that in the process of work there will be a lot of hindrances and problems.
It is possible that in the future we will try a solution based on other technologies that provide the same functionality.
by Sinires
Source: https://habr.com/ru/post/302998/
All Articles