Combining 3CX Phone System with Asterisk (FreePBX)
In this article, we will explain how to combine the 3CX Phone System v14 and Asterisk FreePBX v13 systems. We will proceed from the fact that both systems are in the same local area network. If you have any questions or suggestions for improving integration, you can ask them in a special section of our forum .
In the 3CX Management Console, add a new 3CX trunk in the Bridges section - Add Bridge .
')
The remaining parameters: Allow tuned connection , Publish information , Receive information , Supports Re-Invite , Support Replaces , PBX Delivers Audio, leave the default.
After clicking the Next button, the interface for creating an outgoing rule on Asterisk will appear. Setting outgoing rules is detailed here .
On the Asterisk system, create an outgoing trunk with the following parameters:

Outgoing - Trunk name : 3CX Bridge Outgoing
Outgoing - PEER Details:
host = [3CX IP]
port = [3CX SIP Port]
username = [3CX Bridge ID]
fromuser = [3CX Bridge ID]
secret = [3CX Bridge Password]
sendrpid = yes
qualify = yes
type = peer
And the incoming trunk:

Incoming - USER Details:
host = [3CX IP]
port = [3CX SIP Port]
type = peer
trustrpid = yes
context = from-trunk
Incoming - Register String:
[3CX Bridge ID]: [3CX Bridge Password] @ [3CX IP]: [3CX SIP Port] / [3CX Bridge ID]
In Asterisk, you also need to create an inbound and outbound route that determines the routing of calls from / to 3CX Phone System. To do this, refer to the FreePBX documentation .
If trunk configuration is done correctly, the 3CX trunk on Asterisk should have Registered status in the management console in the System Status - Ports / Trunks section .

If you use Wireshark to capture traffic, the INVITE SIP request should look something like this.

Configure 3CX Phone System
In the 3CX Management Console, add a new 3CX trunk in the Bridges section - Add Bridge .
')
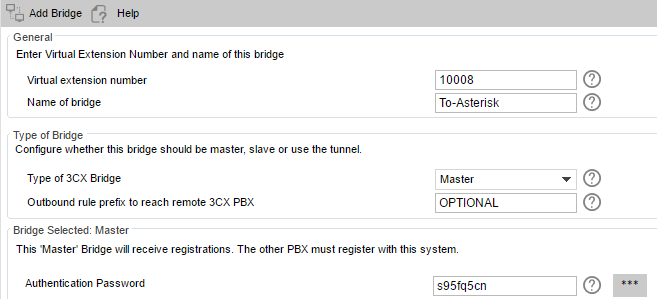
3CX trunk options
- Virtual extension number - leave the value assigned by the system, or specify another 5-digit Bridge ID . Fix the Bridge ID and do not change it, because It is used further.
- Name of Bridge - name the trunk as you like. Typically, the name displays the direction of calls, for example, To-Asterisk .
- Type of 3CX Bridge - set the type of trunk to Master .
- Outbound rule prefix to reach remote 3CX PBX - if you want to use the prefix for calls to the Asterisk system, specify it. However, we recommend to pre-define the numbering plan so that users make a direct dial, i.e. without prefixes. In this case, the prefix should not be specified (and typed).
- Authentication Password - the system automatically generates a complex 8-character Bridge Password Password . Fix the Bridge Password and do not change it, because It is used further.
- Assigned Codecs - voice codecs used for this trunk. The default is the GSM-FR codec, however you can add other codecs and determine their priority. Please note that the codecs you added must be supported by Asterisk. We recommend using the G722 broadband codec and assign it the highest priority so that the system tries to use it before others.
The remaining parameters: Allow tuned connection , Publish information , Receive information , Supports Re-Invite , Support Replaces , PBX Delivers Audio, leave the default.
After clicking the Next button, the interface for creating an outgoing rule on Asterisk will appear. Setting outgoing rules is detailed here .
Configure Asterisk
On the Asterisk system, create an outgoing trunk with the following parameters:
Outgoing - Trunk name : 3CX Bridge Outgoing
Outgoing - PEER Details:
host = [3CX IP]
port = [3CX SIP Port]
username = [3CX Bridge ID]
fromuser = [3CX Bridge ID]
secret = [3CX Bridge Password]
sendrpid = yes
qualify = yes
type = peer
And the incoming trunk:
Incoming - USER Details:
host = [3CX IP]
port = [3CX SIP Port]
type = peer
trustrpid = yes
context = from-trunk
Incoming - Register String:
[3CX Bridge ID]: [3CX Bridge Password] @ [3CX IP]: [3CX SIP Port] / [3CX Bridge ID]
Trunk Parameters
- 3CX Bridge ID - Virtual extension number that was installed when creating the 3CX trunk.
- 3CX Bridge Password - The virtual extension password that was set when creating the 3CX trunk.
- 3CX IP is the IP address or FQDN of the 3CX server to which Asterisk is connected.
- 3CX SIP Port - SIP port of the 3CX server. If you have a regular (ie, non-cloud) installation of 3CX, the default SIP port is 5060. You can change the SIP port in the 3CX management interface in the Settings - Network - Ports section.
In Asterisk, you also need to create an inbound and outbound route that determines the routing of calls from / to 3CX Phone System. To do this, refer to the FreePBX documentation .
Integration testing
If trunk configuration is done correctly, the 3CX trunk on Asterisk should have Registered status in the management console in the System Status - Ports / Trunks section .
If you use Wireshark to capture traffic, the INVITE SIP request should look something like this.
Request parameters
- 101 - dialed from Asterisk to 3CX
- 10003 — Virtual Trunk Extension Number
- John Smith and 100 - Display Name and Caller User ID Asterisk
- 10.172.1.25:5061 - Asterisk IP address and SIP port
- 192.168.9.206:5060 - IP address and SIP port 3CX Phone System
Additional Information
Source: https://habr.com/ru/post/302680/
All Articles