How to raise CI for iOS developers in a day. Part 2
Hello. This is a continuation of an article about how the Live Typing iOS department introduced CI methodology and deployed a server to automate assemblies on Jenkins. As we promised, the second part is devoted to how to get the basic code metrics, archive the project in .ipa, and set up interaction with Slack.
To begin with, we will install programs that will collect statistics for us:
Next, we need to install plugins for Jenkins, which will display the statistics in a readable form:
Also install auxiliary plugins:
To receive notifications about the build status in the Slack team chat, we need to add the appropriate integration with Jenkins in the Slack settings. This can be done here .
After creating the integration, a unique token will be generated, which must be added to the Jenkins settings (or to the settings of a separate job) - as in the example in the screenshot:

')
Next, we configure the launch of assemblies using the built-in command mechanism in Slack. First we need to add integration. To do this, go to the Slash commands subsection in the Custom Integrations section and click on the Add configurations button. This operation can be performed here .
When setting up, you need to specify the name of your team, select the POST data transfer method and specify the URL to which the request will go.
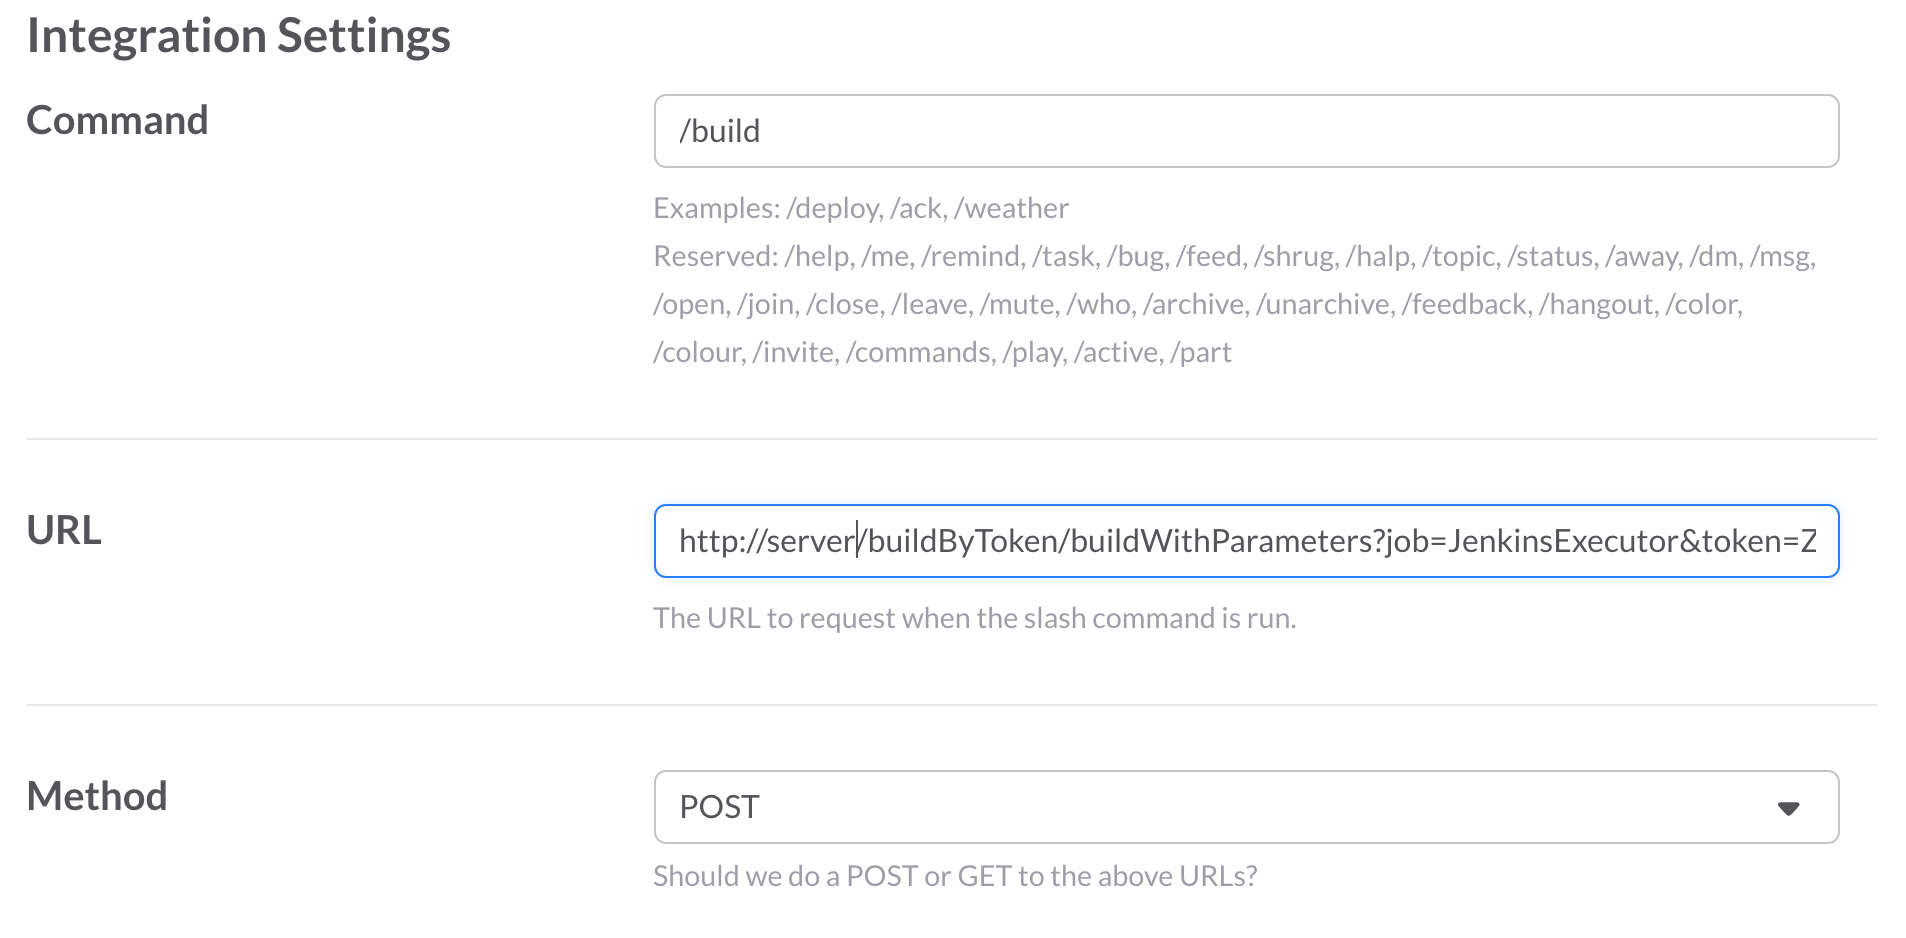
Consider an example of the formation of the URL for the request in more detail. Our URL for example looks like this:
Let's sort it out by components:
As an example, we will use the following command structure:
The considered configuration will allow us to run the assembly of any project with an indication of the desired branch, and a single command will be used: / build.
We will need this job in order to run other jobs. It will also be able to handle errors if the user entered a non-existing project, and add information about the command (kind of help).
We go to the server and create a new task with a free configuration and the name JenkinsExecutor. Next, in the settings of the job, we set a flag indicating that the assembly is parameterized and accepts the text parameter. When running a command in Slack, all the data (Example master test) will be passed in a single line in the text variable.

Next, set the flag responsible for running the assembly remotely. Here you need to specify a token that is identical to the one we set in the settings of the command in Slack:

Now we need to extract the values from the text variable. To do this, go to the "Assembly" section and add the "execute the shell command" assembly step. Command example:
To start the build with the parameters, send a POST request to execute a specific job. To do this, add the following line to the previous shell command:
Here, password is the API key of the user username (the user must have rights to run jobs).
To get the key:
Please note that all running assemblies must be parameterized!
4.1. The first thing you should pay attention to when setting up a job is that the assembly must be parameterized. To do this, set the appropriate flag, add the text parameters BRANCH and TEST and set the default parameters for them:

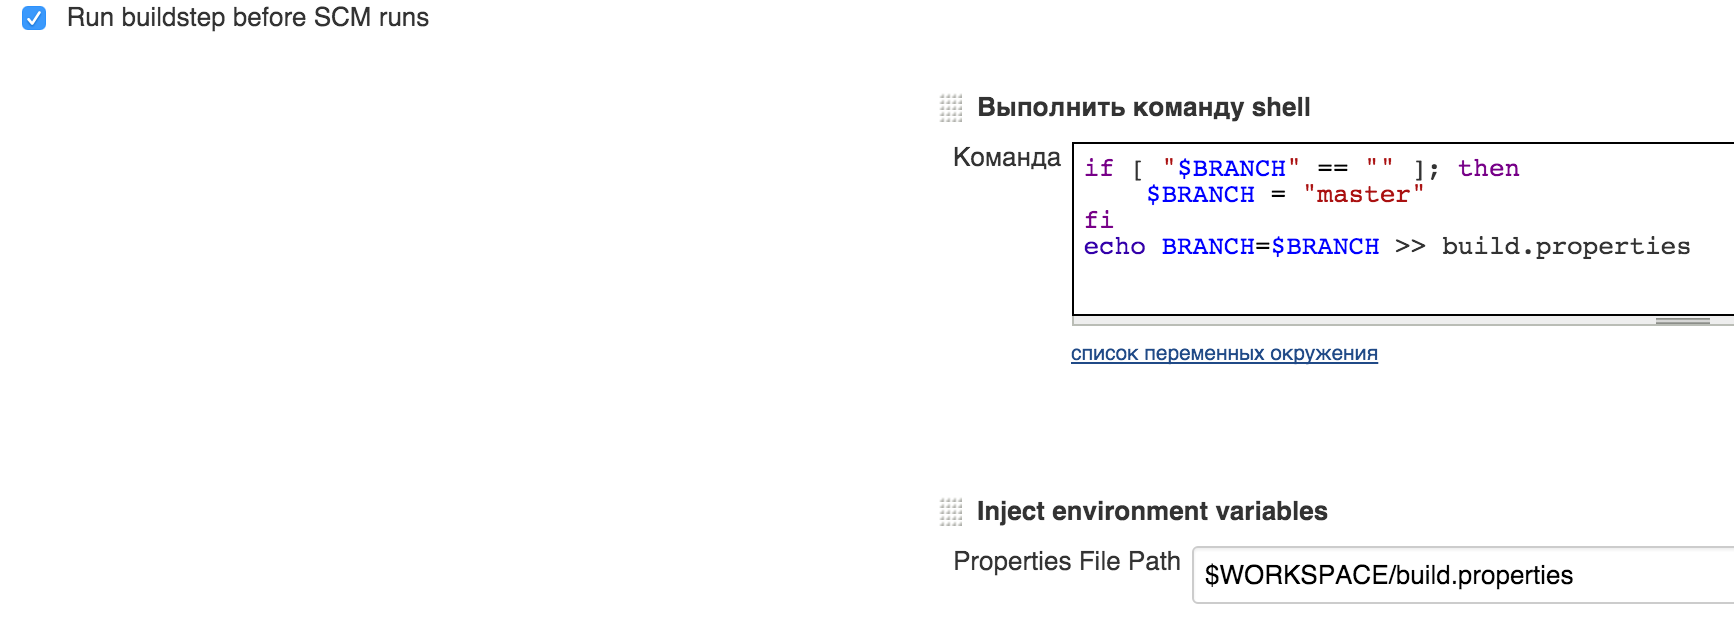
Here it is worth noting that for the BRANCH variable, you must additionally add a default value. The fact is that if you run an assembly from Slack without specifying a branch, then the BRANCH variable will have an empty value and, accordingly, there will be an error. To do this, we will add the Run buildstep before SCM runs flag in the “Build Environment” section. Then add the step “execute the shell command” and the step inject environment variables. We do the following:
4.2. Configuring interaction with GitLab.
Specify the address of the project repository. Specify the assembly branch (in our case it is the BRANCH variable).

4.3. Customize the assembly for the web hook.
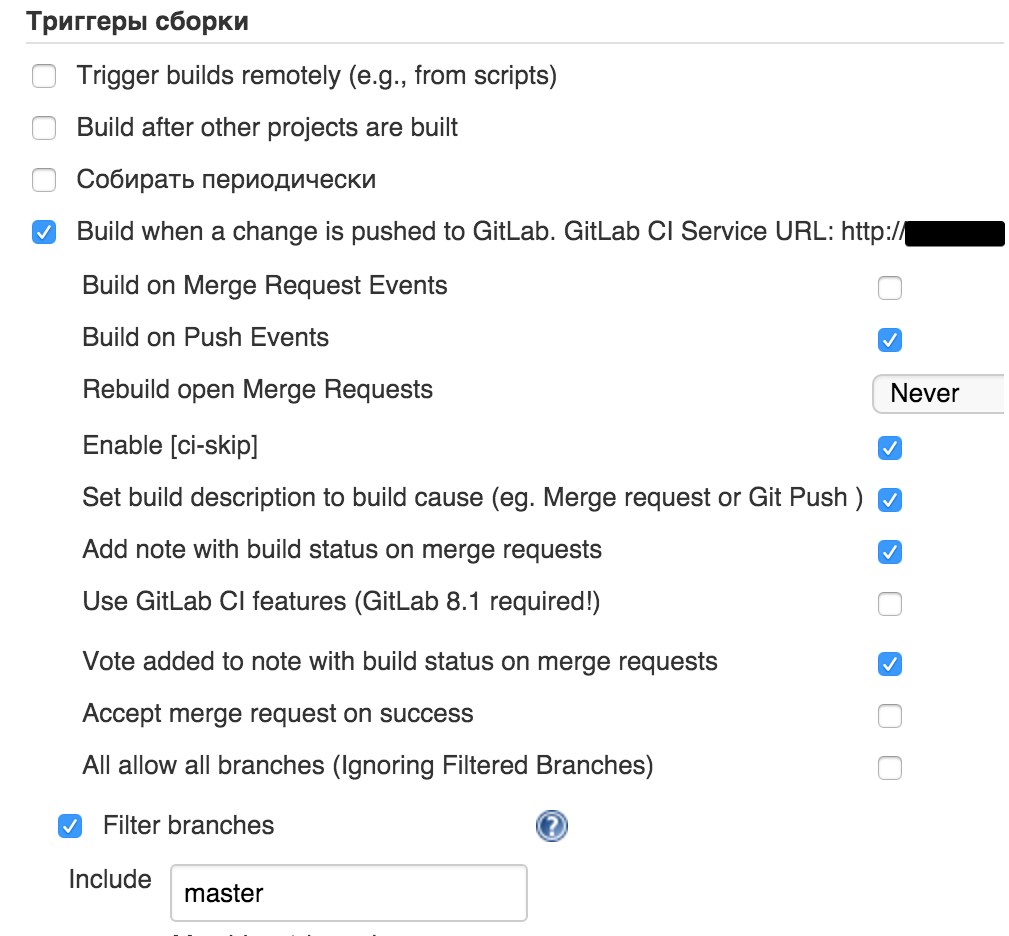
In the triggers of the assembly set the flag "Build on push in GitLab". Add the necessary parameters and specify the branch for which the trigger will work:
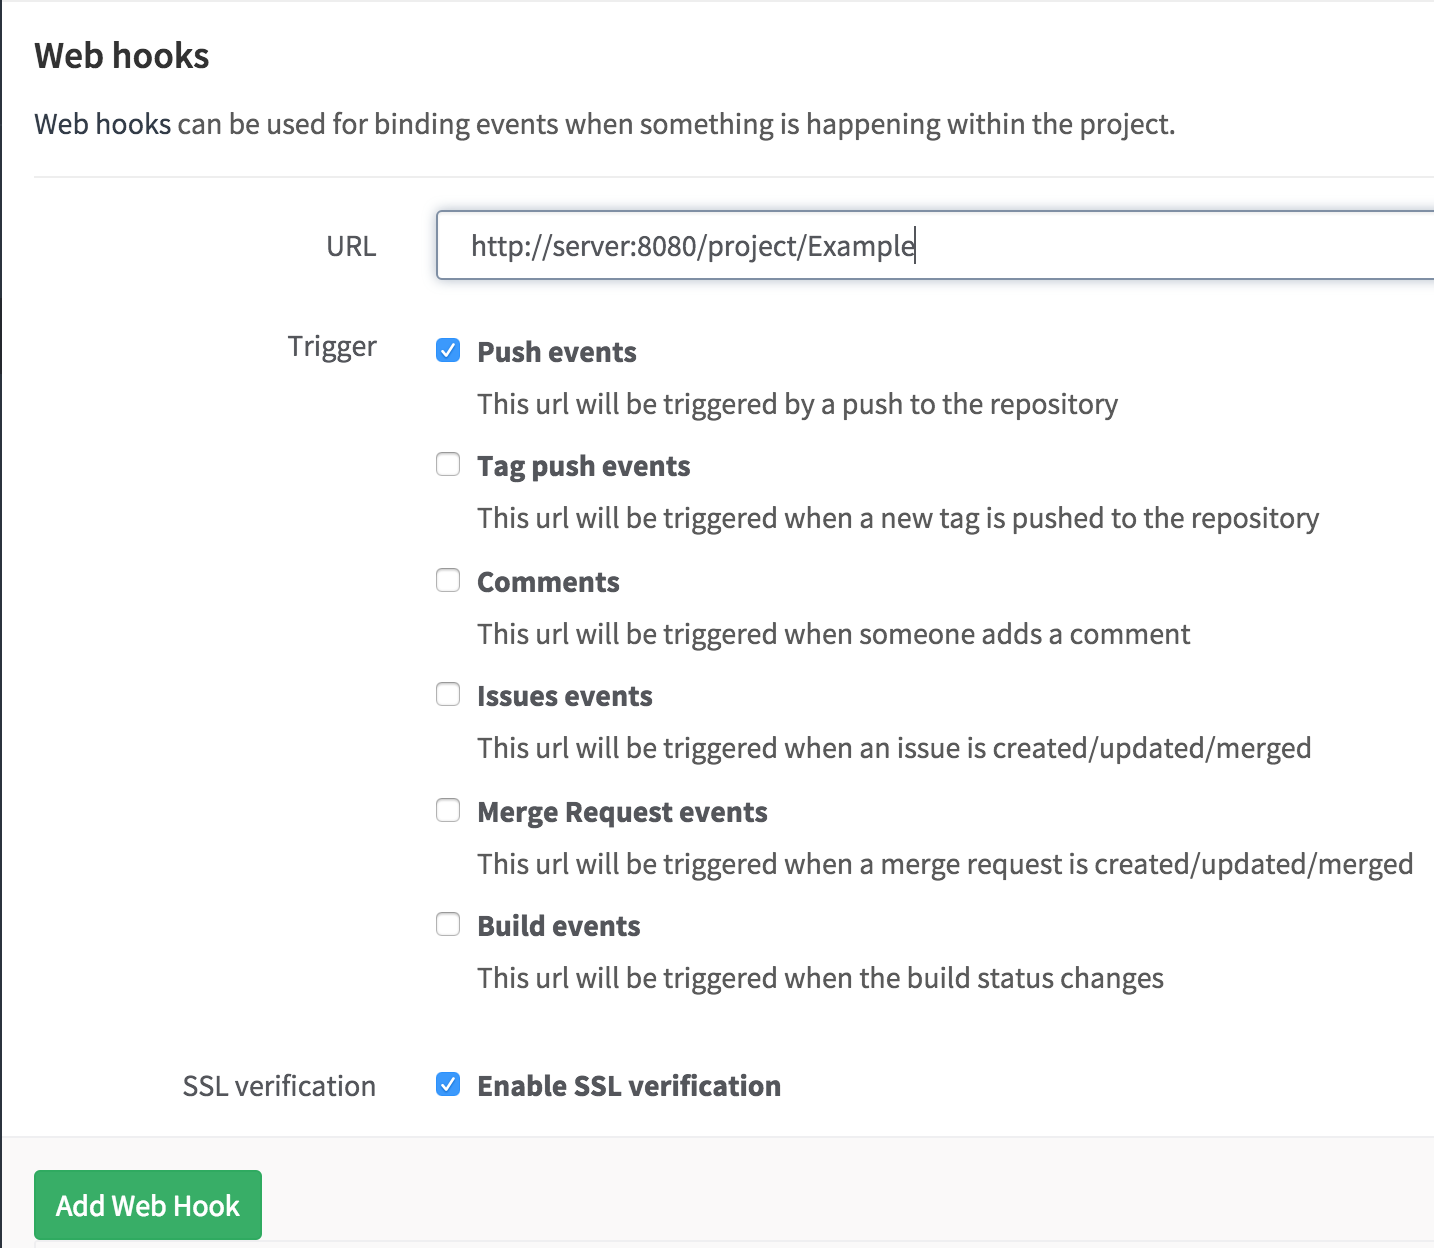
Then in the project settings on GitLab in the category Web hooks add a web hook to the Jenkins server:
4.4. The build phase begins with the execution of a shell command that installs Pods, if the file has been updated:
Then, for convenience, set some variables for the project and write them to a file:
Depending on the set TEST parameter, we start or skip the testing phase and generate reports. An example of what this might look like:
Detailed information on the command syntax is available on the corresponding documentation pages:
4.5. Recorded variables need to be embedded in the build process. To do this, add the assembly step Inject environment variables and specify the desired path:

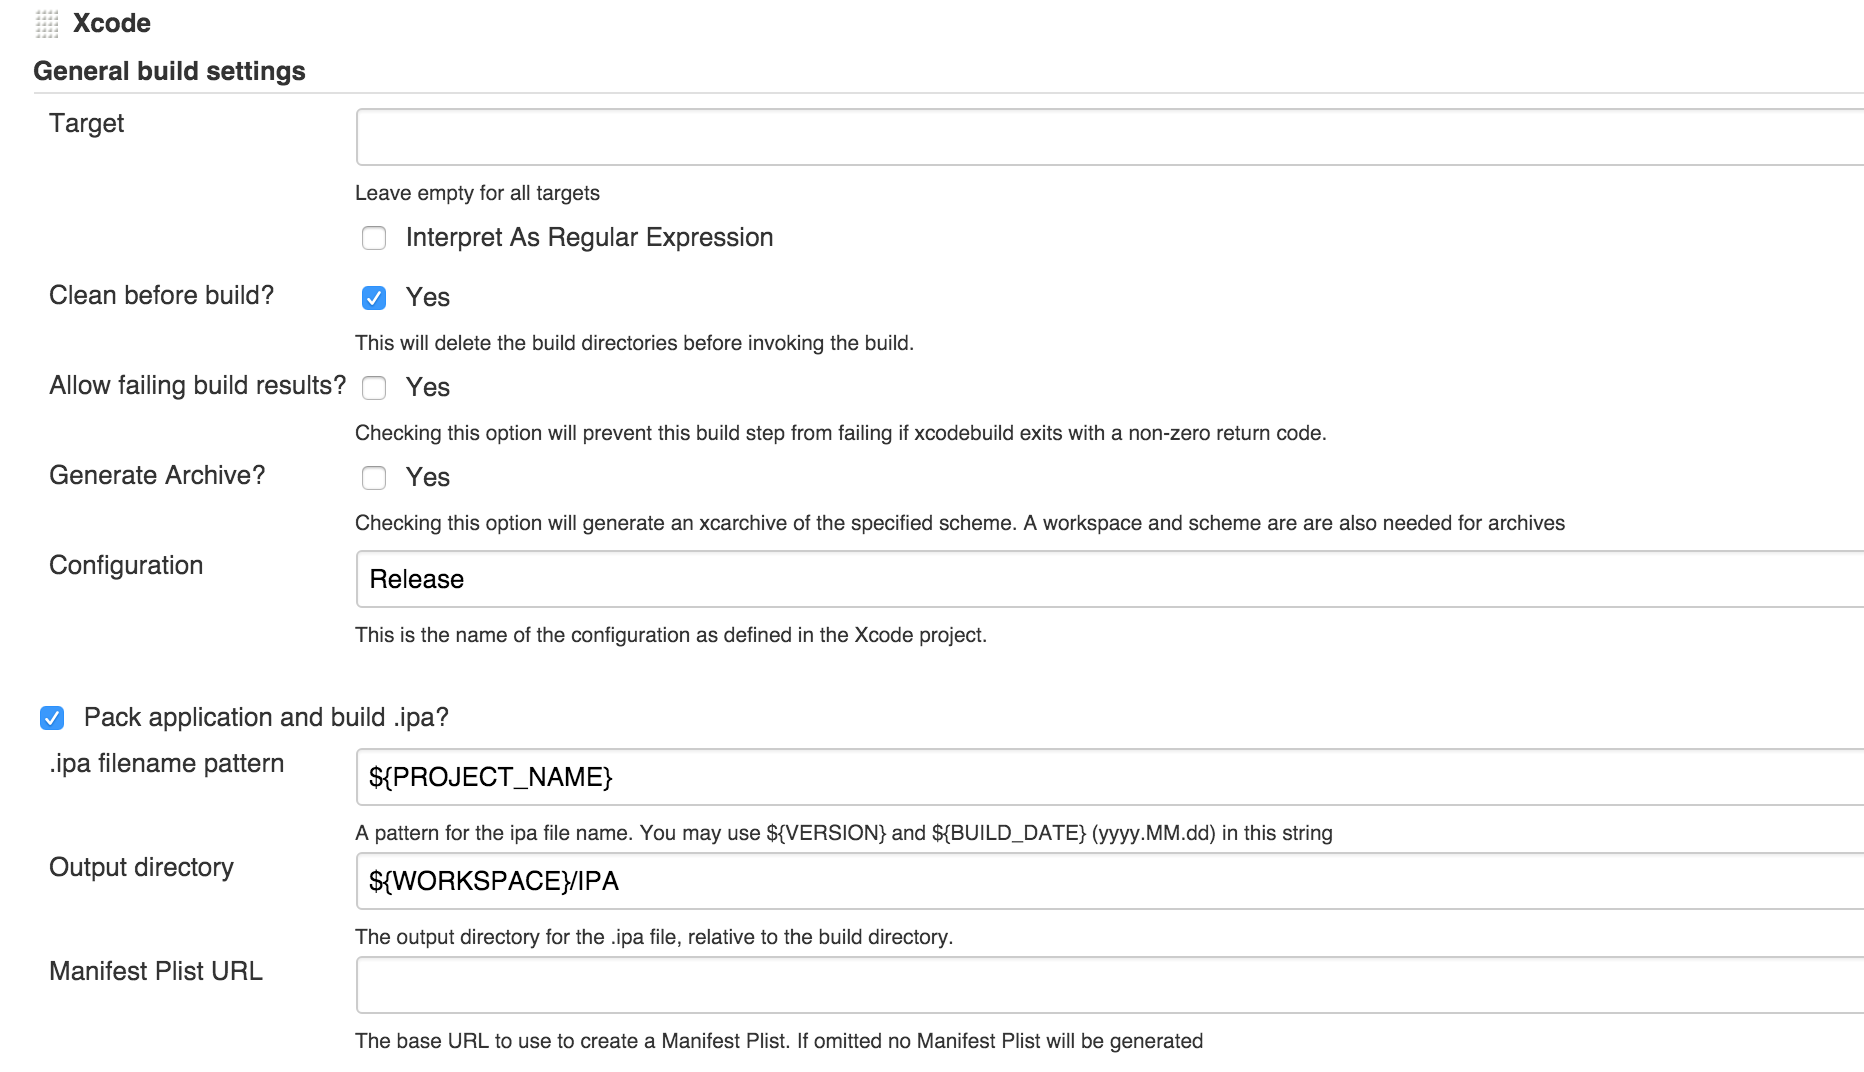
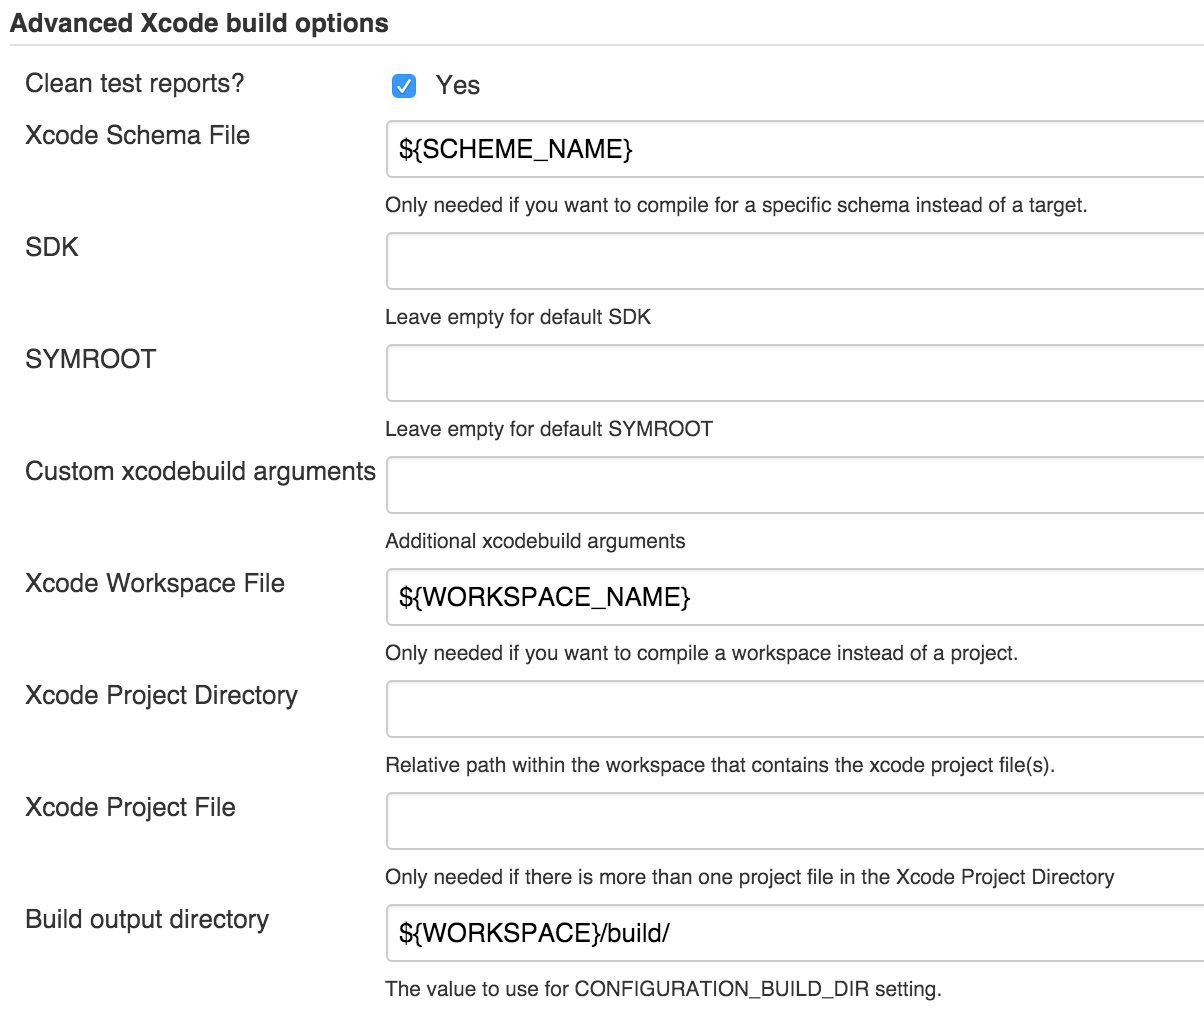
4.6. The next step is creating the assembly and archiving into an .ipa file. To do this, use the Xcode plugin. We do the following:
4.7. The last step is to add post assembly operations.
We generated files for five reports, and now we need to transfer these files to the appropriate plugins:
At this stage, we can send the received in the case of success .ipa-file to where we need (to the server, by e-mail, etc.). If you want to send files to the server via SFTP and you use the Publish Over SSH plugin, you need to go to the Build Environment section, set the flag for send files or execute commands over SSH after the build runs and configure the plugin to suit your requirements.
The last step we need to add is Slack Notification, which, you guessed it, sends notifications to Slack. In the advanced settings of the plugin, you can specify individual settings for the current job. It is worth noting that as a message you can specify a variable (example: $ MESSAGE), the value of which is changed at different stages of the assembly and thereby send more informative messages to Slack.
At this point, CI implementation can be considered complete. We hope that our article will be useful for you, and we ask you to share your questions, thoughts and comments in the comments.
1. Installing all the necessary programs and plug-ins.
To begin with, we will install programs that will collect statistics for us:
# brew install gcovr # brew install cloc # , brew install sloccount # brew install pmd # ( oclint) sudo gem install xcpretty # brew tap oclint/formulae brew install oclint Next, we need to install plugins for Jenkins, which will display the statistics in a readable form:
- PMD Plug-in - generation of a report on the statistical complexity of the code;
- SLOCCount Plug-in - generation of a report on the number of lines of code;
- Test Results Analyzer Plugin - generating a report on test results;
- Cobertura Plugin - generating a report on code coverage with tests;
- DRY Plug-in - generating a code duplication report.
Also install auxiliary plugins:
- Environment Injector Plugin - the introduction of variables in the project;
- Pre SCM BuildStep Plugin - implementing variables before starting the job;
- Build Authorization Token Root Plugin - launching a job with a get-request with a token;
- Parameterized Trigger plugin - allows you to run jobs with parameters at the end of the build;
- Slack Notification Plugin - sending messages to the Slack team chat;
- Publish Over SSH - this plugin is listed here as an example. It will suit you if you, like us, send data via SFTP to the server.
2. Integration with Slack chat
To receive notifications about the build status in the Slack team chat, we need to add the appropriate integration with Jenkins in the Slack settings. This can be done here .
After creating the integration, a unique token will be generated, which must be added to the Jenkins settings (or to the settings of a separate job) - as in the example in the screenshot:
')
Next, we configure the launch of assemblies using the built-in command mechanism in Slack. First we need to add integration. To do this, go to the Slash commands subsection in the Custom Integrations section and click on the Add configurations button. This operation can be performed here .
When setting up, you need to specify the name of your team, select the POST data transfer method and specify the URL to which the request will go.
Consider an example of the formation of the URL for the request in more detail. Our URL for example looks like this:
http://server:8080/buildByToken/buildWithParameters?job=JenkinsExecutor&token=XXXXXXXXXXXXXXXXX
Let's sort it out by components:
- server is the external address of your server. If necessary, here we also indicate the required port (in our case, 8080);
- buildByToken is an opportunity provided by the Build Authorization Token Root Plugin plugin. Allows you to run a job by reference with a token (in our case, XXXXXXXXXXXXXXXXXX);
- buildWithParameters - indicates that you need to run a parameterized build;
- JenkinsExecutor is the name of the job, which we will create and use to run other jobs. It will be discussed below;
- XXXXXXXXXXXXXXXXX is the value of the token, which is set in the settings of the plugin in the configuration of each individual job.
As an example, we will use the following command structure:
/build Example test master
- / build is the name of our team;
- Example - job'a name;
- test - an auxiliary flag associated with running tests and creating reports with metrics;
- master is the build branch.
The considered configuration will allow us to run the assembly of any project with an indication of the desired branch, and a single command will be used: / build.
3. Configuration auxiliary job'a - JenkinsExecutor
We will need this job in order to run other jobs. It will also be able to handle errors if the user entered a non-existing project, and add information about the command (kind of help).
We go to the server and create a new task with a free configuration and the name JenkinsExecutor. Next, in the settings of the job, we set a flag indicating that the assembly is parameterized and accepts the text parameter. When running a command in Slack, all the data (Example master test) will be passed in a single line in the text variable.
Next, set the flag responsible for running the assembly remotely. Here you need to specify a token that is identical to the one we set in the settings of the command in Slack:
Now we need to extract the values from the text variable. To do this, go to the "Assembly" section and add the "execute the shell command" assembly step. Command example:
# , IFS=' ' read -a array <<< "$text" # , — JOB_NAME=${array[0]} #, TEST=${array[1]} # BRANCH=${array[2]} # , : USER_NAME=${user_name} CHANNEL_NAME=${channel_name} To start the build with the parameters, send a POST request to execute a specific job. To do this, add the following line to the previous shell command:
curl -d TEST=${TEST} -d BRANCH=${BRANCH} -X POST \ -u username:password http://127.0.0.1:8080/job/${JOB_NAME}/buildWithParameters Here, password is the API key of the user username (the user must have rights to run jobs).
To get the key:
- Click on the username in the upper right corner of the Jenkins web interface;
- Click on the "Customize" button on the left side of the screen;
- Click on Show API Key - the key we are looking for.
Please note that all running assemblies must be parameterized!
4. Build setup
4.1. The first thing you should pay attention to when setting up a job is that the assembly must be parameterized. To do this, set the appropriate flag, add the text parameters BRANCH and TEST and set the default parameters for them:
Here it is worth noting that for the BRANCH variable, you must additionally add a default value. The fact is that if you run an assembly from Slack without specifying a branch, then the BRANCH variable will have an empty value and, accordingly, there will be an error. To do this, we will add the Run buildstep before SCM runs flag in the “Build Environment” section. Then add the step “execute the shell command” and the step inject environment variables. We do the following:
4.2. Configuring interaction with GitLab.
Specify the address of the project repository. Specify the assembly branch (in our case it is the BRANCH variable).
4.3. Customize the assembly for the web hook.
In the triggers of the assembly set the flag "Build on push in GitLab". Add the necessary parameters and specify the branch for which the trigger will work:
Then in the project settings on GitLab in the category Web hooks add a web hook to the Jenkins server:
4.4. The build phase begins with the execution of a shell command that installs Pods, if the file has been updated:
if [ $(( $(date +"%s") - $(stat -f %m Podfile) )) -le 60 ]; then pod install fi Then, for convenience, set some variables for the project and write them to a file:
# .ipa- PROJECT_NAME="Example" # .xcworkspace WORKSPACE_NAME="Example" # SCHEME_NAME="Example" # . FOLDER_NAME_WITH_CODE="Example" # , echo PROJECT_NAME=$PROJECT_NAME > build.properties echo WORKSPACE_NAME=$WORKSPACE_NAME >> build.properties echo SCHEME_NAME=$SCHEME_NAME >> build.properties Depending on the set TEST parameter, we start or skip the testing phase and generate reports. An example of what this might look like:
if [ "$TEST" == "test" ]; then # reports, if [ ! -d "reports" ]; then mkdir "reports" fi # xcodebuild -workspace ${WORKSPACE_NAME}.xcworkspace \ -scheme ${SCHEME_NAME} \ -configuration Debug \ -sdk iphonesimulator \ -destination 'platform=iOS Simulator,name=iPhone 6' \ -IDECustomDerivedDataLocation="build_ccov" \ GCC_GENERATE_TEST_COVERAGE_FILES=YES \ GCC_INSTRUMENT_PROGRAM_FLOW_ARCS=YES \ clean test | xcpretty -r junit -o reports/junit.xml -r json-compilation-database -o compile_commands.json #Publish JUNIT test = **/reports/junit.xml # oclint-json-compilation-database -v -e Pods -- \ -rc=LONG_LINE=200 \ -rc=NCSS_METHOD=60 \ -rc=LONG_METHOD=100 \ -rc=MINIMUM_CASES_IN_SWITCH=1 \ -report-type pmd \ -o reports/oclint.xml \ -max-priority-1 1000 \ -max-priority-2 1000 \ -max-priority-3 1000 #Publish PMD analysis = **/reports/oclint.xml # gcovr --object-directory="build_ccov/${SCHEME_NAME}/Build/Intermediates/${SCHEME_NAME}.build/"\ "Debug-iphonesimulator/${SCHEME_NAME}.build/Objects-normal/x86_64/" \ --xml \ --print-summary \ --exclude '.*Tests.*' \ --exclude '.*Libs.*' \ --exclude '.*ExternalFrameworks.*' \ --exclude '.*Platforms.*' \ --output=reports/coverage.xml #Publish Cobertura Coverage = **/reports/coverage.xml # ( ): cloc ${WORKSPACE}/${FOLDER_NAME_WITH_CODE} -by-file -skip-uniqueness -xml -out=${WORKSPACE}/reports/cloc.xml #Publish SLOCCount analysis = **/reports/cloc.xml sloccount --duplicates --wide --details ${WORKSPACE}/${FOLDER_NAME_WITH_CODE} -v > reports/sloccount.sc #Publish SLOCCount analysis = **/reports/sloccount.sc # pmd cpd --files ${WORKSPACE}/${FOLDER_NAME_WITH_CODE} \ --minimum-tokens 10 --language objectivec \ --encoding UTF-8 \ --format net.sourceforge.pmd.cpd.XMLRenderer | iconv -f macRoman -t utf-8 | sed 's/MacRoman/UTF-8/g' > reports/duplicated-code.xml #Publish duplicate code = **/reports/duplicated-code.xml else touch reports/junit.xml # , - Publish JUNIT test result report fi Detailed information on the command syntax is available on the corresponding documentation pages:
4.5. Recorded variables need to be embedded in the build process. To do this, add the assembly step Inject environment variables and specify the desired path:
4.6. The next step is creating the assembly and archiving into an .ipa file. To do this, use the Xcode plugin. We do the following:
4.7. The last step is to add post assembly operations.
We generated files for five reports, and now we need to transfer these files to the appropriate plugins:
- Publish PMD analysis results = ** / reports / oclint.xml
- Publish duplicate code analysis results = ** / reports / duplicated-code.xml
- Publish Cobertura Coverage analysis results = ** / reports / coverage.xml
- Publish SLOCCount analysis results = depending on the module used:
- ** / reports / cloc.xml
- ** / reports / sloccount.sc
- Publish JUNIT test result report = ** / reports / junit.xml ( Note : In the advanced settings of the plug-in, you must set the flag do not have the build status, if it was started without running the tests )
At this stage, we can send the received in the case of success .ipa-file to where we need (to the server, by e-mail, etc.). If you want to send files to the server via SFTP and you use the Publish Over SSH plugin, you need to go to the Build Environment section, set the flag for send files or execute commands over SSH after the build runs and configure the plugin to suit your requirements.
The last step we need to add is Slack Notification, which, you guessed it, sends notifications to Slack. In the advanced settings of the plugin, you can specify individual settings for the current job. It is worth noting that as a message you can specify a variable (example: $ MESSAGE), the value of which is changed at different stages of the assembly and thereby send more informative messages to Slack.
At this point, CI implementation can be considered complete. We hope that our article will be useful for you, and we ask you to share your questions, thoughts and comments in the comments.
Source: https://habr.com/ru/post/302642/
All Articles