How to set up two-factor authentication for login and sudo
Security is in fashion, as it should be. We live in a world where data is an incredibly valuable currency that you always risk losing. Therefore, you must do everything to make sure that what you keep on servers and desktops is safe. To do this, administrators and users create incredibly complex passwords, use password managers, etc. But what if I tell you that you can log in to your servers and Linux desktops in two steps instead of one? You can do this with Google Authenticator. Moreover, it is incredibly easy to set up.
I'm going to walk you through the process of setting up two-factor authentication for use on login and sudo . I will demonstrate this on desktop Ubuntu 16.04, but the process also works for the server. To cope with the two-factor side of things, I will use Google Authenticator .
There is one very important caveat: once you configure this, you will not be able to log in (or use the sudo command ) without a six-digit code from the authenticator. One more step is added for you, so if you get a smartphone every time you need to login to your Linux machine (or use sudo ), this is a problem for you, perhaps this method is not for you. But remember, be that as it may, this extra step brings you an extra layer of protection that would not otherwise exist.
')
After that, let's do the setup.
Installing the necessary components
There are two pieces of this puzzle that should be installed together as a Google Authenticator. The first is a smartphone app. Here's how to install it from the Google Play Store:
- Open the Google Play Store on your Android device.
- Find through the search " google authenticator "
- Tapnite by name from Google Inc.
- Tapnite "Install"
- Tapnite “Accept”
- Wait for the installation to complete.
Now let's move on to installing the authenticator on your linux machine. Like this:
- Open terminal window
- Run the
sudo apt-get install libpam-google-authenticator - Enter your sudo password and press Enter
- If prompted, type y and press Enter.
- Wait for the installation to complete.
Now it's time to configure the authentication process to work with google-authenticator .
Configuration
You need to edit just one file to add two-factor authentication for login and sudo at once. This is the /etc/pam.d/common-auth file. Open it and find the line:
auth [success=1 default=ignore] pam_unix.so nullok_secure Above this line add the following:
auth required pam_google_authenticator.so Save and close the file.
The next step is to set up google-authenticator for each user in the system (otherwise they will not be able to login). For example, suppose you have two users on your system: jack and olivia . First we set it up for jack (suppose this is the account that we worked with all this time).
Open a terminal window and run the
google-authenticator command. You will be asked a series of questions (each of which should be answered by y). Questions such:- Do you want me to update your "/home/jack/.google_authenticator" file? (y / n) y
- Do you want to prohibit multiple uses of the same token? This limits you to a single entry attempt about once every 30 seconds, but increases the chances of noticing or even preventing a man-in-the-middle attack. (y / n) y
- By default, tokens are good for 30 seconds, and in order to compensate for the possible time skews between the client and the server, we provide an additional token before and after the current time. If you experience problems with poor-quality time synchronization, you can increase the window from its default value of 1:30 minutes, to about 4 minutes. Want to do this? (y / n) y
- If your computer to which you are logged in is not protected from brute force attempts to log in, you can enable the frequency limit for the authentication module. By default, this limits attackers to no more than 3 attempts to log in every 30 seconds. Want to enable frequency limiting? (y / n) y
By answering these questions, you will be provided with a secret key, verification code and five emergency scratch codes. Print out the scratch codes and keep them with you. These codes can be used if you do not have your smartphone with you (each code can be used only once). The secret key is what you use to set up your account in the Google Authenticator application, and the verification code is a one-time code that you can use immediately (if necessary).
Application setup
You now have a customized user jack . Before you can configure the olivia user, you need to add an account for jack to the Google Authenticator application. Open the application and tap the menu button from the main window (three vertical dots in the upper right corner). Tap “Configure account” and then tap “Enter key”. In the next window (Image 1), you will enter the 16-digit secret key provided during the google-authenticator application. Give your account a name (so you remember which account it will be used on) and tap “ADD”.
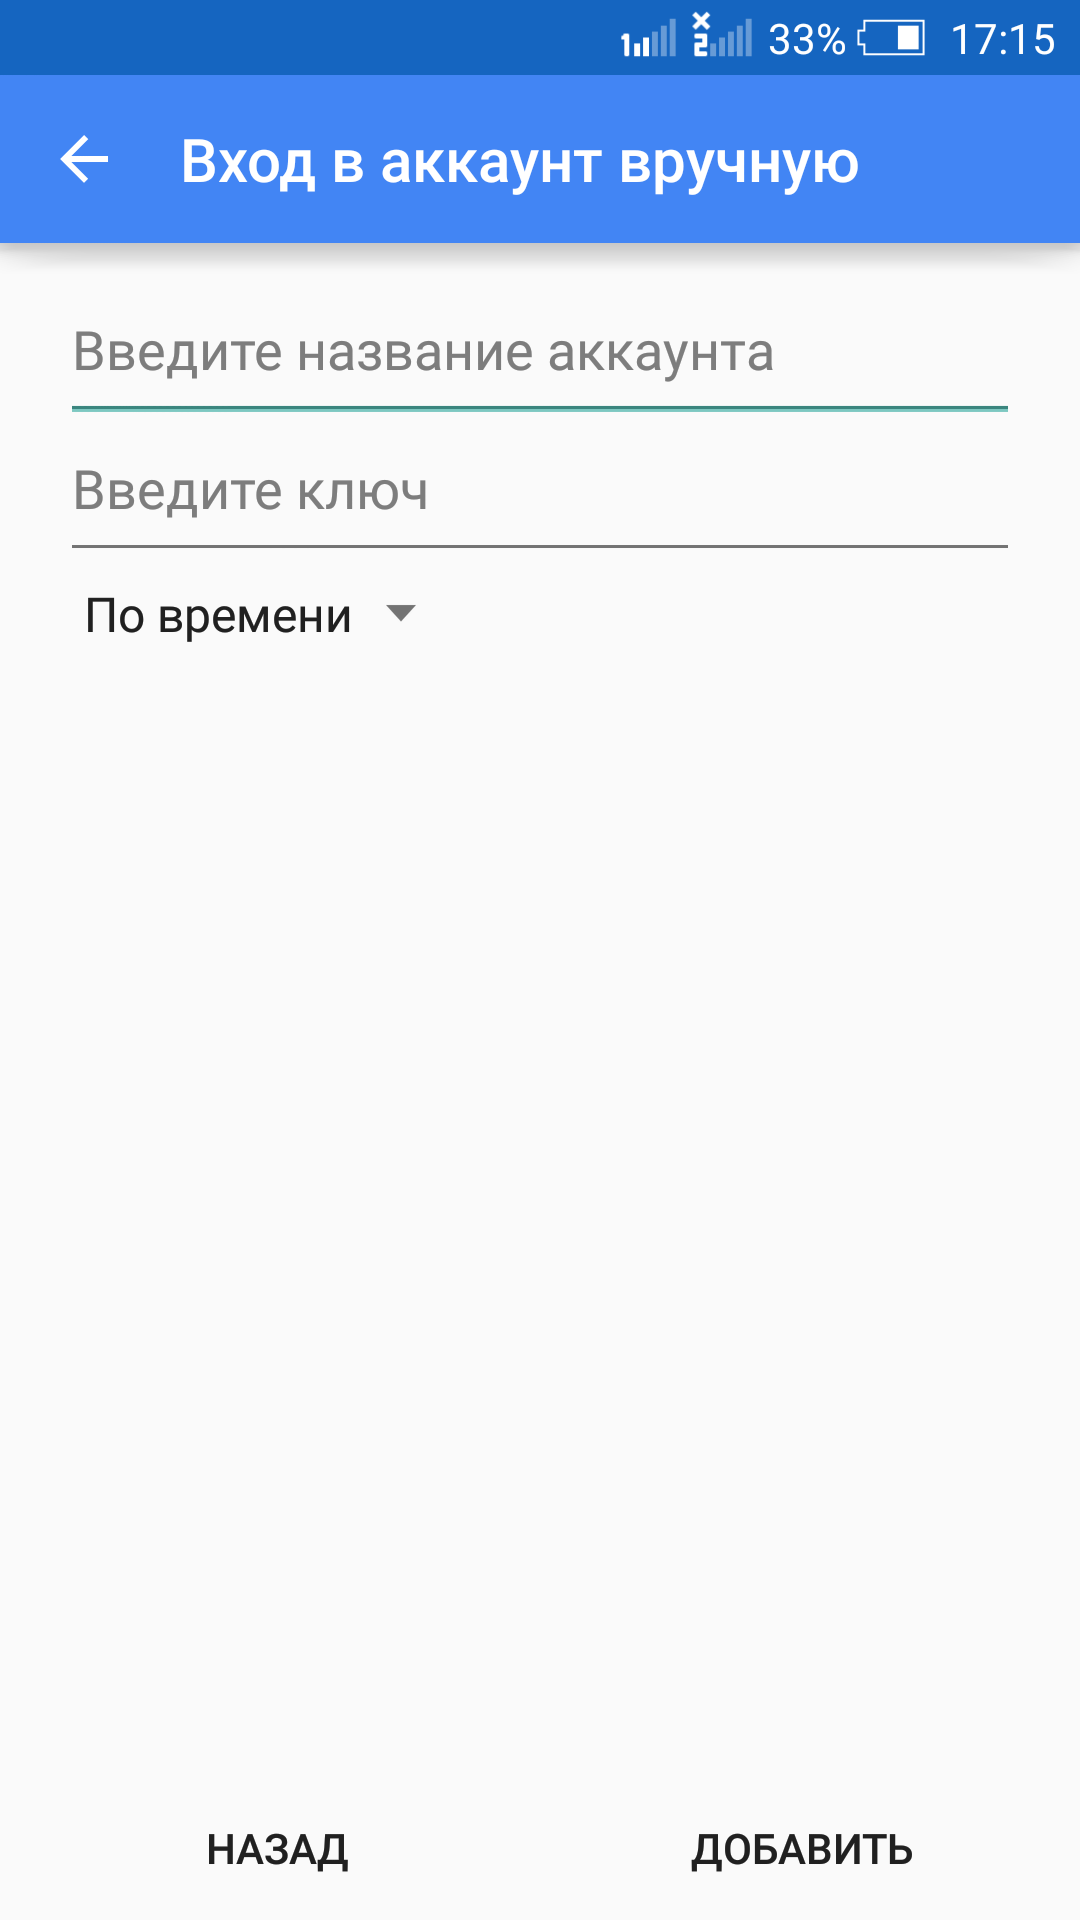
Image 1: Adding a new account to the Google Authenticator app.
Now, after adding the account, you will be presented with six-digit keys that will be required each time you login or try to use sudo .
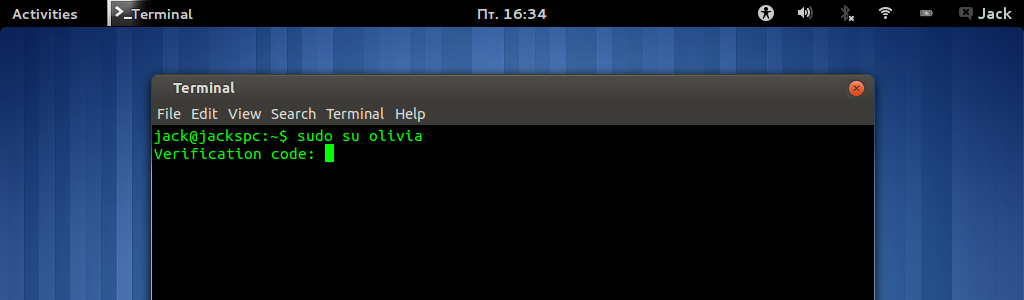
Finally, you must set up other accounts in the system. As I said, we are going to set up an account called olivia . Like this:
- Open a terminal window
- Run
sudo su olivia - Open Google Authenticator on your smartphone
- Enter the six-digit authentication code (provided by the application) in the terminal window (Figure 2) and press Enter
- Enter your sudo password and press Enter
- As a new user, run the
google-authenticatorcommand, answer the questions and write down the keys and codes provided.
After you have successfully configured the olivia user using the google-authenticator command, add a new account in the Google Authenticator application with the appropriate user information (just as you did for the initial user). You should now have accounts for both jack and olivia users in the Google Authenticator app.

Image 2: Enter the six-digit authentication code for sudo .
That's all. Every time you try to log in to your machine (or use sudo ), you will need to provide a six-digit authentication code before you can enter your user password. Your Linux machine is now much more secure than it was before two-factor authentication. Although this process may seem troublesome to some, I highly recommend setting it up ... especially for machines with sensitive data.
Source: https://habr.com/ru/post/302562/
All Articles