Linux for a novice developer or how to forget about Windows forever
Disclaimer
Attention, a lot of letters! I suggest stocking up on popcorn and making time for this event.
The post is intended primarily for those who are engaged in development, but it will also greatly help those who tried to switch to linux, but because of any incomprehensible things and difficulties, he spat and said: “Oh, nafig this Linux, I'll still mess with him. ”
This article discusses installing Ubuntu 16.04 and configuring it exclusively for work .
Prehistory
Attempts have already been made to roll over to linux, but due to its excessive attachment to the Microsoft product, migration was once again postponed to “long box”.
')
I was also always stopped by a large number of questions to which I could not find answers, problems, errors, etc.
But after I became interested and began studying Node.js, one comrade still pushed me to the move on the pretext that it would be more convenient to work in linux. And so, after several unsuccessful installation attempts and some time using Ubuntu as the main OS, I deleted the precious Windows and forgot about it forever. No regrets about it.
Getting Started
The first thing we need to do is to write a bootable USB flash drive or disk. The Ubuntu 16.04 distribution kit weighs only 1.4 GB, so the flash drive is the best for us. Download program Unetbootin -> unetbootin.imtqy.com .

It's all pretty simple. We put the "Disk Image", select the .iso file that we downloaded, select the media and click OK. Recording is not long in coming.
Reboot the system and select the boot method -> via USB. But here someone may be lurking a problem, it lies in the fact that in normal mode, the download will not happen.
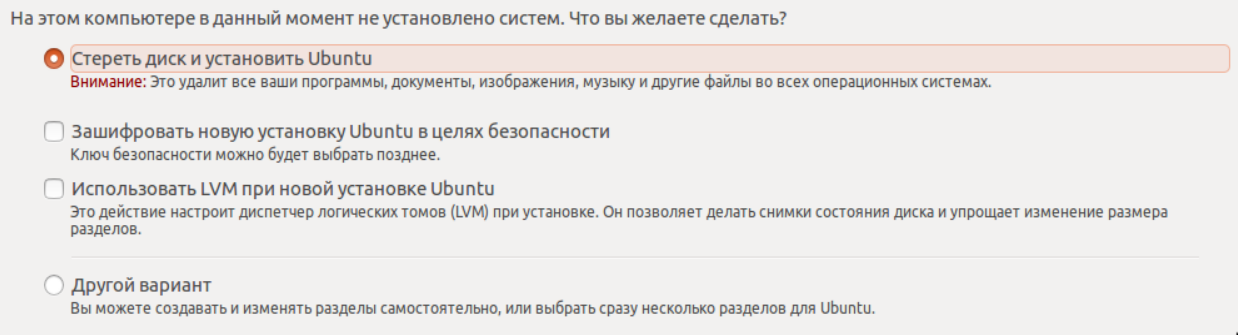
To still get the flash drive, try to boot from it in UEFI mode. But later, we will be asked if we want to continue the installation in UEFI mode. If your decision to switch to linux is final, you can answer yes. If you need to boot into other OSs, then we’ll click “come back” (I’m not sure why they called this button that way). The installation itself should not cause any difficulties. Choose your language, and move on. I recommend in the next window to tick:

In the next window, select the item: "Another option."
Next we need to partition the disk. If you have 2 hard disks and one of them is not used and there is no data on it, then simply select it and click -> "Create a new partition table".
We will have a “free space”, we also click on it and create the first section.
Section number 1:
The size of the root partition can be 4GB, but I recommend to put 40-50, so that there is a stock.
Type - Primary
Location - on all sections should be "The beginning of this space"
Use - Ext4
Mount Point - "/"
Section number 2:
Size = size of your RAM
Use - swap partition
This section plays the role of a backup "RAM" memory stored on our hard disk.
Section number 3:
Size = all remaining space
Type - logical
mount point - "/ home"
That's all, click continue, agree with the fact that all files on the sections will be destroyed. Next - we agree, we enter what asks. Now you can go to drink coffee)
System setup, design, fitting for features of iron
After installation, we of course reboot into our current OS, log in. Go to the parameters of the system -> programs and updates, in the first tab we tick this way:

Immediately execute some commands:
sudo apt update sudo apt upgrade sudo means run as admin
After the first command, you will be asked for the password that you came up with during the installation phase. Do not be alarmed if you enter a password, and the letters are not displayed - this is such a security measure. If you ask about the installation of packages and the cursor will blink in a friendly way - feel free to write Y and press Enter. So what did we just make this team? We ordered the “apt” package manager to update the list of available packages and install them. The principle of operation is based on GIT, you turn on the repositories, update them, install updates. This gives us an advantage - we are always the freshest. The list of repositories is in /etc/apt/sources.list, but we hardly need this.
The update is complete - we reboot, although it is usually not required in linux, but the kernel may have been updated and this operation should still be carried out. Generally, if after update you see lines of similar content:
linux-headers, linux-generic it means the update affects our kernel and a reboot is required.
"Iron" problems
Personally, I immediately had a problem with the mouse. I use a gaming mouse with a sensitivity of 3800DPI. Naturally, she rummaged around the monitor from the slightest movement. And the problem with the display of monitors. I have 2x 17inch with a ratio of 4: 3. One monitor is connected to the motherboard, and the second to the AMD graphics card. With the first, everything was fine, but the one on the integrated graphics faded out immediately after entering the system. It came to mind to write a script to autoload for slowing down the mouse and redefining monitors (it may be useful to someone).
Solving the problem with too quick mouse
In the console, enter xinput and see a list of connected devices. Find your mouse and rewrite its ID. On my mouse ID = 11, enter the xinput list-props '11' command. A list appears again in front of us, but already with a set of options, we need Device Accel Constant Deceleration, we look at its ID (in parentheses). I have it equal to 274. Now, knowing the id of the mouse and id, we write the following:
xinput set-prop '11' 274 2 In the home directory, create a file start.sh and open it, where the last digit (2) means how many times you need to slow down the mouse. We can immediately add this command to our script.
#!/bin/bash xinput set-prop '11' 274 2 Why did we not go into the settings and there did not remove the sensitivity? Because the range of adjustment there is small. And most likely, it will not be enough.
Solving the problem with incorrectly displayed monitors
Go to settings -> customize screens. We see two monitors, we can grab one of them and arrange it the way we need, and also choose which one to have on the launch pad. We click to apply, and if after the reboot everything remains in its place, it means that no further action is required.
But with the priority of the integrated graphics set in the BIOS, after the input the second monitor was turned off and the one that was connected to the video card remained. What is remarkable - after waking up from sleep mode, the second one came to life again and worked normally. We look at the numbering of monitors, here on the main monitor is the label "Primary".
xrandr According to the numbers, we expose how the monitors will be located. We add to our script:
#!/bin/bash xinput set-prop '11' 274 2 xrandr --output VGA1-1 --primary xrandr --output VGA1-1 --left-of VGA1 Now it's time to set the script to autoload, open the dash menu (WIN key) and enter in the search:
"Auto-running applications." Click add, enter the name (no matter what, the main thing is that you understand the meaning of the purpose of this element), leave the description empty. Now in the "team" enter the following:
sh /home/user/start.sh By this we give the command to run the script. You can have any other path. We save and check the operability at the next reboot.
If, however, the problem with monitors remains - try to conjure with their location and priority of video output in BIOS
Regarding drivers, I didn’t install because everything works well without them, in the case of AMD, installing drivers can cause a system crash.
System setup and software installation
Adding windows fonts
After installing the browser (a little later), you will notice that fonts on some sites hurt your eyes and make you want to cry.
sudo apt install msttcorefonts sudo fc-cache -fv After restarting the browser fonts should be displayed correctly. If there is a desire - you can set any of them as system (in the settings or the ubuntu tweak tool). I recommend to log in to ubuntu tweak and in the “fonts” tab set:

Software from already included repositories
Programs that are already included in the canonical partner repository can be installed as follows:
sudo apt install < > Software package that I use:
1. skype
2. ssh (for connecting and remotely controlling the machine)
3. unity-tweak-tool (Tweaking the unity shell)
4. ubuntu-tweak-tool (Advanced System Settings)
5. inkscape (Vector Graphics Editor)
6. gimp (I use instead of photoshop)
7. clementine (audio player)
8. mc (file manager for the terminal)
9. vlc (video player, with many codecs)
10. filezilla (ftp client)
Installing third-party software
To install third-party software, we will have to add repositories to the system.
Telegram
sudo add-apt-repository ppa:atareao/telegram sudo apt update sudo apt install telegram Yandex browser
We download the package from the official website, open it, click “install” in the manager.
To view the video, flash is required, install it.
sudo apt install pepperflashplugin-nonfree Brackets
I like to work in brackets, a very pleasant and convenient thing:
sudo add-apt-repository ppa:webupd8team/brackets sudo apt-get update sudo apt-get install brackets Next, install the theme, I use numix, but you can find any other and install it.
sudo add-apt-repository ppa:numix/ppa sudo apt-get update sudo apt-get install numix-gtk-theme numix-icon-theme n1umix-icon-theme-circle After installation, start the unity tweak tool. The theme is “Numix”, the badges are also “Numix”. Do you like dark themes? Run the ubuntu tweak tool and in the tab "appearance" set "Apply dark theme globally." Until you log out of ubuntu tweak, it's better to set skype and telegram in autoload.
LAMP installation
The final touch is to install the LAMP server (Linux apache mysql php) and phpmyadmin:
sudo apt install lamp-server sudo apt install phpmyadmin sudo phpenmod mcrypt sudo apt-get install php-mbstring php-gettext sudo apt-get install php5-dev Restart apache:
sudo service apache2 reload We try to come to the address localhost . If everything is in order, then move on. Open the apache configuration file:
sudo nano /etc/apache2/apache2.conf We find there tags in them the information about the location of the files of our server is registered, after the latter we write the following structure:
<Directory /home/user/public_html>
AllowOverride All
Require all granted
The way you can specify which one is convenient for you. At the end of the configuration file we write:
ServerName localhost
Attention! The following operations will have to be done every time you add a new virtual host!
To add new virtual hosts do the following. Create a folder in the / home / user / public_html / test directory, open / etc / hosts and add the name of our site to the first line:
127.0.0.1 localhost testsite Further we will execute in the terminal:
sudo cp /etc/apache2/sites-available/000-default.conf /etc/apache2/sites-available/testsite.conf Thus, we copied the default configuration file for our site, open it:
sudo nano /etc/apache2/sites-available/testsite.conf Uncomment the line:
ServerName www.example.com and instead of example.com we will enter our name. Next, we correct DocumentRoot which indicates the location of the files on our site, instead of the standard / var / www - / home / user / public_html / test.
Now we can enable our site:
sudo a2ensite testsite sudo service apache2 reload That's all. Basic setup is complete, you can use!
Do not be afraid to search the Internet if you need to install and configure something! He doesn't bite. In this article, I have tried to explain in as much detail as possible the basic configuration process of Ubuntu 16.04. I am sure that after a week of using ubuntu as the main OS, you are unlikely to come back.
Source: https://habr.com/ru/post/302350/
All Articles