Failover cluster of Windows Server in Microsoft Azure. Network
Preface. This publication is a continuation of the topic of creating a Windows Server failover cluster in the Microsoft Azure cloud. This time the conversation will go about the network.
Hi, fans of clusters. In my previous article, I talked about how to get around the limitations of the Microsoft Azure IaaS environment when preparing data storage for a Microsoft Windows failover cluster. Let's now talk about another important part of creating a cluster - the network.
')
Before you begin, let's list a few basic network concepts in Azure. Here are the terms that we need for an article on creating a cluster:
VIP (Virtual IP address) : Public IP address of the cloud service. It is also used by Azure Load Balancer, which distributes traffic before it is sent to the virtual machine.
DIP (Dynamic IP address) : The internal IP address obtained by the virtual machine from Microsoft Azure DHCP.
Internal Load Balancer : An internal Microsoft Azure balancer that distributes traffic between virtual machines inside a VNET or cloud service.
Endpoint : Associates the VIP / DIP + port on the virtual machine with the port on the Azure Load Balancer for external traffic or the Internal Load Balancer for traffic inside the VNET (or cloud service).
You can find more information about these terms and Azure networks in this blog:
VIPs, DIPs and PIPs in Microsoft Azure
http://blogs.msdn.com/b/cloud_solution_architect/archive/2014/11/08/vips-dips-and-pips-in-microsoft-azure.aspx
OK, enough theory. The data storage is ready and we know how networks work in Azure. Are we ready to create a cluster? Yes!
Instead of using Failover Cluster Manager, I recommend using the New-Cluster cmdlet and specifying a static IP address when creating the cluster. Using this method, you can add all cluster nodes and it is easier to figure out the IP address settings without performing additional actions through the Failover Cluster Manager.
Note : The static IP address assigned by the Cluster Name Object (CNO) is not intended to communicate over the network. It is needed to perform the dependency required for CNO activation. Therefore, you cannot, for example, ping this address, cannot resolve a DNS name, and cannot use CNO for management since its address is not available.
If for some reason you do not want to use PowerShell, or if you are used to using the Failover Cluster Manager, you will have to take a few additional steps. The difference when using Failover Cluster Manager instead of PowerShell is that you have to create a cluster with one node and add a second one later. The reason is that CNO cannot be activated because it cannot get a unique IP address from Azure DHCP. Instead, the CNO, when created via the Failover Cluster Manager, has the same IP address as the node on which the CNO resource is located. This address will not allow the cluster to be activated, since it will be considered a duplicate (after all, it turns out that there are two objects in the network with the same address). To solve this problem, you will have to create a cluster with one node, as mentioned above, and then manually set a new address for the CNO.
Example:
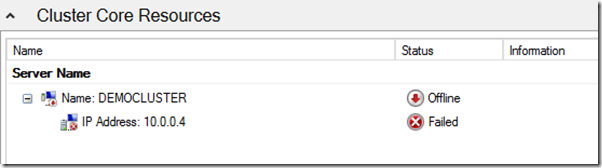
CNO DEMOCLUSTER is not active due to the fact that the IP address on which it depends is not available. The reason is that the CNO receives a conflict at the address 10.0.0.4, since it is already occupied by the virtual machine itself.
To fix this, we need to set some other unused address from the same subnet in the resource settings, for example 10.0.0.7.
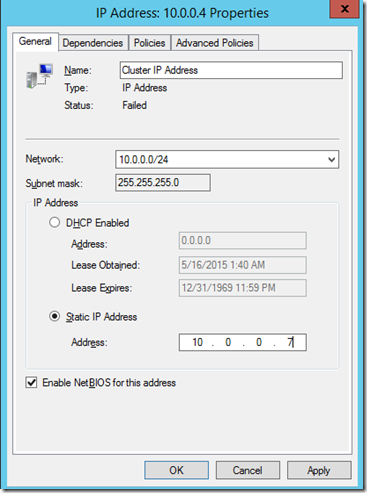
After that we can activate the CNO resource.

Now, we can add a second node to our cluster.
When our cluster is ready, we can add a new service to it. For this article, I use the File Server role, since it is at the same time one of the most common and easy to understand.
Note : We do not recommend that you, in fact, use a clustered file server in Azure for reasons of limitations in performance and the cost of such a solution.
Unlike the clusters that you deploy locally, I recommend that you stop all nodes and leave only one active. This is necessary to avoid a situation where a role moves between nodes due to the fact that the VCO (Virtual Computer Object of the servers) will automatically receive the same IP address as the cluster node on which it is located and, thus, it will disconnect from error and move to the next node. The situation is completely similar to what we discussed for the CNO.
The screenshot below shows the result (we assigned the IP address 10.0.0.8 to our cluster)

Remember that this is all the same temporary IP address that we use to activate the cluster. None of the virtual machines in our network, except the cluster node itself, will be able to access the cluster at this address. The Azure network works in such a way that all traffic from the virtual machine comes back to it.
The fun begins. We need to use Azure Load Balancer so that this address can be used to connect clients with our cluster.
Load Balancer is a network resource in Azure that distributes traffic between different virtual machines. The address of the Load Balancer can be either an external VIP or an internal DIP. Each virtual machine must have its own endpoint, to which the Load Balancer traffic will be directed. Endpoint has two types of ports. The first one is Regular ports for client-server interaction. For example, port 445 for SMB on a file server or port 80 HTTP on a Web server. The second type of port is Probe (default port is 59999). The task of this port is to determine which of the cluster nodes is the active holder of the VCO. Load Balancer regularly polls all cluster nodes via Probe (the default test interval is 10 seconds). You should know which ports the application or service you are going to host on your cluster uses, since you will have to specify these ports in the endpoint settings, and then add the Probe port there. After that you need to add this Probe port to the VCO address settings. As a result, Load Balancer will direct traffic to the corresponding server port on which the VCO is active. All this needs to be done using PowerShell.
Note : At the time of this writing, Microsoft is supporting only one cluster resource group in ctive / Passive mode. The reason is that the VCO can use only the IP address of the cloud service (VIP) or the IP address of the internal Load Balancer. This restriction is still in force, despite the fact that several VIP addresses can now be created in the cloud service.
The diagram below shows the work of the Internal Load Balancer (ILB):
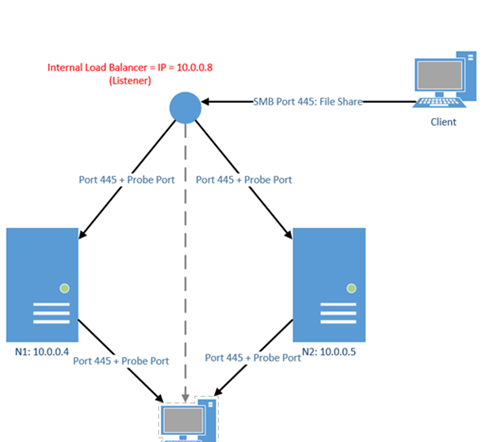
In our example, we are creating a file cluster, so the port for the endpoint will be 445. We will choose the address of the ILB 10.0.0.8. Let's see how to set it up.
Step 1: Add a cluster to the cloud service
These commands are executed on the machine that you use to manage your Microsoft Azure environment.


Step 2: Set up an endpoint for each node using the ILB.
These commands are executed on the machine that you use to manage your Microsoft Azure environment.

Step 3: Update the VCO IP address settings with the selected Probe port.
These commands are executed on the cluster node. Option for Windows Server 2008 R2 :
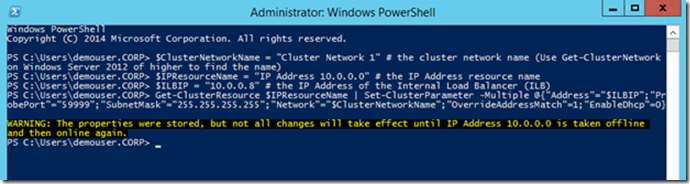
Option for Windows Server 2012/2012 R2 :
The result should be something like this:
Disable and re-enable the cluster resource IP address and run the cluster role.
Your ILB is now associated with the VCO IP address. The last thing you need to do is configure WIndows Firewall. You need to set up rules allowing connections on port 59999 (or the one you chose) on all nodes of your cluster. That's all. Your cluster is ready to go. Please note that the first connection to a VCO or an attempt to connect to it immediately after transferring roles from one node to another can take up to 10 seconds. This is related to the value of the ProbeIntervalInSeconds parameter that we set earlier.
In our example, we chose an internal IP address of 10.0.0.8 for VCO. If you want to make your VCO accessible from the outside, you can use the external IP address of the cloud service (VIP). The steps will be the same and easier because you can skip step 1 (Azure Load Balancer is already used for VIP). You only need to create an endoint with the necessary ports on each cluster node (Step 2) and configure the VCO IP address (Step 3). Remember that if your cluster is accessible from the outside, then you should pay more attention to its security settings.
Fine! You have created your cluster in an Azure IaaS environment. It turned out quite long, but I hope you found it interesting and you learned something useful. You can ask me questions in the comments.
Good luck with clusters!
Mario liu
Support Escalation Engineer
CSS Americas | WINDOWS | HIGH AVAILABILITY
Hi, fans of clusters. In my previous article, I talked about how to get around the limitations of the Microsoft Azure IaaS environment when preparing data storage for a Microsoft Windows failover cluster. Let's now talk about another important part of creating a cluster - the network.
')
Before you begin, let's list a few basic network concepts in Azure. Here are the terms that we need for an article on creating a cluster:
VIP (Virtual IP address) : Public IP address of the cloud service. It is also used by Azure Load Balancer, which distributes traffic before it is sent to the virtual machine.
DIP (Dynamic IP address) : The internal IP address obtained by the virtual machine from Microsoft Azure DHCP.
Internal Load Balancer : An internal Microsoft Azure balancer that distributes traffic between virtual machines inside a VNET or cloud service.
Endpoint : Associates the VIP / DIP + port on the virtual machine with the port on the Azure Load Balancer for external traffic or the Internal Load Balancer for traffic inside the VNET (or cloud service).
You can find more information about these terms and Azure networks in this blog:
VIPs, DIPs and PIPs in Microsoft Azure
http://blogs.msdn.com/b/cloud_solution_architect/archive/2014/11/08/vips-dips-and-pips-in-microsoft-azure.aspx
OK, enough theory. The data storage is ready and we know how networks work in Azure. Are we ready to create a cluster? Yes!
Instead of using Failover Cluster Manager, I recommend using the New-Cluster cmdlet and specifying a static IP address when creating the cluster. Using this method, you can add all cluster nodes and it is easier to figure out the IP address settings without performing additional actions through the Failover Cluster Manager.
New-Cluster -Name DEMOCLUSTER -Node node1,node2 -StaticAddress 10.0.0.7 Note : The static IP address assigned by the Cluster Name Object (CNO) is not intended to communicate over the network. It is needed to perform the dependency required for CNO activation. Therefore, you cannot, for example, ping this address, cannot resolve a DNS name, and cannot use CNO for management since its address is not available.
If for some reason you do not want to use PowerShell, or if you are used to using the Failover Cluster Manager, you will have to take a few additional steps. The difference when using Failover Cluster Manager instead of PowerShell is that you have to create a cluster with one node and add a second one later. The reason is that CNO cannot be activated because it cannot get a unique IP address from Azure DHCP. Instead, the CNO, when created via the Failover Cluster Manager, has the same IP address as the node on which the CNO resource is located. This address will not allow the cluster to be activated, since it will be considered a duplicate (after all, it turns out that there are two objects in the network with the same address). To solve this problem, you will have to create a cluster with one node, as mentioned above, and then manually set a new address for the CNO.
Example:
CNO DEMOCLUSTER is not active due to the fact that the IP address on which it depends is not available. The reason is that the CNO receives a conflict at the address 10.0.0.4, since it is already occupied by the virtual machine itself.
To fix this, we need to set some other unused address from the same subnet in the resource settings, for example 10.0.0.7.
After that we can activate the CNO resource.
Now, we can add a second node to our cluster.
When our cluster is ready, we can add a new service to it. For this article, I use the File Server role, since it is at the same time one of the most common and easy to understand.
Note : We do not recommend that you, in fact, use a clustered file server in Azure for reasons of limitations in performance and the cost of such a solution.
Unlike the clusters that you deploy locally, I recommend that you stop all nodes and leave only one active. This is necessary to avoid a situation where a role moves between nodes due to the fact that the VCO (Virtual Computer Object of the servers) will automatically receive the same IP address as the cluster node on which it is located and, thus, it will disconnect from error and move to the next node. The situation is completely similar to what we discussed for the CNO.
The screenshot below shows the result (we assigned the IP address 10.0.0.8 to our cluster)
Remember that this is all the same temporary IP address that we use to activate the cluster. None of the virtual machines in our network, except the cluster node itself, will be able to access the cluster at this address. The Azure network works in such a way that all traffic from the virtual machine comes back to it.
The fun begins. We need to use Azure Load Balancer so that this address can be used to connect clients with our cluster.
Load Balancer is a network resource in Azure that distributes traffic between different virtual machines. The address of the Load Balancer can be either an external VIP or an internal DIP. Each virtual machine must have its own endpoint, to which the Load Balancer traffic will be directed. Endpoint has two types of ports. The first one is Regular ports for client-server interaction. For example, port 445 for SMB on a file server or port 80 HTTP on a Web server. The second type of port is Probe (default port is 59999). The task of this port is to determine which of the cluster nodes is the active holder of the VCO. Load Balancer regularly polls all cluster nodes via Probe (the default test interval is 10 seconds). You should know which ports the application or service you are going to host on your cluster uses, since you will have to specify these ports in the endpoint settings, and then add the Probe port there. After that you need to add this Probe port to the VCO address settings. As a result, Load Balancer will direct traffic to the corresponding server port on which the VCO is active. All this needs to be done using PowerShell.
Note : At the time of this writing, Microsoft is supporting only one cluster resource group in ctive / Passive mode. The reason is that the VCO can use only the IP address of the cloud service (VIP) or the IP address of the internal Load Balancer. This restriction is still in force, despite the fact that several VIP addresses can now be created in the cloud service.
The diagram below shows the work of the Internal Load Balancer (ILB):
In our example, we are creating a file cluster, so the port for the endpoint will be 445. We will choose the address of the ILB 10.0.0.8. Let's see how to set it up.
Step 1: Add a cluster to the cloud service
These commands are executed on the machine that you use to manage your Microsoft Azure environment.
# $ServiceName = "demovm1-3va468p3" # , . . , , PowerShell get-azurevm. $ILBName = "DEMOILB" # ILB $SubnetName = "Subnet-1" # $ILBStaticIP = "10.0.0.8" # IP ILB # ILB, Add-AzureInternalLoadBalancer -InternalLoadBalancerName $ILBName -SubnetName $SubnetName -ServiceName $ServiceName -StaticVNetIPAddress $ILBStaticIP # Get-AzureInternalLoadBalancer –servicename $ServiceName Step 2: Set up an endpoint for each node using the ILB.
These commands are executed on the machine that you use to manage your Microsoft Azure environment.
# $VMNodes = "DEMOVM1", “DEMOVM2" # , $EndpointName = "SMB" # endpoint $EndpointPort = "445" # public port endpoint ( - SMB) # endpoint 445 probe 59999 . . ProbeIntervalInSeconds. Load Balancer . ForEach ($node in $VMNodes) { Get-AzureVM -ServiceName $ServiceName -Name $node | Add-AzureEndpoint -Name $EndpointName -LBSetName "$EndpointName-LB" -Protocol tcp -LocalPort $EndpointPort -PublicPort $EndpointPort -ProbePort 59999 -ProbeProtocol tcp -ProbeIntervalInSeconds 10 -InternalLoadBalancerName $ILBName -DirectServerReturn $true | Update-AzureVM } # ForEach ($node in $VMNodes) { Get-AzureVM –ServiceName $ServiceName –Name $node | Get-AzureEndpoint | where-object {$_.name -eq "smb"} } Step 3: Update the VCO IP address settings with the selected Probe port.
These commands are executed on the cluster node. Option for Windows Server 2008 R2 :
# $ClusterNetworkName = "Cluster Network 1" # ( Get-ClusterNetwork GUI, ) $IPResourceName = “IP Address 10.0.0.0" # the IP Address resource name (Use get-clusterresource | where-object {$_.resourcetype -eq "IP Address"} or GUI to find the name) $ILBIP = “10.0.0.8” # IP ILB # IP VCO, ILB cluster res $IPResourceName /priv enabledhcp=0 overrideaddressmatch=1 address=$ILBIP probeport=59999 subnetmask=255.255.255.255 Option for Windows Server 2012/2012 R2 :
# $ClusterNetworkName = "Cluster Network 1" # ( Get-ClusterNetwork GUI, ) $IPResourceName = “IP Address 10.0.0.0" # IP ( get-clusterresource | where-object {$_.resourcetype -eq "IP Address"} GUI, ) $ILBIP = “10.0.0.8” # IP ILB $params = @{"Address"="$ILBIP"; "ProbePort"="59999"; "SubnetMask"="255.255.255.255"; "Network"="$ClusterNetworkName"; "OverrideAddressMatch"=1; "EnableDhcp"=0} # IP VCO, ILB Get-ClusterResource $IPResourceName | Set-ClusterParameter -Multiple $params The result should be something like this:
Disable and re-enable the cluster resource IP address and run the cluster role.
Your ILB is now associated with the VCO IP address. The last thing you need to do is configure WIndows Firewall. You need to set up rules allowing connections on port 59999 (or the one you chose) on all nodes of your cluster. That's all. Your cluster is ready to go. Please note that the first connection to a VCO or an attempt to connect to it immediately after transferring roles from one node to another can take up to 10 seconds. This is related to the value of the ProbeIntervalInSeconds parameter that we set earlier.
In our example, we chose an internal IP address of 10.0.0.8 for VCO. If you want to make your VCO accessible from the outside, you can use the external IP address of the cloud service (VIP). The steps will be the same and easier because you can skip step 1 (Azure Load Balancer is already used for VIP). You only need to create an endoint with the necessary ports on each cluster node (Step 2) and configure the VCO IP address (Step 3). Remember that if your cluster is accessible from the outside, then you should pay more attention to its security settings.
Fine! You have created your cluster in an Azure IaaS environment. It turned out quite long, but I hope you found it interesting and you learned something useful. You can ask me questions in the comments.
Good luck with clusters!
Mario liu
Support Escalation Engineer
CSS Americas | WINDOWS | HIGH AVAILABILITY
Source: https://habr.com/ru/post/302344/
All Articles