How to take screenshots faster: create your own free storage on Amazon S3
We need screenshots every day - someone to make funny jokes, and someone to work. One of the most ideal tools for this purpose is Monosnap, which we actively use in Live Typing . At some point, our attention was attracted by the fact that the program periodically (and someone always) starts to hang and does not load anything. If the screenshot is needed urgently, then such a problem can make life difficult. I will tell you about the method that helped me to avoid this, namely, about downloading and storing screenshots in my own storage.
Monosnap has many options for where you can store them, but the most versatile is the Amazon S3 cloud service. It is universal because it is the most fault-tolerant, does not ask for money (details below) and is located in the most optimal geographic location, so your foreign clients should not have problems with viewing either.
Why it will be free? Because the free quota includes 5GB of storage, 20,000 downloads and 2,000 downloads per month. Enough for screenshots, but for screencasts it will not be enough. In order not to get an unpleasant surprise, check out the rates .
')
So, let's begin. First of all, download Monosnap for yourself if you don’t have it. Next, go to aws.amazon.com/s3 . Here you should see this button.

We press on it.
After that, you will need to register with Amazon if you are not registered yet, or just log in. Next are the standard registration steps: name, email address, contact details and your payment card details. After filling in the fields of the “Payment Registration” step, you will receive an SMS about debiting one dollar from the card to check the validity of the card.

This is the only cash contribution you have to make. Money should come back to you in two weeks.
At the “Identity Verification” stage you will receive a four-digit PIN code. Click on the “Call Me Now” button and talk to the “robot” girl: in English, she will ask you to type the same PIN-code on the telephone keypad. Enter it when the “robot” is silent, and be careful when entering, because after a series of incorrect attempts, you will be blocked from registering for 12 hours.
Upon completion of all you will receive an email about the creation of an AWS account.
Next, you should go to the page with a list of all services. Choose S3.

After this, you will need to go to the Buckets page. In AWS terminology, Bucket is a repository. To store something there, you need to create it.

Now click Create Bucket. This modal window should open here:
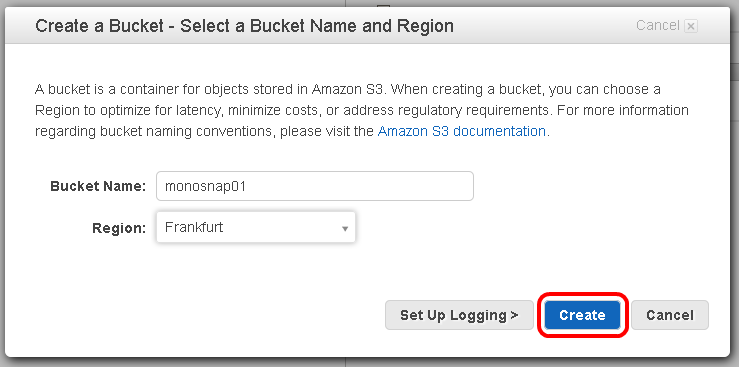
In the Bucket Name you need to enter a unique name (what is on the screen is already taken, of course), consisting only of capital Latin letters and numbers. Frankfurt is chosen as a region - it is closest to us. Click Create.
After creating Bucket, a new page will open with a repository browser. There you have to click on the name of your newly created repository, and then - Create Folder. Now we need to create a folder into which we will upload screenshots.


Next, we need to configure access rights to S3 so that Monosnap can write files there. In the navbar we find our name, click on it, we find Security Credentials.

AWS will then offer a choice of two options: use Security Credentials or IAM Users. We need the last, so click on Get Started with IAM Users .
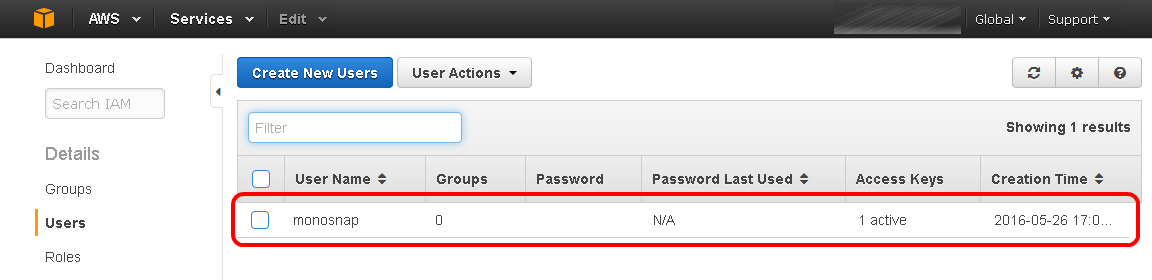
After that the page with the list of users should open. On it, you need to click on Create New Users , and we will go to the user creation page:

We only need one. Suppose that it will be called monosnap . A tick at the Generate an access key for each user is not necessary to remove. Click Create .
After that, a page will open confirming that the user has been created. It will also have access options for this user, which you can see by clicking on Show User Security Credentials.

Attention: on this page you see these parameters last time. Therefore, either write them down, or click on the Download Credentials button and save them somewhere where you can find them.
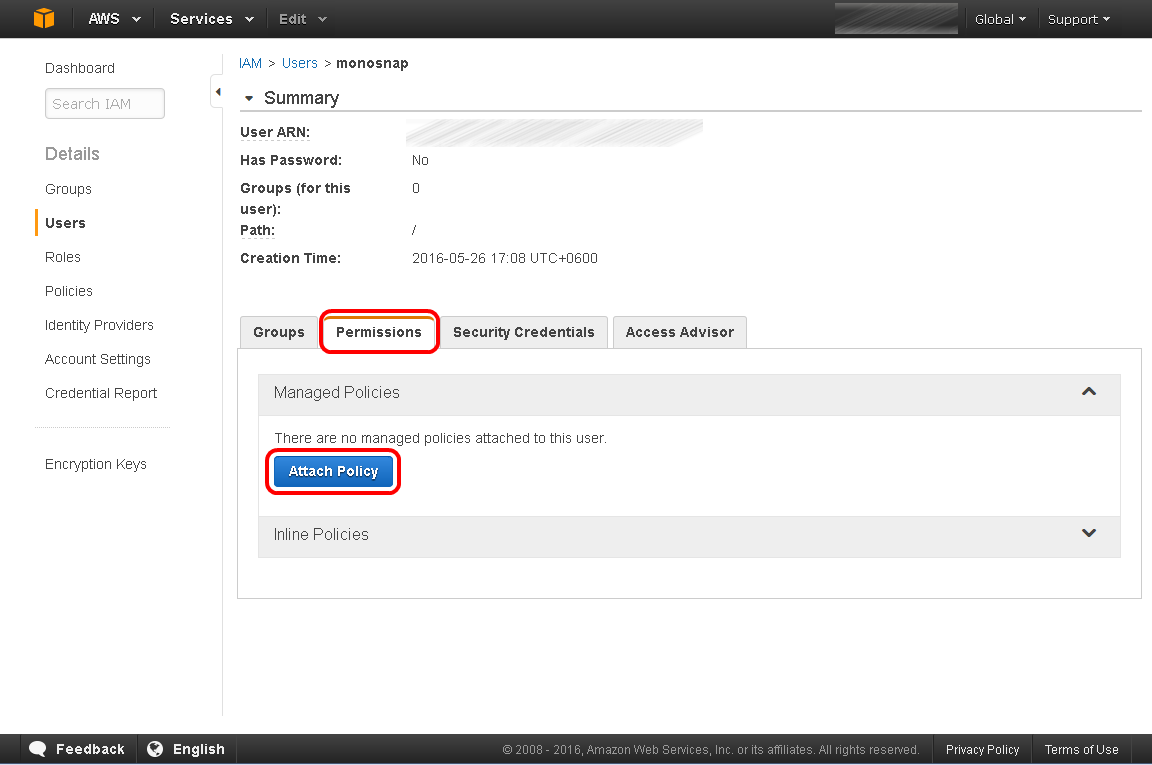
Clicking Close will take you to a page with a list of your users. Find the user you just created in this list. Then you will be taken to a page that summarizes all the information about the user. On it, you need to find the Permissions tab and click on the Attach Policy .
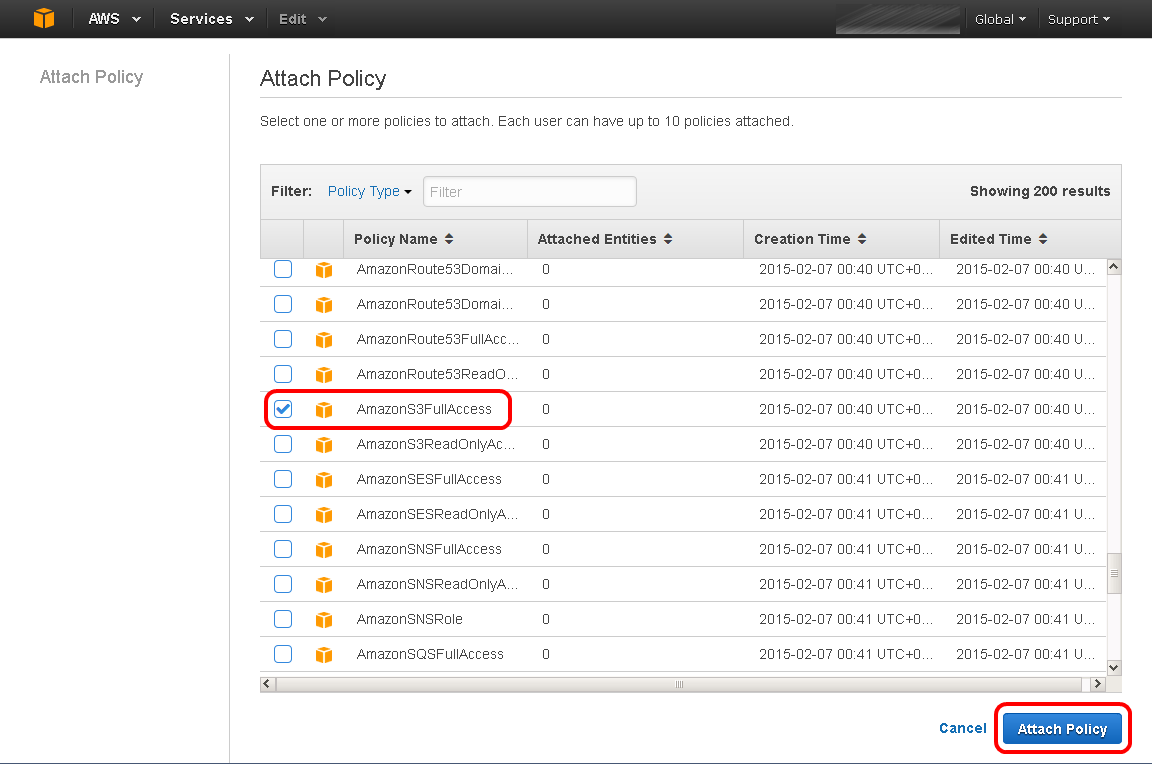
In the list that appears , find AmazonS3FullAccess , tick, click Attach Policy .
We are done with the S3 setup. Now it's up to the Monosnap setup.
Go to the settings , select Account , and there - Amazon S3 .
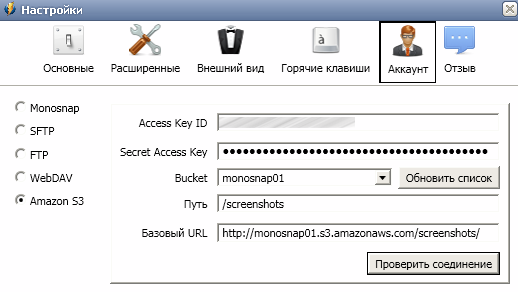
Access Key ID and Secret Access Key we saved at one of the previous stages. We take this data from there and enter it here. If you have a Mac, then Monosnap will ask you to specify a region in the Bucket Region field. We write eu-central-1 - this is Frankfurt, which we chose at the very beginning. Then select the created Bucket , specify the Path (this is the name of your directory) and the Base URL . The base URL should be:
http: // {bucket_name} .s3.amazonaws.com / {path} /
We press Check connection , and if everything is good, then the corresponding inscription will appear.
Now we try to make a screenshot. If everything worked out and works, then the correct link will be copied to the clipboard.
So it turns out the usual good old plumbbus. Done, you can use!
Monosnap has many options for where you can store them, but the most versatile is the Amazon S3 cloud service. It is universal because it is the most fault-tolerant, does not ask for money (details below) and is located in the most optimal geographic location, so your foreign clients should not have problems with viewing either.
Why it will be free? Because the free quota includes 5GB of storage, 20,000 downloads and 2,000 downloads per month. Enough for screenshots, but for screencasts it will not be enough. In order not to get an unpleasant surprise, check out the rates .
')
So, let's begin. First of all, download Monosnap for yourself if you don’t have it. Next, go to aws.amazon.com/s3 . Here you should see this button.
We press on it.
After that, you will need to register with Amazon if you are not registered yet, or just log in. Next are the standard registration steps: name, email address, contact details and your payment card details. After filling in the fields of the “Payment Registration” step, you will receive an SMS about debiting one dollar from the card to check the validity of the card.
This is the only cash contribution you have to make. Money should come back to you in two weeks.
At the “Identity Verification” stage you will receive a four-digit PIN code. Click on the “Call Me Now” button and talk to the “robot” girl: in English, she will ask you to type the same PIN-code on the telephone keypad. Enter it when the “robot” is silent, and be careful when entering, because after a series of incorrect attempts, you will be blocked from registering for 12 hours.
Upon completion of all you will receive an email about the creation of an AWS account.
Next, you should go to the page with a list of all services. Choose S3.
After this, you will need to go to the Buckets page. In AWS terminology, Bucket is a repository. To store something there, you need to create it.
Now click Create Bucket. This modal window should open here:
In the Bucket Name you need to enter a unique name (what is on the screen is already taken, of course), consisting only of capital Latin letters and numbers. Frankfurt is chosen as a region - it is closest to us. Click Create.
After creating Bucket, a new page will open with a repository browser. There you have to click on the name of your newly created repository, and then - Create Folder. Now we need to create a folder into which we will upload screenshots.
Next, we need to configure access rights to S3 so that Monosnap can write files there. In the navbar we find our name, click on it, we find Security Credentials.
AWS will then offer a choice of two options: use Security Credentials or IAM Users. We need the last, so click on Get Started with IAM Users .
After that the page with the list of users should open. On it, you need to click on Create New Users , and we will go to the user creation page:
We only need one. Suppose that it will be called monosnap . A tick at the Generate an access key for each user is not necessary to remove. Click Create .
After that, a page will open confirming that the user has been created. It will also have access options for this user, which you can see by clicking on Show User Security Credentials.
Attention: on this page you see these parameters last time. Therefore, either write them down, or click on the Download Credentials button and save them somewhere where you can find them.
Clicking Close will take you to a page with a list of your users. Find the user you just created in this list. Then you will be taken to a page that summarizes all the information about the user. On it, you need to find the Permissions tab and click on the Attach Policy .
In the list that appears , find AmazonS3FullAccess , tick, click Attach Policy .
We are done with the S3 setup. Now it's up to the Monosnap setup.
Go to the settings , select Account , and there - Amazon S3 .
Access Key ID and Secret Access Key we saved at one of the previous stages. We take this data from there and enter it here. If you have a Mac, then Monosnap will ask you to specify a region in the Bucket Region field. We write eu-central-1 - this is Frankfurt, which we chose at the very beginning. Then select the created Bucket , specify the Path (this is the name of your directory) and the Base URL . The base URL should be:
http: // {bucket_name} .s3.amazonaws.com / {path} /
We press Check connection , and if everything is good, then the corresponding inscription will appear.
Now we try to make a screenshot. If everything worked out and works, then the correct link will be copied to the clipboard.
Source: https://habr.com/ru/post/302258/
All Articles