Extending the Kivy Framework with the XPopup Package (Part 2)
We continue to cross snakes and birds (or - circus and fruit, as you like). In the previous article, we learned how to create notifications, now let's move on to the equally popular window panes: data entry forms and file navigators.
It began with the simplest need to make analog InputBox'a - a window with an input field for text. As a result of this “simplest need”, a couple of useful buns and a base class for creating UI-forms appeared.
The same InputBox. Everything is simple here - the basis was taken kivy.uix.textinput.TextInput and hung on a pop-up window. Apply this:
Result:

Simply. As required - in one line. By the text parameter we set the default value for the input field, and if the field is to be empty, we exclude this parameter.
')
By the way, if you press "Enter" in the input field, the window will perceive it as pressing the "Ok" button.
How to get the entered data? Very simple - we write another window closing handler:
The .get_value () method returns the value of an element hosted on a UI form, more on this here .
The .is_canceled () method returns True if the “Cancel” button was pressed. Read more about it here .
How to replace the standard buttons with your own - look here .
The final chord - let's add a little “user-friendly” (in case of anunexpected exception of an empty field, let the user know that he is in error):
Pay attention to the place in the code:
In order to cancel the window closing event, you need to return True . Not very convenient, but just such a result awaits the superclass .
The same XTextInput , onlyin the profile for entering multi-line text:
Result:
XNotes is a descendant of XTextInput and everything described above about XTextInput is valid for XNotes , except for:
Pop-up window with kivy.uix.slider.Slider on board. Use as follows:
By default, the slider moves in the range [0 ( min ), 1 ( max )], and its current position ( value ) is at 0.5. If desired, these parameters are easily replaced by others:
Result:

Like any descendant of XForm , this class also has a .get_value () method that can be used in the window close event handler. In addition, the class allows you to handle changing the position of the slider on the fly using the on_change event. As usual, we describe the event handler:
The video demonstration shows a more “illustrative” example of how the on_change event works. Here, the handler code resizes the popup window.
This class allows you to create a simple form for user authorization. The form has a login field, a field with masking characters for entering a password and the “Login automatically” checkbox. This example:
Result:
To get the data from the form, write the window close event handler. Using the method .get_value () we get the contents of the corresponding field:
What you need to know about the base class?
Well, try to write your form:
and look at the result:

In addition to .get_value (id) , the class has a values property. This is dict , in which the key is the id of the form element, and the value is the value of this element. Using this property, you can implement a handler differently:
Those. windows for selecting files \ directories or for entering the name of the file to be saved. They look something like this:

Creates a window to select a file. Example:
Need to select multiple files? Choose a few. At the same time, we specify the default path and describe the handler to get the list of selected files:
The class already contains the implementation of checking for an empty selection and will not allow the user to close the window using the “Open” button until at least one file is selected. Therefore, in the handler, we write a check only on pressing “Cancel”.
And we try to create a Russian localization class. A simple substitution of buttons is not enough, you have to dance a bit with a tambourine:
Not very convenient, but for the current version this is the way out. In version 0.3.0, more localization conveniences will be implemented.
The window for entering the name of the saved file. It is used similarly, with the exception of the selection and multiselect properties - here we will not need them. Instead, we will use:
Example:
The class also contains the implementation of checking for the absence of text in the input field, so do not bother about this.
A window for selecting a directory. Used similarly to XFilePopup . The caveat is that when multiselect = False, the selection property will contain the current directory (ie, select the current open directory; this allows you to select the root, if absolutely necessary), and when multiselect = True, the selection property contains a list of selected directories.
More information about the subtleties of selecting a catalog, see below.
The basis is taken kivy.uix.filechooser.FileChooser - a widget for navigating the file system. In addition, the pop-up window contains the following elements:
FileChooser has a large list of useful properties, but in XFilePopup only the "essentials" properties are rendered:
Create a window, point it to the path and set of buttons ( XFilePopup does not have its own set of buttons). And we will immediately describe the handler to get the results:
Pay attention to the path parameter - the value is transferred to it as a unicode string. This is necessary to correctly display names of files and directories containing non-ASCII characters (for example, windows-1251 encoding characters, etc.)
As a result, we get a navigator that allows you to select only one file, without the possibility of selecting folders (similar to XFileOpen).
And finally, a few words about window frames
As can be seen from the class hierarchy , XBase is the ancestor of all the classes discussed in the article. We have already briefly familiarized with some of its properties and methods, here I will provide a complete list of features that are transferred in an object-oriented way:
This class also sets default values for some properties of superclasses:
Note. This class ignores the content property of the Popup class.
A descendant of Popup and a superclass for XBase . Designed forcareful file processing correction of the display windows on mobile devices. His properties:
Note. Application of the described properties occurs only when the window is displayed.
Extending the Kivy Framework with the XPopup Package (Part 1)
Visual aids (video demonstration) .
Download XPopup package .
That's all for today.
Thank you for your attention and pleasant coding.
Data entry forms
It began with the simplest need to make analog InputBox'a - a window with an input field for text. As a result of this “simplest need”, a couple of useful buns and a base class for creating UI-forms appeared.
Class XTextInput
The same InputBox. Everything is simple here - the basis was taken kivy.uix.textinput.TextInput and hung on a pop-up window. Apply this:
XTextInput(title=' ?', text=' ?') Result:
Simply. As required - in one line. By the text parameter we set the default value for the input field, and if the field is to be empty, we exclude this parameter.
')
By the way, if you press "Enter" in the input field, the window will perceive it as pressing the "Ok" button.
How to get the entered data? Very simple - we write another window closing handler:
def my_callback(instance): # "Cancel" if not instance.is_canceled(): # search = instance.get_value() print(u': %s' % search) XTextInput(title=' ?', text=' ?', on_dismiss=my_callback) The .get_value () method returns the value of an element hosted on a UI form, more on this here .
The .is_canceled () method returns True if the “Cancel” button was pressed. Read more about it here .
How to replace the standard buttons with your own - look here .
The final chord - let's add a little “user-friendly” (in case of an
def my_callback(instance): # "Cancel" if not instance.is_canceled(): # search = instance.get_value() # if not search: # XError(text=' , ') # return True print(u': %s' % search) XTextInput(title=' ?', on_dismiss=my_callback) Pay attention to the place in the code:
# return True In order to cancel the window closing event, you need to return True . Not very convenient, but just such a result awaits the superclass .
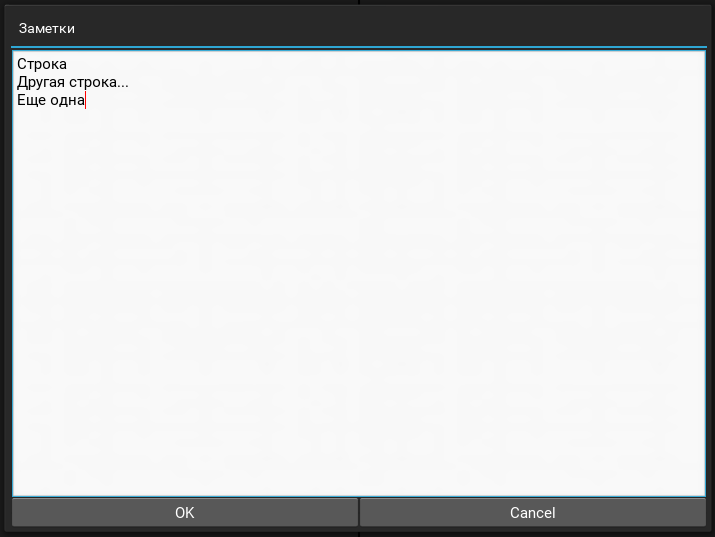
XNotes class
The same XTextInput , only
XNotes(title='', text='\n ...\n ') Result:
XNotes is a descendant of XTextInput and everything described above about XTextInput is valid for XNotes , except for:
- Pressing "Enter" in the input field makes the transition to a new line.
- The text parameter expects a string at the input, multi-line is achieved by adding "\ n" .
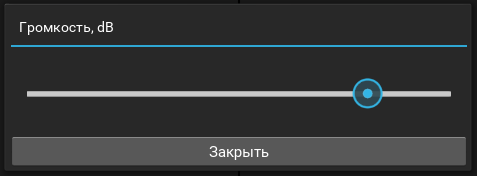
XSlider class
Pop-up window with kivy.uix.slider.Slider on board. Use as follows:
XSlider(title='', buttons=['']) By default, the slider moves in the range [0 ( min ), 1 ( max )], and its current position ( value ) is at 0.5. If desired, these parameters are easily replaced by others:
XSlider(title=', dB', buttons=[''], min=-100, max=12, value=-10) Result:
Like any descendant of XForm , this class also has a .get_value () method that can be used in the window close event handler. In addition, the class allows you to handle changing the position of the slider on the fly using the on_change event. As usual, we describe the event handler:
def volume_change(instance, value): instance.title = ': %0.0f' % (value * 100) XSlider(title='', buttons=[''], on_change=volume_change) The video demonstration shows a more “illustrative” example of how the on_change event works. Here, the handler code resizes the popup window.
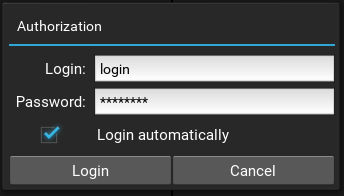
XAuthorization class
This class allows you to create a simple form for user authorization. The form has a login field, a field with masking characters for entering a password and the “Login automatically” checkbox. This example:
XAuthorization() will create an empty login form. You can fill in the fields using the following parameters: login , password and autologin : XAuthorization(login='login', password='password', autologin=True) Result:
To get the data from the form, write the window close event handler. Using the method .get_value () we get the contents of the corresponding field:
def my_callback(instance): if not instance.is_canceled(): login = instance.get_value('login') password = instance.get_value('password') autologin = instance.get_value('autologin') print('LOGIN: %s, PASS: %s, AUTO: %s' % (login, password, autologin)) XAuthorization(login='login', password='password', autologin=True, on_dismiss=my_callback) XForm class
What you need to know about the base class?
- The base class has a .get_value (id) method that searches the form for an element with the specified id and returns its value. The parameter is optional, if you do not specify it, the method will take the 1st element from the form, for which id is set and return its value. This implementation supports getting the values of the elements: TextInput, Switch, CheckBox, Slider .
- The class has an abstract method ._get_form () , the result of which should be the content of the form.
- The class sets the following set of default buttons: “Ok”, “Cancel”.
Well, try to write your form:
class MyForm(XForm): def _get_form(self): # layout = BoxLayout() # id ( ) layout.add_widget(Label(text='Show must go')) # id ( ) layout.add_widget(Switch(id='main_switch', active=True)) # return layout def my_callback(instance): # if not instance.is_canceled(): print('Switch value: ' + str(instance.get_value('main_switch'))) MyForm(title='Party switch', on_dismiss=my_callback) and look at the result:
In addition to .get_value (id) , the class has a values property. This is dict , in which the key is the id of the form element, and the value is the value of this element. Using this property, you can implement a handler differently:
def my_callback(instance): # if not instance.is_canceled(): print('Switch value: ' + str(instance.values['main_switch'])) File Navigators
Those. windows for selecting files \ directories or for entering the name of the file to be saved. They look something like this:
XFileOpen class
Creates a window to select a file. Example:
XFileOpen() Need to select multiple files? Choose a few. At the same time, we specify the default path and describe the handler to get the list of selected files:
def my_callback(instance): if not instance.is_canceled(): print(u'Path: ' + instance.path) print(u'Selection: ' + str(instance.selection)) XFileOpen(multiselect=True, path=u'c:\python27', on_dismiss=my_callback) The class already contains the implementation of checking for an empty selection and will not allow the user to close the window using the “Open” button until at least one file is selected. Therefore, in the handler, we write a check only on pressing “Cancel”.
And we try to create a Russian localization class. A simple substitution of buttons is not enough, you have to dance a bit with a tambourine:
class XFileOpenRU(XFileOpen): title = StringProperty(' ') # BUTTON_OPEN = '' # .is_canceled() BUTTON_CANCEL = '' # TXT_ERROR_SELECTION = ', ?' # buttons = ListProperty([BUTTON_OPEN, BUTTON_CANCEL]) XFileOpenRU() Not very convenient, but for the current version this is the way out. In version 0.3.0, more localization conveniences will be implemented.
XFileSave class
The window for entering the name of the saved file. It is used similarly, with the exception of the selection and multiselect properties - here we will not need them. Instead, we will use:
- filename - linked to the input field of the file name, you can set a default value or read the entered text;
- .get_full_name () is a method that returns the path with the file name.
Example:
def my_callback(instance): if not instance.is_canceled(): # print(u'Path: ' + instance.path) # print(u'Filename: ' + instance.filename) # print(u'Full name: ' + instance.get_full_name()) popup = XFileSave(filename='file_to_save.txt', on_dismiss=my_callback) The class also contains the implementation of checking for the absence of text in the input field, so do not bother about this.
XFolder class
A window for selecting a directory. Used similarly to XFilePopup . The caveat is that when multiselect = False, the selection property will contain the current directory (ie, select the current open directory; this allows you to select the root, if absolutely necessary), and when multiselect = True, the selection property contains a list of selected directories.
More information about the subtleties of selecting a catalog, see below.
XFilePopup class
The basis is taken kivy.uix.filechooser.FileChooser - a widget for navigating the file system. In addition, the pop-up window contains the following elements:
- Button “Icons” - turns on the mode of displaying the contents in the form of icons;
- Button “List” - turns on the mode of displaying the contents in a list;
- Button "New folder" - creates a new directory;
- A label representing the current directory.
FileChooser has a large list of useful properties, but in XFilePopup only the "essentials" properties are rendered:
- path - directory, the contents of which will appear when you create a window; default - '/'. Changes value when changing directory;
- multiselect - enable / disable selection of several elements; False by default;
- dirselect - enable / disable selection of directories; False by default. Important : when dirselect = False opening of the directory occurs in one click; with dirselect = True - a single click marks the directory selected, and the opening is performed by double clicking (which is not very convenient on mobile devices);
- selection — a list containing the selected items;
- browser - an object of the class FileChooser , “passed out” to be able to use its other properties.
Create a window, point it to the path and set of buttons ( XFilePopup does not have its own set of buttons). And we will immediately describe the handler to get the results:
def my_callback(instance): print(u'Path: ' + instance.path) print(u'Selection: ' + str(instance.selection)) XFilePopup(title=' ', buttons=['Select', 'Close'], path=u'c:/python27', on_dismiss=my_callback) Pay attention to the path parameter - the value is transferred to it as a unicode string. This is necessary to correctly display names of files and directories containing non-ASCII characters (for example, windows-1251 encoding characters, etc.)
As a result, we get a navigator that allows you to select only one file, without the possibility of selecting folders (similar to XFileOpen).
3 2 whales
And finally, a few words about window frames
XBase class
As can be seen from the class hierarchy , XBase is the ancestor of all the classes discussed in the article. We have already briefly familiarized with some of its properties and methods, here I will provide a complete list of features that are transferred in an object-oriented way:
- auto_open - boolean property; if True, then when creating an instance of a class, the window will be displayed automatically. Otherwise, to display a window for an instance, call the .open () method. Default is True.
- buttons - a list property that defines a set of popup control buttons. Default - [].
- button_pressed - string property, contains the name of the pressed control button. Available in the on_dismiss event handler .
- .is_canceled () - a method that returns True if the name of the pressed button = XBase.BUTTON_CANCEL.
- ._get_body () is an abstract method, the result of which should be the content of the window.
This class also sets default values for some properties of superclasses:
- min_width = 300dp , min_height = 150dp , fit_to_window = True - properties from XPopup , about this - below;
- size_hint = (. 6, .3) - property from Popup , sets the relative size of the window;
- auto_dismiss = False - property from Popup , prohibits closing the window by clicking in any area of the interface outside the window itself.
Note. This class ignores the content property of the Popup class.
XPopup class
A descendant of Popup and a superclass for XBase . Designed for
- min_width and min_height - the minimum width and height of the window, no default values. Work together with size_hint . Essence: when min_width and / or min_height are set, the size_hint values are corrected so that the window sizes are not less than the allowed minimum values.
- fit_to_window - the boolean property "fit into the window", by default - False. Works together with size . Essence: when fit_to_window = True, the size values are corrected so that the size of the pop-up window is not more than the size of the application window.
Note. Application of the described properties occurs only when the window is displayed.
Links
Extending the Kivy Framework with the XPopup Package (Part 1)
Visual aids (video demonstration) .
Download XPopup package .
That's all for today.
Thank you for your attention and pleasant coding.
Source: https://habr.com/ru/post/302204/
All Articles