How to raise CI for iOS developers in a day
Building the project requires heaps of tedious operations from the developer. When the manager needs to report to the customer on the progress of the work, the developer spends time on pumping out the repository, pulling up libraries, installing certificates, assembling, checking, putting the assembly on the server and other intermediate steps. But there are less and less routine actions on Earth that would not undergo automation. The progressive part of the development environment is practicing the continuous integration (CI) method, and the iOS-department's iOS department decided to join it by deploying a server for assemblies on the Jenkins platform. Since then, a completely different life began.
What we got in the end:
Now we save a lot of time and effort, forgetting what it is to do an assembly and send it to someone. This guide is the fruit of the desire to share this feeling and experience. But, like any other of the many guides, ours also does not pretend to be the ultimate truth.
To get started, review the following reservations and see if our guide is compatible with your tasks:
The manual was rather cumbersome, and we decided to split it into two parts. This section focuses on the basic installation and configuration of Jenkins.
What is necessary:
The user can be created both via the console and using the GUI. It is unlikely that in the second version there will be difficulties, therefore we will better consider the first one ( source ):
Our user is ready, and now we need to go for it. We can log in through the GUI, or log in using the console:
Attention: we perform all further actions under the user Jenkins.
')
To install Jenkins, we will use the Homebrew package management system. In the future, it will also simplify the process of installing and updating additional packages, which we will use to obtain code metrics.
In order for our server to start automatically at system startup, we need to configure the launch of the corresponding task for launchd. We have a choice: do it through LaunchAgents or LaunchDaemon. We will use LaunchAgents, since this will simplify * further work with Jenkins. Just look at the table below to understand this:
* The main problem of launching via Daemon is that it is impossible to perform testing without launching iOS Simulator (for more details about the difference in the use of the daemon and the agent, see here )
However, due to the choice of LaunchAgents, we need to solve the problem of the lack of a logged in user when starting the system. To do this, you need to configure autologin. I know only one way to do this: through the GUI (System Settings -> Users and Groups -> Login Options -> Automatic Login). If someone knows how to do this through the shell - please write in the comments!
To customize LaunchAgents launch, perform the following steps:
Example of the contents of the plist file:
Here you should pay attention to the httpListenAddress field with a value of 0.0.0.0 and the httpPort field with a value of 8080 - so the server will “listen” to any ip-addresses on the specified port.
Let me remind you: to close and save the file in the vim editor, enter: wq
Once installed, Jenkins is available by default at 127.0.0.1 (localhost).
For access from the external network, you can forward ports on the router: 8080 for the Jenkins web interface and 22 for ssh access.
Go to the Jenkins server -> Configure Jenkins -> Manage Plugins. In the “Available” tab we find and install the following plugins:
Via the Jenkins web interface, go to Settings, and then to the System Configuration section. What you should pay attention to here:
4.1. Xcode Builder settings. If you installed Xcode in a standard directory, then the settings do not need to be changed. Otherwise, you must specify the path for the specified components. Given that we started the server using LaunchAgents, Xcode will have access to login.keychain. But if you want to be safe, you can add keychain in this section, as indicated in the screenshot.

Now we can load the necessary certificates through the GUI or through the shell in login.keychain, and Xcode will automatically pull up the ones he needs during the build.
4.2. To configure ssh access, do this:
4.3. To configure security, use the Role-based Authorization Strategy plugin. Let's go to the settings via the Jenkins web interface, and then to the Manage and Assign Roles section. Here we will be able to create various roles that are assigned to users and groups, and determine for them the rights to certain operations. Here, everyone does everything at their discretion. But, if you have configured external access to the server, I strongly recommend removing all rights for the guest user.
5.1. On the main page of the Jenkins web interface, select “Create Item”. Next, select the item “Create a task with a free configuration” and enter the name of the project;
5.2. on the job setup page, the first thing we will do is go to the “Source Code Management” tab and configure the project load from GitLab. Here we need to enter the address of the repository of our project, indicate with what credentials the server will gain access to GitLab and which branch of the project should be collected:
5.3. Next, go to the "Assembly". If you are using CocoaPods dependency management system and do not add Pod files to git, you need to add the “Run shell command” build step in which to start the installation of subs:
Here you can wrap the installation condition, so as not to install the hearth every time. Example (if the file was updated in the last 60 seconds, then execute ...):
5.4. Add an assembly step: Xcode. If you use CocoaPods dependency management system, then you should not specify a value in the Target field, and in the Advanced Xcode build options section, specify the name of the executable schema and the .xcworkspace file. An example of the minimum configuration is shown in the screenshots below:

It should be noted that in the settings of your project, the executable scheme should be marked as shared (the container can be either workspace or project):

Thanks to the Keychains and Provisioning Profiles Management plug-in, you can greatly simplify the work with installing the provisioning profile.
Add provisioning profile:
To specify a specific Provisioning Profile, if necessary, in the job settings in the “Assembly environment” section, you need to set the Mobile Provisioning Profiles flag and select one of the downloaded profiles:
Then in the Xcode settings you need to set custom xcodebuild arguments, as in the screenshot:
You can use the GUI to download the certificate to the login.keychain keyring (just click on the certificate), but this is not always possible. Therefore, we will consider a slightly more complicated option - adding via ssh:
Read more about the security team here .
More information on how to add a specific certificate to a job can be found in the documentation for the corresponding plug-in .
Now we are ready to click on the Built Now button on the main page of the Jenkins web interface or on the page of the project itself. Click and go to the Console Output section of the started assembly. Here you can find a lot of useful information in the logs, including errors.
If you did everything correctly, then at the end of the assembly at the end of the log will be indicated: Finished: SUCCESS, and on the Jenkins main page, next to the name of the assembly, the blue SUCCESS indicator will be lit.
That's it, the initial stage is over! Soon there will be a continuation of the article, where it will be described how to get the main code metrics, archive the project in .ipa and configure interaction with slack.
Write your questions and comments in the comments!
If there are a lot of questions about any aspect, we will add to the article!
What we got in the end:
- The server starts the build:
- on the web hook in the case of a push in the master branch;
- on command in the slack chat with indication of the desired branch and add. parameters.
- Runs Unit and UI tests.
- Gets the following metrics:
- code coverage tests;
- number of lines of code;
- code duplication;
- cyclomatic code complexity.
- Archives the project in ipa, then sends it to the build server (self-developed) and sends a link to the build to slack.
Now we save a lot of time and effort, forgetting what it is to do an assembly and send it to someone. This guide is the fruit of the desire to share this feeling and experience. But, like any other of the many guides, ours also does not pretend to be the ultimate truth.
To get started, review the following reservations and see if our guide is compatible with your tasks:
- server deployed to the needs of iOS development;
- Installing most support programs through homebrew, including Jenkins itself (quick updates and usability);
- using xcodebuilder for all build-testing tasks (abandoned the use of xctool due to the inability to run UI tests);
- we use GitLab as a repository;
- for storage of assemblies we use a server of our own design. For each assembly, a unique URL is generated, and then just open the link from the mobile device in the browser and click “Install” - thanks to the Enterprise account, anyone can install the application on the phone. Due to the specificity of actions related to sending files to our server, this stage is not described in the article;
- All our projects use the CocoaPods dependency management system.
The manual was rather cumbersome, and we decided to split it into two parts. This section focuses on the basic installation and configuration of Jenkins.
What is necessary:
- Mac with OS X and Xcode installed (In our case, MacBook Pro 2011 with OS X 10.11.4);
- a few hours of free time.
1. Creating a Jenkins user and setting it up
The user can be created both via the console and using the GUI. It is unlikely that in the second version there will be difficulties, therefore we will better consider the first one ( source ):
# 'Applications' dseditgroup -o create -n . -u username -p -r 'Applications' applications # sudo dscl . -read /Groups/applications # ( ) sudo dscl . -list /Users UniqueID # ( ) sudo dscl . -create /Users/jenkins sudo dscl . -create /Users/jenkins PrimaryGroupID 777 sudo dscl . -create /Users/jenkins UniqueID 1777 sudo dscl . -create /Users/jenkins UserShell /bin/bash sudo ddcl . -create /Users/jenkins RealName "Jenkins" sudo dscl . -create /Users/jenkins NFSHomeDirectory /Users/jenkins sudo dscl . -passwd /Users/jenkins # sudo mkdir /Users/jenkins sudo chown -R jenkins /Users/jenkins Our user is ready, and now we need to go for it. We can log in through the GUI, or log in using the console:
sudo -u jenkins -i Attention: we perform all further actions under the user Jenkins.
')
2. Install the necessary programs
To install Jenkins, we will use the Homebrew package management system. In the future, it will also simplify the process of installing and updating additional packages, which we will use to obtain code metrics.
- Install Homebrew
/usr/bin/ruby -e "$(curl -fsSL https://raw.githubusercontent.com/Homebrew/install/master/install)" - Install jenkins:
brew install jenkins - Installing cocoapods dependency management system:
sudo gem install -n /usr/local/bin cocoapods
In order for our server to start automatically at system startup, we need to configure the launch of the corresponding task for launchd. We have a choice: do it through LaunchAgents or LaunchDaemon. We will use LaunchAgents, since this will simplify * further work with Jenkins. Just look at the table below to understand this:
| Daemon | Agent | |
|---|---|---|
| Launch time | System start | User login |
| User type | Non-login | Login |
| Home folder | No | Yes |
| Login Keychain | No | Yes |
| iOS Simulator | No | Yes |
| Provisioning Profiles | No | Yes |
However, due to the choice of LaunchAgents, we need to solve the problem of the lack of a logged in user when starting the system. To do this, you need to configure autologin. I know only one way to do this: through the GUI (System Settings -> Users and Groups -> Login Options -> Automatic Login). If someone knows how to do this through the shell - please write in the comments!
To customize LaunchAgents launch, perform the following steps:
- unload the daemon (it was created automatically when installing Jenkins):
sudo launchctl unload /Library/LaunchDaemons/homebrew.mxcl.jenkins.plist - remove the demon:
sudo rm /Library/LaunchDaemons/homebrew.mxcl.jenkins.plist - create an agent:
cd /Users/jenkins/Library/LaunchAgents tap homebrew.mxcl.jenkins.plist - configure the agent using the vim editor:
vim homebrew.mxcl.jenkins.plist
Example of the contents of the plist file:
<?xml version="1.0" encoding="UTF-8"?> <!DOCTYPE plist PUBLIC "-//Apple//DTD PLIST 1.0//EN" "http://www.apple.com/DTDs/PropertyList-1.0.dtd"> <plist version="1.0"> <dict> <key>Label</key> <string>homebrew.mxcl.jenkins</string> <key>ProgramArguments</key> <array> <string>/usr/bin/java</string> <string>-Dmail.smtp.starttls.enable=true</string> <string>-jar</string> <string>/usr/local/opt/jenkins/libexec/jenkins.war</string> <string>—httpListenAddress=0.0.0.0</string> <string>--httpPort=8080</string> </array> <key>RunAtLoad</key> <true/> <key>UserName</key> <string>jenkins</string> </dict> </plist> Here you should pay attention to the httpListenAddress field with a value of 0.0.0.0 and the httpPort field with a value of 8080 - so the server will “listen” to any ip-addresses on the specified port.
Let me remind you: to close and save the file in the vim editor, enter: wq
Once installed, Jenkins is available by default at 127.0.0.1 (localhost).
For access from the external network, you can forward ports on the router: 8080 for the Jenkins web interface and 22 for ssh access.
3. Installing Jenkins Plugins
Go to the Jenkins server -> Configure Jenkins -> Manage Plugins. In the “Available” tab we find and install the following plugins:
- Role-based Authorization Strategy - security. Allows you to create user groups with the distribution of rights;
- GitLab Plugin and Gitlab Hook Plugin — plugins for working with gitlab;
- Xcode integration - integration with Xcode;
- Keychains and Provisioning Profiles Management - makes it easy to work with the provisioning profile.
4. Basic Jenkins setup
Via the Jenkins web interface, go to Settings, and then to the System Configuration section. What you should pay attention to here:
4.1. Xcode Builder settings. If you installed Xcode in a standard directory, then the settings do not need to be changed. Otherwise, you must specify the path for the specified components. Given that we started the server using LaunchAgents, Xcode will have access to login.keychain. But if you want to be safe, you can add keychain in this section, as indicated in the screenshot.
Now we can load the necessary certificates through the GUI or through the shell in login.keychain, and Xcode will automatically pull up the ones he needs during the build.
4.2. To configure ssh access, do this:
- generate a shh-key if it is not there (for example, the instruction can be found here );
- add a key in the CVS section;
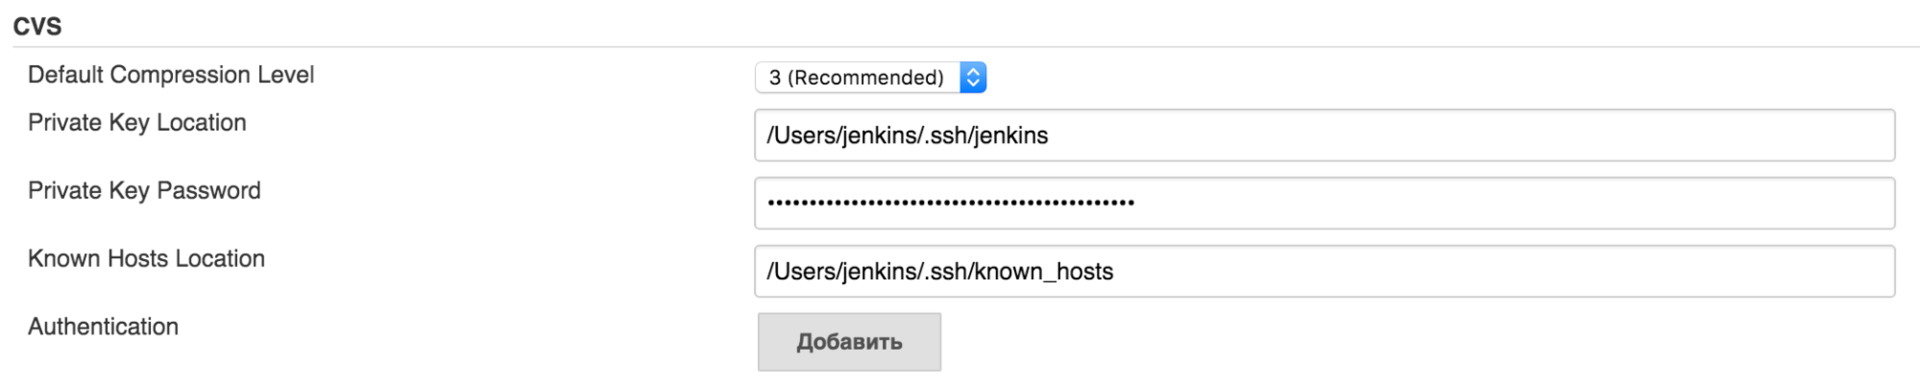
- To access GitLab, go to the Credentials section on the main page of the Jenkins web interface. Here you need to add the private key for our user (Jenkins in this case is a user registered in GitLab). You can paste it directly, as shown in the example below, or specify the path to it:

- in the settings of the GitLab itself, you must specify the corresponding public key:

4.3. To configure security, use the Role-based Authorization Strategy plugin. Let's go to the settings via the Jenkins web interface, and then to the Manage and Assign Roles section. Here we will be able to create various roles that are assigned to users and groups, and determine for them the rights to certain operations. Here, everyone does everything at their discretion. But, if you have configured external access to the server, I strongly recommend removing all rights for the guest user.
5. Creating a job and setting up a project build
5.1. On the main page of the Jenkins web interface, select “Create Item”. Next, select the item “Create a task with a free configuration” and enter the name of the project;
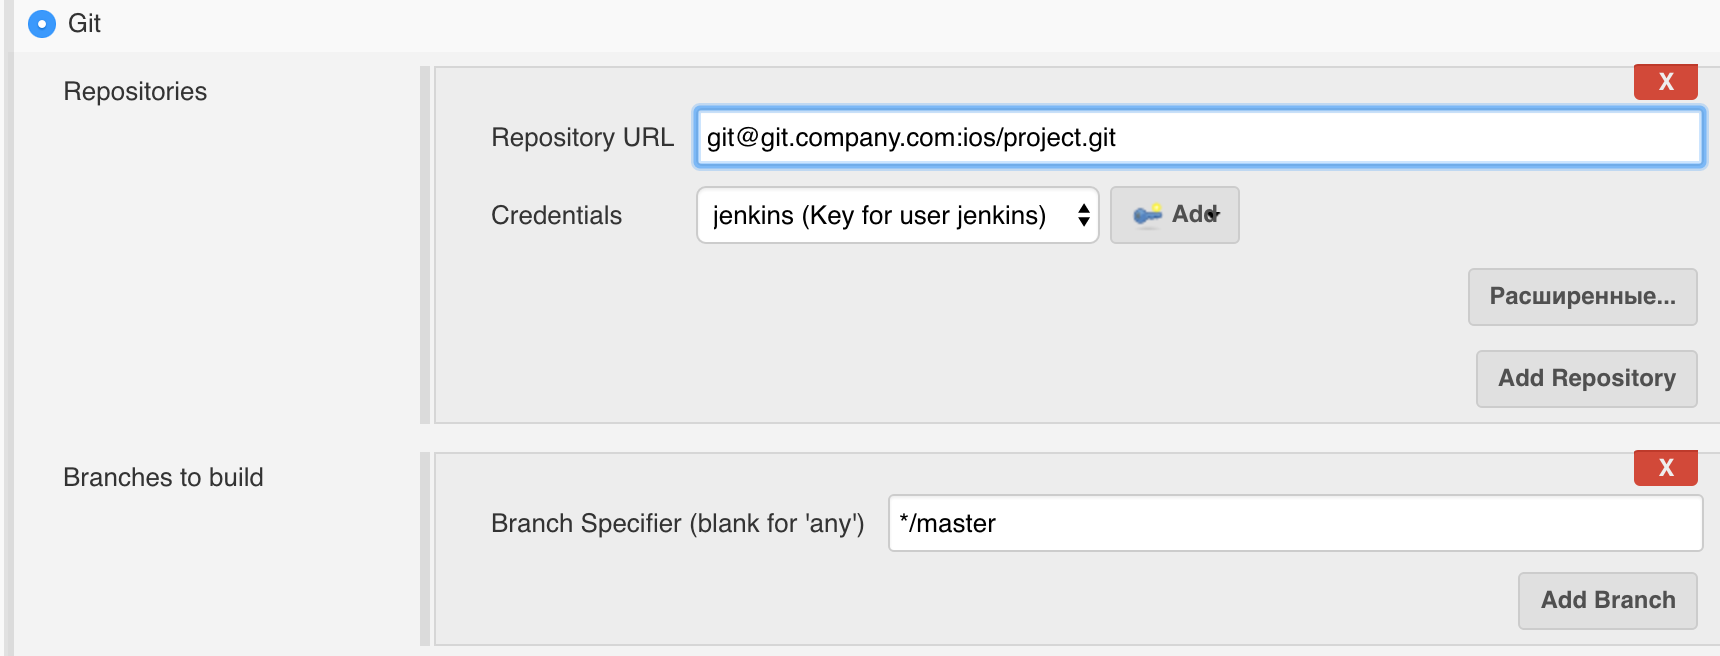
5.2. on the job setup page, the first thing we will do is go to the “Source Code Management” tab and configure the project load from GitLab. Here we need to enter the address of the repository of our project, indicate with what credentials the server will gain access to GitLab and which branch of the project should be collected:
5.3. Next, go to the "Assembly". If you are using CocoaPods dependency management system and do not add Pod files to git, you need to add the “Run shell command” build step in which to start the installation of subs:
#!/bin/bash -l export LANG=UTF-8 pod install Here you can wrap the installation condition, so as not to install the hearth every time. Example (if the file was updated in the last 60 seconds, then execute ...):
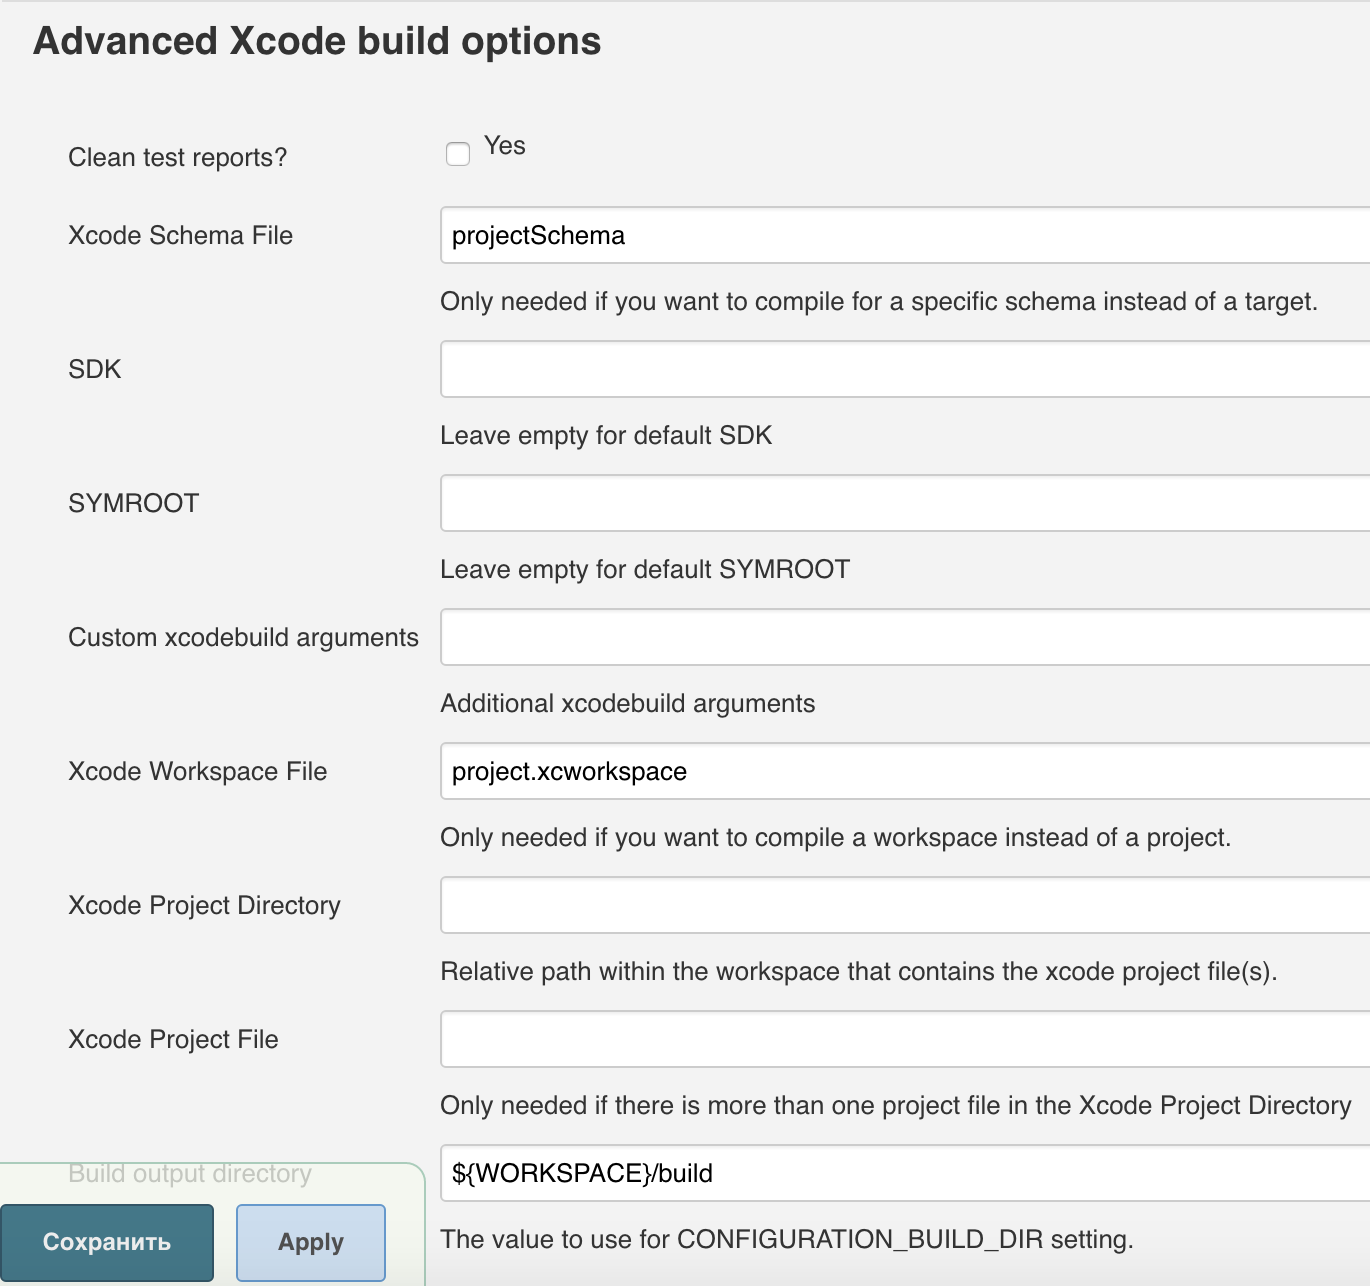
if [ $(( $(date +"%s") - $(stat -f %m Podfile) )) -le 60 ]; then pod install fi 5.4. Add an assembly step: Xcode. If you use CocoaPods dependency management system, then you should not specify a value in the Target field, and in the Advanced Xcode build options section, specify the name of the executable schema and the .xcworkspace file. An example of the minimum configuration is shown in the screenshots below:
It should be noted that in the settings of your project, the executable scheme should be marked as shared (the container can be either workspace or project):
6. Work with certificates and provisioning profile
Thanks to the Keychains and Provisioning Profiles Management plug-in, you can greatly simplify the work with installing the provisioning profile.
Add provisioning profile:
- go to settings Jenkins;
- in the list, select Keychains and Provisioning Profiles Management;
- Click the button "Select file", find your provisioning profile and click Upload.
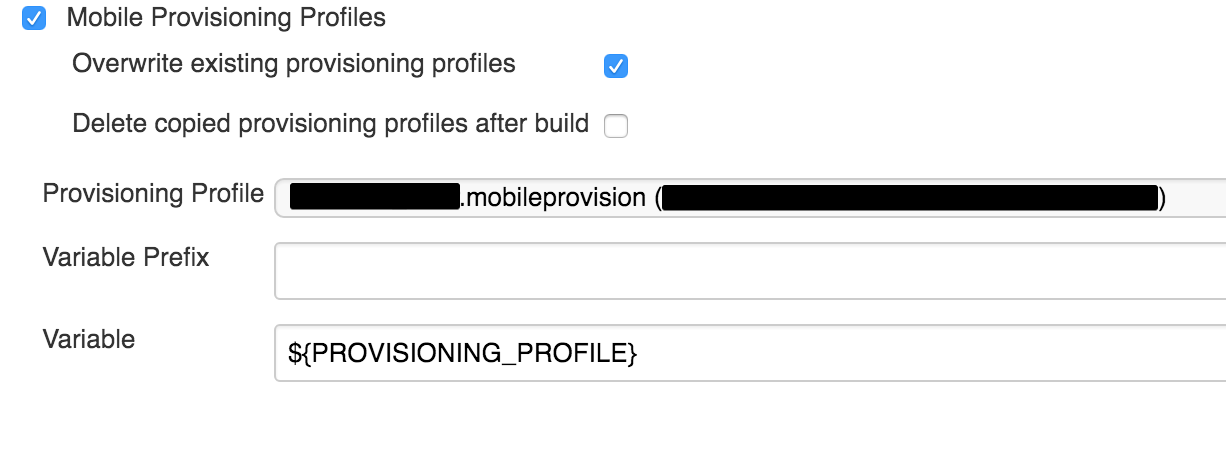
To specify a specific Provisioning Profile, if necessary, in the job settings in the “Assembly environment” section, you need to set the Mobile Provisioning Profiles flag and select one of the downloaded profiles:
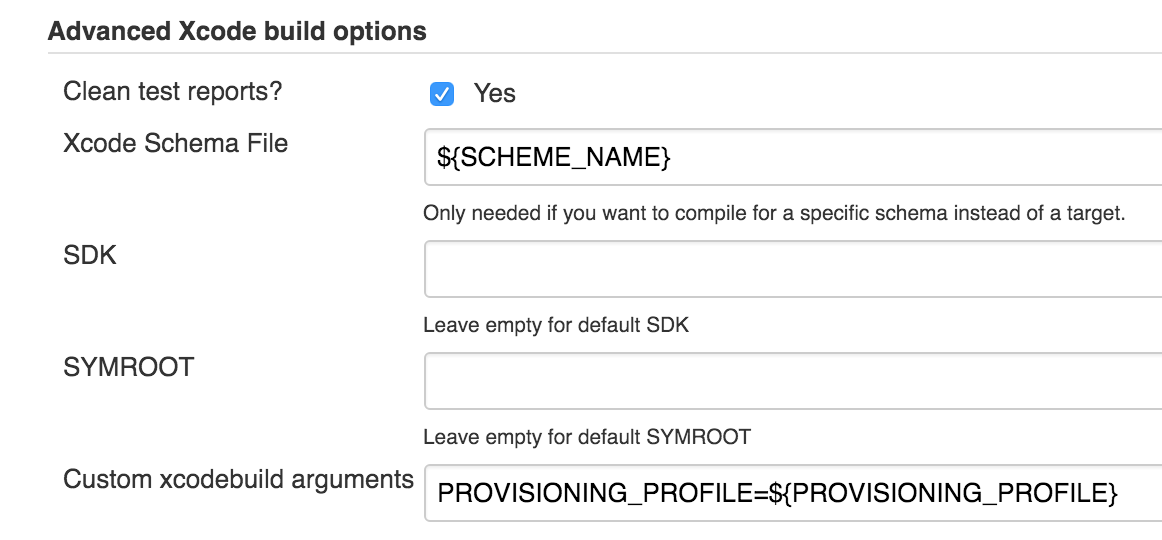
Then in the Xcode settings you need to set custom xcodebuild arguments, as in the screenshot:
You can use the GUI to download the certificate to the login.keychain keyring (just click on the certificate), but this is not always possible. Therefore, we will consider a slightly more complicated option - adding via ssh:
- Download the necessary certificate on your Mac and install it to the local keychain access by double clicking;
- go to keychain access, find the necessary certificate and export the key in the .p12 format;
- we transfer the certificate to the server:
certificate - the name of the certificate;scp certificate.crt jenkins@server:/Users/jenkins
jenkins - username;
server - server address;
: / Users / jenkins - the path to the saved file;
(You can use the parameter to specify the desired port in the format: scp -P 20 certificate.crt jenkins @ server: / Users / jenkins) - pass the key to the server:
scp privatekey.p12 jenkins@server:/Users/jenkins - connect to the server via ssh:
ssh jenkins@server - Open access to the keychain:
security unlock-keychain -p password /Users/jenkins/Library/Keychains/login.keychain - Install the certificate:
security add-certificates ./certificate.crt - Copy the key:
security import privatekey.p12 -k /Users/jenkins/Library/Keychains/login.keychain -P password -A
Read more about the security team here .
More information on how to add a specific certificate to a job can be found in the documentation for the corresponding plug-in .
7. Before running
Now we are ready to click on the Built Now button on the main page of the Jenkins web interface or on the page of the project itself. Click and go to the Console Output section of the started assembly. Here you can find a lot of useful information in the logs, including errors.
If you did everything correctly, then at the end of the assembly at the end of the log will be indicated: Finished: SUCCESS, and on the Jenkins main page, next to the name of the assembly, the blue SUCCESS indicator will be lit.
That's it, the initial stage is over! Soon there will be a continuation of the article, where it will be described how to get the main code metrics, archive the project in .ipa and configure interaction with slack.
Write your questions and comments in the comments!
If there are a lot of questions about any aspect, we will add to the article!
Source: https://habr.com/ru/post/302128/
All Articles