ConstraintLayout 101 and the new layout editor in Android Studio
This article is a translation of the post from the blog of Android developers from South Africa Rebecca Franks riggaroo.co.za , prepared by the Android-department of the company Live Type . The original article is available here .
Recently, I was lucky enough to take part in the Google I / O conference, where I met ConstraintLayout. I was so shocked by its capabilities that I could not wait to come home and try everything myself.
What is ConstraintLayout?
ConstraintLayout is a new kind of layout that you can use in your Android applications. This layout is backward compatible up to API Level 9 and is part of the Support Library. The goal of ConstraintLayout is to reduce the number of layout hierarchies, improve layout performance, and also replace the work with RelativeLayouts. It is compatible with other layouts, so that they can harmonize perfectly with each other.
First steps with ConstraintLayout
To get started, you need to download Android Studio 2.2 Preview 1. In addition to the new layout, the package also includes a new Layout Editor, which, as I was told, had to be created from scratch, because the old one was completely useless.
Now you need to add one line to the dependencies section of the build.gradle file (or Android Studio will do this automatically when you create a new layout using it):
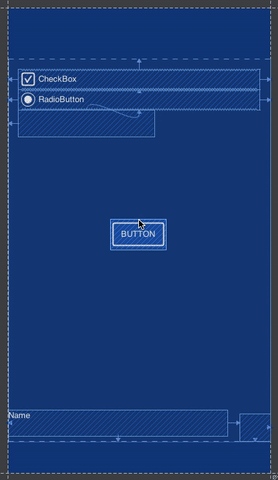
compile'com.android.support.constraint:constraint-layout:1.0.0-alpha1' To use ConstraintLayout, click on the res / layout folder. Choose New> Layout Resource Folder. In the root element option, delete LinearLayout and start typing ConstraintLayout - this will create a new file with your ConstraintLayout, which by default consists of Blueprint Mode  and Design Mode
  and looks like this:

How the new Layout Editor works
Constraints
Constraints are the rules that you define for the widget. Constraints provide options that are largely identical to 'toLeftOf, toRightOf' in RelativeLayouts. Also, with the help of restrictions, alignments are set for widgets.
Types of constraints:
Resize handle
Resize the widget by stretching it around the corners.


Size Constraint Handle
Small circles located on the sides of the widget allow you to set its position inside the container

')Baseline Constraint Handle
Allows you to align two lines of text in widgets.
Bias
Defines the offset of your widget. You can set the vertical or horizontal offset.

Widget size control
In the Properties window is a schematic image with which you can control the size of the widget. Here you can define the fields and how the widget will change its size, namely:
Any size

Similar to match_parent. The only difference is that this option is subject to constraints.
Wrap content

The widget will be as big as necessary to fit all the content.
Fixed size

Allows you to set a fixed size of the widget in dp.
To switch between these types, just click on one of the options on the image.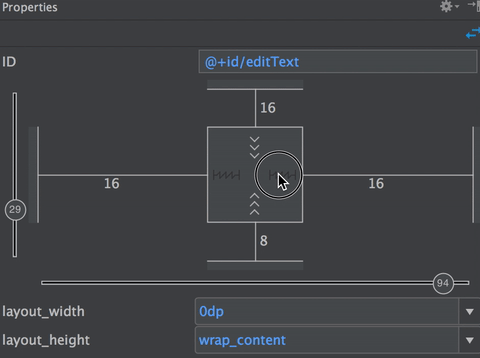
You can also set the offset by dragging the slider along a vertical or horizontal axis.
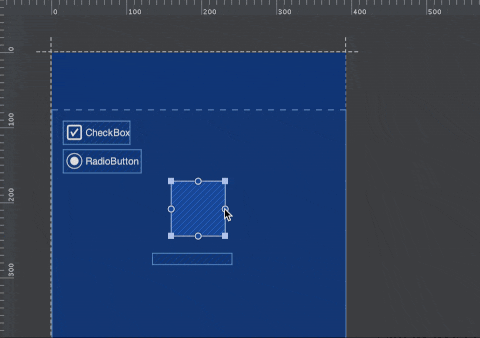
Autoconnect
Autoconnect is an option that automatically starts calculating optimal values for a widget based on its location.
As soon as you move the widget to the layout, you will see lines that will start to diverge from it in different directions - this is how Autoconnect works. The option is on by default and can be turned off and on by clicking on the icon with a magnet. 

Manual Constraints
To create your own constraints, click on the circle on one of the sides of the widget that you want to place. Without releasing the mouse button, draw a line to the widget to which you want to attach it - as soon as the widget turns green, it will create constraint. You can remove constraint by clicking on it when it is highlighted in red.
Inference
Inference creates constraints for all widgets within your layout. It acts like Autoconnect, only it works not with one widget currently being edited, but with the entire layout at once. He uses mathematical calculations to determine which widgets to bind to others, based on their location on the screen.
To use Inference, click the light bulb icon. 

Something else to note:
- The new layout editor also works with old layouts, however some options, such as Inference, may not work;
- This editor creates an XML file for you. But if you are not looking for easy ways and want to write XML yourself - a flag in your hands;
- You can set a lot of other layout properties, for example, set all the default margin values or align a group of widgets to the left, width or center.
What to do with my old markup? Do I need to redo them?
I would not rush headlong into the pool and redo everything in the world without much need. If you think that your old layout is slow or difficult to make any changes there, then you may need to consider using ConstraintLayout. Keep in mind that she is in a state of early alpha.
One of the features of the new Android Studio is that you can automatically convert old layouts to new ones using ConstraintLayout. When you select a file with your layout and are in the design view, right-click >'Convert...Layout to ConstraintLayout' .
Maybe I did something wrong, but all three times when I tried to do this manipulation, ConstraintLayout was added to my layout, but the result was different from what I expected. It seems that you need to wait for some time until the developers finally finish this option.
My thoughts:
The new layout editor and ConstraintLayout shook me to the core. I actually think that we really missed something like that. With all its power and benefits, they look very easy to learn.
I hope that once a separate tool will be made from all this, with which designers can create full-fledged interfaces.
Source: https://habr.com/ru/post/302106/
All Articles