Creating a blog on symfony 2.8 lts [Part 2]
Navigation in parts of the manual
Contact page: validators, forms and email
')
In this part:
1. Validators
2. Forms
3. Bundle Configuration
Project on Github
You can find out how to install the part of the manual you need in the description of the repository by the link . (For example, if you want to start with this lesson without going through the previous one)
Contact page
Routing
As with the “About” page created in the previous chapter, we will begin by defining a route for the contacts page. Open the BloggerBlogBundle routing file located in
src/Blogger/BlogBundle/Resources/config/routing.ymland add the following routing rule.
# src/Blogger/BlogBundle/Resources/config/routing.yml BloggerBlogBundle_contact: path: /contact defaults: { _controller: "BloggerBlogBundle:Page:contact" } requirements: methods: GET There is nothing new here, the rule is valid for the / contact template, the HTTP GET method and performs the contactAction function in the Page controller in our BloggerBlog bundle.
Controller
Let's add a function for the Contacts page to the Page controller of our BloggerBlog bundle which is in
src/Blogger/BlogBundle/Controller/PageController.php
src/Blogger/BlogBundle/Controller/PageController.php
class PageController extends Controller { //.. public function contactAction() { return $this->render('BloggerBlogBundle:Page:contact.html.twig'); } } Now this function is very simple, it only displays the template for the contact page. We will return to the controller later.
Display
Create a template:
src/Blogger/BlogBundle/Resources/views/Page/contact.html.twig
And add the following content:
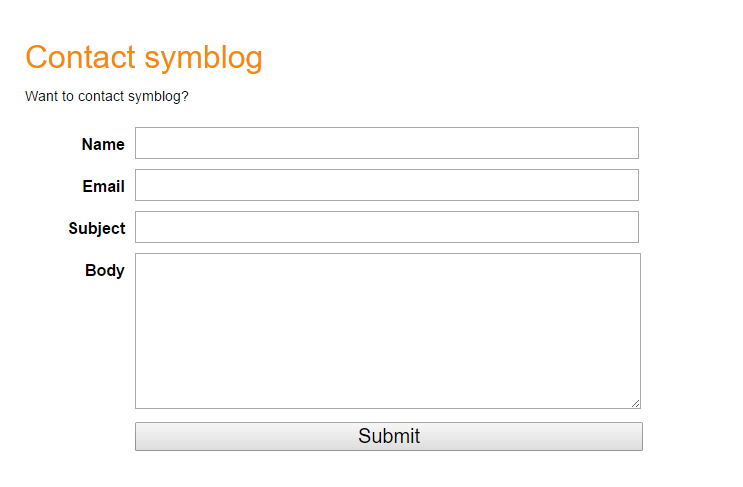
{# src/Blogger/BlogBundle/Resources/views/Page/contact.html.twig #} {% extends 'BloggerBlogBundle::layout.html.twig' %} {% block title %}Contact{% endblock%} {% block body %} <header> <h1>Contact symblog</h1> </header> <p>Want to contact symblog?</p> {% endblock %} This template is also quite simple. It extends the layout template, overrides the title, and defines some content for the body block.
Links to pages
Finally, we need to update the links in the application template to add a link to the contact page
app/Resources/views/base.html.twig #app/Resources/views/base.html.twig {% block navigation %} <nav> <ul class="navigation"> <li><a href="{{ path('BloggerBlogBundle_homepage') }}">Home</a></li> <li><a href="{{ path('BloggerBlogBundle_about') }}">About</a></li> <li><a href="{{ path('BloggerBlogBundle_contact') }}">Contact</a></li> </ul> </nav> {% endblock %} If you go to http: // localhost: 8000 and click on the “Contact” link in the navigation bar, you will see a very simple contact page. Now we have a properly configured page and it's time to work with the form. This includes 2 separate parts: Validators and the Form itself. Before we can address the concept of Validators and Forms, we need to think about how we will process the data from the request.
Contact Entity
Let's start by creating a class that represents a request from a user. We want to take some basic information, such as the name, subject and body of the request. Create a new
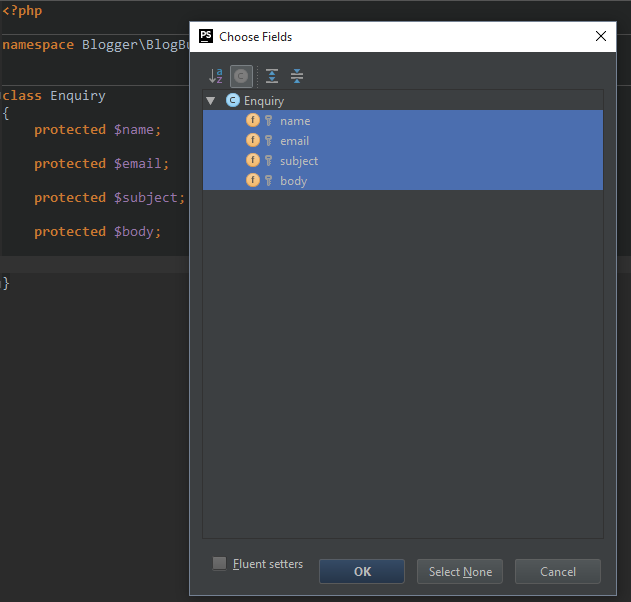
src/Blogger/BlogBundle/Entity/Enquiry.php and paste in the following content: <?php // src/Blogger/BlogBundle/Entity/Enquiry.php namespace Blogger\BlogBundle\Entity; class Enquiry { protected $name; protected $email; protected $subject; protected $body; /** * @return mixed */ public function getName() { return $this->name; } /** * @param mixed $name */ public function setName($name) { $this->name = $name; } /** * @return mixed */ public function getEmail() { return $this->email; } /** * @param mixed $email */ public function setEmail($email) { $this->email = $email; } /** * @return mixed */ public function getSubject() { return $this->subject; } /** * @param mixed $subject */ public function setSubject($subject) { $this->subject = $subject; } /** * @return mixed */ public function getBody() { return $this->body; } /** * @param mixed $body */ public function setBody($body) { $this->body = $body; } } Advice (if you are using IDE PHPStorm)
You have the ability to generate getters and setters automatically.
For this:
1. Click on the right mouse button in the file (or alt + insert combination), select Generate
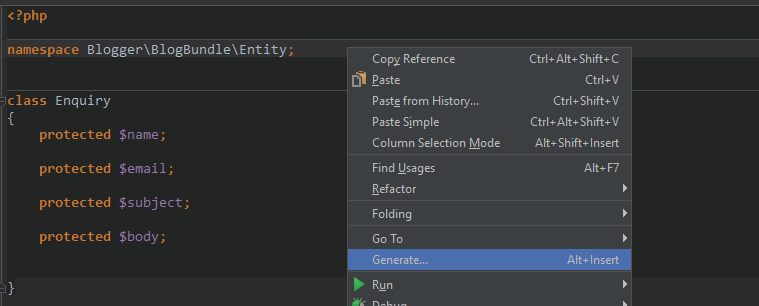
2. Next, Getters and Setters

3. Highlight everything and click OK.
For this:
1. Click on the right mouse button in the file (or alt + insert combination), select Generate
2. Next, Getters and Setters
3. Highlight everything and click OK.
As you can see this class simply defines some protected variables and access methods to them. There is nothing that determines how we will validate variables or how variables relate to form elements. We will come back to this later.
The note
Let's talk about how namespaces are used in symfony2. The entity class we created sets theBlogger\BlogBundle\Entitynamespace. Since Symfony2 supports the PSR-0 autoload standard, the namespace points directly to the bundle file structure. The Inquiry entity class is located insrc/Blogger/BlogBundle/Entity/Enquiry.php, which ensures Symfony2 has the correct class autoload.
How does the symfony2 autoloader understand that the blogger namespace is in the src directory? This is achieved through the autoloader configurationapp/autoload.php/** * @var ClassLoader $loader */ $loader = require __DIR__.'/../vendor/autoload.php'; AnnotationRegistry::registerLoader(array($loader, 'loadClass')); return $loader;
It registers all namespaces that have not been registered. Since the Blogger namespace is not registered, the Symfony2 autoloader will look for the necessary files in the src directory.
Autoloader and namespace is a very powerful concept in symfony2. If you get errors where PHP cannot find classes, you probably have an error in your namespace or folder structure. You should not be tempted to fix this with PHP's require or include inclusion.
Forms
Let's create a form.
Symfony2 comes with a very powerful tool for working with forms. Like all components of symfony2, it can be used outside of symfony2 in other projects. The component of working with Forms is available on GitHub . We begin by creating the AbstractType class, which represents the request form. We could create the form directly in the controller, rather than messing with this class, but separating the form into a separate class allows us to reuse the form throughout the application. It also allows you not to clutter up the controller. The controller should be simple.
InquiryType
Create a new
src/Blogger/BlogBundle/Form/EnquiryType.php and add the following content: <?php namespace Blogger\BlogBundle\Form; use Symfony\Component\Form\AbstractType; use Symfony\Component\Form\Extension\Core\Type\EmailType; use Symfony\Component\Form\Extension\Core\Type\TextareaType; use Symfony\Component\Form\Extension\Core\Type\TextType; use Symfony\Component\Form\FormBuilderInterface; use Symfony\Component\OptionsResolver\OptionsResolver; class EnquiryType extends AbstractType { public function buildForm(FormBuilderInterface $builder, array $options) { $builder->add('name', TextType::class); $builder->add('email', EmailType::class); $builder->add('subject', TextType::class); $builder->add('body', TextareaType::class); } public function configureOptions(OptionsResolver $resolver) { } public function getBlockPrefix() { return 'contact'; } } Advice (if you are using IDE PHPStorm)
If you are using IDE PHPStorm with a symfony plugin, creating the InquiryType class will be even easier.
Right-click on the bundle folder, select New -> Form (or press Alt + Insert and select Form)

then enter the name InquiryType and add the missing lines as described above (note, the last method should be getBlockPrefix )
Right-click on the bundle folder, select New -> Form (or press Alt + Insert and select Form)
then enter the name InquiryType and add the missing lines as described above (note, the last method should be getBlockPrefix )
The InquiryType class represents the FormBuilderInterface interface. This interface is used by the FormBuilder class. The FormBuilder class is your best friend when it comes to creating forms. It can simplify the process of defining fields based on metadata. Since our Inquiry entity is very simple, we will not yet define the metadata, so FormBuilder will display the default values.
The note
Here it is necessary to mention that the getBlockPrefix method should return a unique identifier.
Creating a form in the controller
We have defined the entities Inquiry and InquiryType, now we can update the contact function to use them. Replace the contents of the function located
src/Blogger/BlogBundle/Controller/PageController.php following: // src/Blogger/BlogBundle/Controller/PageController.php public function contactAction(Request $request) { $enquiry = new Enquiry(); $form = $this->createForm(EnquiryType::class, $enquiry); if ($request->isMethod($request::METHOD_POST)) { $form->handleRequest($request); if ($form->isValid()) { // Perform some action, such as sending an email // Redirect - This is important to prevent users re-posting // the form if they refresh the page return $this->redirect($this->generateUrl('BloggerBlogBundle_contact')); } } return $this->render('BloggerBlogBundle:Page:contact.html.twig', array( 'form' => $form->createView() )); } We start by creating an instance of the Inquiry entity. This entity represents the contact request data. Next we create a form. We define the InquiryType that we created earlier, and give it to our inquiry entity object.
Since these controller actions will deal with the display and processing of the submitted form, we need to check the HTTP method. Forms are usually transmitted through the POST method, and our form will not be an exception. If the request method is POST, a call to
submit($request) will turn the submitted data back into the elements of our $ inquiry object. At the moment, the object $ $ inquiry contains an idea of what the user sent. Next we will make a check to make sure the form is filled out correctly. Since we have not specified a single validator for this moment, the form will always be valid. Finally, we will specify the template to render.We have to import namespaces into our controller because use new classes. Update the controller file located in
src/Blogger/BlogBundle/Controller/PageController.phpApplications must be placed under existing ones.
<?php // src/Blogger/BlogBundle/Controller/PageController.php namespace Blogger\BlogBundle\Controller; use Symfony\Bundle\FrameworkBundle\Controller\Controller; // Import new namespaces use Symfony\Component\HttpFoundation\Request; use Blogger\BlogBundle\Entity\Enquiry; use Blogger\BlogBundle\Form\EnquiryType; class PageController extends Controller { //.. Form display
Thanks to the Twig template engine, form output is very simple. Twig provides a multi-level system for outputting forms, which allows you to display the form as a single entity or as separate errors and elements, depending on the level of customization you need. To demonstrate the power of the Twig methods, we derive the entire form with the following code fragment:
<form action="{{ path('BloggerBlogBundle_contact') }}" method="post" > {{ form_start(form) }} {{ form_widget(form) }} {{ form_end(form) }} <input type="submit" /> </form> While it is very simple to create prototypes and simple forms, it also has its limitations when advanced settings are needed, which is often the case with forms.
For our contact form, we will choose a middle ground. Replace the template code located in
src/Blogger/BlogBundle/Resources/views/Page/contact.html.twig {# src/Blogger/BlogBundle/Resources/views/Page/contact.html.twig #} {% extends 'BloggerBlogBundle::layout.html.twig' %} {% block title %}Contact{% endblock%} {% block body %} <header> <h1>Contact symblog</h1> </header> <p>Want to contact symblog?</p> {{ form_start(form, { 'action': path('BloggerBlogBundle_contact'), 'method': 'POST', 'attr': {'class': 'blogger'} }) }} {{ form_errors(form) }} {{ form_row(form.name) }} {{ form_row(form.email) }} {{ form_row(form.subject) }} {{ form_row(form.body) }} {{ form_rest(form) }} <input type="submit" value="Submit" /> {% endblock %} As you can see, we use 4 new Twig methods for form output.
The first form_start method (view, variables) displays the start of a form tag. This helper takes care of the output of the configuration method and the action in the form. It will also include the correct ENCTYPE value if the form contains loading fields.
The second method, form_errors, will output form errors if the check fails.
The third method, form_row, displays the entire elements associated with each form region. This includes any errors in the field, label fields and the actual field element.
Finally we use the form_rest method. It is a safe option to use the method at the end of the form to make any fields that you may have forgotten, including hidden fields and the Symfony2 Form CSRF token.
The note
Cross-site request forgery (CSRF) is explained in detail in the Shapes chapter of the Symfony2 book .
Stylization of the form
Let's add some styles to enhance the look of the form. Since these styles are specific within our bundle, we will create styles in a new style file inside the bundle itself. Create a new
src/Blogger/BlogBundle/Resources/public/css/blog.css and insert styles. .blogger-notice { text-align: center; padding: 10px; background: #DFF2BF; border: 1px solid; color: #4F8A10; margin-bottom: 10px; } form.blogger { font-size: 16px; } form.blogger div { clear: left; margin-bottom: 10px; } form.blogger label { float: left; margin-right: 10px; text-align: right; width: 100px; font-weight: bold; vertical-align: top; padding-top: 10px; } form.blogger input[type="text"], form.blogger input[type="email"] { width: 500px; line-height: 26px; font-size: 20px; min-height: 26px; } form.blogger textarea { width: 500px; height: 150px; line-height: 26px; font-size: 20px; } form.blogger input[type="submit"] { margin-left: 110px; width: 508px; line-height: 26px; font-size: 20px; min-height: 26px; } form.blogger ul li { color: #ff0000; margin-bottom: 5px; } We need the application to know that we want to use this style sheet. We could connect the style sheets into the Contacts page template, but since other templates will also use these styles later, it makes sense to import the stylesheet into the Blogger BlogBundle layout that we created in the first part. Open the BloggerBlogBundle layout
src/Blogger/BlogBundle/Resources/views/layout.html.twig and replace the content with the following: {# src/Blogger/BlogBundle/Resources/views/layout.html.twig #} {% extends '::base.html.twig' %} {% block stylesheets %} {{ parent() }} <link href="{{ asset('bundles/bloggerblog/css/blog.css') }}" type="text/css" rel="stylesheet" /> {% endblock %} {% block sidebar %} Sidebar content {% endblock %} You can see that we have deduced a style block to override it, which in turn is defined in the parent template. It is important to note that the parent method is called. This will include the style files that are defined in
app/Resources/base.html.twig , and allow you to add our new style file. We do not want to override already existing style sheets.In order for the asset function to correctly include files, we need to copy or link the bundle resources in the web folder of our application. This can be done with the following command in the console:
php app/console assets:install web --symlink
Now, if you refresh the page, the form will look much more attractive.
Let's change the route located
src/Blogger/BlogBundle/Resources/config/routing.yml to handle POST requests. # src/Blogger/BlogBundle/Resources/config/routing.yml BloggerBlogBundle_contact: path: /contact defaults: { _controller: "BloggerBlogBundle:Page:contact" } requirements: methods: GET|POST The note
Now that you submit the form, it should function as expected, however the page will simply redirect you back to the contact form.
Validators
Symfony2 validator allows us to perform data validation. Verification is a common task when working with data from a form. Data verification must also be performed before it is sent to the database.
Symfony2 validator allows you to separate our validation logic from components that can use it, such as a form component or a database component. This approach means that we have one set of rules for object validation.
Let's start by updating the Inquiry entity, located in
src/Blogger/BlogBundle/Entity/Enquiry.php we src/Blogger/BlogBundle/Entity/Enquiry.php point out a few validators. Make sure you add 4 new applications at the top of the file. <?php // src/Blogger/BlogBundle/Entity/Enquiry.php namespace Blogger\BlogBundle\Entity; use Symfony\Component\Validator\Mapping\ClassMetadata; use Symfony\Component\Validator\Constraints\NotBlank; use Symfony\Component\Validator\Constraints\Email; use Symfony\Component\Validator\Constraints\Length; class Enquiry { public static function loadValidatorMetadata(ClassMetadata $metadata) { $metadata->addPropertyConstraint('name', new NotBlank()); $metadata->addPropertyConstraint('email', new Email()); $metadata->addPropertyConstraint('subject', new Length(array( 'max' => 50 ))); $metadata->addPropertyConstraint('body', new Length(array( 'min' => 50 ))); } //.. To define validators, we must implement the static method loadValidatorMetadata. He will give us a ClassMetadata object. We can use this object to set limits on the elements of our entities.
The first NotBlank statement applies to the name element. NotBlank validator checks if the field is not empty.
Next, we check whether the user entered his e-mail correctly. The symfony2 service provides a validator that checks the correctness of the e-mail field, including domain validation.
We want the subject field not to be empty and contain no more than 50 characters, and the message to be at least 50 characters.
You can apply as many validators to one field as you need.
A complete list of validators is provided in the Symfony2 reference documents. You can also create custom validators .
Now, when you submit the form, your data will be validated. Try entering a wrong email address. You should see an error message stating that the email address is invalid. Each validator displays a default message that can be overridden if required. For example, to change the validator's e-mail messages, you can do the following:
$metadata->addPropertyConstraint('email', new Email(array( 'message' => 'symblog does not like invalid emails. Give me a real one!' ))); The note
If you use a browser that supports HTML5, you will see HTML5 messages of certain restrictions. This is a client-side check and Symfony2 will set suitable HTML5 restrictions based on Entity metadata. You can see this on the email element. HTML display<input type="email" id="contact_email" name="contact[email]" required="required">
He used one of the new types of HTML5 fields, email and set the required attribute. Verification on the client side is a big plus because it does not require requests to the server to verify the form. However, client side validation should not be used alone. You should always check the data presented on the server side, since it is quite easy to bypass the client side check.
Email sending
While our contact form allows users to send requests, nothing really happens yet. Let's update the controller to send a letter to the webmaster of the blog. Symfony2 comes bundled with the SwiftMailer library for sending email. Swift Mailer is a very powerful library, we’ll just touch on what this library can do.
Configuration settings SwiftMailer
Swift Mailer is already configured out of the box to work in Symfony2, however, we need to configure some parameters regarding sending methods and permissions. Open the settings file located in
app/config/parameters.yml and find the settings with the mailer_ prefix.mailer_transport: smtp
mailer_host: 127.0.0.1
mailer_user: null
mailer_password: null
Swift Mailer provides a number of methods for sending email, including using an SMTP server, using the Sendmail 'local' setup, or even using a Gmail account. For simplicity, we’ll use a Gmail account. Update the settings by substituting your username and password.
mailer_transport: gmail
mailer_encryption: ssl
mailer_auth_mode: login
mailer_host: smtp.gmail.com
mailer_user: _
mailer_password: _
Important !
Be careful if you use a version control system (VCS) as Git for your project, especially if your repository is publicly available. You need to make sure that the application fileapp/config/parameters.yml
added to ignore your vcs.
Controller
Update the Page controller located
src/Blogger/BlogBundle/Controller/PageController.php copying the following code into it: if ($form->isValid()) { $message = \Swift_Message::newInstance() ->setSubject('Contact enquiry from symblog') ->setFrom('enquiries@symblog.co.uk') ->setTo('email@email.com') ->setBody($this->renderView('BloggerBlogBundle:Page:contactEmail.txt.twig', array('enquiry' => $enquiry))); $this->get('mailer')->send($message); $this->get('session')->getFlashBag()->add('blogger-notice', 'Your contact enquiry was successfully sent. Thank you!'); // Redirect - This is important to prevent users re-posting // the form if they refresh the page return $this->redirect($this->generateUrl('BloggerBlogBundle_contact')); } When you use the SwiftMailer library to create Swift_Message, it can be sent as an email.
The note
Since the Swift Mailer library does not use namespaces, we must prefix the Swift Mailer \ class. This tells PHP to go back to the global space. You will need to add the prefix to all classes and functions that do not have a namespace with \. If you do not place this prefix before the Swift_Message class, PHP will be visible to the class in the current namespace, which in this example is Blogger \ BlogBundle \ Controller, which will result in an error.
We also installed a flash message in the session. Flash , . Symfony2. flash , . flash , .
flash ,
src/Blogger/BlogBundle/Resources/views/Page/contact.html.twig : //.. <header> <h1>Contact symblog</h1> </header> {% for flashMessage in app.session.flashbag.get('blogger-notice') %} <div class="blogger-notice"> {{ flashMessage }} </div> {% endfor %} <p>Want to contact symblog?</p> //.. , flash blogger-notice .
email' -
Symfony2 , , . -, . , . , , , .
src/Blogger/BlogBundle/Resources/config/config.yml : parameters: # Blogger contact email address blogger_blog.emails.contact_email: contact@email.com . . BloggerBlogBundle blogger_blog… . (). .
, Symfony2 , ,
app/config/config.yml , : # app/config/config.yml imports: # .. existing import here - { resource: "@BloggerBlogBundle/Resources/config/config.yml"} – .
contactAction .
// src/Blogger/BlogBundle/Controller/PageController.php public function contactAction(Request $request) { $enquiry = new Enquiry(); $form = $this->createForm(EnquiryType::class, $enquiry); if ($request->isMethod($request::METHOD_POST)) { $form->handleRequest($request); if ($form->isValid()) { $message = \Swift_Message::newInstance() ->setSubject('Contact enquiry from symblog') ->setFrom('enquiries@symblog.co.uk') ->setTo($this->container->getParameter('blogger_blog.emails.contact_email')) ->setBody($this->renderView('BloggerBlogBundle:Page:contactEmail.txt.twig', array('enquiry' => $enquiry))); $this->get('mailer')->send($message); $this->get('session')->getFlashBag()->add('blogger-notice', 'Your contact enquiry was successfully sent. Thank you!'); // Redirect - This is important to prevent users re-posting // the form if they refresh the page return $this->redirect($this->generateUrl('BloggerBlogBundle_contact')); } } return $this->render('BloggerBlogBundle:Page:contact.html.twig', array( 'form' => $form->createView() )); } The board
. ,app/config/config.yml.# app/config/config.yml parameters: # Blogger contact email address blogger_blog.emails.contact_email: assistant@email.com
email, .
src/Blogger/BlogBundle/Resources/views/Page/contactEmail.txt.twig:
{# src/Blogger/BlogBundle/Resources/views/Page/contactEmail.txt.twig #} A contact enquiry was made by {{ enquiry.name }} at {{ "now" | date("Ymd H:i") }}. Reply-To: {{ enquiry.email }} Subject: {{ enquiry.subject }} Body: {{ enquiry.body }} , , . .txt.twig . , .txt . , .txt, .html, .css, .js, XML .json . , , Twig. .php PHP .
, , blogger_blog.emails.contact_email .
The board
Symfony2 SwiftMailer Symfony2. . , Symfony 2 SwiftMailer , .app/config/config_test.ymlswiftmailer: disable_delivery: true
, Dev . , , . , Dev ,app/config/config_dev.yml
, , . Symfony2 . - , .
, , intercept_redirects
app/config/config_dev.yml true , .
SwiftMailer Dev , Dev ,
app/config/config_dev.yml swiftmailer: delivery_address: development@symblog.dev Conclusion
, -: .
, . Doctrine 2 blog Model. Data fixtures.
:
https://symfony.com/
http://tutorial.symblog.co.uk/
http://twig.sensiolabs.org/
http://www.doctrine-project.org/
https://getcomposer.org/
Post Scriptum
, , , .
Part 1 - Configuring Symfony2 and Templates
Part 3 - Doctrine 2 and Data Fixtures
Part 4 - Comment Model, Repository and Migrations of Doctrine 2
Part 5 - Twig Extensions, Sidebar (sidebar) and Assetic
Part 6 - Modular and Functional Testing
, . Thank.
Source: https://habr.com/ru/post/302032/
All Articles