Using the ceiling clock as an information board
Preamble
At the end of 2013, our company moved to a new office in one of the towers of the Moscow-City complex. Inheritance from the past tenant of the premises we got a ceiling clock, designed to display the time in different time zones. Apparently, the tenant was tied to the financial or banking sector.
At first we tried to reconfigure the clock (to adjust the time and change the displayed cities), but we could not do it - there was a monolithic aluminum box on the ceiling without any controls. In consequence, the clock was de-energized and remained hanging without signs of life. Two years later, got the idea to revive the clock and use them as something more.

Device identification
The first problem on the way was the need to identify the device - we didn’t know neither the watch model nor their manufacturer. No identification marks, stickers and engravings on the case of the device could not be found. Documentation for the device was also missing.
At this point, we concluded that to identify the device it is necessary to open the box, starting from the sides. The heads of the bolts were damaged even during the first attempt of an autopsy two years ago. One of the bolts could not be unscrewed - I had to break the corner of the panel. Fortunately, it is made of soft aluminum, so that we managed to inflict minimal visual and structural damage to the structure.

Broken corner
Inside was a web of wires and a scattering of control boards. At one of them we were able to identify the name of the manufacturer of watches Wharton, on the site of which our specimen was identified by visual signs.
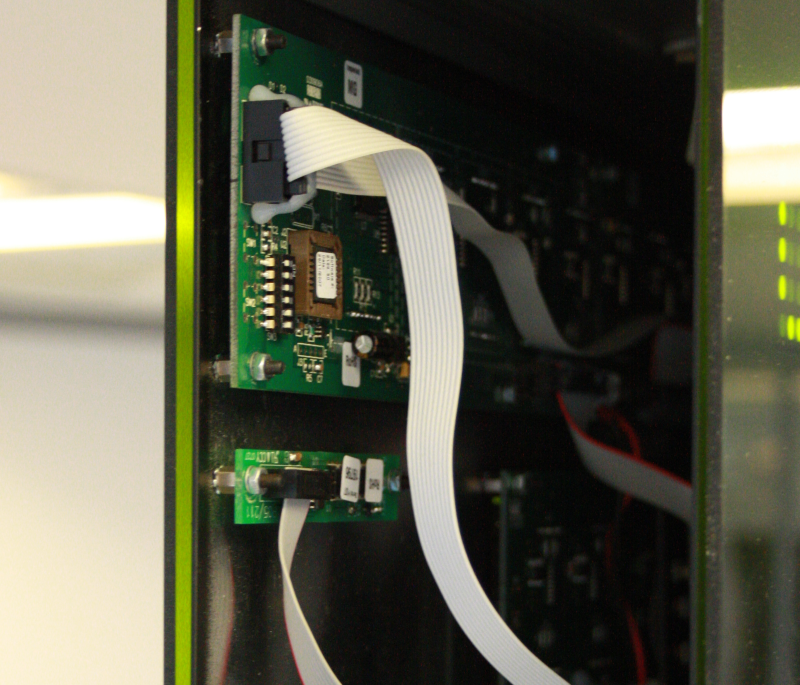
Watch interiors
The manufacturer’s consumer support section is limited to the contact details of an organization headquartered in the UK. After ten minutes of talking on the phone with the second line of support, we were sent instructions to the clock, where the procedure for setting the clock using the remote control was described in detail. Remote tenants have not left us.
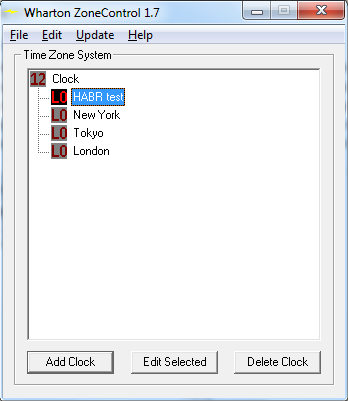
After another ten minutes of conversation with the support service, they sent us a proprietary utility designed to adjust the clock, set time zones, set the signature over the sections, and also to synchronize the time. The program communicates with the clock through the usual COM-port, which was kindly hidden by the installers under the false ceiling above the clock. For our copy of the program has worked "with a bang."

In the process of studying the insides of the clock, a set of jumpers was noticed on the control board of each section. Having played with the utility and jumpers, we found out that they control the internal number of the section, which allows displaying the same information and time on different sections. This feature is relevant to our bilateral sample - time and text are duplicated on both sides.
Watch management program
It's time to move on to the entertaining part of the exercise: an analysis of the algorithm of the setup program in order to write your own control program. This task can be approached in several ways. At first we considered the option of disassembling the official utility. After several attempts to understand the assembler code, we decided to follow the path of reverse engineering of the data transfer protocol: to study and understand the data that is transmitted via the COM cable.

To study the commands transmitted via the COM port, we used the software HDD Software Device Monitoring Studio. The program clings to the COM port installed in the system without disrupting its operation, removes the data transmitted on the port and automatically breaks it into data packets based on the delays between transmissions. With the running studio, we removed the traffic from the tuning program to the clock:

For the purposes of the project, the change of the time zone is not required, because only the first part of the request was studied in detail. The trial and error method was able to parse the structure of the first part of the query in more detail:
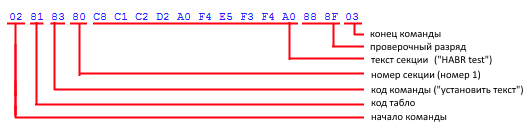
The beginning and end of a command are constant values for all commands. In the ASCII table, these codes correspond to the characters "beginning of the text" and "end of the text." The board code makes sense if several boards are chained together. In our case, the scoreboard is only one, because for us the meaning is constant. There are several command codes (“set text”, “set time zone”, “synchronize time”), for our project only “ 0x83 - set text” is used. For the section number, use the value according to the formula: 0x80 + _ – 1 .
For section text, the conversion rule is used: 0x80 | ord() 0x80 | ord() . The clock supports a small set of characters to display: numbers, Latin lowercase and uppercase characters, a space, special characters and punctuation. The Cyrillic alphabet is not sewn into the system. The length of the text is limited to ten characters and is constant. If the length of the displayed string is less than ten characters, it is necessary to “finish” the string to the full length with spaces. When displaying text on a clock, spaces at the beginning and end of a line are ignored, and the text itself is centered when rendering. If the character code is not supported, the “!” Symbol is displayed.
The check digit is present at the end of each command. For the team we are interested in, the formula for calculating the check digit is a character XOR for the text and the section number (already encoded). For the received value, the high and low octets are written into separate bytes of the control bit of the message. Visual example:

Checking the correctness of the algorithm was carried out through a proof-of-concept script written in PHP, which writes the appropriate commands directly to the COM port. Using this script, we clarified the minimum allowable delays between commands, in particular, managed to minimize the delay between commands from one second (standard in the program from the supplier) to 300 ms, and also checked the alphabet supported by the clock.
Access to the clock on the network
Interaction with the watch program was only one part of the problem, albeit the most difficult. To ensure the success of the project, it was necessary to be able to send control commands to the watch via the network. In the end, we could not leave the test notebook connected to the 24x7 clock.
To implement a network connection, it was decided to create a simple C # program that opens a TCP port and waits for a connection from the outside. When receiving a command over the network, the program performs the following operations:
- sets a lock (to avoid parallel work with the clock);
- opens a local COM port on which the clock hangs;
- sends the command;
- closes the port;
- waiting for the preset time (as set above - 300 ms);
- removes the lock;
- sends confirmation of command execution.
Initially, the idea was to provide a direct connection to the COM port over the network (that is, to implement a tcp2com solution ). This approach could allow you to send any commands to the clock and experiment with the device. But in the end, this idea was abandoned in favor of the implementation of a service program that implements all the logic of encoding and controlling the clock.

The compiled program implements the XML interface, accepts requests through the standard for C # HttpListener . The format of messages over the network implies the indication of the section for setting and the displayed text:
<setTextXML> <section>[section number]</section> <text>[section text]</text> </setTextXML> The written program was installed on a Windows server locked in a technical office room. Since the server is at some distance, we dragged 10 meters of CAT5-wires under the false ceiling from the clock to the utility room. CAT5 cable was used as a signal COM cable (only two wires were used). There were worries that ten meters of wire for a watch is too much, but, fortunately, the connection worked without problems. The Windows server itself is connected to the company's internal network and has a static address. Simple testing from a browser on the internal network confirmed the connection and correct operation of both the program and the connection with the clock.
Display of useful information
The clock is connected and is now available on the network as a web service. It's time to display useful information!
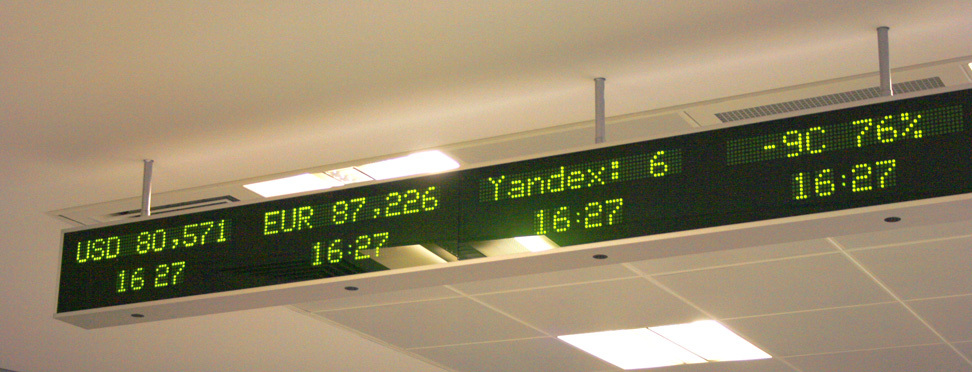
To integrate with external data sources, we took SAP Process Integration 7.4 corporate bus deployed in our office. At the time of launching the project, we took three data sources:
- Central Bank of Russia;
- Weather Russia;
- Yandex.Probki.
The SAP PI system polls external sources on a schedule, converts data, and then transmits the result to the clock.
For the Central Bank, we take away once an hour the latest published data on the euro and US dollars. For the Hydrometeorological Center, once every 15 minutes, we retrieve information from a weather station located near the Kievskaya metro station - the closest weather station in open access to our office. Of the available attributes, we display only the temperature and relative humidity of the air. For the Yandex.Traffic service, an update occurs every 15 minutes and displays the current state of congestion for Moscow as a whole.
And now - photo finish!
')
Source: https://habr.com/ru/post/301830/
All Articles