Creating a blog on symfony 2.8 lts
Navigation in parts of the manual
opening speech
')
In this series of articles we will look at creating a blog on symfony 2 . The project http://tutorial.symblog.co.uk/ of the developer Darren Rees ( Darren Rees ) is taken and translated. Before writing this article, I turned to him, and he gave his consent to the translation with amendments to the Symfony 2.8 lts version , for which I am very grateful to him.
I would also like to note that these articles are made for beginners, I do not want to act as a teacher and I have no experience in commercial development in this framework. So, if a person who is well versed in Symfony2 and notices any shortcomings reads it, I will be happy with the criticism and comments. I would like everyone who has the ability and desire to contribute to these articles and, if possible, to detect any errors, bugs, etc. pointed at them.
You also know that there are a lot of documentation and articles on Symfony2 , including on Habré , videos on youtube , etc., so this project is not something new.
I would very much like us to develop this project together with you, I really hope that everyone who touches this manual will get some benefit for themselves.
Project on Github
Go!
Introduction
I will implement our project in Windows 10 , IDE PHPStorm 2016 . I also recommend using this IDE, but if you use something else, then CodeLobster , NotePad ++ , etc., do not worry.
The manual is divided into several parts, each of which covers various aspects of Symfony 2 and its components.
Parts of the manual
[Part 1] - Configuring symfony2 and templates
[Part 2] - Contact page: validators, forms and email
[Part 3] - Blog Model: Using Doctrine 2 and Data Fixture
[Part 4] - Comment Model: Add Comments, Doctrine 2 Repository and Migrations
[Part 5] - Customize view: Twig, Sidebar and Assetic extensions
[Part 6] - Testing: Unit and Functional with PHPUnit
This guide aims to cover common tasks that you encounter when creating websites using Symfony2 .
1. Bundles
2. Controllers
3. Templates (Using Twig )
4. Model - Doctrine 2
5. Migrations
6. Data Fixtures
7. Validators
8. Forms
9. Routing
10. Asset
11. Email
12. Security
13. User and sessions
14. Generate CRUD (Create Read Update Delete - Create Read Update Update)
Symfony2 is a highly customizable framework and provides a number of different ways to accomplish the same task. An example of this is the ability to write configuration parameters in YAML, XML, PHP formats or annotations, as well as creating templates using Twig or PHP. To make this guide as simple as possible, we will use the YAML format and annotations for configuration and Twig for templates.
Part 1
1. Setting up a symfony2 application
2. Symfony2 Bundles
3. Routing
4. Controllers
5. Twig Template Engine
Installing symfony2 with Composer on Windows
Install Composer globally for Windows, you can download the installer at https://getcomposer.org/Composer-Setup.exe as well, you must also have PHP installed in my case version PHP 5.6
Usually it is included in the server platforms such as Open Server , and also includes the MySQL we need and many other utilities, so you can use XAMPP or something else to your taste.
Next, open the console, go to the directory in which you want to place your project, and enter:
After the installer downloads enter:
By the way, how to install Symfony 2, you can always look at the official framework website .
Usually it is included in the server platforms such as Open Server , and also includes the MySQL we need and many other utilities, so you can use XAMPP or something else to your taste.
Next, open the console, go to the directory in which you want to place your project, and enter:
php -r "file_put_contents('symfony', file_get_contents('https://symfony.com/installer'));" After the installer downloads enter:
symfony new __ 2.8 By the way, how to install Symfony 2, you can always look at the official framework website .
In our case, we will use PHPStorm with a symfony plugin to install the framework, as this is a simpler option. To do this Open PHPStorm, click on Create new Project and create a new project.

Next, select Symfony Installer, specify the path to the folder where the project will be installed, the version of the framework (in our case 2.8.6 lts), as well as the path to php.exe and click Create .

When Symfony2 is installed, we need to start the server in the console from the project folder, this is done with the command:
php app/console server:run 
To constantly not prescribe a command to start the server, we can ask PHPStorm to do it for us.
- To do this, click on the button in the panel:

- Select Edit Configurations
- Click on the green plus and add the PHP script
- Enter a name
- Path to the console.php file in your project
- In the arguments, list server: run and click Ok

- The Play icon will appear in the panel to launch the script with an argument, after which we will simply click on this icon to start the server.

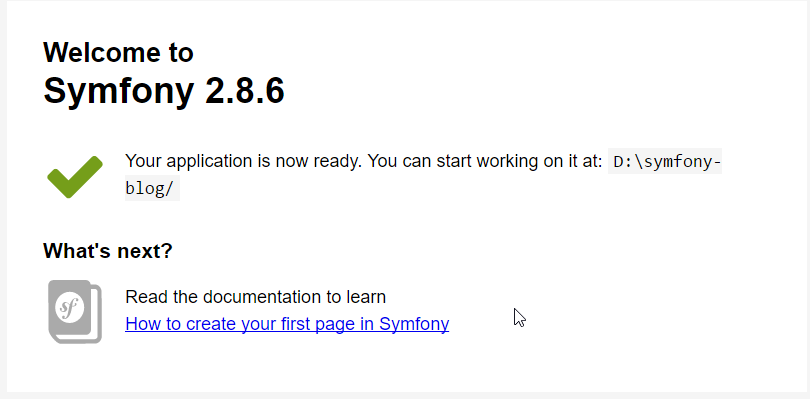
The server started and our website became available at http://127.0.0.1:8000/ and http: // localhost: 8000 / . You should see this page:
You will see a toolbar at the bottom of the welcome screen.

This developer toolbar gives you valuable information about the status of the application. Information including script execution time, memory usage, database queries, authentication status, and more. By default, the toolbar is displayed only when working in the Dev environment, since the display of the toolbar in the Prod environment will pose a great security risk, since it allows you to see a lot of “insides” of your application.
Symfony setup
Open the file app / config / parameters.yml and enter the data for your database: username, password, etc. In my case, these are the default values.

Bundles: Symfony2
Bundle is the main building block of any Symfony2 application, in fact Symfony2 itself is a Bundle. Bundles allow you to separate the functionality from each other. We will create a bundle for our site in the Blogger namespace. If you are not familiar with namespaces in PHP, you should spend some time learning them, as they are widely used in Symfony2.
The board
A good understanding of namespaces can help eliminate problems you may encounter when folder structures are incorrectly displayed in a namespace structure.
Bundle Creation
The board
Do not forget to remove the default bundle installed (we will not need it) for this:
- Delete the AppBundle folder from the src directory
- Delete the line new AppBundle \ AppBundle () from the registered bundles in the file
app/AppKernel.php- delete the default folder at
app/Resources/views- delete these lines:
app: resource: "@AppBundle/Controller/" type: annotation
fromapp/config/routing.yml
To encapsulate the functionality of the blog, we will create a Blog bundle. This is the “home” of all the necessary files, and it can easily be used in another Symfony2 application. Symfony2 provides a number of commands to help us with typical operations. One of these commands is the bundle generation command.
To generate a bundle, run the following command in the console from the project folder:
php app/console generate:bundle The board
You can also write:php app/console gen:bun
Symfony will understand this command.
You will be presented with a number of tips that allow you to customize the bundle.
- We will be asked if we will use this bundle in other applications.
We answer yes :Are you planning this sharing? [no]: yes
- Specify the namespace with us it will be Blogger / BlogBundle :
Bundle namespace: Blogger / BlogBundle
- Next, install the Bundle:
Target Directory [src /]:
We leave by default, press Enter - You also need to specify the format of the configuration file, we will choose yml :
Configuration format (annotation, yml, xml, php) [xml]: yml
We created a bundle, while a route was automatically created in the background, and the bundle is registered in the
app/AppKernel.php .The board
You are not required to use the generator that Symfony2 provides, it is created only to help you. You could manually create a Bundle folder and file structure. While the use of a generator is optional, it provides some advantages for getting a working package. One such example is the automatic registration of the Bandl.
Register Bundle
Our new BloggerBlogBundle package has been registered in the core and is located in app / AppKernel.php. Symfony2 requires the registration of all the bundles that the application should use. You will also notice that some bundles are registered only in Dev or Test environments. Downloading these bundles to the Prod environment will cause an extra load. Below is how BloggerBlogBundle was registered.
// app/AppKernel.php class AppKernel extends Kernel { public function registerBundles() { $bundles = array( // .. new Blogger\BlogBundle\BloggerBlogBundle(), ); // .. return $bundles; } // .. } Routing
Route Bundle was imported into the main application routing file located in
app/config/routing.yml . # app/config/routing.yml blogger_blog: resource: "@BloggerBlogBundle/Resources/config/routing.yml" prefix: / The prefix allows you to make the entire BloggerBlogBundle available at the address with the prefix. In our case, we decided to set the default value -
/ .Those. Now our site is available at http: // localhost: 8000 if you want your site to be accessible at http: // localhost: 8000 / blogger change to
prefix: /blogger .Default structure
A bundle was created in the
src directory. It starts at the top level with the Blogger folder, which points directly to the Blogger namespace. Next comes the BlogBundle folder that contains our Bundle. The contents of this folder will be reviewed in the course of this guide. If you are familiar with MVC frameworks, some of the folders will be familiar to you.Bundle routing
The BloggerBlogBundle route file is located at
src/Blogger/BlogBundle/Resources/config/routing.yml and contains the following route: blogger_blog_homepage: path: / defaults: { _controller: BloggerBlogBundle:Default:index } Routing consists of a pattern and some default settings. The template is checked against the URL, and the default settings tell the controller to run if the route matches. The route does not define HTTP methods.
If the route matches all the specified criteria, it will be executed using the default
_controller option. The _controller option defines the logical name of the controller, which allows Symfony2 to determine the path to a specific file. The above example will call the index action function in the default controller, which is located here: src / Blogger / BlogBundle / Controller / DefaultController.php.Controller
The controller in this example is very simple. The
DefaultController extends the Controller class, which provides some useful methods, such as the render method used below. Our function does nothing, it just calls the presentation method (render) with the index.html.twig template specified in the BloggerBlogBundle folder.Template name format: Bundle: Controller: Template . In our example, this is the BloggerBlogBundle: Default: index.html.twig , which displays the
index.html.twig template, in the default view folder in the BloggerBlogBundle or physically the src/Blogger/BlogBundle/Resources/views/Default/index.html.twig file .Different variations of the template formats can be used to display templates from different locations of the application and its bundles. We will see it later in this part.
<?php namespace Blogger\BlogBundle\Controller; use Symfony\Bundle\FrameworkBundle\Controller\Controller; class DefaultController extends Controller { public function indexAction() { return $this->render('BloggerBlogBundle:Default:index.html.twig'); } } Template (View)
As you can see the pattern is very simple. It displays only the inscription:
{# src/Blogger/BlogBundle/Resources/views/Default/index.html.twig #} Hello World! Cleaning
Let's clean our bundle a bit, because we do not need some of the files created by the generator. The src / Blogger / BlogBundle / Controller / DefaultController.php file can be deleted in the same way as the Default
src/Blogger/BlogBundle/Resources/views/Default folder.Finally, delete the route located at
src/Blogger/BlogBundle/Resources/config/routing.yml .Templates
We have 2 default options for using symfony2 templates; Twig and PHP. You can, of course, not use any of them and choose another library. This is possible thanks to the Symfony2 Dependency Injection Container. We will use the Twig engine for a variety of reasons.
- Twig is fast and requires little resources.
- Twig is concise - Twig allows us to function as templates in a very compressed form. Compare this with PHP, where some statements are very verbose.
- Twig supports pattern inheritance. Templates have the ability to expand and redefine other templates, allow child templates to change the default values provided by the parent templates.
- Twig is secure - shielding is turned on by default and provides, even out of the box, an environment for importing patterns.
- Twig is extensible — Twig provides a lot of common kernel functionality, which is what you expect from the template engine, but for those cases where you need additional functionality, Twig can be easily extended.
These are just some of the benefits of Twig. Other reasons why you are advised to turn your attention to Twig can be seen on the official Twig website .
Layout structure
Since Twig supports pattern inheritance, we will use the three-level pattern inheritance approach. This approach allows us to change the view at 3 different levels of the application, giving us great opportunities and flexibility. Read about the templates here .
Main Template - Level 1
Start by creating a basic template for symblog . We need 2 files, a template and CSS. Since symfony2 supports HTML5, we will use it. Copy this code into the base template:
<!-- app/Resources/views/base.html.twig --> <!DOCTYPE html> <html> <head> <meta http-equiv="Content-Type" content="text/html"; charset=utf-8" /> <title>{% block title %}Symblog{% endblock %} - Symblog</title> <!--[if lt IE 9]> <script src="http://html5shim.googlecode.com/svn/trunk/html5.js"></script> <![endif]--> {% block stylesheets %} <link href='http://fonts.googleapis.com/css?family=Irish+Grover' rel='stylesheet' type='text/css'> <link href='http://fonts.googleapis.com/css?family=La+Belle+Aurore' rel='stylesheet' type='text/css'> <link href="{{ asset('css/screen.css') }}" type="text/css" rel="stylesheet" /> {% endblock %} <link rel="shortcut icon" href="{{ asset('favicon.ico') }}" /> </head> <body> <section id="wrapper"> <header id="header"> <div class="top"> {% block navigation %} <nav> <ul class="navigation"> <li><a href="#">Home</a></li> <li><a href="#">About</a></li> <li><a href="#">Contact</a></li> </ul> </nav> {% endblock %} </div> <hgroup> <h2>{% block blog_title %}<a href="#">Symblog</a>{% endblock %}</h2> <h3>{% block blog_tagline %}<a href="#">creating a blog in Symfony2</a>{% endblock %}</h3> </hgroup> </header> <section class="main-col"> {% block body %}{% endblock %} </section> <aside class="sidebar"> {% block sidebar %}{% endblock %} </aside> <div id="footer"> {% block footer %} Symfony2 blog tutorial - created by <a href="https://github.com/dsyph3r">dsyph3r</a> {% endblock %} </div> </section> {% block javascripts %}{% endblock %} </body> </html> The note
There are 3 external files used in the template, 1 javascript and 2 css. The JavaScript file fixes the lack of HTML5 support in IE browsers up to version 9. 2 CSS files import fonts from Google web fonts.
This template marks the basic structure of our blog. Most of the template consists of HTML, with Twig tags. Twig tags, we'll look further.
Pay attention to the title. Let's look at the name:
<title>{% block title %}Symblog{% endblock %} - Symblog</title> The first thing you'll notice is the unknown {% tag. This is not HTML, and certainly not PHP. This is one of 3 Twig tags. This tag is a Twig tag that performs an action. It is used to execute statements such as declarations and block element definitions. A complete list can be found in the Twig documentation. The twig block we defined in the title does 2 things; It sets the block identifier to the header, and provides a default mapping between the block and endblock tags. Defining the block, we can use it in the future. For example, on a page for displaying blog posts, we would like the title of the page to be displayed in the title of the blog. We can achieve this by extending the template and overriding the block header.
{% extends '::base.html.twig' %} {% block title %}The blog title goes here{% endblock %} In the example above, we extended the pattern by inheriting the base pattern. You will notice that the Bundle and Controller parts are missing in the template format, remember the Bundle: Controller: Template format ??? By excluding Bundle and Controller, we indicated that a template would be used at the application level defined in
app/Resources/views .Further, we have defined one more block and fill it with content, in our case this is the Blog Title. Since the parent template already contains a Header Block, it is overridden by ours. Now “
The blog title goes here – symblog ” The blog title goes here – symblog . ”This functionality is provided by Twig and will be widely used when creating templates.In the Styles block, we introduce the tag that follows the Twig tag {{ or “
- ”. <link href="{{ asset('css/screen.css') }}" type="text/css" rel="stylesheet" /> This tag is used to display the value of a variable or expression. In the example above, it displays the values returned by the asset function, which provides us in a portable way, obtaining references to the assets of applications such as CSS, JavaScript, and images.
The {{ tag can also be combined with filters to manipulate output before display.
{{ blog.created|date("dmY") }}
For a complete list of filters, see the Twig documentation .
The last Twig tag that we did not see in the templates is a comment tag - {# . Its use looks like this:
{# The quick brown fox jumps over the lazy dog #}
No other concepts are presented in this template. It provides us with the basic layout to customize it, as we need.
Let's add some styles. Create a stylesheet file,
web/css/screen.css and add the following content. This will add styles for the main template. html,body,div,span,applet,object,iframe,h1,h2,h3,h4,h5,h6,p,blockquote,pre,a,abbr,acronym,address,big,cite,code,del,dfn,em,img,ins,kbd,q,s,samp,small,strike,strong,sub,sup,tt,var,b,u,i,center,dl,dt,dd,ol,ul,li,fieldset,form,label,legend,table,caption,tbody,tfoot,thead,tr,th,td,article,aside,canvas,details,embed,figure,figcaption,footer,header,hgroup,menu,nav,output,ruby,section,summary,time,mark,audio,video{border:0;font-size:100%;font:inherit;vertical-align:baseline;margin:0;padding:0}article,aside,details,figcaption,figure,footer,header,hgroup,menu,nav,section{display:block}body{line-height:1}ol,ul{list-style:none}blockquote,q{quotes:none}blockquote:before,blockquote:after,q:before,q:after{content:none}table{border-collapse:collapse;border-spacing:0} body { line-height: 1;font-family: Arial, Helvetica, sans-serif;font-size: 12px; width: 100%; height: 100%; color: #000; font-size: 14px; } .clear { clear: both; } #wrapper { margin: 10px auto; width: 1000px; } #wrapper a { text-decoration: none; color: #F48A00; } #wrapper span.highlight { color: #F48A00; } #header { border-bottom: 1px solid #ccc; margin-bottom: 20px; } #header .top { border-bottom: 1px solid #ccc; margin-bottom: 10px; } #header ul.navigation { list-style: none; text-align: right; } #header .navigation li { display: inline } #header .navigation li a { display: inline-block; padding: 10px 15px; border-left: 1px solid #ccc; } #header h2 { font-family: 'Irish Grover', cursive; font-size: 92px; text-align: center; line-height: 110px; } #header h2 a { color: #000; } #header h3 { text-align: center; font-family: 'La Belle Aurore', cursive; font-size: 24px; margin-bottom: 20px; font-weight: normal; } .main-col { width: 700px; display: inline-block; float: left; border-right: 1px solid #ccc; padding: 20px; margin-bottom: 20px; } .sidebar { width: 239px; padding: 10px; display: inline-block; } .main-col a { color: #F48A00; } .main-col h1, .main-col h2 { line-height: 1.2em; font-size: 32px; margin-bottom: 10px; font-weight: normal; color: #F48A00; } .main-col p { line-height: 1.5em; margin-bottom: 20px; } #footer { border-top: 1px solid #ccc; clear: both; text-align: center; padding: 10px; color: #aaa; } Bundle Pattern - Level 2
Now we are going to create a layout for BlogBundle. Create a file located in
src/Blogger/BlogBundle/Resources/views/layout.html.twig and add the following content. {# src/Blogger/BlogBundle/Resources/views/layout.html.twig #} {% extends '::base.html.twig' %} {% block sidebar %} Sidebar content {% endblock %} At first glance, this template may seem a bit simple, but its simplicity is the key. First, it extends the base template we created earlier. Secondly, overrides the parent sidebar. Since the sidebar will be present on all pages of our blog, it makes sense to perform customization at this level. You may ask why we simply do not put the settings in the application template, as it will be present on all pages. It's simple, the application knows nothing about Bundle and should not. A bundle must independently contain all its functionality and the sidebar output is part of this functionality. So why don't we just put a sidebar in each of the page templates? Again, it's simple, we would duplicate the sidebar every time we add a page. This second level pattern will give us the flexibility to add other settings in the future. For example, we want to change the basement copy on all pages, this would be a great place to do this.
Page Template - Level 3
Finally, we are ready for the layout of the controller. These layouts will be widely associated with the controller action, that is, a
blog show action will have a blog show template.Let's start by creating a controller for the home page and its template. Since this is the first page we create, we need to create a controller. Create a controller
src/Blogger/BlogBundle/Controller/PageController.php and add the following: <?php // src/Blogger/BlogBundle/Controller/PageController.php namespace Blogger\BlogBundle\Controller; use Symfony\Bundle\FrameworkBundle\Controller\Controller; class PageController extends Controller { public function indexAction() { return $this->render('BloggerBlogBundle:Page:index.html.twig'); } } Now create a template for this function. As you can see in the controller function, we will display an index page template. Create a template:
src/Blogger/BlogBundle/Resources/views/Page/index.html.twig
{# src/Blogger/BlogBundle/Resources/views/Page/index.html.twig #} {% extends 'BloggerBlogBundle::layout.html.twig' %} {% block body %} Blog homepage {% endblock %} In this example, BloggerBlogBundle :: layout.html.twig is missing the controller name. Eliminating the name of the controller, we indicated the use of the template level Bundle
src/Blogger/BlogBundle/Resources/views/layout.html.twig .Now let's add a route for our site. Update the
src/Blogger/BlogBundle/Resources/config/routing.yml : # src/Blogger/BlogBundle/Resources/config/routing.yml BloggerBlogBundle_homepage: path: / defaults: { _controller: "BloggerBlogBundle:Page:index" } requirements: methods: GET Now we are ready to look at our Blogger template. Go to your browser at http: // localhost: 8000 .
You should see the main blog layout, with main content and sidebar .

“About” page
The last task in this part of the lesson will be to create a static “About” page. This will demonstrate how to link the pages together, and then apply the three-level inheritance approach to the patterns adopted by us.
Route
When creating a new page, one of the first tasks is to create a route for it. Open the BloggerBlogBundle routing file located in
src/Blogger/BlogBundle/Resources/config/routing.yml and add the following routing rule. # src/Blogger/BlogBundle/Resources/config/routing.yml BloggerBlogBundle_about: path: /about defaults: { _controller: "BloggerBlogBundle:Page:about" } requirements: methods: GET Controller
Then open the Page Controller located in
src/Blogger/BlogBundle/Controller/PageController.php and add an action to process the “About” page:
// src/Blogger/BlogBundle/Controller/PageController.php class PageController extends Controller { //... public function aboutAction() { return $this->render('BloggerBlogBundle:Page:about.html.twig'); } } Display
To display the template, create a new
src/Blogger/BlogBundle/Resources/views/Page/about.html.twig and copy there: {# src/Blogger/BlogBundle/Resources/views/Page/about.html.twig #} {% extends 'BloggerBlogBundle::layout.html.twig' %} {% block title %}About{% endblock%} {% block body %} <header> <h1>About symblog</h1> </header> <article> <p>Donec imperdiet ante sed diam consequat et dictum erat faucibus. Aliquam sit amet vehicula leo. Morbi urna dui, tempor ac posuere et, rutrum at dui. Curabitur neque quam, ultricies ut imperdiet id, ornare varius arcu. Ut congue urna sit amet tellus malesuada nec elementum risus molestie. Donec gravida tellus sed tortor adipiscing fringilla. Donec nulla mauris, mollis egestas condimentum laoreet, lacinia vel lorem. Morbi vitae justo sit amet felis vehicula commodo a placerat lacus. Mauris at est elit, nec vehicula urna. Duis a lacus nisl. Vestibulum ante ipsum primis in faucibus orci luctus et ultrices posuere cubilia Curae.</p> </article> {% endblock %} There is nothing special about the “About” page. This is just a function that displays a template with some content. It will nevertheless lead us to the next task.
Links to pages
Now we have the “About” page. Go to http: // localhost: 8000 / about to verify this. However, the user has no other way to get to this page except how to write its full address in the address bar, which we did above. Remember you should always use the routing functions provided by symfony2, never use the following:
<a href="/contact">Contact</a> <?php $this->redirect("/contact"); ?> You may be surprised at what happened to this approach, because before that you could always link your pages together in exactly this way. However, there are a number of problems associated with this approach.
1. This approach uses a hard link, and completely ignores the symfony2 routing system. For example, if you want to change the location of the contact page at any time, you will have to find all the links on the hard link and change them.
2. It will ignore the controller environment. Environments are something that we have not really explained, but you have already used them.
App_dev.php- the front controller gives us access to our application in the Dev environment . If you replace app_dev.phpwith app.php, you will run the application in a Prod environment. The significance of these conditions will be explained further in the lesson, but now it is important to note that the hard link does not support the current environment where we are.The correct way to link pages is
pathand the urlmethods provided by Twig. They are both very similar, the URL method will provide us with an absolute URL. Let's update the app template app/Resources/views/base.html.twigand link the Home page to the “About” page together. <!-- app/Resources/views/base.html.twig --> {% block navigation %} <nav> <ul class="navigation"> <li><a href="{{ path('BloggerBlogBundle_homepage') }}">Home</a></li> <li><a href="{{ path('BloggerBlogBundle_about') }}">About</a></li> <li><a href="#">Contact</a></li> </ul> </nav> {% endblock %} Now refresh the page, you will see that links to pages work.
Finally, update the logo links that will redirect you to the main page. Update the template located
app/Resources/views/base.html.twig. <!-- app/Resources/views/base.html.twig --> <hgroup> <h2>{% block blog_title %}<a href="{{ path('BloggerBlogBundle_homepage') }}">symblog</a>{% endblock %}</h2> <h3>{% block blog_tagline %}<a href="{{ path('BloggerBlogBundle_homepage') }}">creating a blog in Symfony2</a>{% endblock %}</h3> </hgroup> Conclusion
We began to explore the fundamental concepts behind the Symfony2 application, including routing and the Twig template engine.
In the next part, we will create a contact page. This page is a bit more complicated than the “About” page, and allows users to interact with the web form to send us requests. In the next part, we will introduce new concepts and find out what the Forms Validator is in Symfony2.
Sources and supporting materials:
https://symfony.com/
http://tutorial.symblog.co.uk/
http://twig.sensiolabs.org/
http://www.doctrine-project.org/
Post Scriptum
, , , .
Part 2 - Contact page: validators, forms, and email
Part 3 - Doctrine 2 and Data Fixtures
Part 4 - Comment Model, Repository and Migrations of Doctrine 2
Part 5 - Twig Extensions, Sidebar (sidebar) and Assetic
Part 6 - Modular and Functional Testing
Also, if you like the guide, you can put a star to the project repository or subscribe. Thank.
Source: https://habr.com/ru/post/301760/
All Articles