Creating an Android application with React Native
As the name suggests, in this article we will look at the process of creating React Native applications for Android by means of React Native. It will be simple, with just a text field. There you will need to enter the name of one of the Pokemon, and the application will show detailed information about the data and read it using the text-to-speech function.
We will not touch the installation of the Android SDK , React Native and the creation of a project , or any other developer tools. We will proceed from the fact that this is your first experience of creating an application with the help of React Native, so we will take a closer look at each piece of code.
Server creation
First we need to create a server component of our application. We will write it on PHP, and CouchDB will act as a database. Installation Instructions: PHP and CouchDB . After installation and configuration, you need to check that the database is running. To do this, run
curl localhost:5984 and get back something like:')
{"couchdb":"Welcome","uuid":"xxxxxxxxxxxxxxxx","version":"1.6.0","vendor":{"name":"Ubuntu","version":"15.10"}}To access Futon, the CouchDB control system, open http: // localhost: 5984 / _utils in your browser. Click Create Database to create a database to store the details received from the Pokemon API . Name the base pokedex and click Create . It would be possible to access the API directly from React Native, but then the network traffic increases. And if you store everything in the database, you can get data on a single request and at any time.
Saving data
We now turn directly to the creation of the server component. Inside your web server folder, create a working folder, inside it create the file composer.json and enter the code into it:
{ "require": { "doctrine/couchdb-odm": "@dev" }, "minimum-stability": "dev", "prefer-stable": true } This means that the
doctrine/couchdb-odm library now belongs to our project. She will help us work with CouchDB in PHP. To install it, run composer install .Now create inside the working folder a file pokemon.php , and then add the code to it:
<?php require 'vendor/autoload.php'; set_time_limit(0); $client = \Doctrine\CouchDB\CouchDBClient::create(array('dbname' => 'pokedex')); $pokedex = file_get_contents('http://pokeapi.co/api/v1/pokedex/1/'); $pokedex_data = json_decode($pokedex, true); foreach($pokedex_data['pokemon'] as $row){ //get details $pokemon = file_get_contents('http://pokeapi.co/' . $row['resource_uri']); $pokemon = json_decode($pokemon, true); //get description $pokemon_description = file_get_contents('http://pokeapi.co/' . $pokemon['descriptions'][0]['resource_uri']); $pokemon['description'] = json_decode($pokemon_description, true)['description']; //get sprites $pokemon_sprites = file_get_contents('http://pokeapi.co' . $pokemon['sprites'][0]['resource_uri']); $pokemon_sprites = json_decode($pokemon_sprites, true); $pokemon['small_photo'] = 'http://pokeapi.co' . $pokemon_sprites['image']; $client->postDocument($pokemon); } Consider the code above. First of all, the startup file is added. It automatically loads all libraries installed by us using Composer. Next, the
set_time_limit parameter is assigned a zero value. The fact is that with PHP scripts, by default the execution time is limited, and after this time is over the script is interrupted. Zeroing the above parameter, we disable the time limit.At the time of this writing, there were 721 pokemon, and for each of them we need to execute three HTTP requests in order to get the detailed data, description and sprites.
<?php require 'vendor/autoload.php'; set_time_limit(0); Initialize the CouchDB client and enter the name of our database:
<?php $client = \Doctrine\CouchDB\CouchDBClient::create(array('dbname' => 'pokedex')); Using the function
file_get_contents we get from the API a full list of Pokemons. The data will be returned in JSON format, so for further work we will have to convert them into an array: <?php $pokedex = file_get_contents('http://pokeapi.co/api/v1/pokedex/1/'); $pokedex_data = json_decode($pokedex, true); Run the cycle on all the results:
<?php foreach($pokedex_data['pokemon'] as $row){ ... } Inside the loop for each Pokemon, we access
resource_uri and use it to create a URL that returns details: <?php //get details $pokemon = file_get_contents('http://pokeapi.co/' . $row['resource_uri']); $pokemon = json_decode($pokemon, true); The data received in response to the previous request, we use to create a request for a description of the Pokemon and its sprites:
<?php //get description $pokemon_description = file_get_contents('http://pokeapi.co/' . $pokemon['descriptions'][0]['resource_uri']); $pokemon['description'] = json_decode($pokemon_description, true)['description']; //get sprites $pokemon_sprites = file_get_contents('http://pokeapi.co' . $pokemon['sprites'][0]['resource_uri']); $pokemon_sprites = json_decode($pokemon_sprites, true); $pokemon['small_photo'] = 'http://pokeapi.co' . $pokemon_sprites['image']; Let's save the received information in CouchDB:
<?php $client->postDocument($pokemon); To start saving, open the pokemon.php file in the browser. This will take some time, but for now you can proceed to the next step.
Data retrieval
To retrieve data from CouchDB, we need to create a view. Go to the database we created , click View in the drop-down menu and select Temporary view . Under the text field map function, paste the code:
function(doc) { emit(doc.name, null); } Now click on the Run button to check how our data is displayed:
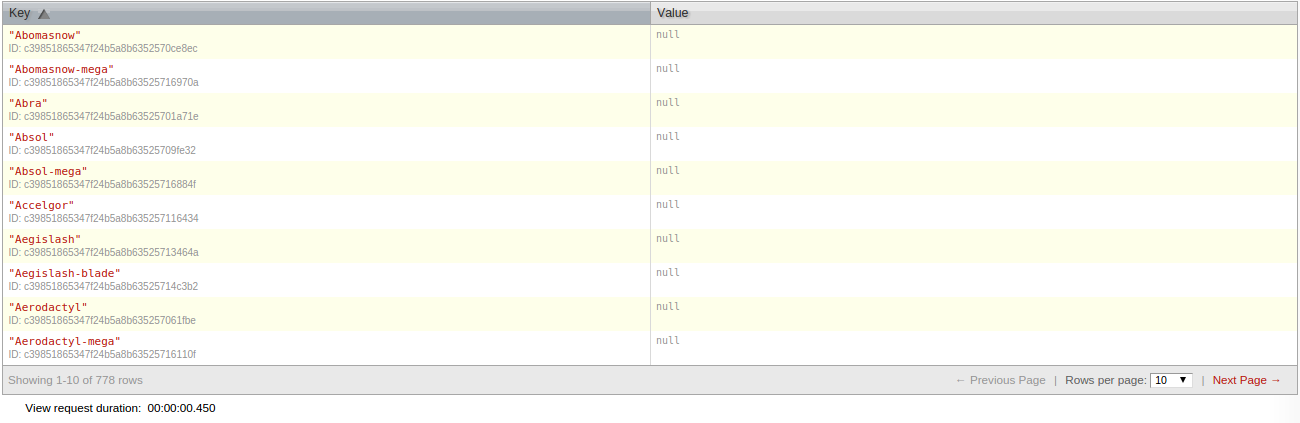
Click on Save as , enter the name of the pokemon database in the Design document field , and by_name in the View name field . Now go back to the working folder, create the file get.php and add the code to it:
<?php require 'vendor/autoload.php'; $client = \Doctrine\CouchDB\CouchDBClient::create(array('dbname' => 'pokedex')); $pokemon = $_GET['name']; $query = $client->createViewQuery('pokemon', 'by_name'); $query->setKey($pokemon); $query->setReduce(false); $query->setIncludeDocs(true); $result = $query->execute(); if(!empty($result[0])){ $data = $result[0]; echo json_encode($data); }else{ $result = array('no_result' => true); echo json_encode($result); } Let's break it down. First we get the name of the pokemon sent to us by the application:
<?php $pokemon = $_GET['name']; Using the call to the
createViewQuery method, createViewQuery create the view, set the names for the Design document and View name , and then determine the option values. The setKey method is used to describe a query; data from the view is setReduce using setReduce , and setIncludeDocs adds a specific document for each returned result. You may have noticed that there is no document in the screenshot above. The fact is that when setIncludeDocs is setIncludeDocs and the argument is true , the document that was saved during the previous access to the pokemon.php file is used by default . <?php $query = $client->createViewQuery('pokemon', 'by_name'); // design document view name $query->setKey($pokemon); // pokemon $query->setReduce(false); // reduce $query->setIncludeDocs(true); // $result = $query->execute(); // Next you need to check the availability of results. If they are, then return the JSON version, otherwise return the message about the absence of data.
<?php if(!empty($result[0])){ $data = $result[0]; echo json_encode($data); }else{ $result = array('no_result' => true); echo json_encode($result); } If you are working on a local machine, you can open access to the Internet for the server using Ngrok . Or use the internal IP, later it will still be used in our application.
Create application
Installing dependencies
Let's start with the initialization of a new project in React Native:
react-native init PokedexWhen the operation is completed, install the dependencies using npm:
cd Pokedexnpm install lodash react-native-android-speech react-native-gifted-spinner --saveWhat this code does:
lodashis used to translate text into alodashand, as well as to extract specific data from an array.react-native-android-speech- converts textual description to speech.react-native-gifted-spinner- displays the loading animation when a network request is made.
You can view all installed modules in the node_modules / react-native / node_modules folder .
When the installation is complete, go to the React Native Android Speech repository and configure it according to the instructions.
Making network requests
In the root directory of the React Native project, create a folder src , inside it create the file api.js and add the code to it:
module.exports = function(pokemon){ var url = 'http://192.168.xxx.xxx/pokedex/get.php?name=' + pokemon; return fetch(url).then(function(response){ return response.json(); }).then(function(json){ return json; }); } The
fetch function exports the data retrieval function from the server. In this way, network requests are made in React Native. This method gets the URL to create the request, returns a promise to use the then method and gets the answer using the callback function.The data received in the response cannot be used "as is", first you have to pass them on to the
json method, which is available from the response object. From there, you can already get data in JSON format by calling another then method. They are passed to the callback function as an argument, which we then return.Note that the return result from the
fetch method is also a promise. Therefore, when we later call this module from our main script, we will have to use the then method again before accessing the JSON data.Attention : make sure you change
http://192.168.xxx.xxx/ to the previously mentioned IP address or domain name. Remember that pokedex is a folder inside the web index.Main application file
Open the file index.android.js . It should contain some default code, delete it all.
At the beginning of each file we will include strict mode. This will help avoid common errors, like the lack of a variable definition before initializing the value.
Import React Native and additional project dependencies:
'use strict'; var React = require('react-native'); var tts = require('react-native-android-speech') var GiftedSpinner = require('react-native-gifted-spinner'); var _ = require('lodash'); Initialize all necessary components and APIs:
var { AppRegistry, StyleSheet, Text, TextInput, View, Image, ListView } = React; Various components and APIs are available in React Native. They are not loaded by default, so you have to specifically specify everything you need. You can consider them as user interface elements. Suppose a web page has text fields, lists, tables, images, tabs, etc. In React Native, all these interface elements are components. For example, there are components for displaying pictures , for displaying scrollbars , for creating lists , etc.
React's APIs are used to access various features of the device, such as cameras and push notifications. You will use some API quite seldom, and some are needed in each project. Examples include StyleSheet and AppRegistry .
Here is a brief description of the components and APIs that we use in our application:
AppRegistry- registers custom components. In React Native, everything is a component, and components can consist of even smaller components.StyleSheet- used to describe the styles used in the application.Text- is responsible for displaying text.TextInput- used to create text fields.View- the main component when creating a user interface. Usually used as a wrapper.Image- displays images.ListView- displays lists.
Now import the previously created src / api.js file . This will allow network requests by calling the
api method. var api = require('./src/api.js'); Create a new custom component in React that contains all the interface and application logic:
var Pokedex = React.createClass({ ... }); Initialize the state inside the class. By “state” in React Native is meant a way to store data that will be available throughout the entire component.
query- user-entered text.hasResult- says that there is a search result.noResult- says that there is no search result. It performs the opposite task tohasResult, but is used to decide whether to display a no-result message. We do not want the user to immediately see such a revelation at the first load of the application, when no search has yet been carried out.result- stores the current result received from the server.isLoading- displays the download indicator.dataSource- contains the data source for the list view. First, a new instance ofListView.DataSourceis created, which receives an object containing therowHasChangedfunction. When the data source is changed, this function gives theListViewcommand to re-render the line in the list. In our case, the source is an array consisting of objects of Pokemon types. If you look at thesearchmethod, you will understand how this data is provided.
getInitialState: function(){ return { query: null, hasResult: false, noResult: false, result: null, isLoading: false, dataSource: new ListView.DataSource({ rowHasChanged: (row1, row2) => row1 !== row2, }) } }, Now take a look at the
render method. He is responsible for rendering the user interface. render: function() { ... }, The interface is returned inside the method.
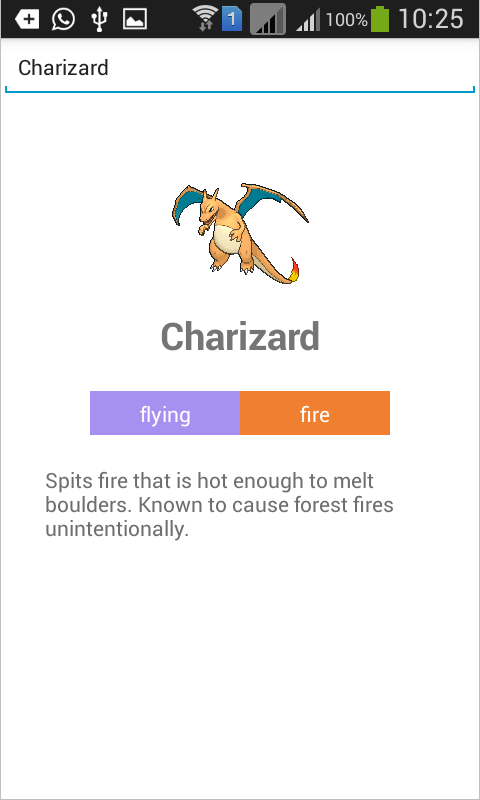
return ( <View style={styles.container}> <View style={styles.search}> <TextInput style={styles.text_input} onChangeText={this.changeText} onSubmitEditing={this.search} placeholder="Type a pokemon name" /> </View> { this.state.hasResult && <View style={styles.result}> <View style={styles.main_details}> <Image source={{uri: this.state.result.small_photo}} style={styles.image_dimensions} resizeMode={Image.resizeMode.contain} /> <Text style={styles.main_text}>{this.state.result.name}</Text> <ListView contentContainerStyle={styles.types} dataSource={this.state.types} renderRow={this.renderType}></ListView> <View style={styles.description}> <Text style={styles.description_text}>{this.state.result.description}</Text> </View> </View> </View> } { this.state.noResult && <View style={styles.no_result}> <Text style={styles.main_text}>Pokemon not found</Text> <Text style={styles.sub_text}>Please type the exact name</Text> </View> } { this.state.isLoading && <View style={styles.loader}> <GiftedSpinner /> </View> } </View> ); Let's sort this code. Create the main container:
<View style={styles.container}> </View> Please note : this is a prerequisite, since a single root component must exist, and all other components are nested. The value of the
style attribute is an object that describes the styling of the component. Below you will learn how the styles object is declared, but for now just remember that when using objects as values, do not use quotes.Inside the main container there is a component designed to enter the name of the pokemon. It has three attributes:
onChangeText- sets the function to be executed each time the text changes in the text field.onSubmitEditing- sets the function to be executed each time the text is sent in the text field.placeholder- sets the text displayed when there is no data to enter.
<View style={styles.search}> <TextInput style={styles.text_input} onChangeText={this.changeText} onSubmitEditing={this.search} placeholder="Type a pokemon name" /> </View> Next comes the component to display the search results. Its syntax is slightly different from the previous one, it is enclosed in braces, and at the beginning there is a condition. Because of this, React renders the component only if the result is stored in the state. Inside this component there are two more:
Image , which displays the image of a pokemon, and Text with the name of the animal. Next comes the ListView component, it contains information about the type of pokemon. The fact is that some Pokemons can belong to several species, so we need this component. Finally, the View component is responsible for displaying the description of the Pokémon. { this.state.hasResult && <View style={styles.result}> <View style={styles.main_details}> <Image source={{uri: this.state.result.small_photo}} style={styles.image_dimensions} resizeMode={Image.resizeMode.contain} /> <Text style={styles.main_text}>{this.state.result.name}</Text> <ListView contentContainerStyle={styles.types} dataSource={this.state.types} renderRow={this.renderType}></ListView> <View style={styles.description}> <Text style={styles.description_text}>{this.state.result.description}</Text> </View> </View> </View> } Let's take a closer look at each of the components.
Image gets the source attribute, which allows us to specify the source of the image. This can be a picture from the network, from the local file system or from application resources. In our case, a picture from the network is used, and the data is stored in the state. resizeMode sets the image resizing if it does not fit into the frame. The contain used as the value. This means that the image fits into the frame without distorting the proportions. <Image source={{uri: this.state.result.small_photo}} style={styles.image_dimensions} resizeMode={Image.resizeMode.contain} /> The
Text component displays text. In React Native, any output text must fit into the Text component. <Text style={styles.main_text}>{this.state.result.name}</Text> The
ListView component displays a list. There is one nuance here: contentContainerStyle used instead of the style attribute to determine the style.dataSource allows dataSource to define a data source for rendering the list, and renderRow specifies the function to be performed when rendering each item in the list. <ListView contentContainerStyle={styles.types} dataSource={this.state.types} renderRow={this.renderType}></ListView> After displaying the search results, there is a component that is displayed in the absence of results.
{ this.state.noResult && <View style={styles.no_result}> <Text style={styles.main_text}>Pokemon not found</Text> <Text style={styles.sub_text}>Please type the exact name</Text> </View> } Below is the download indicator, which uses the Gifted Spinner module to display the animation. The indicator is shown only if the status of the
isLoading property is true . This is done immediately before performing the network request, and when the response is received, the value changes to false . { this.state.isLoading && <View style={styles.loader}> <GiftedSpinner /> </View> } Then a method is added to render each item in the list. In the declaration of the
ListView component, renderRow used as the value of the renderRow attribute. This is the very method. renderType: function(type){ return ( <View style={[styles[type.name], styles.type]}> <Text style={styles.type_text}>{type.name}</Text> </View> ); }, If you look at the
ListView code, you’ll see that in the renderRow attribute we’ve not found the type that we refer to below. The fact is that renderRow automatically transfers data in a hidden way.As follows from the response returned by the server, the
types object contains an array of objects corresponding to different types of Pokemon: [ { "name":"electric", "resource_uri":"\/api\/v1\/type\/13\/" } ] We access this object in the
renderType method renderType a type argument. It is used to display the type of pokemon and style management. Further, in the style declaration, you will need to add different styles for each type. As you can see, for the View component, we use two style declarations. Thus, each style declaration is added to the React Native array. <View style={[styles[type.name], styles.type]}> <Text style={styles.type_text}>{type.name}</Text> </View> Now the
changeText method is changeText , which is executed each time the text in the text field changes. Since the actual text data is transferred to this method, it is a good place to update the state property that stores the current information entered by the user. changeText: function(text){ this.setState({ query: text }); }, The
search method is executed each time data is sent in a text field. When you enter text into Android, the Done button appears, clicking which triggers the onSubmitEditing event. Above, we already defined this.search as the value for the onSubmitEditing attribute. As a result, the following method is executed: search: function(){ var pokemon = _.capitalize(this.state.query); this.setState({ isLoading: true }); api(pokemon).then( (data) => { var speech = 'Pokemon was not found. Please type the exact name.'; if(data.doc){ var types = this.state.dataSource.cloneWithRows(data.doc.types); this.setState({ hasResult: true, noResult: false, result: data.doc, types: types, isLoading: false }); var type_names = _.map(data.doc.types, function(type){ return type.name; }); speech = data.doc.name + ". A " + type_names.join(' and ') + ' pokemon. ' + data.doc.description; }else{ this.setState({ hasResult: false, noResult: true, isLoading: false, result: null }); } tts.speak({ text: speech, forceStop : true , language : 'en' }); } ); } We will understand this code. The
capitalize method provided by Lodash is called to convert all letters to uppercase, with the exception of the first letters. The state is then updated, and the isLoading property is set to true , so that the load indicator is displayed below the last component. var pokemon = _.capitalize(this.state.query); this.setState({ isLoading: true }); Using the
api module, we perform a network request: api(pokemon).then( (data) => { ... } ); Please note : the syntax of the callback function is slightly different from the usual one.
api(pokemon).then(function(data){ ... }); The value of
this object also differs. According to the new syntax, this object refers to the external scope, and not to the callback function. This allows this to be used to update the state from within the callback function, without the need to create a variable to store the current scope.Inside the callback function, the default text is set, which will be converted to speech.
var speech = 'Pokemon was not found. Please type the exact name.';doc , cloneWithRows , , dataSource . , dataSource ListView ..
type_names , , . Lodash map . , : if(data.doc){ //create the list view data source var types = this.state.dataSource.cloneWithRows(data.doc.types); //update the state this.setState({ hasResult: true, noResult: false, result: data.doc, types: types, isLoading: false }); //create an array containing the type names var type_names = _.map(data.doc.types, function(type){ return type.name; }); //construct the text to be used for the speech speech = data.doc.name + ". A " + type_names.join(' and ') + ' pokemon. ' + data.doc.description; } , :
hasResultfalse, , .noResulttrue, .isLoadingfalse, .resultnull.
... else{ this.setState({ hasResult: false, noResult: true, isLoading: false, result: null }); } :
if(data.doc){ ... }else{ ... } tts.speak({ text: speech, forceStop : true , language : 'en' }); Pokodex StyleSheet API: var styles = StyleSheet.create({ container: { flex: 1, backgroundColor: '#FFF' }, search: { flex: 1 }, result: { flex: 8 }, no_result: { flex: 8, alignItems: 'center' }, loader: { flex: 1, alignItems: 'center' }, main_details: { padding: 30, alignItems: 'center' }, image_dimensions: { width: 100, height: 100 }, main_text: { fontSize: 25, fontWeight: 'bold', textAlign: 'center' }, sub_text: { color: '#6e6e6e' }, description: { marginTop: 20 }, text_input: { height: 40, borderColor: 'gray', borderWidth: 1 }, types: { flexDirection: 'row', marginTop: 20 }, type: { padding: 5, width: 100, alignItems: 'center' }, type_text: { color: '#fff', }, normal: { backgroundColor: '#8a8a59' }, fire: { backgroundColor: '#f08030' }, water: { backgroundColor: '#6890f0' }, electric: { backgroundColor: '#f8d030' }, grass: { backgroundColor: '#78c850' }, ice: { backgroundColor: '#98d8d8' }, fighting: { backgroundColor: '#c03028' }, poison: { backgroundColor: '#a040a0' }, ground: { backgroundColor: '#e0c068' }, flying: { backgroundColor: '#a890f0' }, psychic: { backgroundColor: '#f85888' }, bug: { backgroundColor: '#a8b820' }, rock: { backgroundColor: '#b8a038' }, ghost: { backgroundColor: '#705898' }, dragon: { backgroundColor: '#7038f8' }, dark: { backgroundColor: '#705848' }, steel: { backgroundColor: '#b8b8d0' }, fairy: { backgroundColor: '#e898e8' } }); . ,
flex 1 , Flexbox. , . , . , . container: { flex: 1, backgroundColor: '#FFF' }, , , :
search: { flex: 1 }, result: { flex: 8 }, no_result: { flex: 8, alignItems: 'center' }, loader: { flex: 1, alignItems: 'center' }, , . , . .
flex: 1 , . 10 , 1 , 8 . <View style={styles.search}> ... </View> <View style={styles.result}> ... </View> <View style={styles.no_result}> ... </View> <View style={styles.loader}> ... </View> , ,
main_details . , , . main_details: { padding: 30, alignItems: 'center' }, – CSS.
image_dimensions: { width: 100, height: 100 }, main_text: { fontSize: 25, fontWeight: 'bold', textAlign: 'center' }, sub_text: { color: '#6e6e6e' }, description: { marginTop: 20 }, .
ListView flexDirection row . , , (inline effect). . , width . 5 . alignItems . types: { flexDirection: 'row', marginTop: 20 }, type: { padding: 5, width: 100, alignItems: 'center', }, type_text: { color: '#fff', }, . , , .
normal: { backgroundColor: '#8a8a59' }, fire: { backgroundColor: '#f08030' }, water: { backgroundColor: '#6890f0' }, electric: { backgroundColor: '#f8d030' }, grass: { backgroundColor: '#78c850' }, ice: { backgroundColor: '#98d8d8' }, fighting: { backgroundColor: '#c03028' }, poison: { backgroundColor: '#a040a0' }, ground: { backgroundColor: '#e0c068' }, flying: { backgroundColor: '#a890f0' }, psychic: { backgroundColor: '#f85888' }, bug: { backgroundColor: '#a8b820' }, rock: { backgroundColor: '#b8a038' }, ghost: { backgroundColor: '#705898' }, dragon: { backgroundColor: '#7038f8' }, dark: { backgroundColor: '#705848' }, steel: { backgroundColor: '#b8b8d0' }, fairy: { backgroundColor: '#e898e8' } AppRegistry . React Native Pokedex . AppRegistry.registerComponent('Pokedex', () => Pokedex); Application launch
, -,
react-native run-android . :
, React, . (, index.android.js ). React
react-native start . : [7:38:33 AM] <START> Building Dependency Graph [7:38:33 AM] <START> Crawling File System [7:38:33 AM] <START> Loading bundles layout [7:38:33 AM] <END> Loading bundles layout (1ms) React packager ready. [7:38:46 AM] <END> Crawling File System (13516ms) [7:38:46 AM] <START> Building in-memory fs for JavaScript [7:38:52 AM] <END> Building in-memory fs for JavaScript (6200ms) [7:38:52 AM] <START> Building in-memory fs for Assets [7:38:59 AM] <END> Building in-memory fs for Assets (6048ms) [7:38:59 AM] <START> Building Haste Map [7:39:03 AM] <START> Building (deprecated) Asset Map [7:39:05 AM] <END> Building (deprecated) Asset Map (2191ms) [7:39:08 AM] <END> Building Haste Map (9348ms) [7:39:08 AM] <END> Building Dependency Graph (35135ms) Building Dependency Graph
adb shell input keyevent 82 . . Dev settings , Debugging IP- , React.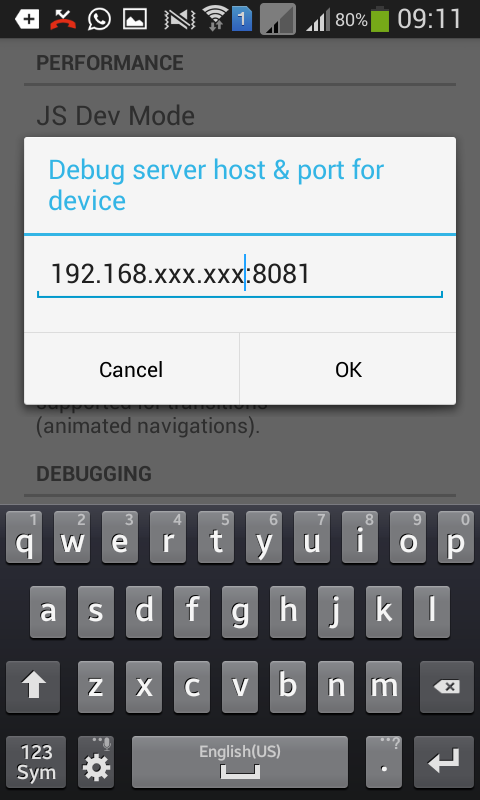
, Reload JS . , .
React
, Watchman.
Error building DependencyGraph:Error: Watcher took too long to loadTry running `watchman version` from your terminalhttps://facebook.imtqy.com/watchman/docs/troubleshooting.htmlat [object Object]._onTimeout (index.js:103:16)at Timer.listOnTimeout (timers.js:89:15):
sudo sysctl fs.inotify.max_user_instances=99999sudo sysctl fs.inotify.max_user_watches=99999sudo sysctl fs.inotify.max_queued_events=99999watchman shutdown-server, :
echo 999999 | sudo tee -a /proc/sys/fs/inotify/max_user_instancesecho 999999 | sudo tee -a /proc/sys/fs/inotify/max_user_watchesecho 999999 | sudo tee -a /proc/sys/fs/inotify/max_queued_eventswatchman shutdown-server, , . Watchman, .
React , . :
- Android- .
- IP- IP- .
, .
, , Chrome . Debug in Chrome Enable Live Reload . console.log Chrome. , .
What's next?
, React Native app?
- React Native , API .
- , index.android.js .
- .
- Reapp UI Kit .
Finally
React Native. : , , . , GitHub , .
Source: https://habr.com/ru/post/301734/
All Articles