Geo-distributed s3 cluster in active-active mode
Foreword
Having started to configure geo-distributed replication in rados, I encountered the problem that the official documentation does not fit the new major release of jewel a bit, and there are still no actual instructions on the Internet. This manual will save a lot of time for those who want to afford a small, their own geodistributed s3-cloud.
Some terms
Zone: a group of copies of objects, one of which is the master
Zonegroup: consists of zone
Zonegroup map: a zonegroup map that contains a map of the entire system, i.e. relationship between different zonegroup and zone
Realm: consists of zonegroup
Period: structure of the current state of realm . Each new change to a relam, zonegroup or zone must be accompanied by a new period.
Initial data
OS: ubuntu 14.04
realm: project1
zonegroup: en
zone: dc1, dc2
')
We have already deployed 2 ceph clusters in 2 data centers. There is a lot of information on this, so I will not describe. At once we will generate key and secret_key , we will make them identical for all zones, and system yuzvery.
SYSTEM_ACCESS_KEY
cat /dev/urandom | tr -dc 'a-zA-Z0-9' | fold -w 20 | head -n 1 SYSTEM_SECRET_KEY
cat /dev/urandom | tr -dc 'a-zA-Z0-9' | fold -w 40 | head -n 1 Preparing configs
For replication to work, you need to prepare configs, json files that are identical in both data centers.
zonegroup.json
{ "name": "ru", "api_name": "ru", "is_master": "true", "endpoints": [ "http:\/\/s3.dc1.superdomain.ru:80\/" ], "master_zone": "ru-dc1", "zones": [ { "name": "ru-dc1", "endpoints": [ "http:\/\/s3.dc1.superdomain.ru:80\/" ], "log_meta": "true", "log_data": "true", }, { "name": "ru-dc2", "endpoints": [ "http:\/\/s3.dc2.superdomain.ru:80\/" ], "log_meta": "true", "log_data": "true", } ], "placement_targets": [ { "name": "default-placement", "tags": [] } ], "default_placement": "default-placement", } dc1.json
{ "name": "ru-dc1", "domain_root": "ru-dc1.rgw.data.root", "control_pool": "ru-dc1.rgw.control", "gc_pool": "ru-dc1.rgw.gc", "log_pool": "ru-dc1.rgw.log", "intent_log_pool": "ru-dc1.rgw.intent-log", "usage_log_pool": "ru-dc1.rgw.usage", "user_keys_pool": "ru-dc1.rgw.users.keys", "user_email_pool": "ru-dc1.rgw.users.email", "user_swift_pool": "ru-dc1.rgw.users.swift", "user_uid_pool": "ru-dc1.rgw.users.uid", "system_key": { "access_key": "SYSTEM_ACCESS_KEY", "secret_key": "SYSTEM_SECRET_KEY" }, "placement_pools": [ { "key": "default-placement", "val": { "index_pool": "ru-dc1.rgw.buckets.index", "data_pool": "ru-dc1.rgw.buckets.data", "data_extra_pool": "ru-dc1.rgw.buckets.non-ec", "index_type": 0 } } ], "metadata_heap": "ru-dc1.rgw.meta", } dc2.json
{ "name": "ru-dc2", "domain_root": "ru-dc2.rgw.data.root", "control_pool": "ru-dc2.rgw.control", "gc_pool": "ru-dc2.rgw.gc", "log_pool": "ru-dc2.rgw.log", "intent_log_pool": "ru-dc2.rgw.intent-log", "usage_log_pool": "ru-dc2.rgw.usage", "user_keys_pool": "ru-dc2.rgw.users.keys", "user_email_pool": "ru-dc2.rgw.users.email", "user_swift_pool": "ru-dc2.rgw.users.swift", "user_uid_pool": "ru-dc2.rgw.users.uid", "system_key": { "access_key": "SYSTEM_ACCESS_KEY", "secret_key": "SYSTEM_SECRET_KEY" }, "placement_pools": [ { "key": "default-placement", "val": { "index_pool": "ru-dc2.rgw.buckets.index", "data_pool": "ru-dc2.rgw.buckets.data", "data_extra_pool": "ru-dc2.rgw.buckets.non-ec", "index_type": 0 } } ], "metadata_heap": "ru-dc2.rgw.meta", } Preparation of the first data center
- Generating keys for radosgw :
ceph auth get-or-create client.rgw.ru-dc1 osd 'allow rwx' mon 'allow rwx' -o /etc/ceph/ceph.client.radosgw.keyring - Add a section describing our radosgw in /etc/ceph/ceph.conf :
[client.rgw.ru-dc1]
rgw_zonegroup = ru
rgw_zone = ru-dc1
log_file = /var/log/ceph/client.rgw.dc1.log
keyring = /etc/ceph/ceph.client.radosgw.keyring
rgw_dns_name = s3.dc1.superdomain.ru
rgw_socket_path = /tmp/rgw.ru-dc1.sock
host = ceph1 - Check with the ceph osd pool ls command which pools are currently created, and delete everything except rbd , the ceph osd pool delete $ pool $ pool - yes-i-really-really-mean-it command will help us (yes, exactly 2 times), where $ pool is the name of the pool.
I had it:ceph osd pool delete default.rgw.control default.rgw.control --yes-i-really-really-mean-it ceph osd pool delete default.rgw.data.root default.rgw.data.root --yes-i-really-really-mean-it ceph osd pool delete default.rgw.gc default.rgw.gc --yes-i-really-really-mean-it ceph osd pool delete default.rgw.log default.rgw.log --yes-i-really-really-mean-it - And now we create the necessary ones:
ceph osd pool create .rgw.root 8 ceph osd pool create ru-dc1.rgw.control 8 ceph osd pool create ru-dc1.rgw.data.root 8 ceph osd pool create ru-dc1.rgw.gc 8 ceph osd pool create ru-dc1.rgw.log 8 ceph osd pool create ru-dc1.rgw.intent-log 8 ceph osd pool create ru-dc1.rgw.usage 8 ceph osd pool create ru-dc1.rgw.users.keys 8 ceph osd pool create ru-dc1.rgw.users.email 8 ceph osd pool create ru-dc1.rgw.users.swift 8 ceph osd pool create ru-dc1.rgw.users.uid 8 ceph osd pool create ru-dc1.rgw.buckets.index 8 ceph osd pool create ru-dc1.rgw.buckets.data 128 128 ceph osd pool create ru-dc1.rgw.meta 8 - Create a directory for our client radosgw and rule the owner:
mkdir /var/lib/ceph/radosgw/ceph-rgw.ru-dc1 chown ceph:ceph /var/lib/ceph/radosgw/ceph-rgw.ru-dc1 - Remove the realm, zonegroup and zone , which were the default. You can view them with the command radosgw-admin (realm | zonegroup | zone) list , for me it was like this:
radosgw-admin zonegroup delete --rgw-zonegroup=default radosgw-admin zone delete --rgw-zone=default - Create our realm, zonegroup, zone , new period :
radosgw-admin realm create --rgw-realm=project1 --default radosgw-admin zonegroup set --rgw-realm=project1 --rgw-zonegroup=ru --default < zonegroup.json radosgw-admin zone set --rgw-realm=project1 --rgw-zonegroup=ru --rgw-zone=ru-dc1 --default < dc1.json radosgw-admin zone set --rgw-realm=project1 --rgw-zonegroup=ru --rgw-zone=ru-dc2 < dc2.json radosgw-admin period update --commit - We install and configure apache2 to work with our cloud. For this you need apache2 and libapache2-mod-fastcgi . Replication with the version from the standard ubuntu repository did not work for me normally, but the ceph team took care of this, and it can be taken in a separate turnip.
echo “deb http://gitbuilder.ceph.com/libapache-mod-fastcgi-deb-trusty-x86_64-basic/ref/master trusty main” > /etc/apt/sources.list.d/ceph-fastcgi.list apt-key adv --keyserver keyserver.ubuntu.com --recv-key 6EAEAE2203C3951A apt-get update apt-get install apache2 libapache2-mod-fastcgi a2enmod rewrite - Apache config itself:
FastCgiExternalServer /var/www/s3gw.fcgi -socket /tmp/rgw.ru-dc1.sock <VirtualHost *:80> ServerName s3.dc1.superdomain.ru ServerAlias *.s3.dc1.superdomain.ru DocumentRoot /var/www RewriteEngine On RewriteRule ^/(.*) /s3gw.fcgi?%{QUERY_STRING} [E=HTTP_AUTHORIZATION:%{HTTP:Authorization},L] <IfModule mod_fastcgi.c> <Directory /var/www> Options +ExecCGI AllowOverride All SetHandler fastcgi-script Order allow,deny Allow from all AuthBasicAuthoritative Off </Directory> </IfModule> AllowEncodedSlashes On ErrorLog /var/log/apache2/error.log CustomLog /var/log/apache2/access.log vhost_combined ServerSignature Off </VirtualHost> - Apache restart:
service apache2 restart - Create a script /var/www/s3gw.fcgi
#!/bin/sh exec /usr/bin/radosgw -c /etc/ceph/ceph.conf -n ceph-rgw.ru-dc1 - rule the rights:
chmod +x /var/www/s3gw.fcgi - And finally, start radosgw :
start radosgw id=rgw.ru-dc1 - Create a system user:
radosgw-admin user create --uid=zone.user --display-name="ZoneUser" --access-key=SYSTEM_ACCESS_KEY --secret=SYSTEM_SECRET_KEY --system
On this we set up the 1st ds, and go to the 2nd.
DC №2
We carry out all the points in the same way for the second cluster, simply replacing dc1 with dc2 .
A little bit more
At the current stage, we get data replication in buckets, but in order to sync the list of buckets and users, we need radosgw-agent .
- We put it in the first data center:
apt-get install radosgw-agent - Configuring /etc/ceph/radosgw-agent/default.conf :
src_zone: ru-dc1 source: http://s3.dc1.superdomain.ru:80 src_access_key: SYSTEM_ACCESS_KEY src_secret_key: SYSTEM_SECRET_KEY destination: http://s3.dc2.superdomain.ru:80 dest_access_key: SYSTEM_ACCESS_KEY dest_secret_key: SYSTEM_SECRET_KEY log_file: /var/log/ceph/sync.dc1-dc2.log dest_zone: ru-dc2 - And run it:
/etc/init.d/radosgw-agent start
What is the result?
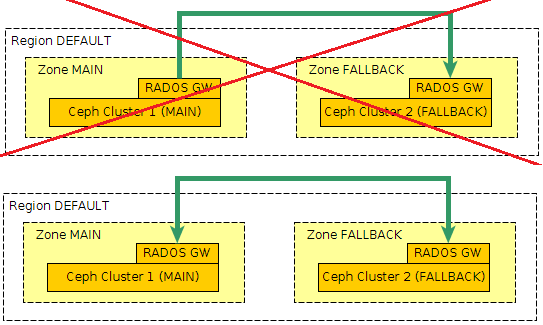
As a result, we get an active-active geo-distributed s3-cloud. All operations of writing / deleting objects will be performed asynchronously, with a delay of a couple of tens of seconds. The only restriction is the impossibility of creating buckets in the second data center.
Source: https://habr.com/ru/post/301584/
All Articles