IPSec VPN for OS X and iOS. Without pain
VPN (eng. Virtual Private Network) is a generic name for technologies that allow you to provide one or several network connections (a logical network) on top of another network (for example, the Internet).
© Wikipedia
VPN is used to connect to the workplace remotely, to protect data, to bypass filters and locks, to impersonate a citizen of another country and in general is an indispensable thing. Almost everywhere, the well-known OpenVPN , which I used, is used as a simple tool for organizing a user VPN. Exactly until I had a Macbook and OS X to boot. Due to the fact that Apple’s approach to the DNS configuration is very different from the approach of other * nix-systems, DNS forwarding via VPN did not work normally.
After some research I got two options:
- Using DNS "by" VPN, which is highly insecure, but solves the problem.
- Using OS X-native VPN protocols: PPTP and IPSec family.
Of course, I chose the latter and of course - IPSec, not the outdated PPTP.
TL; DR;
Configuring Linux (in my case - Arch Linux)
')
OS X Setup
')
#!/bin/bash MYIP="1.2.3.4" # IP- # ( Arch Linux ) pacman -S --noconfirm ipsec-tools pwgen # wget https://gist.githubusercontent.com/annmour/e8d12dbfc4cd2c711c11588b4388afd4/raw/0929a169dde09ae3f041f4da4bf161614501d62c/racoon.conf \ -O /etc/racoon.conf sed -i "s/0.0.0.0/$MYIP/g" /etc/racoon.conf # psk mkdir -p /etc/racoon/ && echo $(pwgen -s 8 1) $(pwgen -s 64 1) > /etc/racoon/psk.key && \ chmod 0400 /etc/racoon/psk.key # VPN groupadd vpn # racoon systemctl enable racoon && systemctl start racoon # VPN useradd -s /bin/nologin -G vpn -g vpn -M -N -d / vpn_user && \ passwd vpn_user # filter + nat iptables -t filter -I INPUT -p esp -j ACCEPT iptables -t filter -I INPUT -p udp --dport 500 -j ACCEPT iptables -t filter -I INPUT -p udp --dport 4500 -j ACCEPT iptables -t filter -I FORWARD -s 192.168.100.0/24 -j ACCEPT iptables -t filter -I FORWARD -d 192.168.100.0/24 -j ACCEPT iptables -t nat -A POSTROUTING -s 192.168.100.0/24 -j MASQUERADE iptables-save > /etc/iptables/iptables.rules # echo net.ipv4.ip_forward=1 > /etc/sysctl.d/10-ip_fowrard.conf sysctl -p /etc/sysctl.d/10-ip_fowrard.conf OS X Setup
- Open Settings → Network
- Click (+) and select VPN / Cisco IPSec
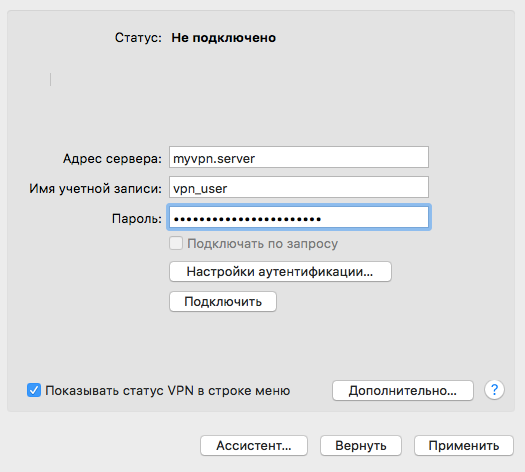
- Fill out basic information (address, username and password)
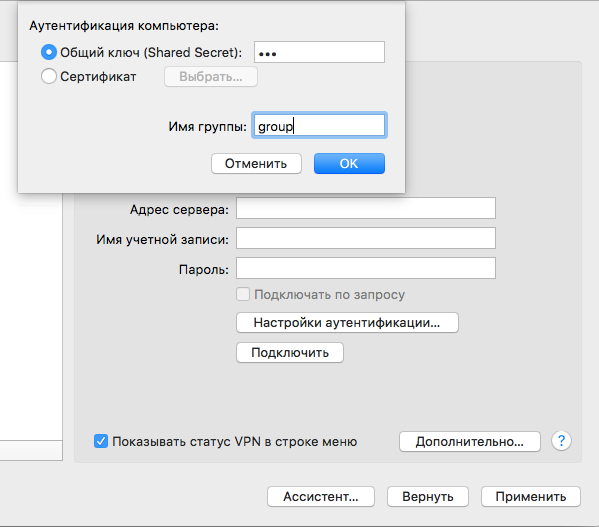
- Select “Authentication Settings” and specify the group and PSK (from the /etc/racoon/psk.key file)
- Connect
OS X and IPSec
IPSec is not a single protocol, but a set of protocols and standards, each of which has a bunch of options and options. OS X supports three types of IPSec VPN:
- IPSec / L2TP
- IKEv2
- Cisco VPN
The first option is redundant - what's the point of forwarding ethernet packets for a user VPN?
Secondly, it requires certificates and highly complex settings on the client side, which is also not good.
There remains a third, which is called "Cisco", and in fact - XAuth + PSK. We will use it.
OS X preparation
After some unsuccessful attempts to configure VPN on OS X, I climbed up to study the system in order to find out exactly how the VPN works there.
A brief search gave me the file /private/etc/racoon/racoon.conf , which had the line include "/var/run/racoon/*.conf"; .
After that, everything became clear: when you click the button, OS X generates a config for racoon and puts it in / var / run / racoon /, after the end of the connection, deletes it. It remains only to get the config, which I did by running the script before connecting.
while true; for I in *.conf; do CP $I $HOME/$I; exit 0; done; done Inside, I found exactly the information I lacked to configure the server: IPSec proposals . These are lists of authentication, encryption, and signature modes supported by the client (and server), with which the connection cannot be established.
The final proposal for OS X 10.11 and iOS 9.3 is as follows:
encryption_algorithm aes 256;
hash_algorithm sha256;
authentication_method xauth_psk_server;
dh_group 14;
VDS selection and VPN setup
For the VPN server, I chose VDS from OVH, since they provide full virtualization with the ability to install any kernel with any modules. This is very important because ipsec works at the kernel level, not the user, like OpenVPN.
Cisco VPN mode (XAuth + PSK) implies two-step authentication:
- Using the group name and PSK for it (stage 1)
- Using a username and password (step 2)
Racoon setup
racoon is a key management daemon (IKE). He is the one who gives the kernel permission to hang up the tunnel after it authenticates the client and agrees on all the details of the protocol (aka proposal). racoon is included in the standard ipsec-tools package and is found in almost any Linux distribution out of the box.
Racoon configuration
/etc/racoon.conf
 # file path with pre-shared-key.  Rights must be 0400
 path pre_shared_key "/etc/racoon/psk.key";
 # external ip-address is required, 0.0.0.0 does not work!
 listen {
	 isakmp 1.2.3.4 [500];
	 isakmp_natt 1.2.3.4 [4500];
 }

 # anonymous aka road warrior - a client with an unknown external address
 remote anonymous {
 # passive - "wait for incoming" mode
	 passive on;
 # transfer configuration to client
 mode_cfg on;
 # taken from racoon.conf for os x
	 exchange_mode main, aggressive;
	 ike_frag on;
	 verify_cert off;
	 verify_identifier off;
 # server name
	 my_identifier fqdn "vpn.server";
 # generate one-time policies (spd) automatically
 # they can still be generated by hands, but not needed
	 generate_policy on;
 # pass through NAT mode
	 nat_traversal on;
 # dead clients fall off after 5 minutes
	 dpd_delay 300;
 # proposal - client protocol suite
 # taken from racoon.conf for os x
	 proposal {
  		 encryption_algorithm aes 256;
  		 hash_algorithm sha256;
  		 authentication_method xauth_psk_server;
  		 dh_group 14;
  	 }
 }


 mode_cfg {
 # unix user authentication
	 auth_source system;
 # ... and unix groups
	 group_source system;
 # ... and only allow members of vpn groups
	 auth_groups "vpn";
 # ... allow the client to save the password
	 save_passwd on;
 # take configuration from config (but not from radius for example)
	 conf_source local;
 # starting pool address
	 network4 192.168.100.100;
 # pool mask
	 netmask4 255.255.255.0;
 # dns server
	 dns4 8.8.8.8;
 # pool size
	 pool_size 50;
 }

 # encryption setting
 sainfo anonymous {
	 encryption_algorithm aes;
	 authentication_algorithm hmac_sha1;
	 compression_algorithm deflate;
 }
Psk file configuration
/etc/racoon/psk.key
Using random 64 bits of the group and 512 bits of the key, I get enough options to make brute forceless.
 # group key
 z1x7VZto IgYLrXQdsTFPWKpH7DrV6H06GnbQGl1jlesLZbJ6hZi7BIEULk1MF3yqkqAGDWvM
 U8WLLyuk so70ums1VqrCilBvEBEUTDN9kripEd8l5pyQHWf8PNMmnvdV4uqUUeDLhHsnpK5c
 4eU8rxhB TublZZd0K03REBdRe8BmkGuuOqNOnsW5d26bbtIsv4x0M1xlZWDjwHcjt3QYg1rc
 L2rSlX01 IaXcgzUNVCMkf2BFGcHR14s4rLLbA9ZckQG0H5vNqLWMh4g2tSBa807Y2fmhxPxy
 2QkqRbEv GnClE7m3Aq2HrXa6vhSubxNc6ZnY7LSWAFqmasgi5pqThzWmVQY0vONAbAXYpBk4
 2mC1aO86 Dmmmty5rbaOZY0Uh0PGIcVYOLTI8fYlGWJCJfHhZSyXTDzTsc7Qhnj75vfApju2c
 kotVQ8eN 31cRpnVpEzkrrm58gWuiaCeOvYLwJYY42dglA3IHsuYkftER5tmLJbtV5vwktLZx
 YXQX4YSm 74f2RND10NIDaRk2bQtuPEjgJWXxeZdD7KoBdYBzdIq053PNzlNvdQdfn1Taa6zV
 4ZwwJuMP 1xNyfGJSYvDRX7MgId9AgmwygqVFiOJDet2ofLVJkOOUKUfBt3IIn2pksXFTyiN2
 t9D9S59q euDKjEM73eONU8hmbPGm3mtnyz3h66AY3tHWo5WJOBTm7PULc1TlVXeoGwOIUapm
Linux setup
- You must enable routing: sysctl net.ipv4.ip_forward = 1
- It is necessary to allow the ESP protocol and incoming connections to ports 500 / udp and 4500 / udp: iptables -t filter -I INPUT -p esp -j ACCEPT; iptables -t filter -I INPUT -p udp --dport 500 -j ACCEPT; iptables -t filter -I INPUT -p udp --dport 4500 -j ACCEPT
- It is necessary to enable NAT for our network: iptables -t nat -A POSTROUTING -s 192.168.100.0/24 -j MASQUERADE
- It is necessary to create a group and create / add users there: groupadd vpn and useradd -G vpn vpn_user
- You must run racoon: racoon -vF
OS X Setup
OS X in pictures
Settings → Network

Select (+) → VPN → Cisco IPSec → Make a Name

Select connection → enter server address, username and password
Select “Authentication Settings” → enter the group name and key (in that order)
Connect
Select (+) → VPN → Cisco IPSec → Make a Name
Select connection → enter server address, username and password
Select “Authentication Settings” → enter the group name and key (in that order)
Connect
IOS setup
iOS in pictures
Settings → Basic → VPN → Add VPN configuration.
Fill out the form by analogy, connect.

Fill out the form by analogy, connect.
<<< EOF
Thank you for your attention, encrypt your traffic!
EOF;
Source: https://habr.com/ru/post/301422/
All Articles