We study Bootmgr. Part 1 - tools and basic principles of debugging the initial stages of loading Windows
Introduction
Perhaps some readers will remember my very first article on a resource dedicated to booting Windows from a VHD image. Perhaps I would not have returned to this topic if there were no people who tried to repeat this technology on their home machines. Naturally, with the implementation of this solution, there were problems concerning mainly the errors that bootmgr spits out in cases when he does not like something. Attempts to interpret download errors like 0xc03a0003 by googling do not lead to particularly valuable results, and the Microsoft documentation on this subject keeps significant silence. There was an idea to study the processing of VHD-images, having received information first-hand, that is, from the loader itself.
If you turn to the information already available on the network, then there is a wonderful blog "Notes of Enikeyschik about Windows" on whose pages ( one , two and three ), in my opinion, the most valuable information is available on bootmgr device issues. The author reviewed in detail the boot process, including the MBR and PBR code studies, focusing on the bootmbr structure, briefly describing the processes that occur during its operation.
We will go further - we will describe the tools that can be used to study the bootloader device and try to deal with some algorithms that interest us. If such a proposal seemed interesting to someone, you are welcome under the cat.
1. Get the Bootmgr code from the system
Bootmgr loader appeared in the operating systems of the Windows family since Windows Vista. The reason for its development was the fact that the good old ntldr, used in the NT line, could not boot the system, on computers with motherboards equipped with UEFI, at that time (2005) was not common among a wide range of ordinary users.
By default, with a regular installation, this bootloader is placed in a separate partition located at the beginning of the HDD, with a size sufficient to accommodate the bootmgr itself as well as its configuration files. This section is not mounted in the normal system operation mode and the drive letter is not assigned to it. In systems with MBR, the creation of this partition can be avoided by installing Windows on a pre-marked and formatted HDD. In this case, the bootloader is placed in the same partition as the OS files. Systems with EFI + GPT initially require a partition of type 0xef and formatted in FAT.
Thus, our first task is to get bootmgr. It is advisable to take it from the system, which will act as an experimental. To do this, install Windows on a virtual machine. This can be both VirtualBox, and VMware, and QEMU - it all depends on what kind of virtualization tools you have. I mainly work in Linux, I will mainly focus on the tools used there, although I will pay attention to Windows.
So, suppose we have a virtual machine (VM) with Windows 7 (x86) installed on it. The disk layout is based on the MBR, the system is installed in one partition. Suppose this is QEMU, the disk on which the experimental one is installed is in raw format. that is, an ordinary binary image. Mount this image
$ sudo modprobe -r loop $ sudo modprobe loop max_part=15 $ sudo losetup -f win7.hdd $ sudo mount /dev/loop0p1 ~/virt-win $ ls -l ~/virt-win On the mounted partition we will see the following contents.
5504541 -rwxrwxrwx 1 root root 24 11 2009 autoexec.bat drwxrwxrwx 1 root root 4096 21 09:08 Boot -rwxrwxrwx 1 root root 391640 21 2015 bootmgr -rwxrwxrwx 1 root root 8192 21 09:08 BOOTSECT.BAK -rwxrwxrwx 1 root root 10 11 2009 config.sys lrwxrwxrwx 2 root root 60 14 2009 'Documents and Settings' -> /home/maisvendoo/virt-win/Users -rwxrwxrwx 1 root root 2415517696 21 09:26 hiberfil.sys -rwxrwxrwx 1 root root 3220692992 21 09:26 pagefile.sys drwxrwxrwx 1 root root 0 14 2009 PerfLogs drwxrwxrwx 1 root root 4096 21 09:14 ProgramData drwxrwxrwx 1 root root 4096 12 2011 'Program Files' drwxrwxrwx 1 root root 0 21 09:14 Recovery drwxrwxrwx 1 root root 0 21 09:14 '$Recycle.Bin' drwxrwxrwx 1 root root 4096 21 09:09 'System Volume Information' drwxrwxrwx 1 root root 4096 21 09:14 Users drwxrwxrwx 1 root root 16384 21 09:09 Windows The file bootmgr is of interest to us. However, before we need not quite it, but the 32-bit bootmg boot image of bootmgr.exe, which is packaged in bootmgr. To unpack it, you must use the bmzip utility, which is written in general for Windows (it did not work out with a swoop under Linux), so we will execute the unpacking on a virtual machine. The binary build of this utility, which worked fine, turned out to be quite difficult to find, despite the fact that there was a link to it. As a result, the package was found on one of the sites dedicated to bootmgr customization. For bmzip to work, the MSCompression.dll library was needed. The ready-to-work package can now be downloaded here .
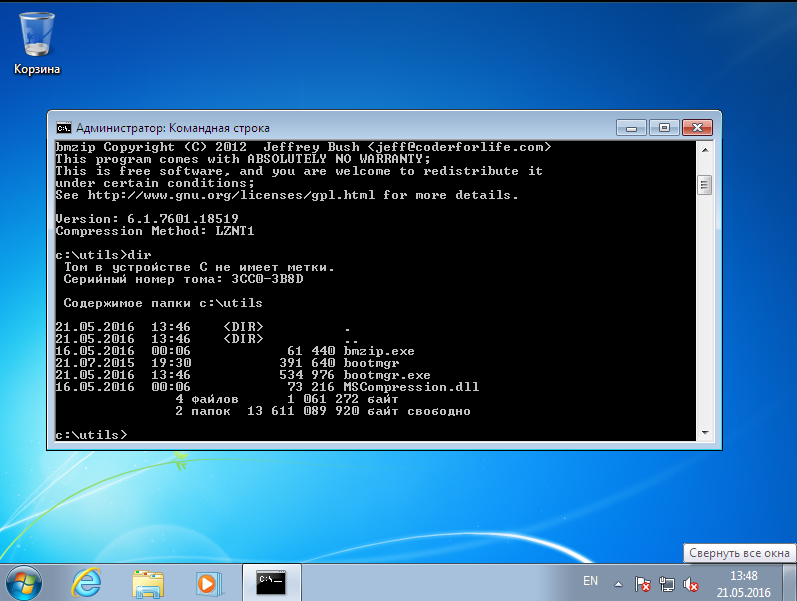
Create the utils folder on the VM disk and copy bmzip.exe there with MSCompression.dll. Unmount the image and run the VM. Run the command prompt as administrator. To accidentally spoil the bootloader, make a copy of it.
C:\ Windows\System32>cd c:\ C:\ xcopy bootmgr utils\bootmgr /h The bootloader file is hidden and systemic, so remove these attributes from it.
C:\ cd utils C:\ attrib -S -H /s Unpack the bootloader
C:\ bmzip bootmgr bootmgr.exe As a result, we get the unpacked bootmgr.exe image
Turn off the VM and mount its disk in Linux again. Create a folder where we will gut the bootloader with a disassembler and copy the unpacked image there.
$ mkdir -p ~/work/bootmgr/ $ cp ~/virt-win/utils/bootmgr.exe ~/work/bootmgr/ 2. Disassemble bootmgr.exe
Now let's feed the resulting "executable" to the disassembler. For example IDA Pro. Run the "go" and open the extracted file in it.
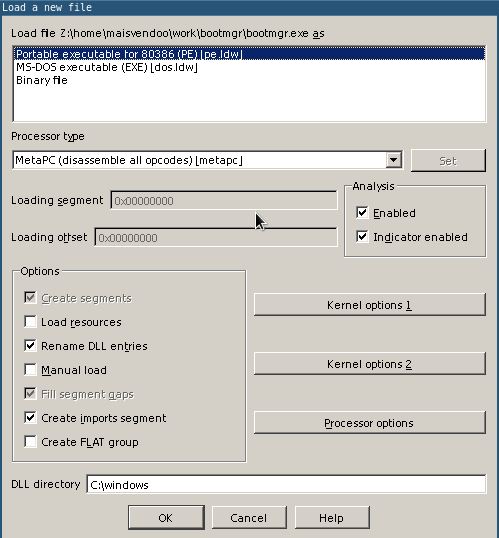
IDA correctly identifies the file as a 32-bit PE executable file. Click OK. Now, if the plug-in for working with pdb files is installed in IDA Pro, during the disassembling process we will be offered to download debug symbols, and not from anywhere, but from the Microsoft website.
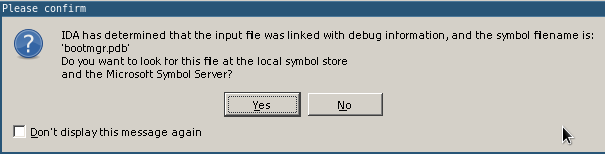
We agree and get this picture
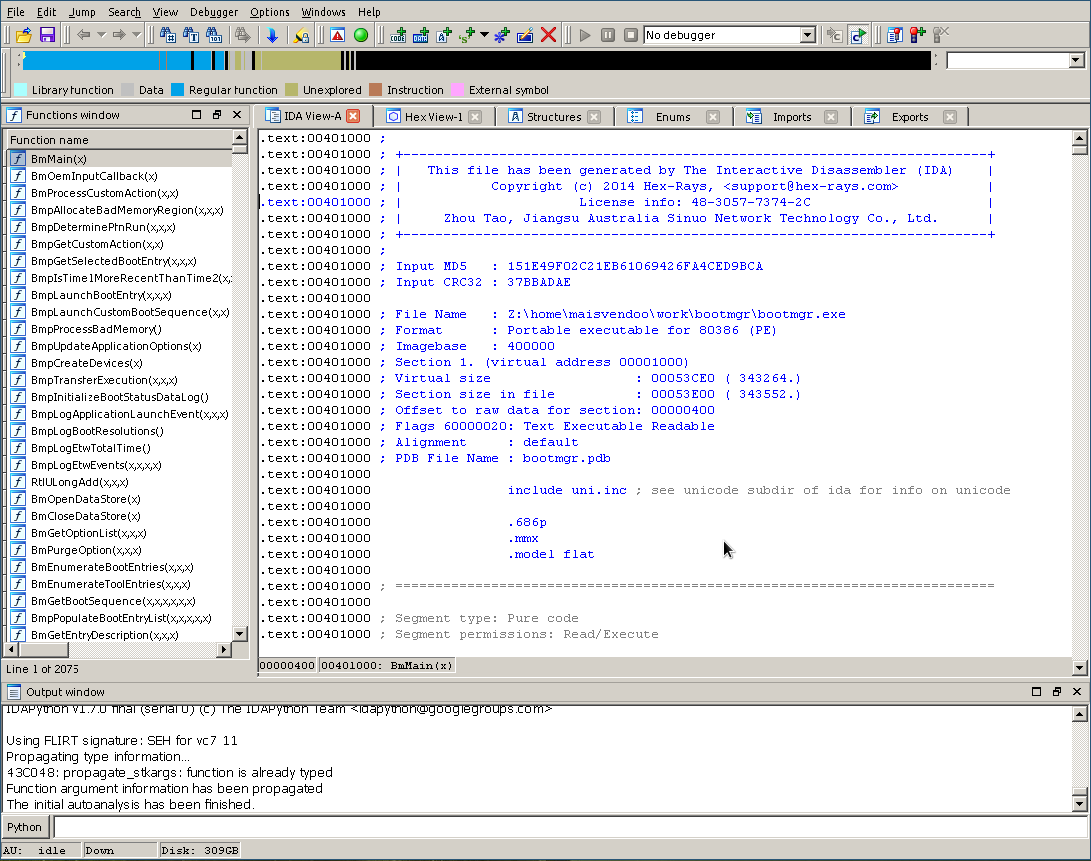
Yeah, on the left we see the prototypes of the functions contained in the file being examined, thanks to the fact that we agreed to download the debug symbols. This will greatly facilitate our subsequent work. In the meantime, we define the entry point to the bootloader code, and it is not difficult to guess that this will be the BmMain () function. However, without taking it on faith, press Ctrl + E

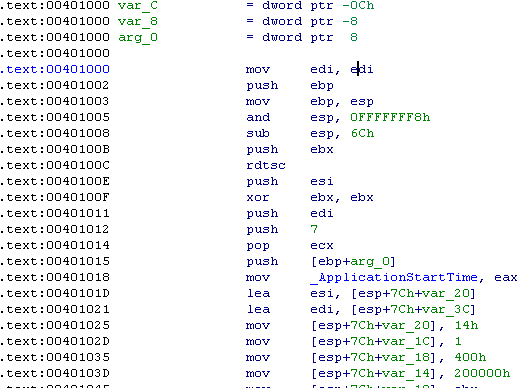
making sure that our guess is correct - BmMain () is the entry point located at 0x401000. Click OK and move to the beginning of the code.
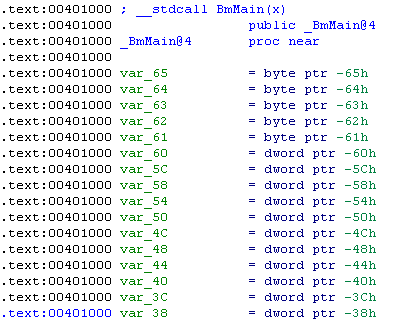
We see the header of the BmMain () function with an impressive list of local variables, and just below the function code itself
Understanding the jumble of assembly code is quite difficult, and why not do it. First of all, let's decide on what functions of the loader we want to explore. Did I talk about VHD there? Well, let's look for something in the code regarding virtual disks. Right-click on the list of functions on the left and in the pop-up context menu, select "Quick filter" (or go to the window with prototypes and press Ctrl + F). In the search bar, type "vhd" and ...
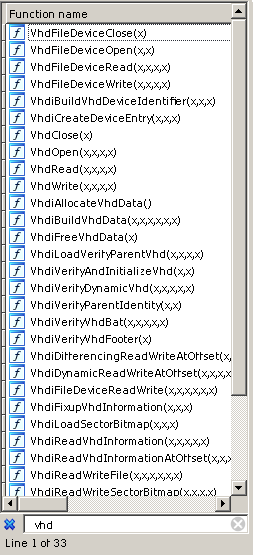
Yes, these functions are available in an amount of 33 pieces. Among them, VhdOpen () will obviously be responsible for opening the virtual disk, but for example VhdiVerifyVhdFooter () is responsible for checking the correctness of the VHD disk footer. That is, we roughly imagine where we will put breakpoints in the debugger. By the way, it's time to talk about debugging.
3. Debugging Bootmgr on a bunch of QEMU + IDA Pro
We start the virtual machine with the -s -S keys - this enables debug mode
$ qemu-system-x86_64 ~/VM/qemu/win7-efi/win-x86.hdd -m 4096 -s -S VM starts and immediately pauses, waiting for the debugger to connect.
Important! Never use the -enable-kvm switch using hardware virtualization. When used, debugging in QEMU does not work.
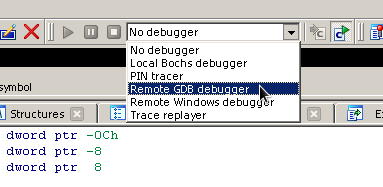
Now on the toolbar in IDA, select the "Remote GDB debugger" debugger
Having answered "Yes" to several questions asked to us, we will get a window
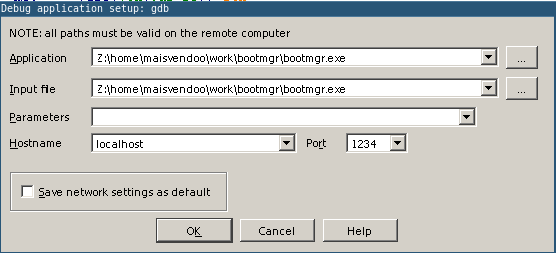
where we set the parameters of the connection with the VM: localhost on port 1234. Click OK. We’ll be told that some process is already running and is waiting for the debugger to connect - do we want to join it? Of course we go!

Therefore, we answer "Yes" and ...
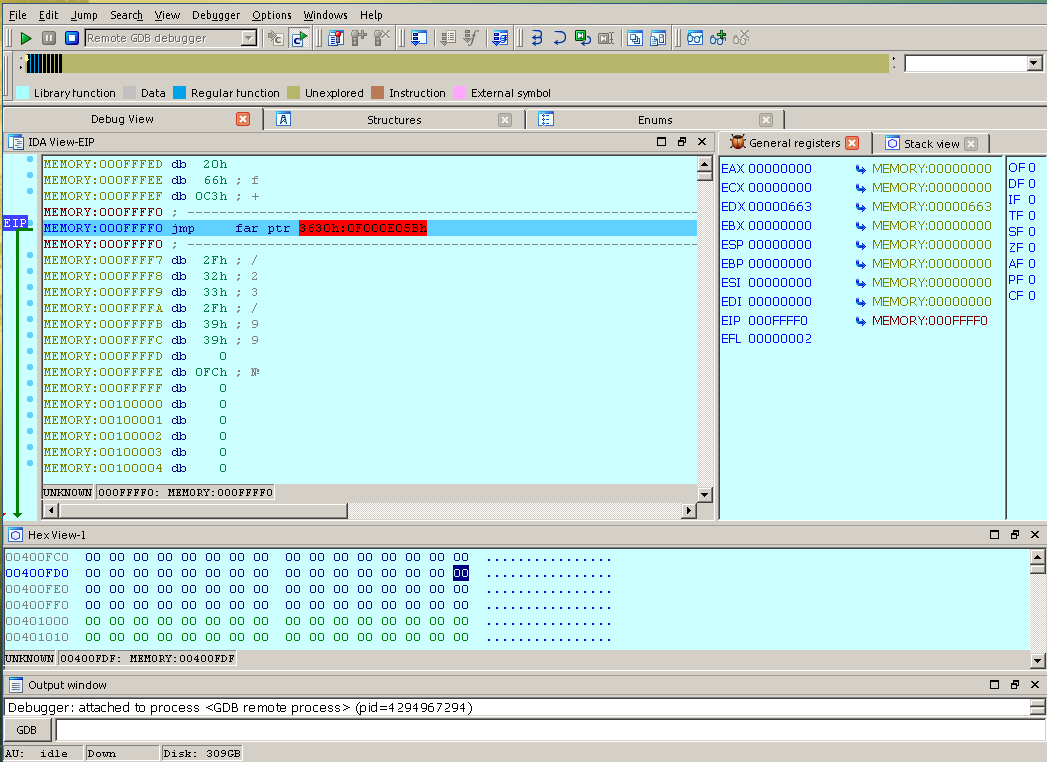
we pause somewhere in the beginning of the bios of the virtual machine. Great, but now we have to get to the place where bootmgr starts running. Put a breakpoint on the BmMain () function. Click on the toolbar a list of breakpoints, press Insert on the keyboard and indicate at what address we want to interrupt the execution of the code and go to debugging
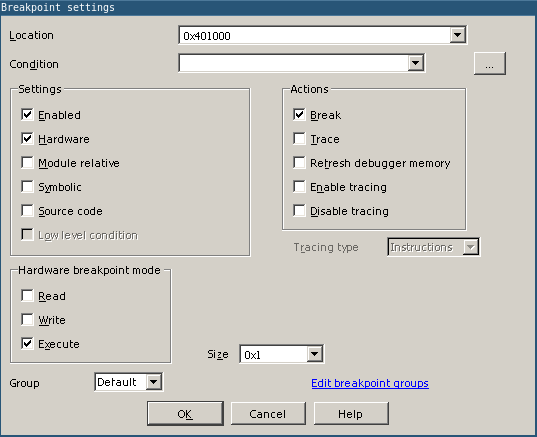
We drive in the address 0x401000. If we want to break the necessary function, then go to the main menu and open the list of functions in the debugging session: View -> Open subviews -> Functions. In the list that appears, right-click the context menu and select Add breakpoint. Now press F9 and after a short wait we get to the very beginning of the bootloader code
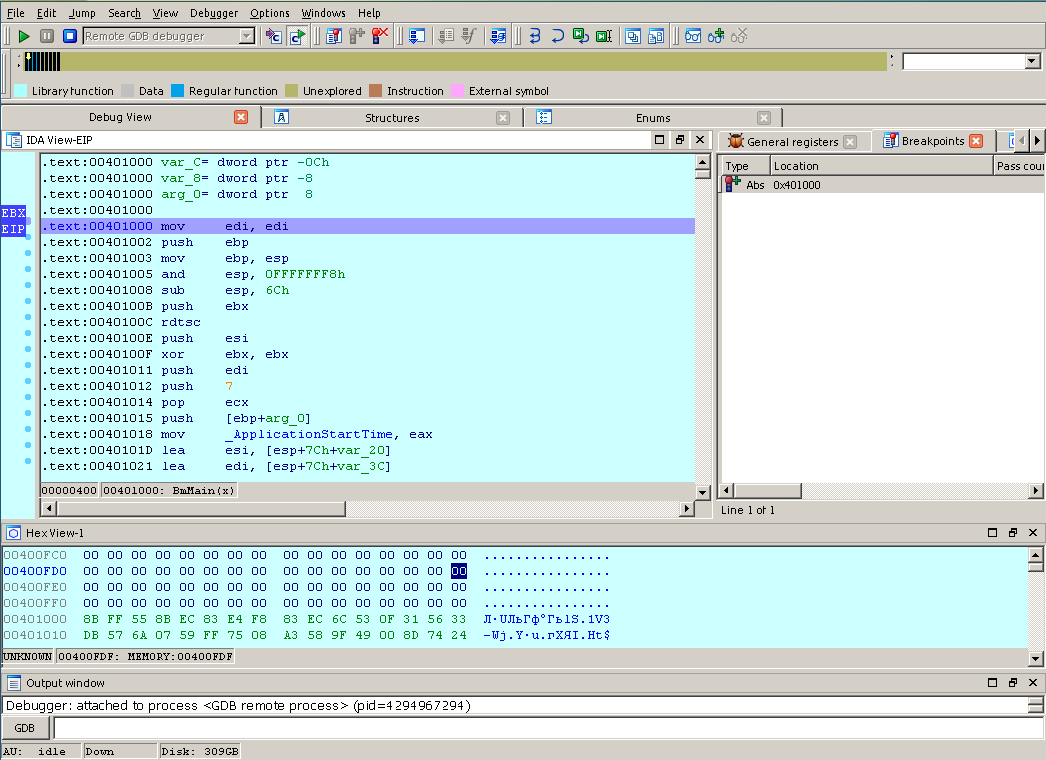
Now we can go through the code step by step, watch the values of registers and the stack, track the call stack and so on. To some extent, the debugger built into IDA is convenient and intuitive.
Maybe they will ask me - is it possible to use GDB? You can run the VM in debug mode, run gdb in the console
$ gdb -q Connect to a remote VM session
(gdb) target remote localhost:1234 Enable display of disassembled instructions.
(gdb) display/4i $pc If you are not satisfied with the AT & T syntax, switch to Intel.
(gdb) set disassembly-flavor intel Put a breakpoint on BmMain () and start execution
(gdb) b *0x401000 Breakpoint 1 at 0x401000 (gdb) c Continuing. Breakpoint 1, 0x00401000 in ?? () 1: x/4i $pc => 0x401000: mov edi,edi 0x401002: push ebp 0x401003: mov ebp,esp 0x401005: and esp,0xfffffff8 (gdb) Please, we see almost the same thing as seen in IDA, while having all the power of GDB. Almost, because here we will not be able to use debugging symbols from Microsoft, because GDB does not understand them. But the possibilities of GDB are much wider than those of IDA in terms of the debugging process and its automation.
However, there is another possibility of debugging, which you cannot pass
3. Debugging on WinDbg + VirtualBox
Those who are developing drivers for Windows are certainly familiar with this great debugger. It is remarkable that it has capabilities comparable to the capabilities of Linux GDB. Its only drawback is a creepy way to customize its interface. But we will omit these moments, and turn to the capabilities of this debugger for the problem we are solving.
So, let us have a VM based on VirtualBox. Let's create a COM port for this VM with the following parameters
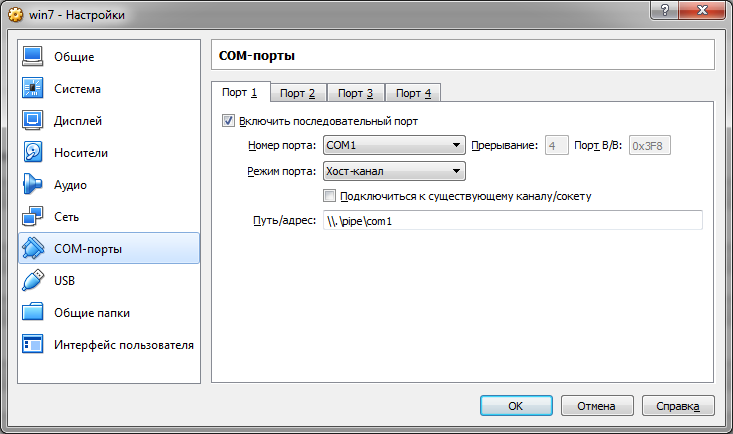
This is a virtual COM port that is forwarded to the named pipe. To debug through the serial port, the virtual machine should be configured accordingly. We load it and we start the console with the administrative rights. With it we enter the bootloader configuration commands for debugging.
c:\ Windows\system32> bcdedit /bootdebug {bootmgr} on This command will enable the debugger boot feature. Next, configure the port for debugging
c:\ Windows\system32> bcdedit /dbgsettings serial debugport:1 baudrate:115200 We indicate that we use COM1 at a speed of 115200 baud. Great, turn off the VM and start the debugger.
The WinDbg debugger can be officially downloaded from the Microsoft website along with the driver development kit. However, this debugger build has a problem - a glitch with the display of register values. Therefore, I use an assembly that downloads from the same Redmod site, referenced from a tweeter and a certain Dominic Wong. In this build, this bug is missing. Run WinDbg with the following command.
c:\Wingdbx86> windbg -b -k com:pipe,port=\\.\pipe\com1,resets=0,reconnect Open the interface settings (File -> Open Workspace in File) in which, among other parameters, the path http://msdl.microsoft.com/download/symbols is saved to download debugging symbols from Microsoft servers. I have this way pre-hammered into the settings (File -> Symbol File Path) and saved in the theme for WinDbg. This setting will allow us to automatically get debug information for the bootloader.
Now run the VM. Almost immediately it will pause, and in the debugger window we will see the following picture.
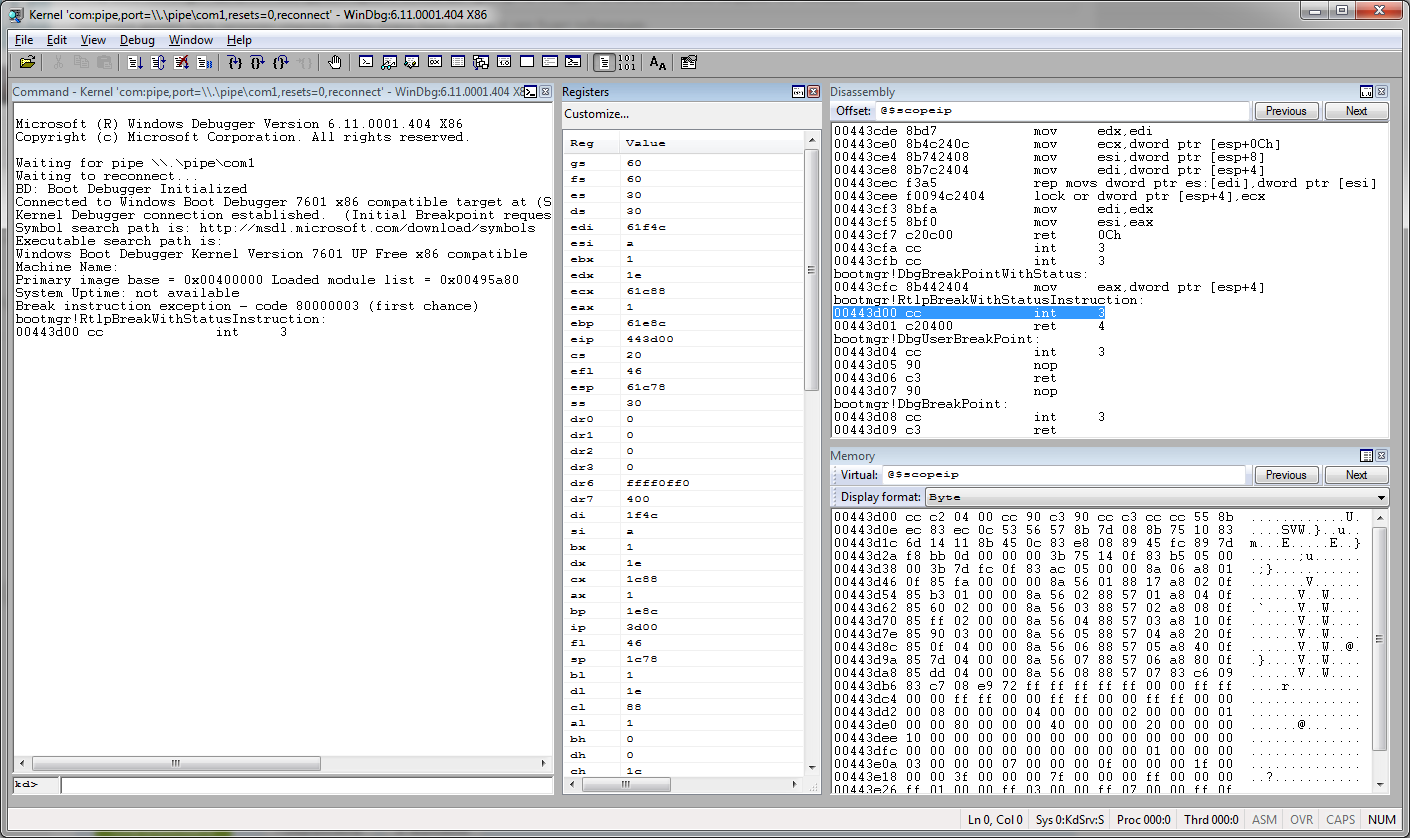
Yeah, the debugger connected to the VM and got to the point, kindly provided to us by Microsoft. Well, now all debugging options using windbg are available to us.
However, we do not stop at the very beginning of the loader code, but a little further. As step-by-step debugging shows, we are right behind the BlInitializeLibrary () function that provides initial hardware initialization.

and, when debugging with IDA, we simply do not get here. Thus, when debugging with WinDbg, some of the bootmgr actions elude us right after its launch. This is the disadvantage of using standard debugging tools provided by Microsoft. However, the unavailable code we can always investigate separately using IDA.
Now, as an example, let's take a look at how bootmgr works with fixed-size VHD images.
4. Debugging boot from VHD
The following is considered on the WinDbg debugger connected to the VM on VirtualBox, but equally true for other debugging methods, taking into account their features. VM used in this example contains two systems: one installed on the HDD, the other on the VHD image. Put a breakpoint on the function VhdOpen ()
kd> bp VhdOpen and hit F5. The debugger will be on the specified function.
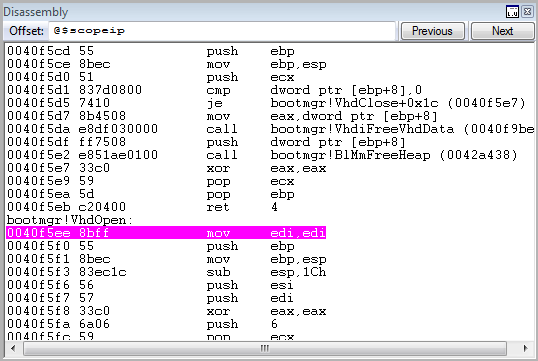
Moreover, attention - we still did not go into the boot menu at all and did not choose a boot from VHD. This means that the VHD check takes place long before the menu appears. We observe the same behavior, for example, if we drop bootmgr an empty VHD. The boot menu will not show us at all, but they will show an error with the code 0xc000000F.
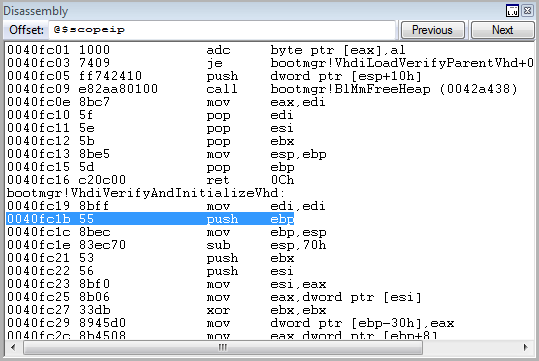
We go a little further by pressing F10 or typing p in the command line and get to the VhdiAllocateVhdData () call - this is obviously the creation in memory of some structures for working with the image

Below is a call to VhdiVerifyAndInitializeVhd () - obviously checking the correctness of the image. It seemed interesting to me and I went inside (F11)
Below, after some preparatory operations, the loader reads the last 512 bytes of the image, which contain the so-called "footer" of the image, calling the VhdiReadVhdInformation () function. No need to go to the fortuneteller to understand - the function will return a pointer to the structure containing the footer data. As I managed to find out, this pointer, after calling VhdiReadVhdInformation () is in the ecx register. Its value is 0x110098. Look at the memory at that address.
kd> db 0x110098 The command reads the memory at the specified address, displaying it in the debugger window as a sequence of bytes.
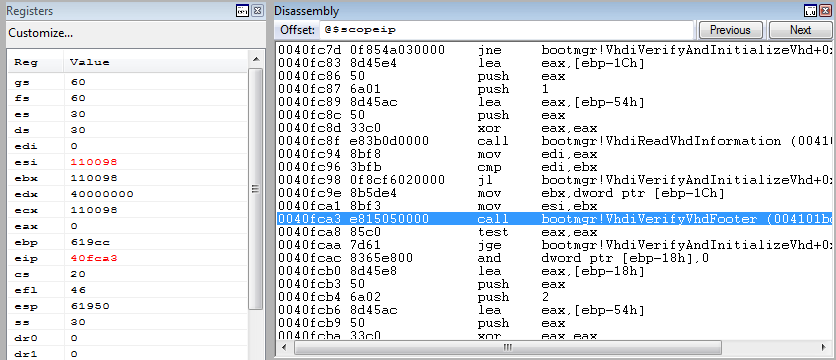
00110098 63 6f 6e 65 63 74 69 78-00 00 00 02 00 00 01 00 conectix........ 001100a8 ff ff ff ff ff ff ff ff-70 5e d3 1e 77 69 6e 20 ........p^..win 001100b8 00 06 00 01 57 69 32 6b-00 00 00 40 06 00 00 00 ....Wi2k...@.... 001100c8 00 00 00 40 06 00 00 00-cb 2c 10 3f 02 00 00 00 ...@.....,.?.... 001100d8 83 e6 ff ff 75 11 0a 5a-eb 03 c6 43 b9 c9 d6 df ....u..Z...C.... 001100e8 24 b6 76 57 00 00 00 00-00 00 00 00 00 00 00 00 $.vW............ 001100f8 00 00 00 00 00 00 00 00-00 00 00 00 00 00 00 00 ................ 00110108 00 00 00 00 00 00 00 00-00 00 00 00 00 00 00 00 ................ Yeah, we see the familiar word - conectix. This field precedes the VHD image footer, is called a cookie, and stores the memory that Microsoft bought VHD technology from Conectix, which developed this virtual disk format for older Macintosh computers. This is undoubtedly VHD footer, we can see here the signature of the operating system it was created (Wi2k) as well as the win sequence indicates that the VHD was created using Windows tools. Yes, it was so. Passing a little further, we come across a call VhdiVerifyVhdFooter () checking the format of the footer. As a parameter, it receives a pointer to the structure described above, for some reason through the esi register (???)
This piece of code interested me the most, so somewhere using IDA Pro, somewhere with my hands, I converted it to pseudocode in C
signed int __usercall VhdiVerifyVhdFooter(int footer) { signed int error_code; // Error code int cur_checksum; // Actual checksum, writed in VHD int calc_checksum; // Calculated checksum int disk_type; // Disk type int creator_host_os; // Creator host OS // Error code error_code = -1069940733; // 0xc03a0003 // Check cookie if ( RtlCompareMemory((const void *)footer, "conectix", 8) == 8 ) { // Store actual checksumm cur_checksum = *(_DWORD *)(footer + 64); // Write zero to checksum in footer structure *(_DWORD *)(footer + 64) = 0; // Calculate check summ calc_checksum = BlUtlCheckSum(0x40001, 0, footer, 0x200); // Restore checsum in footer *(_DWORD *)(footer + 64) = cur_checksum; // Checksum verify if ( calc_checksum == cur_checksum ) { // File type verify if ( *(_WORD *)(footer + 14) == 1 ) { // Check disk type disk_type = *(_DWORD *)(footer + 60); if ( disk_type == 2 || disk_type == 3 || disk_type == 4 ) { // Check creator host OS creator_host_os = *(_DWORD *)(footer + 36); if ( creator_host_os != 1798465879 && creator_host_os ) { error_code = -1073741637; // 0xc00000bb } // Check disk size (by integer sectors count) else if ( *(_DWORD *)(footer + 48) & 0x1FF || *(_DWORD *)(footer + 40) & 0x1FF ) { error_code = -1069940718; // 0xc03a0012 } else { error_code = 0; } } else { error_code = -1069940732; // 0xc03a0004 } } else { error_code = -1069940731; // 0xc03a0005 } } else { error_code = -1069940734; // 0xc03a0002 } } return error_code; } The VHD footer can be represented as the following structure (in the comments, the displacements from its beginning are indicated).
//----------------------------------------------------------------------------- // VHD foother's data //----------------------------------------------------------------------------- struct vhd_footer_t { char cookie[8]; // +0 uint32_t features; // +8 uint32_t file_format_version; // +12 uint64_t data_offset; // +16 uint32_t time_stamp; // +24 char creator_application[4]; // +28 uint32_t creator_version; // +32 char creator_host_os[4]; // +36 uint64_t original_size; // +40 uint64_t current_size; // +48 vhd_disk_geometry_t disk_geometry; // +56 uint32_t disk_type; // +60 uint32_t checksum; // +64 vhd_uuid_t unique_id; // +68 uint8_t saved_state; // +84 uint8_t reserved[427]; }; Using this data, we can conclude which fields of the footer the bootmgr checks and which errors it throws. If the VHD image is correct, this function returns zero; otherwise, the alignment is
0xc03a0003 - cookie 0xc03a0002 - 0xc03a0005 - 0xc03a0004 - 0xc00000bb - Windows 0xc0300012 - 512 ( VHD) The information I received resolved the dispute that arose with a colleague in the forum at which the method of loading Windows with VHD was discussed. I lost it, considering that the images created by VirtualBox will not be loaded using bootmgr. VirtualBox, creating such images, writes all the fields in accordance with the Microsoft specification, except the creator_application field, where it is written win in the original image and vbox in the case of virtualbox. But this field is not checked by bootmgr, so the disks work, but they did not work for me for a completely different reason, which is the subject of a completely different story ...
Conclusion
Perhaps the article is somewhat muddled. But, she says that the pots are fired not by the gods, but the debugging of the low-level Windows code is only a matter of technology. The information you are interested in can always be obtained by putting your head and hands to it. In this text, I tried to summarize the scattered information I collected on the net about debugging bootmgr. I hope that I did it, thank all the readers for their attention and ...
to be continued!
')
Source: https://habr.com/ru/post/301334/
All Articles