We control the computer from an Android device
Start
It all started with the fact that the general calls me to him and says: “You see the phone? I want a button there, I click on it, and the cinema turns on in my laptop. I press another - the music is playing. ”And I also said a lot of things, I don’t remember. “The task is clear? Do it! ”I really don't know why he had such a need. Either the stars did not stand at that angle, or a dream dreamed up. In short, you will not understand these rich ... Well, okay.
At first it was useful to rummage through Google in search of a suitable program, and then I thought - what the hell? I will write myself. Moreover, the task did not seem complicated, and the “call of the code” had already made itself felt (a sort of professional it-breaking). So I decided to connect Windows and Android on my own.
What he asked for, I did in a couple of days. But here I do not want to fence a lot of code, checks and exception handling, etc. The article is rather intended for the smallest, as a basis, based on which you can build something more ambitious. In no case do I claim to originality, obviously someone wrote something like this, I just offer my version. In general, everyone who is interested is dedicated.
What we have
It means so. On the one hand, we have an Android phone on board, on the other hand, Windows with installed programs, and we need to launch some of these programs by issuing a command from the phone.
We will connect the phone and the computer through a local network, here there are no options (well, do not send sms). Thus, we will write two programs. The first is a server running on a computer, the task of this program is to open and listen to the port. If something useful falls on this port, then perform the action we have specified. The second program is a client running on the phone, its task is to process the user's actions, connect to the server and transfer information.
')
Little about sockets
The theme of socket programming is already hackneyed, and there is nothing much to say. But still in a nutshell, for those who do not like to follow links.
A socket is a software interface that allows communication between two processes using the tcp / ip protocol. The socket is associated with two aspects: ip-address and port. Where the ip-address is the address of the host (computer) on the network, the IP protocol works with it. Port is the identifier of the application to which the connection is addressed, TCP works here. The port can be both TCP and UDP, in this article I will only use TCP. Since the ip-address is unique both on the Internet and on the local network, it uniquely identifies the sender's address and the address of the recipient. The port is unique within the operating system, it defines the application with which we want to interact. Ports can be standard, for example, 80 is assigned to HTTP, or 3389 - RDP. You can use any unused port, but the standard is better not to touch. Very well and with examples about sockets written here .
Server. Getting bullied
Run Aimp, Windows Media Player, etc. even from the phone it is not interesting, and on the basis of this article you can easily implement all this by modifying the code a little. Let's get better at it. We'll twist-twirl the monitor screen as we like or display unexpected messages (a kind of unidirectional atsky messenger), and the worst thing is to turn off the computer! True, for this they can wear a pitchfork. Well, okay, let them first get caught.
So let's get started. In Visual Studio, we create a new Windows Form application with the name, say, FunnyJoke. Open the Program.cs file and delete all the code in the body of the Main function. This code initializes the main form of the application, our server does not need any windows, it should sit quietly peacefully and wait for commands.
In the Program class, we define the following variables:
// static int port = 10000; // static IPAddress ipAddress = IPAddress.Parse("0.0.0.0"); // const byte codeMsg = 1; // const byte codeRotate = 2; // const byte codePoff = 3; I took port 10000, it is our server that will listen to it, instead of an ip address I set 0.0.0.0, which means that all available network interfaces will be processed. This is not entirely correct, but it will come down for a start. Further I defined three constants which set the codes of commands coming from the client. At the beginning of the project, do not forget to connect:
using System.Net; using System.Net.Sockets; Now, instead of the remote code, we insert the following into the Main function:
Main
static void Main() { // IPEndPoint ipEndPoint = new IPEndPoint(ipAddress, port); // Socket socket = new Socket(ipAddress.AddressFamily, SocketType.Stream, ProtocolType.Tcp); try { // socket.Bind(ipEndPoint); // "" socket.Listen(1); while (true) { // . Socket Socket handler = socket.Accept(); // , . byte[] recBytes = new byte[1024]; int nBytes = handler.Receive(recBytes); switch (recBytes[0]) // { case codeMsg: // nBytes = handler.Receive(recBytes); // if (nBytes != 0) { // String msg = Encoding.UTF8.GetString(recBytes, 0, nBytes); MessageBox.Show(msg, " !"); } break; case codeRotate: // RotateScreen(); break; case codePoff: // System.Diagnostics.Process p = new System.Diagnostics.Process(); p.StartInfo.FileName = "shutdown.exe"; p.StartInfo.Arguments = "-s -t 00"; p.Start(); socket.Close(); break; } // handler.Shutdown(SocketShutdown.Both); handler.Close(); } } catch (Exception ex) { } } The example is well commented. But still I will explain. First, create a local endpoint and associate it with our ip address and port. Then, we define the main socket, connect it to the end point, and put it into listening mode. After that we enter an infinite loop, and starting with the line:
Socket handler = socket.Accept(); our server goes to the waiting state of the connection. With a successful connection, a new instance of Socket will be created, through which we will communicate with our client. After the connection is established, we start reading the data:
int nBytes = handler.Receive(recBytes Client commands are encoded with a single-byte code (described at the beginning of the program), the server decrypts the command code and starts to execute it, then goes back to standby mode. The exception is codeMsg , since after it is expected a set of bytes containing the message string. Therefore, having received this command, the server again reads data from the socket:
nBytes = handler.Receive(recBytes); if (nBytes != 0) { String msg = Encoding.UTF8.GetString(recBytes, 0, nBytes); MessageBox.Show(msg, " !"); } The string coming from the client has the UTF-8 character encoding, so before showing it to the unfortunate user, you must bring it to a standard form.
To simplify the program, and not to create unnecessary dialogues, I used the standard class MessageBox, but this approach has one drawback. MessageBox creates a modal window that blocks the flow of the entire application. In other words, while the message window is open, our server does nothing. Minus of course, but you have to pay for simplicity.
I will not paint the procedure for changing the orientation of the screen, I executed its code as recommended by Microsoft right here . How to rotate the screen using .NET I did not find. This is easy to implement for mobile platforms, but for an ordinary PC, it was an unsolvable problem. But, the good old WINAPI came to the rescue and ruined everything.
Turn off the computer using standard Windows tools by calling the shutdown command with the appropriate flags.
With the server, perhaps, everything. I will attach the source code of the project at the end of the article.
Customer
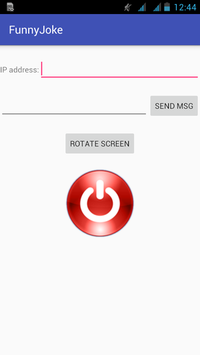
The client will write in Android Studio, because I like this IDE more than Eclipse. Lovers of the latter, I think it will not be difficult to remake the project. For debugging, I used VirtualBox with the Android virtual machine installed, because my native emulator is terribly slow, and my life is not enough to debug something with it. Well, and periodically checked on a "live" phone. So, create a project with the name FunnyJoke, set the minimum API version that your phone is able to pull off (I have 16) and select Empty Activity. Everything else is the default. Make markup submission. With the design, I didn’t really pervert, who needs to let him draw beautiful buttons, place them according to Shuya's hair dryer, etc. I made it simple: two EditText fields, the first to enter the ip address of the computer being monitored, the second for the text of the message, and the button that will make the desktop rotate. But the completion button I made a big and threatening red. This is not to accidentally click.
activity_main.xml:
<?xml version="1.0" encoding="utf-8"?> <LinearLayout android:layout_width="match_parent" android:layout_height="match_parent" xmlns:android="http://schemas.android.com/apk/res/android" android:orientation="vertical" android:weightSum="1" android:layout_marginTop="20dp"> <LinearLayout android:orientation="horizontal" android:layout_width="match_parent" android:layout_height="wrap_content" android:layout_marginBottom="20dp"> <TextView android:layout_width="wrap_content" android:layout_height="wrap_content" android:text="IP address:" android:id="@+id/textView" /> <EditText android:layout_width="match_parent" android:layout_height="wrap_content" android:id="@+id/edIPaddress" android:digits="0123456789." /> </LinearLayout> <LinearLayout android:orientation="horizontal" android:layout_width="match_parent" android:layout_height="wrap_content" android:layout_gravity="top" > <EditText android:layout_width="wrap_content" android:layout_height="wrap_content" android:id="@+id/etMsg" android:layout_gravity="center_vertical" android:layout_weight="1" /> <Button android:layout_width="wrap_content" android:layout_height="wrap_content" android:text="Send Msg" android:layout_weight="0" android:id="@+id/btnSMsg" android:layout_gravity="center_vertical" android:onClick="onClick" /> </LinearLayout> <Button android:layout_width="wrap_content" android:layout_height="wrap_content" android:text="Rotate Screen" android:id="@+id/btnRotate" android:layout_weight="0" android:layout_gravity="center_horizontal" android:layout_marginBottom="20dp" android:layout_marginTop="20dp" android:onClick="onClick" /> <ImageButton android:layout_width="wrap_content" android:layout_height="wrap_content" android:id="@+id/btnPowerOff" android:layout_gravity="center" android:src="@drawable/button_img" android:background="@null" android:onClick="onClick" /> </LinearLayout> Here you should pay attention to the edIPaddress field, there is filtering on input of only numbers and. (dot), since the field is intended to enter the ip address. I must say that this is the only check for the correctness of the entered data, everything else remains on the user's conscience. I also want to say about the btnPowerOff button , its state is monitored by the selector, and depending on whether it is pressed or not, the image is changed (otherwise, it is not clear if the button is pressed, the button will look like a static picture). Here is the button_img.xml selector code:
<?xml version="1.0" encoding="utf-8"?> <selector xmlns:android="http://schemas.android.com/apk/res/android"> <item android:state_pressed="true" android:drawable="@drawable/poweroffs"/> <item android:drawable="@drawable/poweroff"/> </selector> Accordingly, the resources should have two pictures, one for the pressed state, the other for the usual one. You’ll get this screen:
With this markup finish. Go to the file MainActivity.java. First of all, just as in the server, we define the command codes and some variables:
String serIpAddress; // int port = 10000; // String msg; // final byte codeMsg = 1; // final byte codeRotate = 2; // final byte codePoff = 3; // byte codeCommand; Next, go to the button click handler. Note that the handler is one, and which button was pressed is determined by the identifier. First of all, we get a string from the edIPaddress field, if the field is not filled, then we output a message about the need to enter an ip address, and do nothing else.
public void onClick (View v) { // ip EditText etIPaddress = (EditText)findViewById(R.id.edIPaddress); serIpAddress = etIPaddress.getText().toString(); // , if (serIpAddress.isEmpty()){ Toast msgToast = Toast.makeText(this, " ip ", Toast.LENGTH_SHORT); msgToast.show(); return; } . . . . } In Android, it is not recommended to create long-playing processes in the main thread, this is due to the fact that a program may “hang” and the user or the system can simply close the application without waiting for an answer. Such long-playing processes include work with the network. In this case, it is necessary to create an additional stream in which to execute the “long” code. In java, there is a standard class Thread , which allows you to control threads but, we will not use it, because in Android, there is a special class AsyncTask . Details can be read here or here.
We create a class that will be engaged in sending a message, its parent is doing AsyncTask , and override the doInBackground method in the body of which the main code will be located:
SenderThread
class SenderThread extends AsyncTask <Void, Void, Void> { @Override protected Void doInBackground(Void... params) { try { // ip InetAddress ipAddress = InetAddress.getByName(serIpAddress); // Socket socket = new Socket(ipAddress, port); // / OutputStream outputStream = socket.getOutputStream(); DataOutputStream out = new DataOutputStream(outputStream); switch (codeCommand) { // case codeMsg: // out.write(codeMsg); // UTF-8 byte[] outMsg = msg.getBytes("UTF8"); out.write(outMsg); break; case codeRotate: // out.write(codeRotate); break; case codePoff: // out.write(codePoff); break; } } catch (Exception ex) { ex.printStackTrace(); } return null; } } First, create an instance of the class InetAddress , which will contain the server ip. Then we create a socket, associate it with a remote address and port, and request the standard input / output stream (or rather, only the output, because our client does not receive anything). And finally, depending on the value of the codeCommand variable, we send a message to the server.
Now, let's go back to our button click handler, create an instance of the SenderThread class, then, depending on which button was clicked, initialize the codeCommand variable, according to which our thread will determine what we want from it. Finally, activate it by calling the execute () method.
. . . SenderThread sender = new SenderThread(); // switch (v.getId()) // id { case R.id.btnSMsg: // if (!msg.isEmpty()) { codeCommand = codeMsg; sender.execute(); } else { // , Toast msgToast = Toast.makeText(this, " ", Toast.LENGTH_SHORT); msgToast.show(); } break; case R.id.btnRotate: // codeCommand = codeRotate; sender.execute(); break; case R.id.btnPowerOff: // codeCommand = codePoff; sender.execute(); break; } } Let's slightly fix the application manifest, give permission to use the network and wi-fi, without this, nothing will work:
<uses-permission android:name="android.permission.INTERNET" /> <uses-permission android:name="android.permission.ACCESS_NETWORK_STATE" /> <uses-permission android:name="android.permission.ACCESS_WIFI_STATE" /> Everything! You can collect and check. Here is the result:

Links
Source: https://habr.com/ru/post/301190/
All Articles