Work with ListView in Xamarin.Android
Recently, I had the idea to collect all the basic most frequently used features for ListView in Android and for convenience to combine them into one project. As usual, I went to the Internet and found there a wonderful article and its translations in Habré ( translation 1 , translation 2 ). Not everything, in my opinion, was necessary and useful in this article, so I included in the final project only what seemed to me significant. I hope in the future it will be useful to someone else.
By the way, I’m Xamarin developer, so the project (and samples, respectively) will be written in C # for Xamarin.Android.
So let's get started:
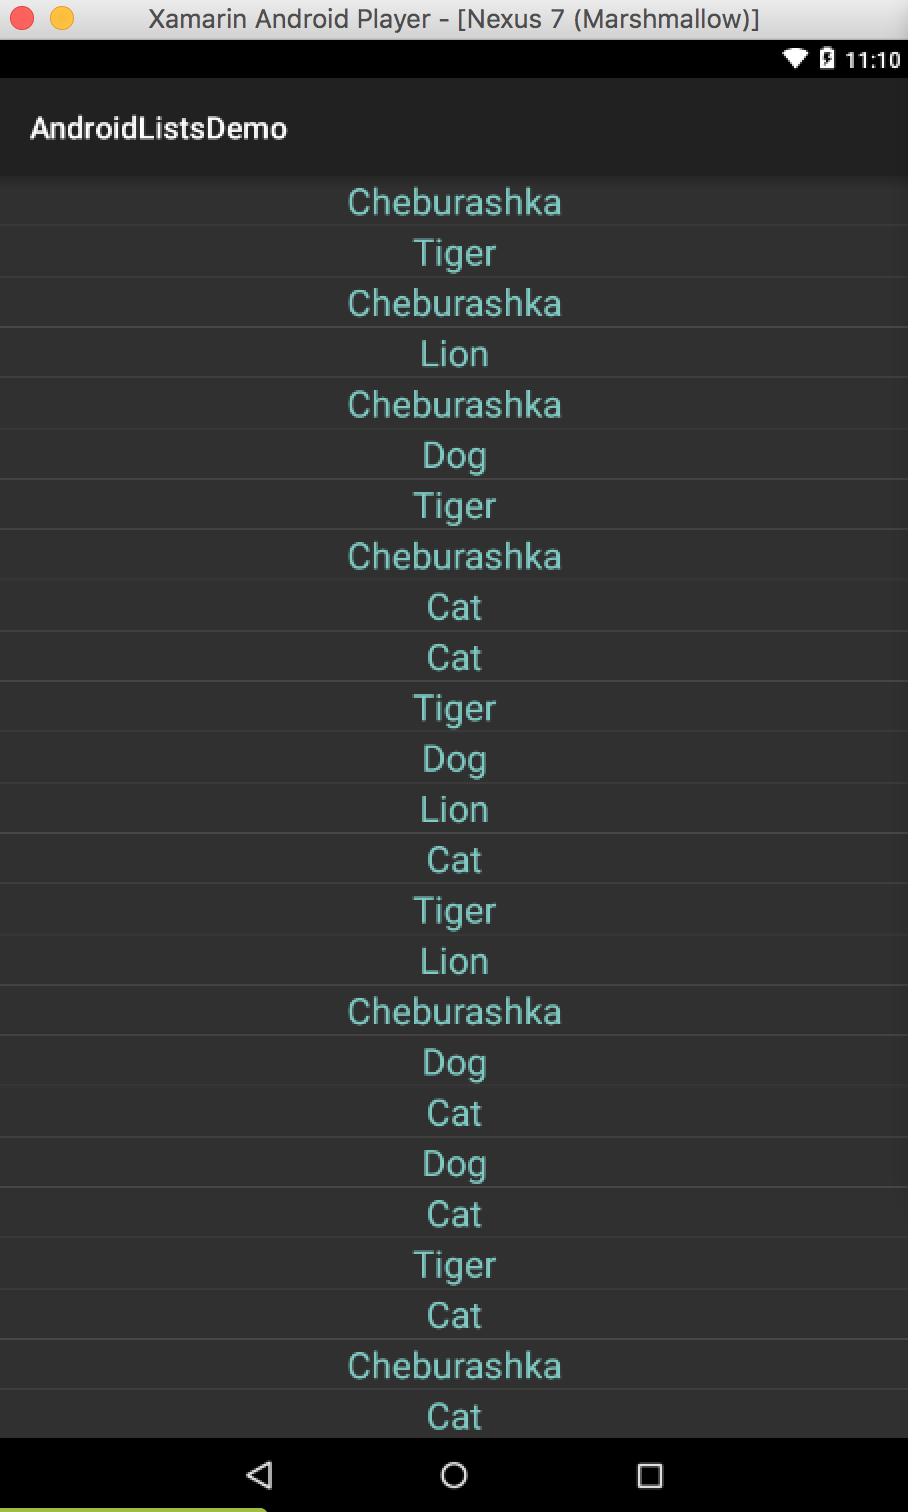
As you know, ListView in Android is an item that provides data in the form of a list, where each item is represented by its View. Adapters are used to control the display of cells. In order to fill the ListView data in the most modest form, you can use the ArrayAdapter. This is done in two lines:
')
As you can see, the result is appropriate - fast, cheap and not very nice, but we'll return to this.

The user often needs to somehow communicate with the displayed list — select items, view detailed information, etc. To handle cell selection in Xamarin.Android, you just need to subscribe to the ItemClick event on the ListView. To delete the selected item, use the following code:
There is a possibility that the user will see a list without elements. In order for it not to get lost and to close the application, it is best to use an EmptyView. It should be declared in the layout Activity and in a single line make the ListView understand that it must show this View when it has no elements:
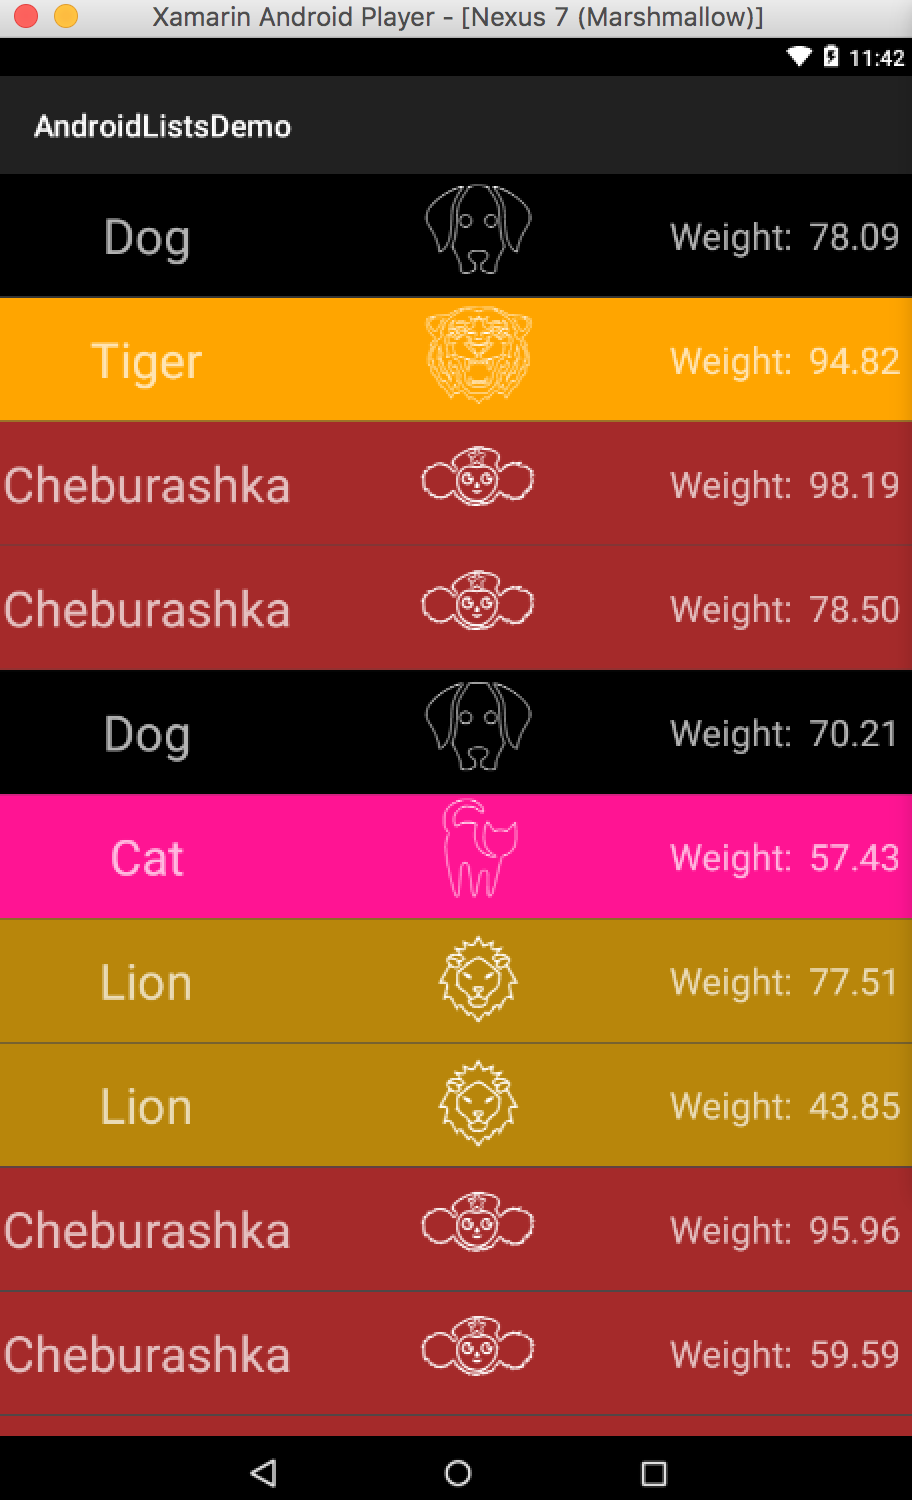
To slightly improve the appearance of our list, you can apply an overload of the ArrayAdapter constructor and pass the layout to it, which will be used to display the list item. You also need to pass an Id of the text field, where the string analogue of the object will be displayed:
Now our list looks a little better:
To further update the appearance, we will create our own adapter, in which we will override the GetView method and will manage the appearance of the cells ourselves. The adapter implementation is the most basic, so posting all the code here is unnecessary. If you want to see the changes, uncomment the code in the TODO5 region. Also, some old code will require modification - the GetItem method can only return an object of type Java.Lang.Object. Since wrapping each item in the list in Java.Lang.Object is an excessive luxury, let's create our own GetRawItem method that will return the desired type. Now as to the modification, in order for the project to compile, when deleting a cell, you need to replace the GetItem call with GetRawItem.
Here we see this as a result. At the design competition is not suitable, but for the test project what you need.
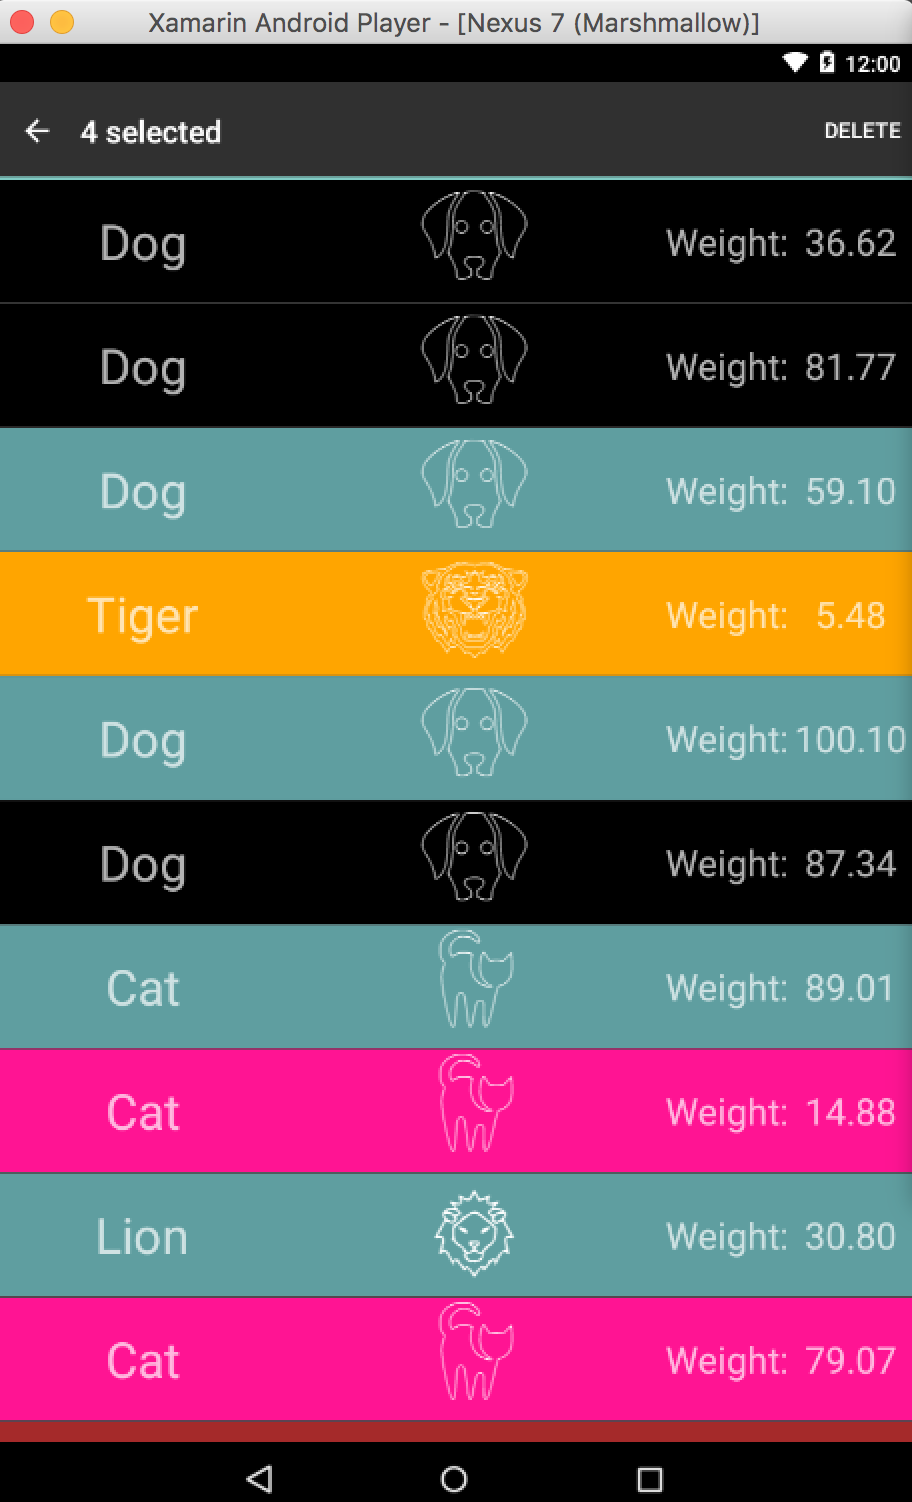
Our next step is to add the CAB functionality to our ListView. For reference, a description and detailed implementation guide can be found here . In order to add a CAB, firstly you need a menu that will appear with a custom long tap. Menu file:
Secondly, you need to implement the ActionMode.ICallback interface in the Activity as follows:
Thirdly, in the method of processing a user click you need to take into account that the user can be located in ActionMode:
Fourth, methods should be added to the adapter that will be responsible for selecting the element:
Then we get the desired result:
To make the ListView show its elements faster, we implement the ViewHolder pattern . To do this, create a ViewHolder class that inherits the base Java.Lang.Object (this is necessary in order to assign the ViewHolder property to view.Tag). People in the know say that ListView with ViewHolder is 15% faster. On my simulator, the speed from 1-3ms jumped to 0-1ms for one View. Of course, this depends on how often the FindViewByID is called. Now, actually, let's see how our GetView method has changed:
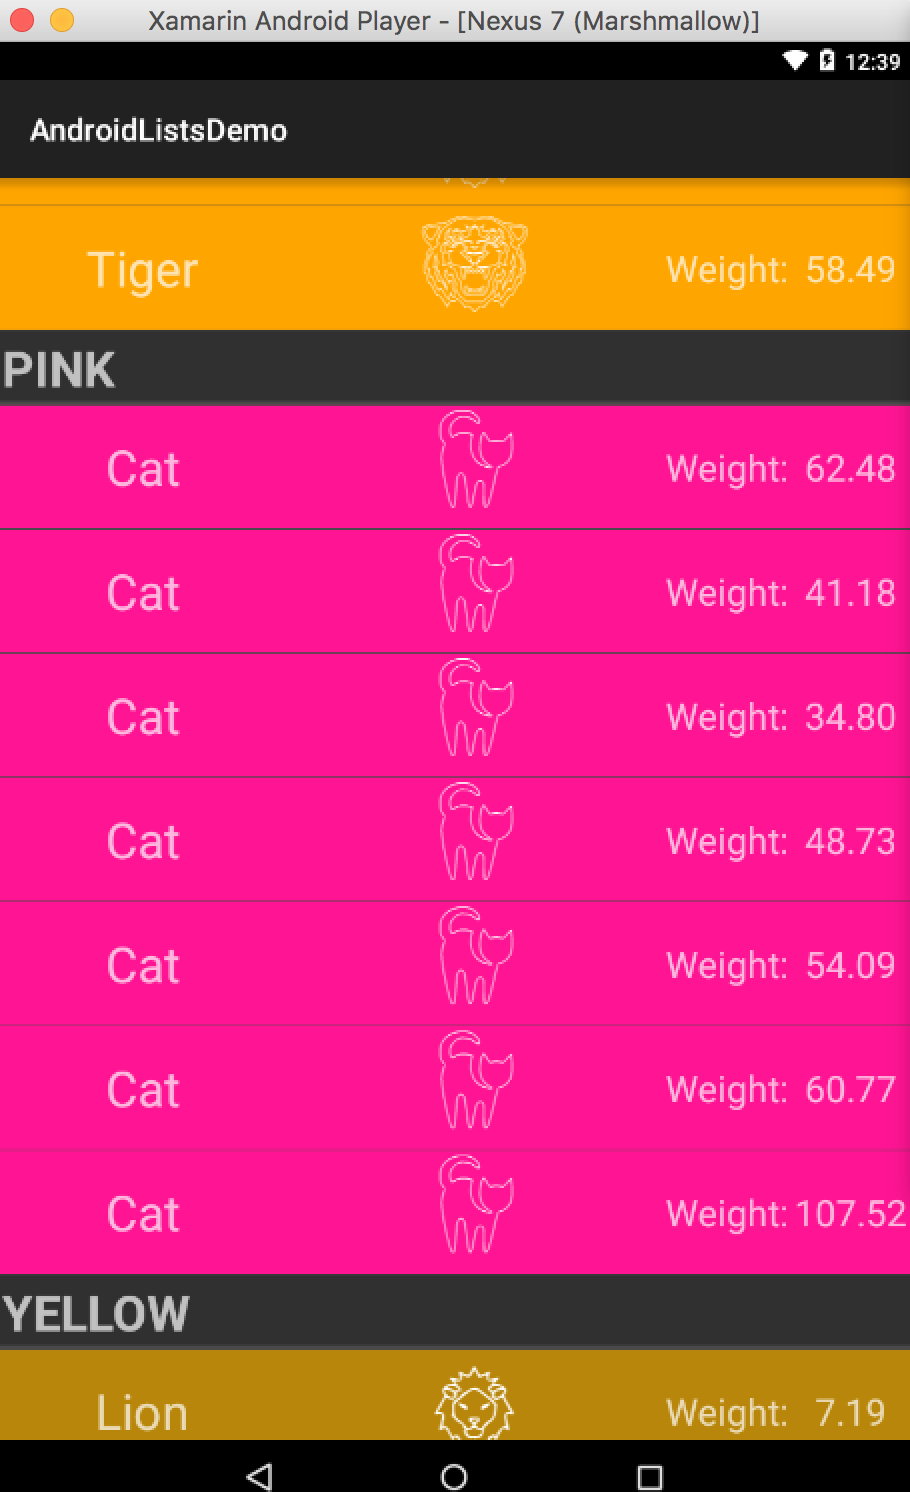
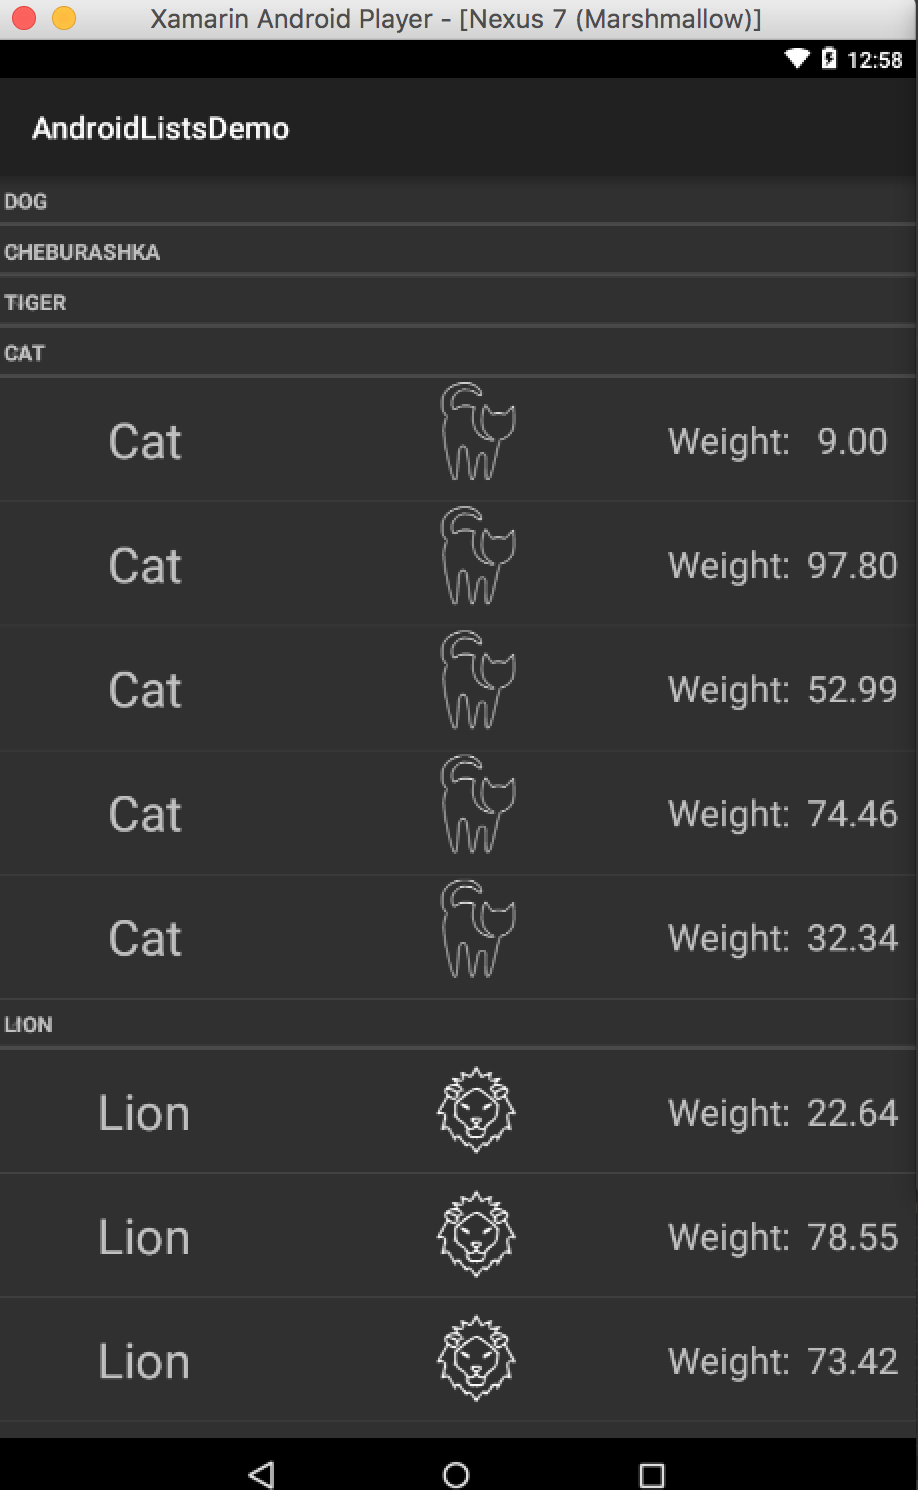
In order for our animals to look more consistent, you should divide them into groups according to colors. To do this, create a new adapter SectionAnimalAdapter, which will inherit AnimalAdapter. The main difference of this adapter is that it stores objects as a dictionary Dictionary <string, List> and each time it deletes an element, calls the BuildSections method to re-create the Dictionary. Also add a new Viewtype - header and layout for it. The code can be viewed in the file .
Now our list will look like this:
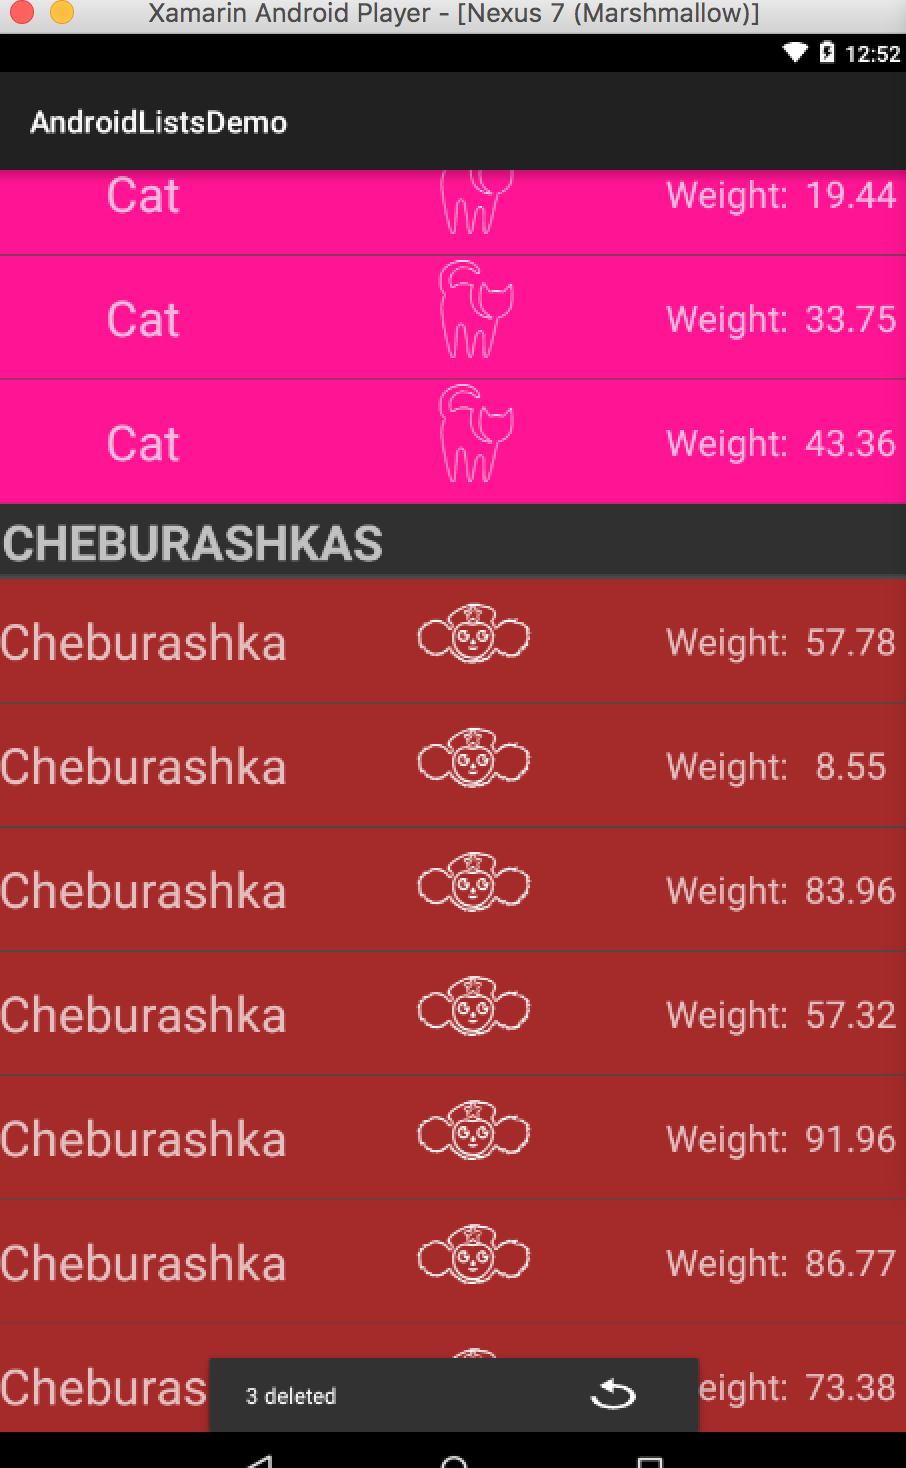
Very often, users have a desire to cancel the last action, especially when it comes to deleting. We implement this functionality using Snackbar . After deletion, we will show the user Snackbar with a proposal to cancel the last action. Of course, this will require small manipulations in the adapter - you should create an additional list where the last state will be stored, to which the user can roll back, and the Rollback method:
If necessary, you can implement drop-down lists. For a list to be a drop-down list, it must be of type ExpandableListView, and its adapter must inherit the type BaseExpandableListAdapter. Its main difference from the usual adapter is two methods for the group and for the child element:
To implement a list that will support drag'n'drop, you need to create a new class that will inherit the ListView class. The original example is taken from this video . In a nutshell, with a long-tap user per cell, a snapshot of her is created, which moves to the next of the user's finger. When the finger reaches the next cell, the objects in the adapter are swapped and redrawn. DynamicListView code here .
In order to start the application with the drag'n'drop list, you should set the starting SecondaryActivity. Uncomment the line MainLauncher = true.
That's all I wanted to tell about ListView for Android. But perhaps the project still lacks some important features? I would be glad to hear in the comments what features your ListView uses most often :)
By the way, I’m Xamarin developer, so the project (and samples, respectively) will be written in C # for Xamarin.Android.
So let's get started:
Data Filling (TODO 1)
As you know, ListView in Android is an item that provides data in the form of a list, where each item is represented by its View. Adapters are used to control the display of cells. In order to fill the ListView data in the most modest form, you can use the ArrayAdapter. This is done in two lines:
')
var animals = GetAnimals (); var adapter = new ArrayAdapter<Animal> (this, Android.Resource.Layout.SimpleListItem1, animals); As you can see, the result is appropriate - fast, cheap and not very nice, but we'll return to this.
Cell selection processing (TODO 2)
The user often needs to somehow communicate with the displayed list — select items, view detailed information, etc. To handle cell selection in Xamarin.Android, you just need to subscribe to the ItemClick event on the ListView. To delete the selected item, use the following code:
bool inDeletion = false; list.ItemClick += (sender, e) => { if (!inDeletion) { inDeletion = true; e.View.Animate () .SetDuration (500) .Alpha (0.0f) .WithEndAction (new Runnable (() => { #region TODO5 //TODO 05 var item = adapter.GetRawItem (e.Position); #endregion //var item = list.Adapter.GetItem(e.Position); adapter.Remove (item); adapter.NotifyDataSetChanged (); e.View.Alpha = 1; #region TODO9 //TODO 09 ShowSnackBar (1); #endregion inDeletion = false; })); } }; Handling an empty list (TODO 3)
There is a possibility that the user will see a list without elements. In order for it not to get lost and to close the application, it is best to use an EmptyView. It should be declared in the layout Activity and in a single line make the ListView understand that it must show this View when it has no elements:
list.EmptyView = FindViewById<TextView> (Resource.Id.empty); Change Cell Appearance (TODO 4,5)
To slightly improve the appearance of our list, you can apply an overload of the ArrayAdapter constructor and pass the layout to it, which will be used to display the list item. You also need to pass an Id of the text field, where the string analogue of the object will be displayed:
var adapter = new ArrayAdapter<Animal> (this, Resource.Layout.row_custom, Resource.Id.row_custom_text, animals); Now our list looks a little better:
To further update the appearance, we will create our own adapter, in which we will override the GetView method and will manage the appearance of the cells ourselves. The adapter implementation is the most basic, so posting all the code here is unnecessary. If you want to see the changes, uncomment the code in the TODO5 region. Also, some old code will require modification - the GetItem method can only return an object of type Java.Lang.Object. Since wrapping each item in the list in Java.Lang.Object is an excessive luxury, let's create our own GetRawItem method that will return the desired type. Now as to the modification, in order for the project to compile, when deleting a cell, you need to replace the GetItem call with GetRawItem.
Here we see this as a result. At the design competition is not suitable, but for the test project what you need.
Add Contextual Action Bar (CAB) (TODO 6)
Our next step is to add the CAB functionality to our ListView. For reference, a description and detailed implementation guide can be found here . In order to add a CAB, firstly you need a menu that will appear with a custom long tap. Menu file:
<?xml version="1.0" encoding="UTF-8" ?> <menu xmlns:android="http://schemas.android.com/apk/res/android"> <item android:id="@+id/ActionModeDeleteItem" android:title="Delete" android:showAsAction="always"/> </menu> Secondly, you need to implement the ActionMode.ICallback interface in the Activity as follows:
public bool OnActionItemClicked (ActionMode mode, IMenuItem item) { switch(item.ItemId){ case Resource.Id.ActionModeDeleteItem: SparseBooleanArray selected = _adapter.SelectedIds; List<Animal> itemList = new List<Animal> (); var keys = new List<int> (); for (int i = (selected.Size () - 1); i >= 0; i--) { //checkisvaluecheckedby user if (selected.ValueAt (i)) { keys.Add (selected.KeyAt (i)); var selectedItem = _adapter.GetRawItem (selected.KeyAt (i)); itemList.Add (selectedItem); } } _adapter.Remove (itemList); _mode.Finish(); return true; default: return false; } } public bool OnCreateActionMode (ActionMode mode, IMenu menu) { mode.MenuInflater.Inflate (Resource.Menu.menu, menu); inActionMode = true; return true; } public void OnDestroyActionMode (ActionMode mode) { _adapter.RemoveSelection (); _adapter.NotifyDataSetChanged (); _mode = null; inActionMode = false; } public bool OnPrepareActionMode (ActionMode mode, IMenu menu) { return false; } Thirdly, in the method of processing a user click you need to take into account that the user can be located in ActionMode:
if(inActionMode){ adapter.ToggleSelection(e.Position); _mode.Title=(adapter.SelectedCount.ToString()+" selected"); return; } Fourth, methods should be added to the adapter that will be responsible for selecting the element:
protected virtual void SelectView(int position, bool value){ if(value) _selectedItemsIds.Put(position,value); else _selectedItemsIds.Delete(position); NotifyDataSetChanged(); } public void ToggleSelection(int position){ SelectView(position, !_selectedItemsIds.Get(position)); } public int SelectedCount { get{ return _selectedItemsIds.Size(); } } public void RemoveSelection(){ _selectedItemsIds=new SparseBooleanArray(); NotifyDataSetChanged(); } public SparseBooleanArray SelectedIds{ get { return _selectedItemsIds; } } Then we get the desired result:
ListView Performance (TODO 7)
To make the ListView show its elements faster, we implement the ViewHolder pattern . To do this, create a ViewHolder class that inherits the base Java.Lang.Object (this is necessary in order to assign the ViewHolder property to view.Tag). People in the know say that ListView with ViewHolder is 15% faster. On my simulator, the speed from 1-3ms jumped to 0-1ms for one View. Of course, this depends on how often the FindViewByID is called. Now, actually, let's see how our GetView method has changed:
public override View GetView(int position, View convertView, ViewGroup parent) { var item = this [position]; var view = convertView; if (view == null) { view = LayoutInflater.From (parent.Context).Inflate (Resource.Layout.row_custom_adapter, parent, false); var viewHolder = new ViewHolder (); viewHolder.Text = view.FindViewById<TextView> (Resource.Id.row_custom_name); viewHolder.Weight = view.FindViewById<TextView> (Resource.Id.row_custom_weight); viewHolder.Icon = view.FindViewById<ImageView> (Resource.Id.row_custom_icon); view.Tag = viewHolder; } var holder = (ViewHolder)view.Tag; holder.Text.Text = item.Name; holder.Weight.Text = item.Weight.ToString ("F"); if (_selectedItemsIds.Size () > 0 && _selectedItemsIds.Get (position)) { view.SetBackgroundColor (Android.Graphics.Color.CadetBlue); } else { view.Background = GetBackground (item.Color); } holder.Icon.SetImageResource (GetImage (item.Name)); return view; } Adding Sections (TODO 8)
In order for our animals to look more consistent, you should divide them into groups according to colors. To do this, create a new adapter SectionAnimalAdapter, which will inherit AnimalAdapter. The main difference of this adapter is that it stores objects as a dictionary Dictionary <string, List> and each time it deletes an element, calls the BuildSections method to re-create the Dictionary. Also add a new Viewtype - header and layout for it. The code can be viewed in the file .
Now our list will look like this:
Undo last action (TODO 9)
Very often, users have a desire to cancel the last action, especially when it comes to deleting. We implement this functionality using Snackbar . After deletion, we will show the user Snackbar with a proposal to cancel the last action. Of course, this will require small manipulations in the adapter - you should create an additional list where the last state will be stored, to which the user can roll back, and the Rollback method:
public virtual void RollBack () { _animals = _rollbackAnimals; _rollbackAnimals = null; } Drop-down Lists (TODO 10)
If necessary, you can implement drop-down lists. For a list to be a drop-down list, it must be of type ExpandableListView, and its adapter must inherit the type BaseExpandableListAdapter. Its main difference from the usual adapter is two methods for the group and for the child element:
public override View GetGroupView (int position, bool isExpandable, View convertView, ViewGroup parent) { GroupViewHolder holder = null; var view = convertView; if (view != null) holder = view.Tag as GroupViewHolder; if (holder == null) { view = LayoutInflater.From (parent.Context).Inflate (Resource.Layout.row_expandable_header, null); holder = new GroupViewHolder (); holder.Text = view as CheckedTextView; } var sect = _sections.Keys.ToList () [position]; var name = _sections [sect].First ().Name; holder.Text.Text = name; holder.Text.Checked = isExpandable; return view; } public override View GetChildView (int groupPosition, int childPosition, bool isLastChild, View convertView, ViewGroup parent) { var view = convertView; var sect = _sections.Keys.ToList () [groupPosition]; var item = _sections [sect] [childPosition]; if (view == null) { view = LayoutInflater.From (parent.Context).Inflate (Resource.Layout.row_custom_adapter, parent, false); var viewHolder = new ChildViewHolder (); viewHolder.Text = view.FindViewById<TextView> (Resource.Id.row_custom_name); viewHolder.Weight = view.FindViewById<TextView> (Resource.Id.row_custom_weight); viewHolder.Icon = view.FindViewById<ImageView> (Resource.Id.row_custom_icon); view.Tag = viewHolder; } var holder = (ChildViewHolder)view.Tag; holder.Text.Text = item.Name; holder.Weight.Text = item.Weight.ToString ("F"); holder.Icon.SetImageResource (GetImage (item.Name)); return view; } Drag'n'Drop lists (TODO 11)
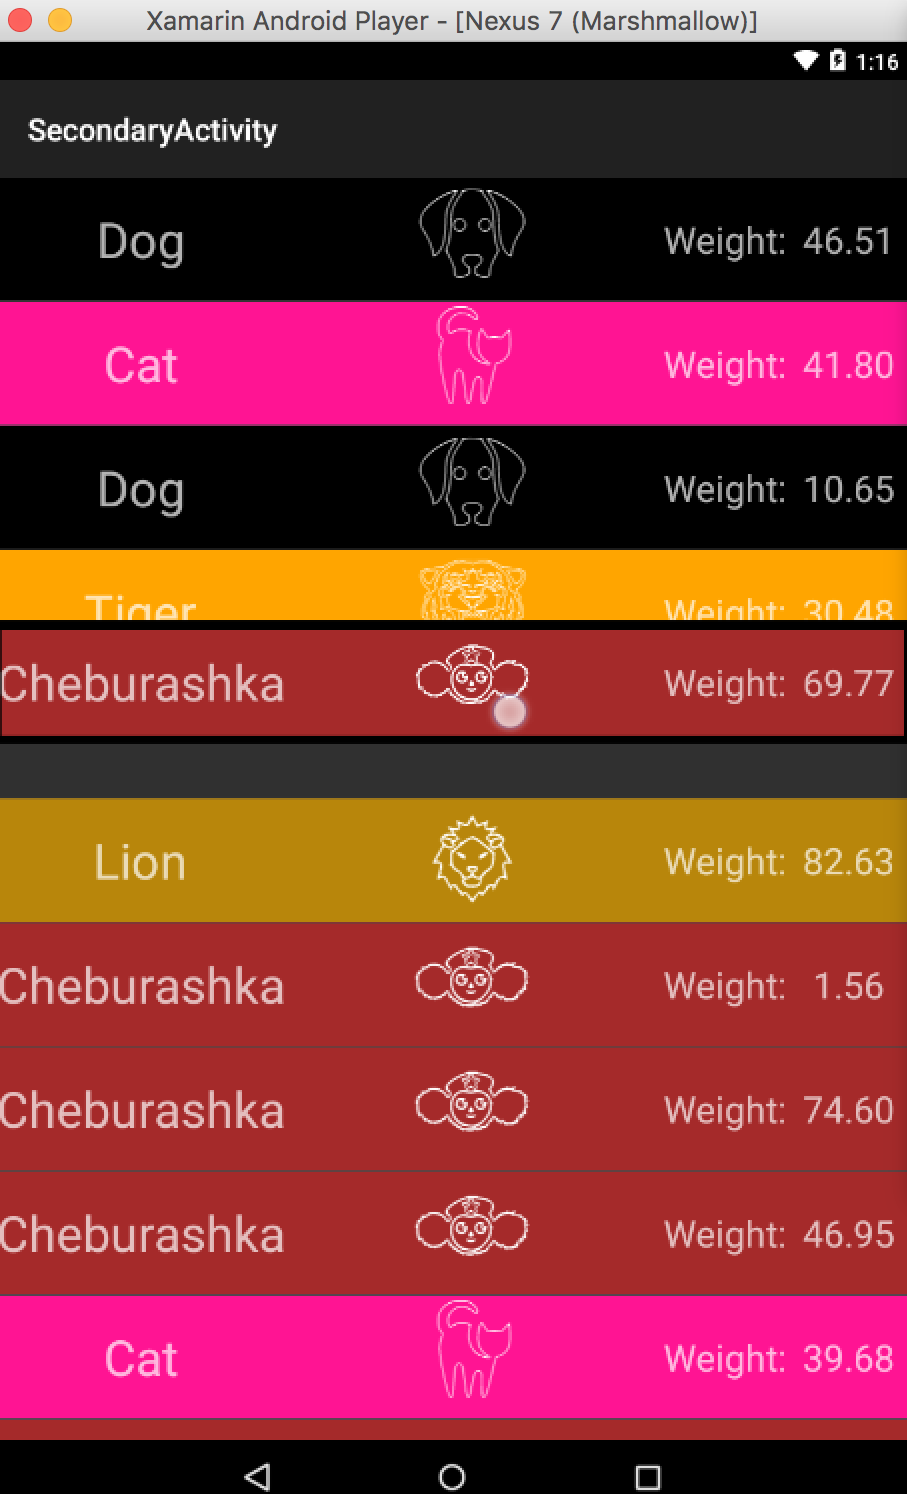
To implement a list that will support drag'n'drop, you need to create a new class that will inherit the ListView class. The original example is taken from this video . In a nutshell, with a long-tap user per cell, a snapshot of her is created, which moves to the next of the user's finger. When the finger reaches the next cell, the objects in the adapter are swapped and redrawn. DynamicListView code here .
In order to start the application with the drag'n'drop list, you should set the starting SecondaryActivity. Uncomment the line MainLauncher = true.
That's all I wanted to tell about ListView for Android. But perhaps the project still lacks some important features? I would be glad to hear in the comments what features your ListView uses most often :)
Source: https://habr.com/ru/post/301128/
All Articles