Recognize faces in the photo using Python and OpenCV
In this article I would like to dwell on the face recognition algorithms, and at the same time introduce you to the very interesting and useful OpenCV library. I am sure that this material will be useful for beginners in this field.
What we need:
• Installed Python 2.7 with NumPy and PIL libraries
• OpenCV version 2
Here is a link to the material for installing all the necessary components. Installing all the necessary is not difficult.
First, let's see how to recognize the face in the photo. First, you need to find where the person's face is located in the photo and not confuse him with the clock on the wall and the cactus on the windowsill. It would seem that a simple task for a person is not so easy for a computer. In order to find a face, we must highlight its main components, such as the nose, forehead, eyes, lips, etc. To do this, we will use templates (they are also Haar primitives) like these:
')

If the patterns correspond to specific areas in the image, we will assume that there is a human face in the image. In fact, these patterns are much more. For each of them is considered the difference between the brightness of the white and black areas. This value is compared with the standard and a decision is made whether there is a part of a human face or not.
This method is called the Viola-Jones method (also known as the Haar cascades). Let's imagine that we have in the photo not one big face, but many small ones. If we apply templates to the whole picture, we will not find any faces there, because they will be less patterns. In order to search all photos of faces of different sizes, the sliding window method is used. It is inside this window that primitives are calculated. The window slides across the image. After each passing of the image the window is enlarged to find faces of larger scale.
You can see a demonstration of the algorithm in this video:
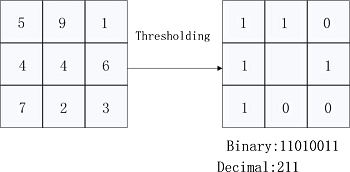
And so we found the face in the photograph, but how to determine that this face is exactly what we are looking for? To solve this problem, we will use the Local Binary Patterns algorithm. Its essence lies in the fact that we divide the image into parts and in each such part each pixel is compared with the neighboring 8 pixels. If the value of the central pixel is greater than the neighboring one, then we write 0, otherwise 1. And so for each pixel we get a certain number. Further, on the basis of these numbers for all parts into which we have divided the photo, a histogram is considered. All histograms from all parts are combined into one vector characterizing the image as a whole. If we want to find out how similar the two faces are, we will have to calculate such a vector for each of them and compare them. The figures below will help to better understand the essence of the algorithm:

Well, let's finally write some code. I took the code from this article as a basis.
# import cv2, os import numpy as np from PIL import Image # cascadePath = "haarcascade_frontalface_default.xml" faceCascade = cv2.CascadeClassifier(cascadePath) # recognizer = cv2.createLBPHFaceRecognizer(1,8,8,8,123) The cascadePath parameter contains the name of the file with the ready-made values for face recognition. This file can be taken from the directory with OpenCV (opencv \ build \ etc \ haarcascades \).
Next, create the CascadeClassifier object and the LBPHFaceRecognizer face recognition object. At the last dwell in more detail, more precisely, on its parameters. The first two values 1 and 8 characterize the neighborhood of a pixel. It is clear what this can be demonstrated with this picture:

That is, the first number is the radius in which we select the pixels, and the second is the number of these pixels. The more pixels in the vicinity of the point we take, the more accurate our recognition will be.
The following parameters (8.8) characterize the size of the areas into which we divide the original image with the face. The smaller it is, the more such areas will be and the better the recognition.
Finally, the last value is the confidence threshold parameter, which defines the threshold for face recognition. The less confidence, the more the algorithm is sure that the photo shows a face known to him. The threshold means that when there is little confidence, the algorithm simply considers this person as unfamiliar. In this case, the threshold is 123.
Go ahead. Let's write a function that finds the faces of people in all the photographs in a certain way and saves them.
def get_images(path): # image_paths image_paths = [os.path.join(path, f) for f in os.listdir(path) if not f.endswith('.happy')] images = [] labels = [] for image_path in image_paths: # - gray = Image.open(image_path).convert('L') image = np.array(gray, 'uint8') # , subject_number = int(os.path.split(image_path)[1].split(".")[0].replace("subject", "")) # faces = faceCascade.detectMultiScale(image, scaleFactor=1.1, minNeighbors=5, minSize=(30, 30)) # images, labels for (x, y, w, h) in faces: images.append(image[y: y + h, x: x + w]) labels.append(subject_number) # cv2.imshow("", image[y: y + h, x: x + w]) cv2.waitKey(50) return images, labels For example, I used a database of people called Yale Faces . It has 15 people with different facial expressions in each photo.

The name of each file in this database is as follows: subject01.sad. First comes the word subject, then the serial number of the person, and then the description of the photo. For example, the characteristic sad means a sad face, happy is fun, etc.
The get_images function reads every photo, except those with the ending .happy and highlights the area where the face is located. We will use photos with a cheerful expression on the next step for recognition, this will be a control sample, i.e. Those photos on which we will check the quality of recognition.
Also from each file name is extracted the number of the person in the photo and the list of labels is saved. Each photo will eventually be assigned this number.
The faceCascade.detectMultiScale () function defines areas in a photo where there are human
faces. It returns a list with parameters [x, y, w, h] for each face found. These
Parameters describe a rectangular area in the place where the face was found.
Now let's look at the function parameters:
image - the original image
scaleFactor - determines how much the sliding search window will increase at each iteration. 1.1 means 10%, 1.05 5%, etc. The higher the value, the faster the algorithm.
minNeighbors - The more this value is, the more paranoid the search will be and the more often it will skip real persons, considering that this is a false positive. The optimal value is 3-6.
minSize - the minimum size of the face in the photo. 30 to 30 is usually quite enough.
Well, now we can create a set of faces and their corresponding tags. Let's teach the program to recognize these faces.
# path = './yalefaces' # images, labels = get_images(path) cv2.destroyAllWindows() # recognizer.train(images, np.array(labels)) Specify the path to our photos, we get a list with photos and tags. And then we run our workout function using the LBP algorithm. There is nothing supernatural in it, just pass it the values obtained after running the get_images () function. The program will do the rest.
And so we have a trained “recognizer” and there is a set of happy faces. Now we need to ask the algorithm to recognize these happy faces.
# image_paths = [os.path.join(path, f) for f in os.listdir(path) if f.endswith('.happy')] for image_path in image_paths: # gray = Image.open(image_path).convert('L') image = np.array(gray, 'uint8') faces = faceCascade.detectMultiScale(image, scaleFactor=1.1, minNeighbors=5, minSize=(30, 30)) for (x, y, w, h) in faces: # , # recognizer.predict confidence, # , , , number_predicted, conf = recognizer.predict(image[y: y + h, x: x + w]) # , number_actual = int(os.path.split(image_path)[1].split(".")[0].replace("subject", "")) if number_actual == number_predicted: print "{} is Correctly Recognized with confidence {}".format(number_actual, conf) else: print "{} is Incorrect Recognized as {}".format(number_actual, number_predicted) cv2.imshow("Recognizing Face", image[y: y + h, x: x + w]) cv2.waitKey(1000) In the cycle, we again determine the location of the face on each photo with the ending .happy. All parameters and procedures are the same as in the previous step.
For each face found, we launch the function recognizer.predict (), which returns the subject's identifier number, which is supposedly in the photo, as well as the confidence parameter. Next, we compare the value that the function returned to us with the real number of the subject, if they are equal, the recognition was successful.
Well, that's all, further in the console displays the recognition results for each photo from the control sample.

The source code of the program can be found here .
Source: https://habr.com/ru/post/301096/
All Articles