Urho3D: Post Effects
We continue to understand the graphics subsystem Urho3D. This time, let's talk about the effects of post-processing. The set of the engine includes many ready-made effects, and one of them (Bloom), we even used in the last article . But no engine can satisfy all the needs of any developer, so it will be useful to learn how to create your own effects. As an example, I decided to choose the effect of showing a character through the walls, which is often used in strategies and RPGs.
In simple words, the post-effect is a rectangular polygon covering the entire screen. And our task is to paint this polygon.
So, we need:
')
To get the mask of the invisible part you can:
Total we need to get and combine three textures:

The finished demo is here (OpenGL). To start, use START_DEMO.bat. The standard resources of the engine are located in the Data and CoreData folders, and all new / modified files are placed in MyData. Well, traditionally used version of the engine . And now in more detail :)
Previously, we considered renderpas as a way to specify the order of passes in materials (section “Rendering Process”). But renderpasses also perform other functions .
Standard renderpasses are in the CoreData / RenderPaths folder . The default is Forward.xml . Renderpas can be changed in different ways:
Renderpasses can be not only downloaded from files, but also dynamically changed during the operation of the application. For example, when you apply any post-effect from the Data / PostProcess folder, nothing else happens, as adding commands to the current renderpas. In other words, you can simply copy the contents of some file (or files) from Data / PostProcess to the end of some file from CoreData / RenderPaths .
https://github.com/1vanK/Urho3DHabrahabr06/blob/master/MyData/Scripts/Main.as
Here, the download of the render interface MyForward.xml (which is based on Forward.xml ) takes place, and then the full-screen anti-aliasing effect FXAA3.xml is added to it.
Renderpasos consist of rendertargets and commands.
Renderertets are, roughly speaking, textures that can be passed to commands as input, or vice versa, commands can output the result of their work to them.
https://github.com/1vanK/Urho3DHabrahabr06/blob/master/MyData/RenderPaths/MyForward.xml
Here two renderargues are declared for masks (visiblemask is the mask of the visible part of the character and fullmask is the mask of the whole character).
The name parameter defines the name of the renderarget by which it can be accessed.
The tag parameter allows you to define renderargets and commands in some group that can be dynamically turned on and off in the game using the RenderPath :: SetEnabled () and RenderPath :: ToggleEnabled () functions. Please note that all standard post effects have their own tag. Thus, you can, for example, turn on the screen blur only when you open the menu. Well, in our demo by pressing the spacebar, the scanning effect is switched.
https://github.com/1vanK/Urho3DHabrahabr06/blob/master/MyData/Scripts/Main.as
The parameter size allows you to create renderarget with a size different from the size of the viewport. In our demo, the size of the masks is identical to the size of the window (since the viewport occupies the entire game window). But here, for example, in the post-effect Bloom.xml, the size of the renderarget is 4 times smaller than the size of the viewport for performance purposes (high resolution is not required for the superimposed glow).
The format parameter defines, in fact, the format of the renderarget. The most commonly used formats are “rgb” and “rgba”, but in our case one channel is enough to store masks, so the single-channel format “a” is used. There is a nuance. In OpenGL 2, the “a” format corresponds to GL_ALPHA (which means you need to work with the alpha channel), and in OpenGL 3 - GL_R8 (you need to work with the red channel). We will come back to this when considering shaders.
Please note that renderargets do not have to be declared at the beginning of the file. They can be anywhere, even at the end of the file. It is guaranteed that all renderargets will be created before executing commands.
And immediately about the first team, which we need - clear .
https://github.com/1vanK/Urho3DHabrahabr06/blob/master/MyData/RenderPaths/MyForward.xml
Everything is simple here - renderargety is painted in black. Since on each frame the white mask of the character is drawn in a new position, then, if you forget to clear it, you will get a white loop.
If the output parameter is absent, the viewport is cleared. Sometimes you may want to intentionally omit the cleaning, for example if you need a transparent viewport background .
These are the same render passes that were mentioned in the last article .
https://github.com/1vanK/Urho3DHabrahabr06/blob/master/MyData/RenderPaths/MyForward.xml
Two passes are added here. In order for the passages to be completed, they must also be available in the technique that our character's material uses:
https://github.com/1vanK/Urho3DHabrahabr06/blob/master/MyData/Techniques/DiffNormalWallHack.xml
Let me remind you that the declaration of passes in the renderpas determines the order of these passes, and the passes in the technique determine the specific shaders to be used. In this case, this is the minimum possible Mask shader that outputs a white pixel.
By the time passes, the visiblemask and fullmask depth buffer is already filled. We do not need to write anything there, but only to use it. Therefore, in both passes, the depthwrite parameter is set to false . However, the depthtest parameter is different. If depthtest = “always”, the depth buffer is ignored, and the full character mask is drawn. If depthtest = “equal” , the depth test will be passed only when the value in the Z-buffer matches the depth of the output geometry, that is, when the same geometry is rendered again.
It is this command that displays a rectangular polygon covering the screen, designed to implement post-effects (the so-called screen quad).
https://github.com/1vanK/Urho3DHabrahabr06/blob/master/MyData/RenderPaths/MyForward.xml
Here, to draw a quad, the WallHack shader is used, and 3 textures are transferred to the input of this shader (viewport - rendered scene, fullmask - full character mask and visiblemask - mask of the visible part of the character). Do not be confused with the names of texture units (diffuse, normal and specular). You are free to transmit anything through them and use them as you like in your shaders.
The WallHack shader is very simple.
1) We get the color of the rendered scene texel (I remind you that we rendered the render scene through the texture unit diffuse) in the renderpas :
https://github.com/1vanK/Urho3DHabrahabr06/blob/master/MyData/Shaders/GLSL/WallHack.glsl
2) We get both masks:
https://github.com/1vanK/Urho3DHabrahabr06/blob/master/MyData/Shaders/GLSL/WallHack.glsl
Returning to the nuance mentioned above, we see that, depending on the version of OpenGL, we use different channels when working with a single-channel texture.
If your hardware supports OpenGL 3, then this version is used by default. For testing purposes, you can force the engine to use OpenGL 2 using the command line parameter "-gl2".
3) And finally, all three textures are combined:
https://github.com/1vanK/Urho3DHabrahabr06/blob/master/MyData/Shaders/GLSL/WallHack.glsl
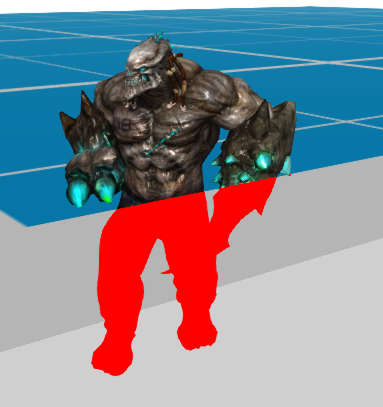
If in this place the full mask is black (that is, the fragment does not belong to the character), then we display the texel from the rendered scene. Otherwise, if the visible mask is not black (that is, the fragment belongs to the visible part of the character), then we also output the rendered scene (the visible part of the character in all its glory, with normal maps and so on). Otherwise, the third and last option remains - the fragment belongs to the invisible part of the character. Here it is, and draw in red.
Sometimes for debugging purposes, you may want to display intermediate renderargets on the screen. For this it is convenient to use the standard shader CopyFramebuffer . Just add to the end of the renderpas:
This shader expects you to transfer the desired texture in the “rgb (a)” format via the texture unit diffuse. It is not suitable for outputting our single-channel mask. Therefore, I slightly modified this shader so that it expects a “a” format texture at the input (see the ShowATexture.glsl shader). It was with his help that screenshots for the article were made.
Blur when turning the camera (Motion Blur):
Stroke in both Left 4 Dead and Dota 2 :
Dissolving objects as in Doom 3 :
Soft Particles , an improved water shader , SSAO , and more, see the official forum .
Idea
In simple words, the post-effect is a rectangular polygon covering the entire screen. And our task is to paint this polygon.
Note.
At once I will make a reservation that I did not set myself the goal to realize the effect by the most optimal method. First of all, I wanted to show how to do this using postprocessing in the simplest and most understandable way possible. But if you know a more elegant approach to implement this effect, be sure to share it in the comments :)
So, we need:
')
- Render the scene.
- Get the mask of the invisible part of the character.
- Paint the mask in any color and apply it to the render scene.
To get the mask of the invisible part you can:
- Re-render the character with the depth test turned on, using a simple shader that outputs a white pixel (we obtain in this way a black and white texture of the visible part of the character).
- Re-render the character using the same shader, but already ignoring the depth buffer (we thus obtain the black and white mask of the entire character).
- If in some place the full mask is white, and the mask of the visible part is black, then this is the desired invisible part of the character.
Total we need to get and combine three textures:
Implementation
The finished demo is here (OpenGL). To start, use START_DEMO.bat. The standard resources of the engine are located in the Data and CoreData folders, and all new / modified files are placed in MyData. Well, traditionally used version of the engine . And now in more detail :)
RenderPass Download
Previously, we considered renderpas as a way to specify the order of passes in materials (section “Rendering Process”). But renderpasses also perform other functions .
Standard renderpasses are in the CoreData / RenderPaths folder . The default is Forward.xml . Renderpas can be changed in different ways:
- Call the Renderer :: SetDefaultRenderPath () function before creating the viewport. In this case, subsequent created viewports will use the specified renderpas. This method is used in the demo.
- Specify the renderer in the engine parameters (using command line parameters when launching the application or through engineParameters_ in the program text). At the same time, the same Renderer :: SetDefaultRenderPath () function is called.
- Use the Viewport :: SetRenderPath () function after creating a viewport.
- In the editor, the renderer can be specified in the View> Editor Settings window.
Renderpasses can be not only downloaded from files, but also dynamically changed during the operation of the application. For example, when you apply any post-effect from the Data / PostProcess folder, nothing else happens, as adding commands to the current renderpas. In other words, you can simply copy the contents of some file (or files) from Data / PostProcess to the end of some file from CoreData / RenderPaths .
https://github.com/1vanK/Urho3DHabrahabr06/blob/master/MyData/Scripts/Main.as
void Start() { ... renderer.SetDefaultRenderPath(cache.GetResource("XMLFile", "RenderPaths/MyForward.xml")); Viewport@ viewport = Viewport(scene_, cameraNode.GetComponent("Camera")); viewport.renderPath.Append(cache.GetResource("XMLFile", "PostProcess/FXAA3.xml")); renderer.viewports[0] = viewport; } Here, the download of the render interface MyForward.xml (which is based on Forward.xml ) takes place, and then the full-screen anti-aliasing effect FXAA3.xml is added to it.
Renderdergety
Renderpasos consist of rendertargets and commands.
Renderertets are, roughly speaking, textures that can be passed to commands as input, or vice versa, commands can output the result of their work to them.
https://github.com/1vanK/Urho3DHabrahabr06/blob/master/MyData/RenderPaths/MyForward.xml
<renderpath> <rendertarget name="visiblemask" tag="WallHack" sizedivisor="1 1" format="a" /> <rendertarget name="fullmask" tag="WallHack" sizedivisor="1 1" format="a" /> ... </renderpath> Here two renderargues are declared for masks (visiblemask is the mask of the visible part of the character and fullmask is the mask of the whole character).
The name parameter defines the name of the renderarget by which it can be accessed.
The tag parameter allows you to define renderargets and commands in some group that can be dynamically turned on and off in the game using the RenderPath :: SetEnabled () and RenderPath :: ToggleEnabled () functions. Please note that all standard post effects have their own tag. Thus, you can, for example, turn on the screen blur only when you open the menu. Well, in our demo by pressing the spacebar, the scanning effect is switched.
https://github.com/1vanK/Urho3DHabrahabr06/blob/master/MyData/Scripts/Main.as
void HandleUpdate(StringHash eventType, VariantMap& eventData) { ... if (input.keyPress[KEY_SPACE]) renderer.viewports[0].renderPath.ToggleEnabled("WallHack"); ... } The parameter size allows you to create renderarget with a size different from the size of the viewport. In our demo, the size of the masks is identical to the size of the window (since the viewport occupies the entire game window). But here, for example, in the post-effect Bloom.xml, the size of the renderarget is 4 times smaller than the size of the viewport for performance purposes (high resolution is not required for the superimposed glow).
The format parameter defines, in fact, the format of the renderarget. The most commonly used formats are “rgb” and “rgba”, but in our case one channel is enough to store masks, so the single-channel format “a” is used. There is a nuance. In OpenGL 2, the “a” format corresponds to GL_ALPHA (which means you need to work with the alpha channel), and in OpenGL 3 - GL_R8 (you need to work with the red channel). We will come back to this when considering shaders.
Please note that renderargets do not have to be declared at the beginning of the file. They can be anywhere, even at the end of the file. It is guaranteed that all renderargets will be created before executing commands.
And immediately about the first team, which we need - clear .
https://github.com/1vanK/Urho3DHabrahabr06/blob/master/MyData/RenderPaths/MyForward.xml
<renderpath> ... <command type="clear" tag="WallHack" color="0 0 0 0" output="visiblemask" /> <command type="clear" tag="WallHack" color="0 0 0 0" output="fullmask" /> ... </renderpath> Everything is simple here - renderargety is painted in black. Since on each frame the white mask of the character is drawn in a new position, then, if you forget to clear it, you will get a white loop.
If the output parameter is absent, the viewport is cleared. Sometimes you may want to intentionally omit the cleaning, for example if you need a transparent viewport background .
Scenepass command
These are the same render passes that were mentioned in the last article .
https://github.com/1vanK/Urho3DHabrahabr06/blob/master/MyData/RenderPaths/MyForward.xml
<renderpath> ... <command type="scenepass" tag="WallHack" pass="visiblemask" output="visiblemask" /> <command type="scenepass" tag="WallHack" pass="fullmask" output="fullmask" /> ... </renderpath> Two passes are added here. In order for the passages to be completed, they must also be available in the technique that our character's material uses:
https://github.com/1vanK/Urho3DHabrahabr06/blob/master/MyData/Techniques/DiffNormalWallHack.xml
<technique ...> ... <pass name="visiblemask" vs="Mask" ps="Mask" depthwrite="false" depthtest="equal" psexcludes="PACKEDNORMAL" /> <pass name="fullmask" vs="Mask" ps="Mask" depthwrite="false" depthtest="always" psexcludes="PACKEDNORMAL" /> </technique Let me remind you that the declaration of passes in the renderpas determines the order of these passes, and the passes in the technique determine the specific shaders to be used. In this case, this is the minimum possible Mask shader that outputs a white pixel.
By the time passes, the visiblemask and fullmask depth buffer is already filled. We do not need to write anything there, but only to use it. Therefore, in both passes, the depthwrite parameter is set to false . However, the depthtest parameter is different. If depthtest = “always”, the depth buffer is ignored, and the full character mask is drawn. If depthtest = “equal” , the depth test will be passed only when the value in the Z-buffer matches the depth of the output geometry, that is, when the same geometry is rendered again.
Quad team
It is this command that displays a rectangular polygon covering the screen, designed to implement post-effects (the so-called screen quad).
https://github.com/1vanK/Urho3DHabrahabr06/blob/master/MyData/RenderPaths/MyForward.xml
<renderpath> ... <command type="quad" tag="WallHack" vs="WallHack" ps="WallHack" output="viewport"> <texture unit="diffuse" name="viewport" /> <texture unit="normal" name="fullmask" /> <texture unit="specular" name="visiblemask" /> </command> </renderpath> Here, to draw a quad, the WallHack shader is used, and 3 textures are transferred to the input of this shader (viewport - rendered scene, fullmask - full character mask and visiblemask - mask of the visible part of the character). Do not be confused with the names of texture units (diffuse, normal and specular). You are free to transmit anything through them and use them as you like in your shaders.
The WallHack shader is very simple.
1) We get the color of the rendered scene texel (I remind you that we rendered the render scene through the texture unit diffuse) in the renderpas :
https://github.com/1vanK/Urho3DHabrahabr06/blob/master/MyData/Shaders/GLSL/WallHack.glsl
void PS() { vec3 viewport = texture2D(sDiffMap, vTexCoord).rgb; ... } 2) We get both masks:
https://github.com/1vanK/Urho3DHabrahabr06/blob/master/MyData/Shaders/GLSL/WallHack.glsl
void PS() { ... #ifdef GL3 float fullmask = texture2D(sNormalMap, vTexCoord).r; float visiblemask = texture2D(sSpecMap, vTexCoord).r; #else float fullmask = texture2D(sNormalMap, vTexCoord).a; float visiblemask = texture2D(sSpecMap, vTexCoord).a; #endif ... } Returning to the nuance mentioned above, we see that, depending on the version of OpenGL, we use different channels when working with a single-channel texture.
Source / Urho3D / Graphics / OpenGL / OGLGraphics.cpp
unsigned Graphics::GetAlphaFormat() { #ifndef GL_ES_VERSION_2_0 // Alpha format is deprecated on OpenGL 3+ if (gl3Support) return GL_R8; #endif return GL_ALPHA; } If your hardware supports OpenGL 3, then this version is used by default. For testing purposes, you can force the engine to use OpenGL 2 using the command line parameter "-gl2".
3) And finally, all three textures are combined:
https://github.com/1vanK/Urho3DHabrahabr06/blob/master/MyData/Shaders/GLSL/WallHack.glsl
void PS() { ... if (fullmask == 0.0 || visiblemask > 0.0) gl_FragColor = vec4(viewport, 1.0); else gl_FragColor = vec4(1.0, 0.0, 0.0, 1.0); } If in this place the full mask is black (that is, the fragment does not belong to the character), then we display the texel from the rendered scene. Otherwise, if the visible mask is not black (that is, the fragment belongs to the visible part of the character), then we also output the rendered scene (the visible part of the character in all its glory, with normal maps and so on). Otherwise, the third and last option remains - the fragment belongs to the invisible part of the character. Here it is, and draw in red.
Output intermediate textures
Sometimes for debugging purposes, you may want to display intermediate renderargets on the screen. For this it is convenient to use the standard shader CopyFramebuffer . Just add to the end of the renderpas:
<renderpath> ... <command type="quad" vs="CopyFramebuffer" ps="CopyFramebuffer" output="viewport"> <texture unit="diffuse" name=" " /> </command> </renderpath> This shader expects you to transfer the desired texture in the “rgb (a)” format via the texture unit diffuse. It is not suitable for outputting our single-channel mask. Therefore, I slightly modified this shader so that it expects a “a” format texture at the input (see the ShowATexture.glsl shader). It was with his help that screenshots for the article were made.
<renderpath> ... <command type="quad" vs="ShowATexture" ps="ShowATexture" output="viewport"> <texture unit="diffuse" name="fullmask" /> </command> </renderpath> More examples
Blur when turning the camera (Motion Blur):
Stroke in both Left 4 Dead and Dota 2 :
Dissolving objects as in Doom 3 :
Soft Particles , an improved water shader , SSAO , and more, see the official forum .
Source: https://habr.com/ru/post/301092/
All Articles