Visualize this, or plan an Agile project using a Gantt chart.
At first glance, it may seem that Agile methodology is not one of those approaches for which planning plays a decisive role. Judge for yourself: people and the interaction between them are more important than processes and tools; a working product is more important than documentation; readiness for change, according to Agile Manifesto , is more important than following the original plan. At first glance, it looks more like a kind of creative mess than a serious and solid model of software development. But this is only at first glance. Agile approach is the best fit to the dynamism of the modern world and prefers adaptive planning to follow the original master plan. Apparently, this is why he is so flexible.
It is more convenient for all of us to perceive visual data than text. Disable the icons on the desktop of your computer and you will understand what I mean.
')
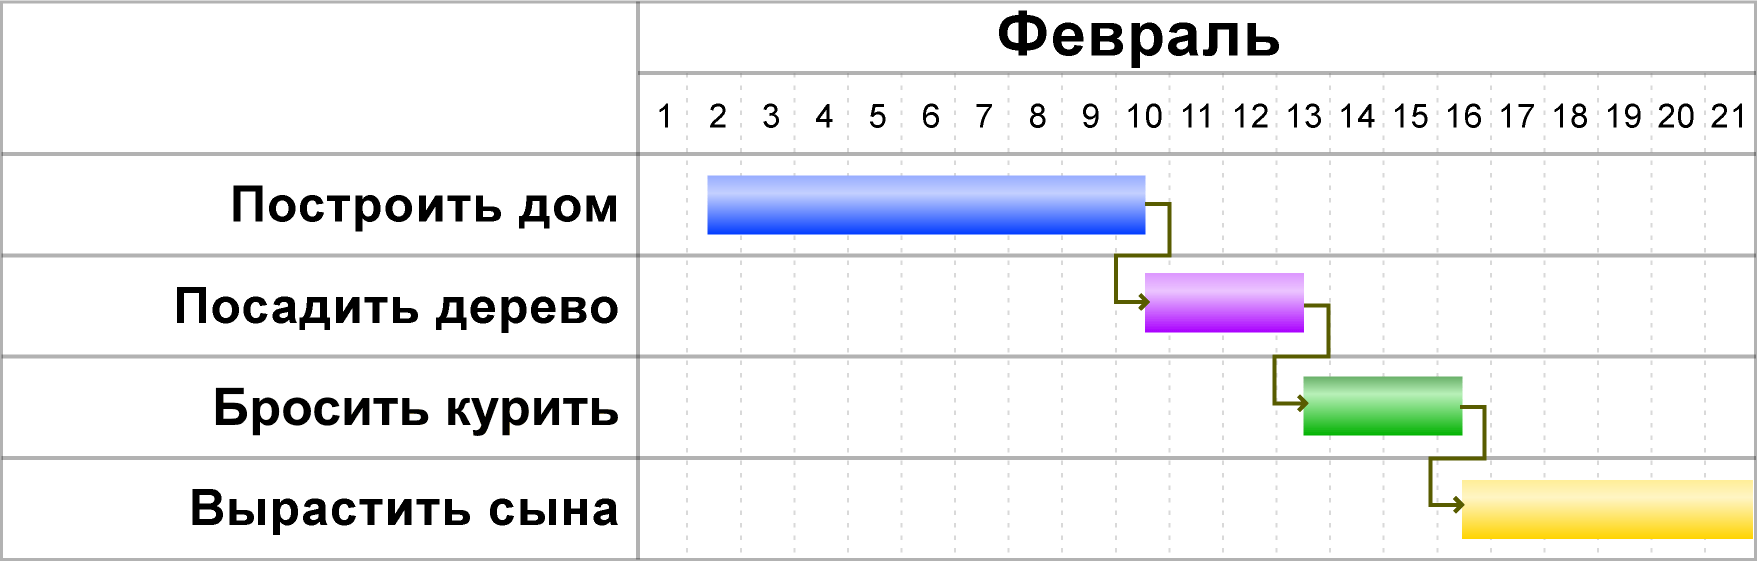
One of the most convenient and familiar ways to visualize the development process are Gantt charts . They can be useful not only for the design of the software development process. Want to plan the construction of the house? No problem! With their help, you can even visualize your favorite homemade lasagna recipe!
It looks convenient, but to answer the question of what exactly it is to use to complete the task is only half of the solution. It is also necessary to decide how to use it in the best way. And this is exactly the moment when GanttPRO appears on the horizon.
GanttPRO is an online application that is created to help you with project planning, task distribution and control over their implementation.
Key Features:
- Scheduling tasks based on ** priorities **
- Distribution of tasks between project participants
- The critical path will help you finish the work on the project faster. Use it to identify weak points.
- A set of templates will be useful if you do not know where to start. Templates are available for Software Development, Product Release, Design Development, Startup, and other tasks. Moreover, I have reliable insider information that in the near future it will be possible to create my own templates. But it is only between us.
- Scaling in the range from several hours to months will help to consider in detail individual tasks or the entire project as a whole.
- Drag-and-drop . Just because it's more convenient.
- Filter and search
And now for the sake of which we all gathered. Agile-oriented features that will help you work in a team:
- Advanced sharing system . You can share the project with the customer or with colleagues via e-mail or by sending them a link to the project. Moreover, you can set the rights to view or edit the project to work on it together
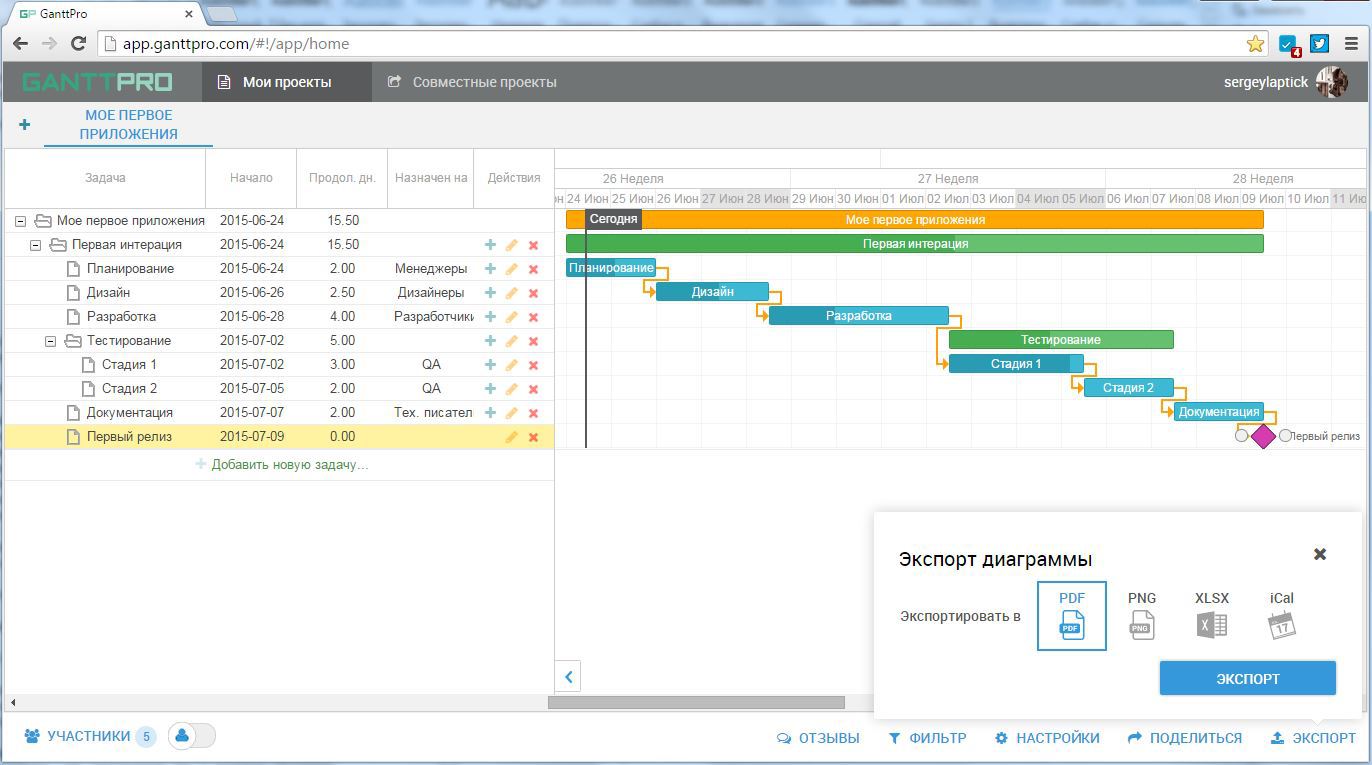
- Export project to PDF, PNG, XLSX or iCalc. The resulting file can be sent to the customer or used in the report.
- Automatic scheduling . Suddenly, a new task appeared from the customer? You can add it to the project, the application will automatically shift the task and recalculate the time it takes to complete the entire project, taking into account the new task. GanttPRO is a good helper in order to always have a common vision of the project and to plan later with the help of gantt sprints for developing low-frequency goals.
- The progress line will help keep track of what stage is the implementation. You may think that this feature is more likely to be in the main features, but the trick is that after you give someone the right to edit, you can change the current status together
If you are interested in how this is all implemented, here is a list of the technologies used :
- Webix JavaScript Library
- HTML5
- CSS3
- javascript
- Node.js
Well, now is the time to try the application at work.
GanttPRO is an online application. Thus, you do not need to download or install anything. Just open the project home page and click Start:

And here you are waiting for the first good news: all you need to get started is your e-mail address or social network account. No messing around filling out the forms!
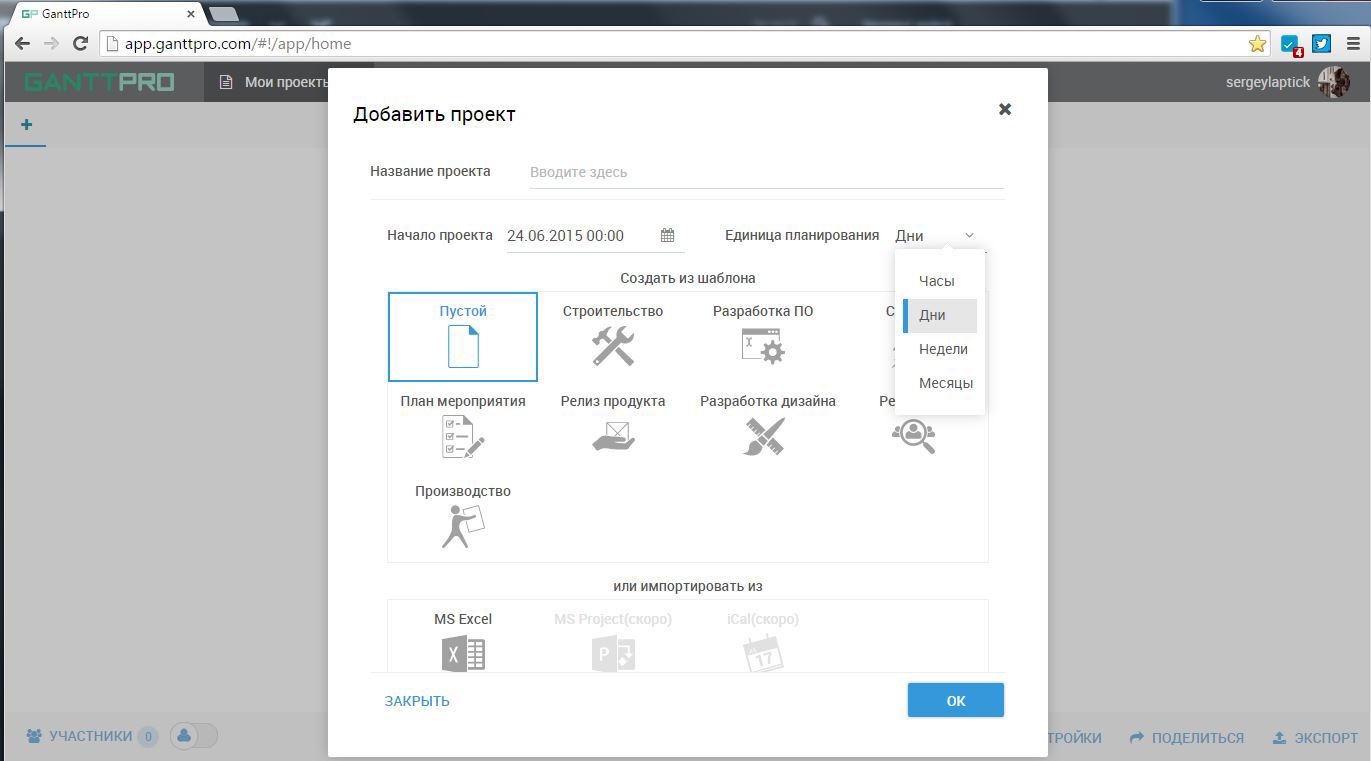
Immediately after registration, you can choose one of the available templates or create an empty project. The developers have provided the ability to manually set the project start time and planning unit (hours, days, weeks, months).
You can see what these templates are, but in order to properly understand the basics, it is better to select the “Empty” one, the planning unit is the day:
This is how it looks like by default:
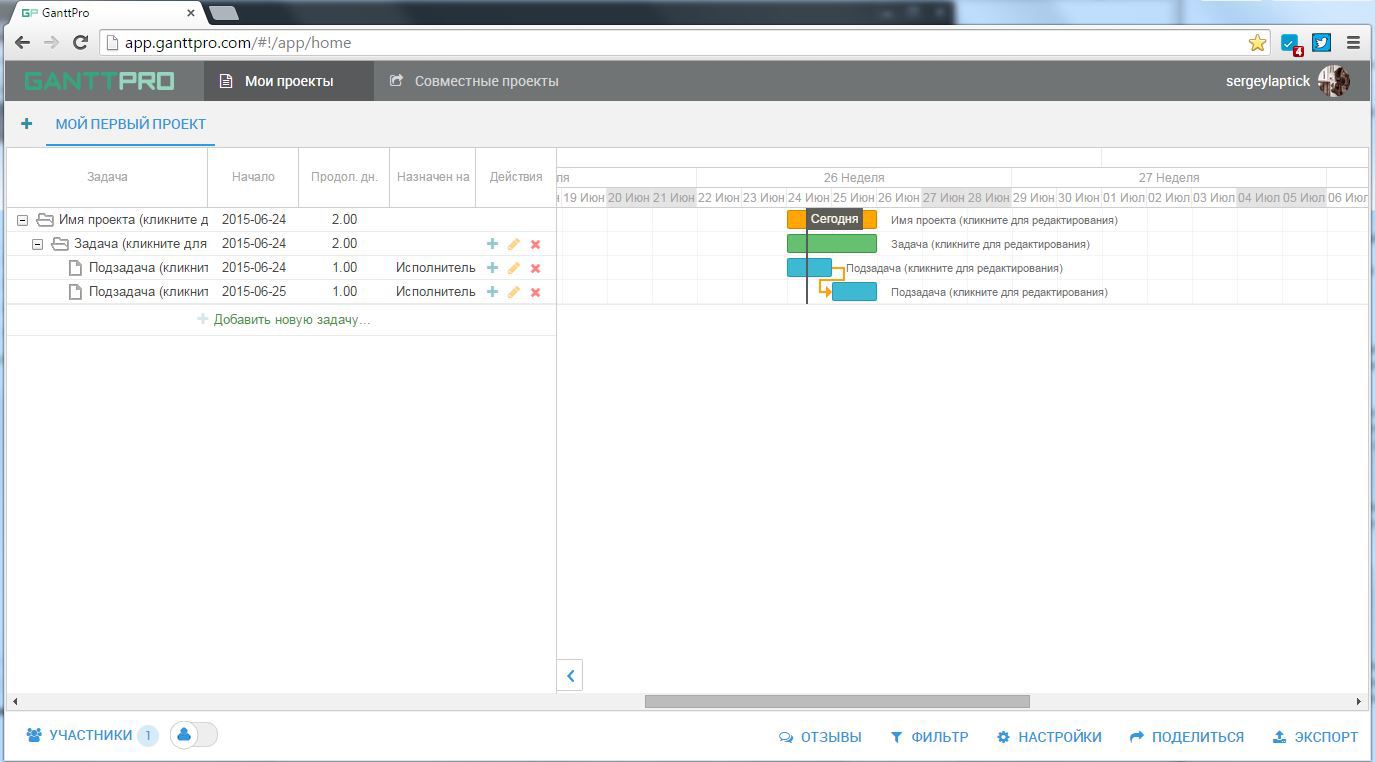
As you can see, this is not an empty empty project. Developers have added some tasks in advance. Apparently, in order to save us from the fear of a clean slate. Let's try to edit our project.
To add new members to your project, click the Members button at the bottom left. Then set the name of the new member or team:

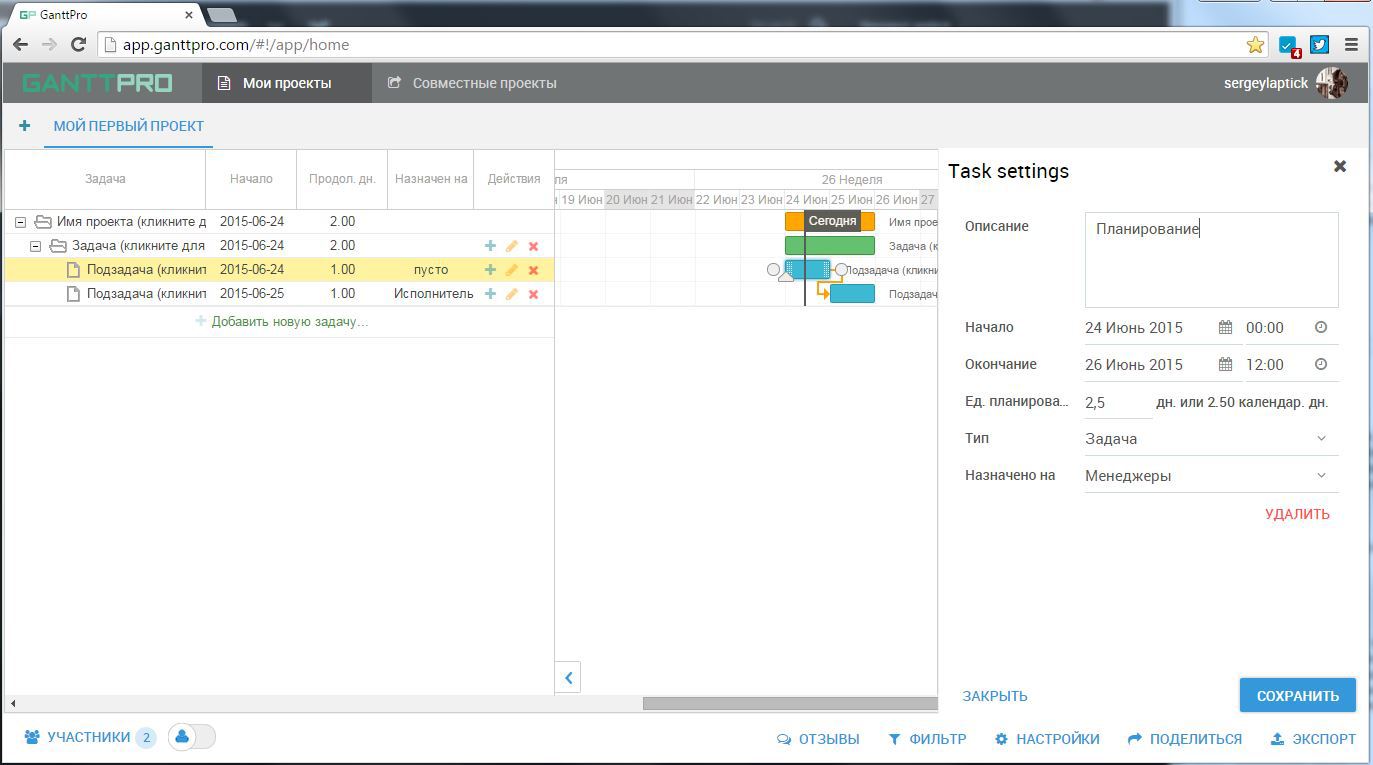
Let's deal with the Tasks now. All available fields (Task, Start, Duration, etc.) can be edited. Just click on any field whose value you want to change, and you will see how simple it is. By clicking, a text box will appear for the task name, a calendar for selecting the start date for the task, the "+" and "-" buttons for changing the duration of the task and a list of available participants for the "Assigned to" field. If you want to change more than one value at a time, use the edit button. It can be found in the column "Actions". Yes, yes, this little pencil. Let's edit the existing tasks to make our project look more like a real one:
Here is the project with the tasks assigned to certain participants:
It looks neat and clear, but, frankly, not very solid. Let's add new tasks and see how dependencies work.
You can add tasks in several ways. Using the button “Add new task ...” you can create a task that is not associated with any other tasks. You can also use the "+" button next to already existing tasks. And here we are given a choice:
What we are interested in at the moment is a new subtask. Here is how it looks by default:

And now is the time to pay attention to the small circles located on both sides of the task, as well as the triangle below, because this is where the magic of drag-and-drop and automatic scheduling begins, which is enabled by default for all new projects.
A triangle is a slider with which you can adjust the progress of a task, and circles are needed to determine the dependencies between them. You can simply drag them, connecting the end of one task with the beginning of another. Once the two tasks are connected by a link, the application recalculates the duration of the project and determines the position of the task, which is very convenient for large projects. Tasks can also be moved horizontally to determine the start date of work on them, as well as change their size to determine the duration of the task. Looks intuitive, right?
Notice how the state of the project and the parent task changed: the size and duration increased automatically after adding a new subtask.
Continuous interaction is one of the cornerstones of the Agile approach. That is why the developers have added several possible ways to collaborate on a project.
After the main tasks are defined, you can share the development plan with the customer. To do this, click the Share button, then assign the necessary rights and enter an email address. You can also get a link to view and send it to the desired recipient:
You can also export the project, for example, to PDF and send the resulting file by mail:
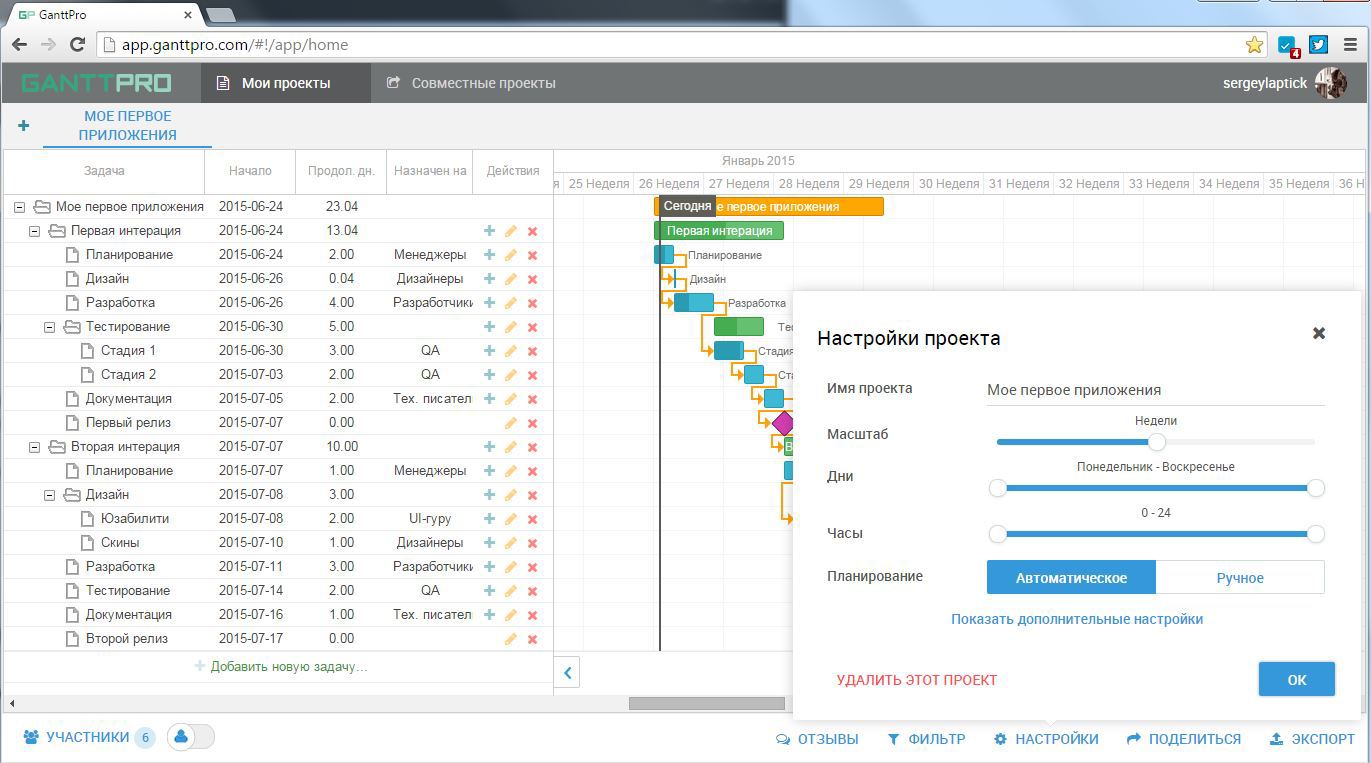
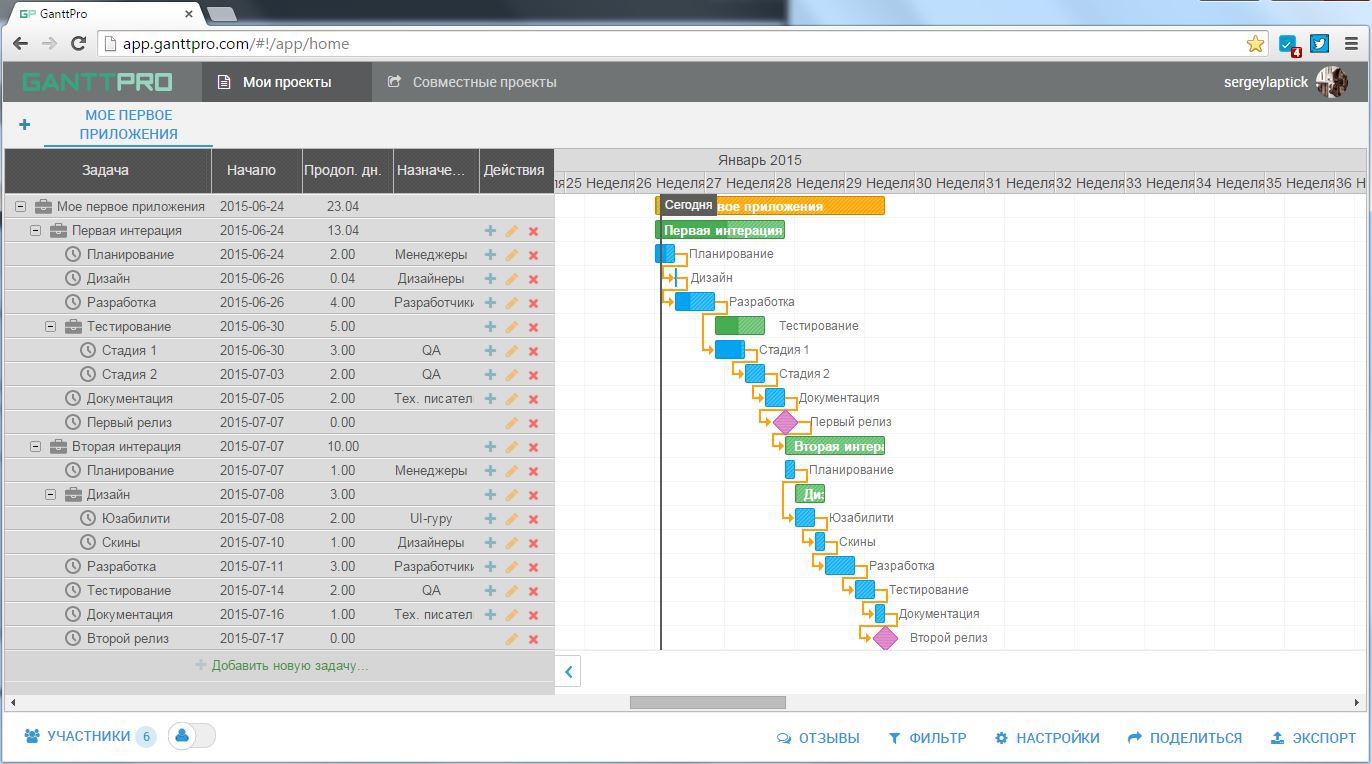
Fine. Now the customer can follow the development process and make changes as needed. It would be nice to accelerate this process. And here we will help the critical path. It shows the tasks that should be given special attention, because the time of their implementation affects the duration of the project the most. Enable the critical path can be in the "Settings" menu. Let's try:

Wow! Apparently, absolutely every task is critical for a project as small as mine. It would be necessary to return to him soon!
But seriously, the critical path can be extremely useful for complex projects with a large number of tasks and dependencies between them.
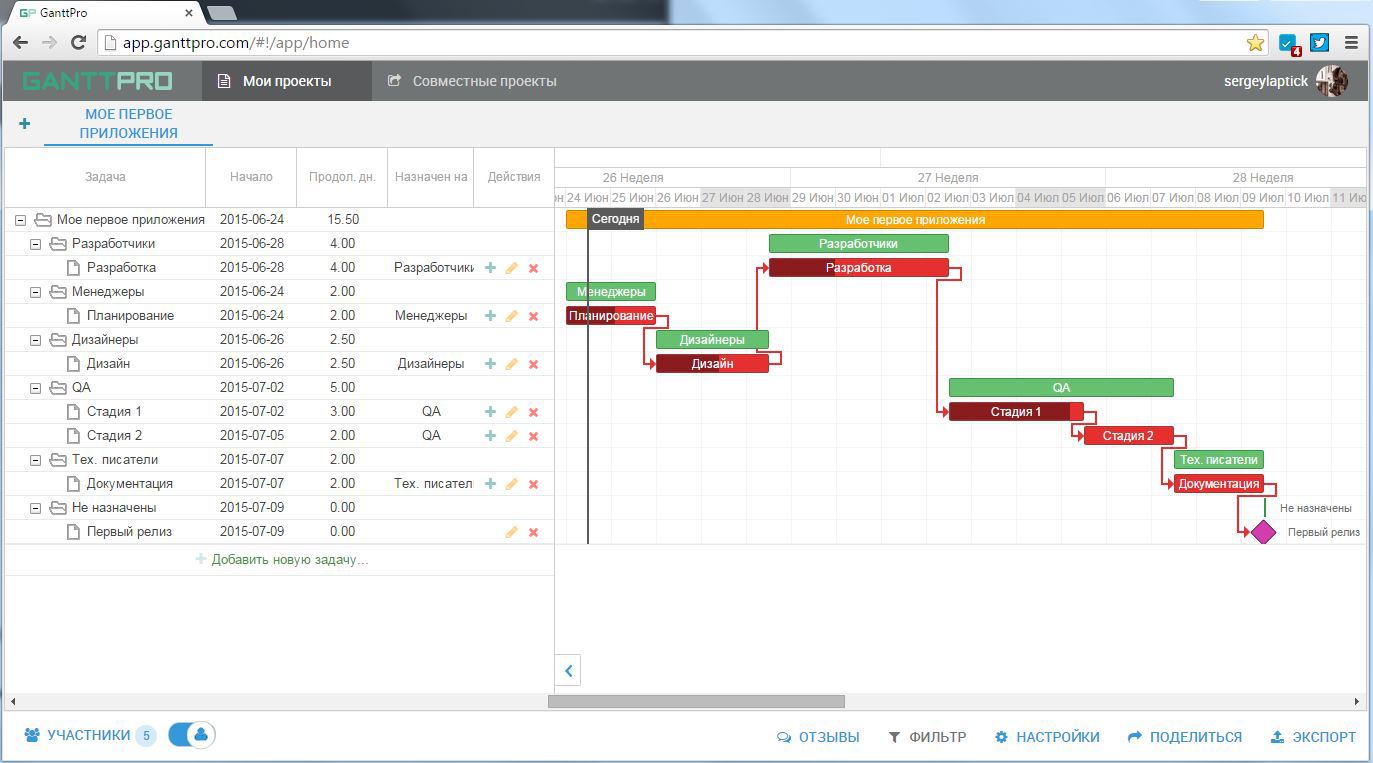
You can use the Critical Path along with the ability to group. You may have already noticed a small button to the right of the Participants button. It includes grouping by the teams involved and will help you determine which of them has a greater number of critical tasks.
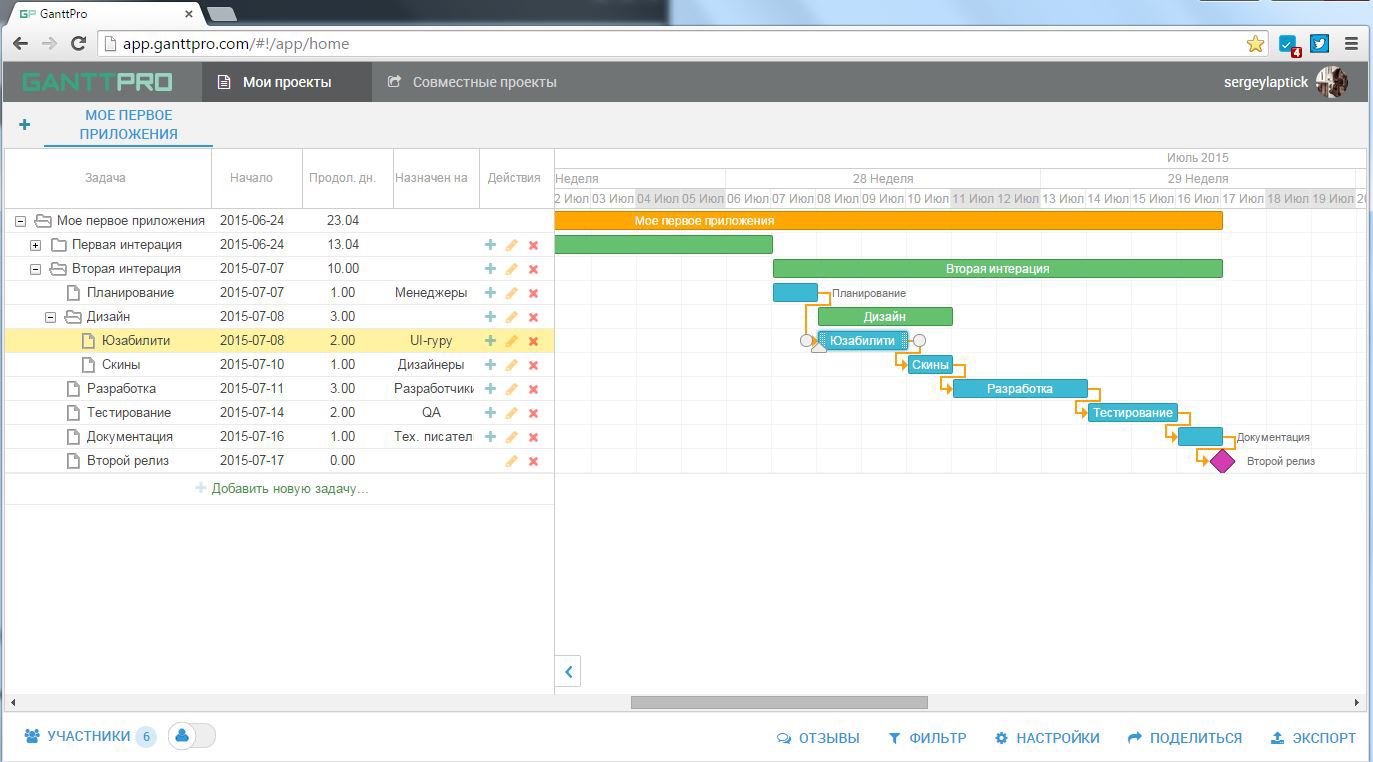
Now imagine that the release of the first version of your application has already taken place and you have started the second iteration of development. And here you receive a letter from the customer, in which he asks you to improve the usability of your application, as well as add a set of skins. A possible option to make the customer happy in a short time would be to divide the design team into two subcommands (one for usability, one for working on skins) and splitting the design task into two subtasks. It seems we did a good job:
We figured out how the fundamentals of project management work. Let's look at other useful tools.
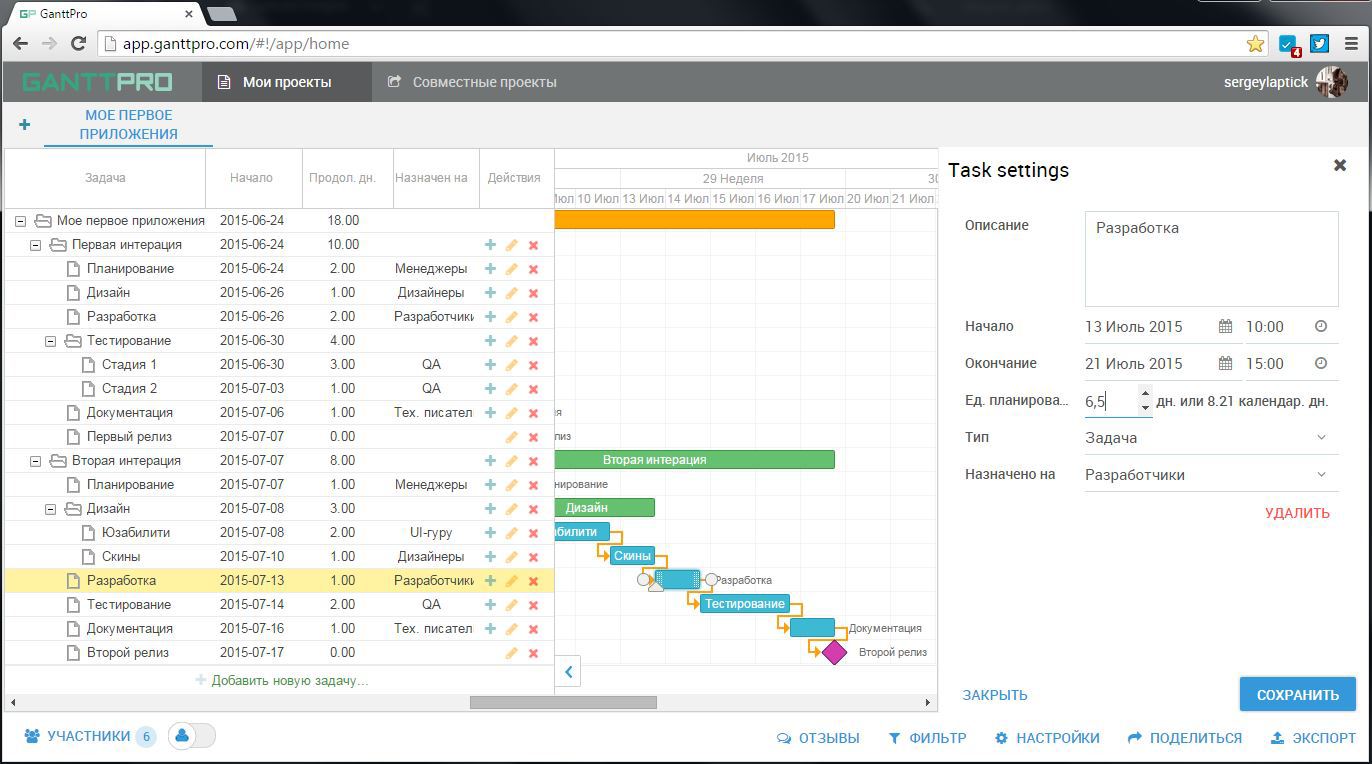
Changing the scale, you can look at your project “from a bird's eye view”, or consider in detail small tasks lasting several hours.
GanttPRO provides the ability to change the working time of a team: days and hours.
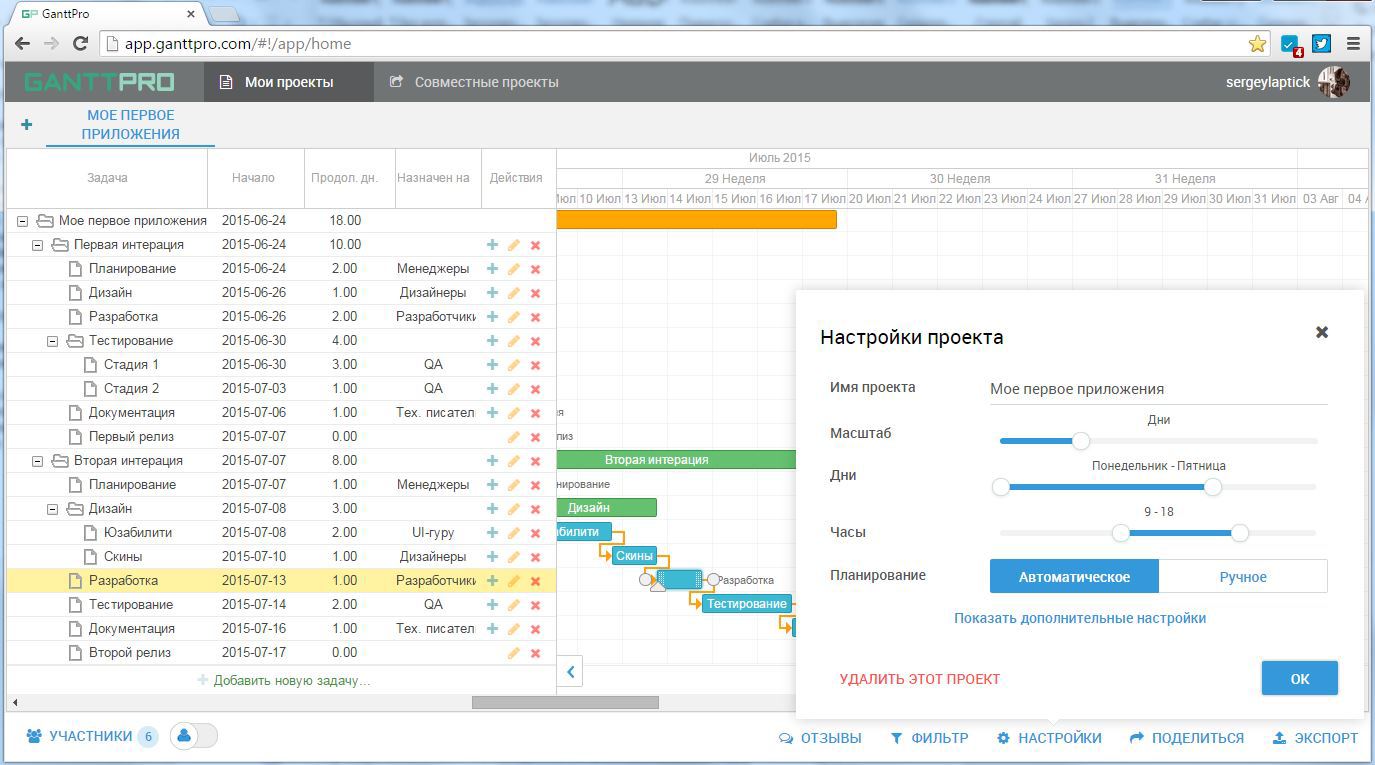
But best of all, the application instantly recounts all the tasks created, based on the set project work time, and provides data in effective time and calendar days. Customer satisfied!
GanttPRO also allows you to change the appearance of the project. These options are available in Settings.
The display mode allows you to choose between three available options: Auto, Compact and Tablet. The latter increases the size of the project elements, so that it is convenient to edit them manually. Literally.
The view allows you to select one of the four available skins. Here's how, for example, Broadway looks like:
It seems that the developers have set themselves the task of creating a nice-looking and intuitive application. Charts can be edited by dragging tasks along the timeline, and the parent tasks, as well as the entire project, are automatically changed according to your actions. You can quickly install dependencies and change the current progress. The sharing system is quite convenient. And although GanttPRO cannot claim to be a comprehensive agile-oriented program, it performs the quick planning function at the level of a good designer. The ready-made templates or materials on the project’s home page will help you to understand the principles of work. In order to master GanttPRO you do not even need to dive into the documentation. Just spend some time on the application and be able to manage the diagrams with one hand.
Gantt charts. Visualize it!
It is more convenient for all of us to perceive visual data than text. Disable the icons on the desktop of your computer and you will understand what I mean.
')
One of the most convenient and familiar ways to visualize the development process are Gantt charts . They can be useful not only for the design of the software development process. Want to plan the construction of the house? No problem! With their help, you can even visualize your favorite homemade lasagna recipe!
It looks convenient, but to answer the question of what exactly it is to use to complete the task is only half of the solution. It is also necessary to decide how to use it in the best way. And this is exactly the moment when GanttPRO appears on the horizon.
In theory
GanttPRO is an online application that is created to help you with project planning, task distribution and control over their implementation.
Key Features:
- Scheduling tasks based on ** priorities **
- Distribution of tasks between project participants
- The critical path will help you finish the work on the project faster. Use it to identify weak points.
- A set of templates will be useful if you do not know where to start. Templates are available for Software Development, Product Release, Design Development, Startup, and other tasks. Moreover, I have reliable insider information that in the near future it will be possible to create my own templates. But it is only between us.
- Scaling in the range from several hours to months will help to consider in detail individual tasks or the entire project as a whole.
- Drag-and-drop . Just because it's more convenient.
- Filter and search
And now for the sake of which we all gathered. Agile-oriented features that will help you work in a team:
- Advanced sharing system . You can share the project with the customer or with colleagues via e-mail or by sending them a link to the project. Moreover, you can set the rights to view or edit the project to work on it together
- Export project to PDF, PNG, XLSX or iCalc. The resulting file can be sent to the customer or used in the report.
- Automatic scheduling . Suddenly, a new task appeared from the customer? You can add it to the project, the application will automatically shift the task and recalculate the time it takes to complete the entire project, taking into account the new task. GanttPRO is a good helper in order to always have a common vision of the project and to plan later with the help of gantt sprints for developing low-frequency goals.
- The progress line will help keep track of what stage is the implementation. You may think that this feature is more likely to be in the main features, but the trick is that after you give someone the right to edit, you can change the current status together
If you are interested in how this is all implemented, here is a list of the technologies used :
- Webix JavaScript Library
- HTML5
- CSS3
- javascript
- Node.js
On practice
Well, now is the time to try the application at work.
The first steps
GanttPRO is an online application. Thus, you do not need to download or install anything. Just open the project home page and click Start:
And here you are waiting for the first good news: all you need to get started is your e-mail address or social network account. No messing around filling out the forms!
Immediately after registration, you can choose one of the available templates or create an empty project. The developers have provided the ability to manually set the project start time and planning unit (hours, days, weeks, months).
You can see what these templates are, but in order to properly understand the basics, it is better to select the “Empty” one, the planning unit is the day:
This is how it looks like by default:
As you can see, this is not an empty empty project. Developers have added some tasks in advance. Apparently, in order to save us from the fear of a clean slate. Let's try to edit our project.
New Tasks. And the participants who will solve them
To add new members to your project, click the Members button at the bottom left. Then set the name of the new member or team:
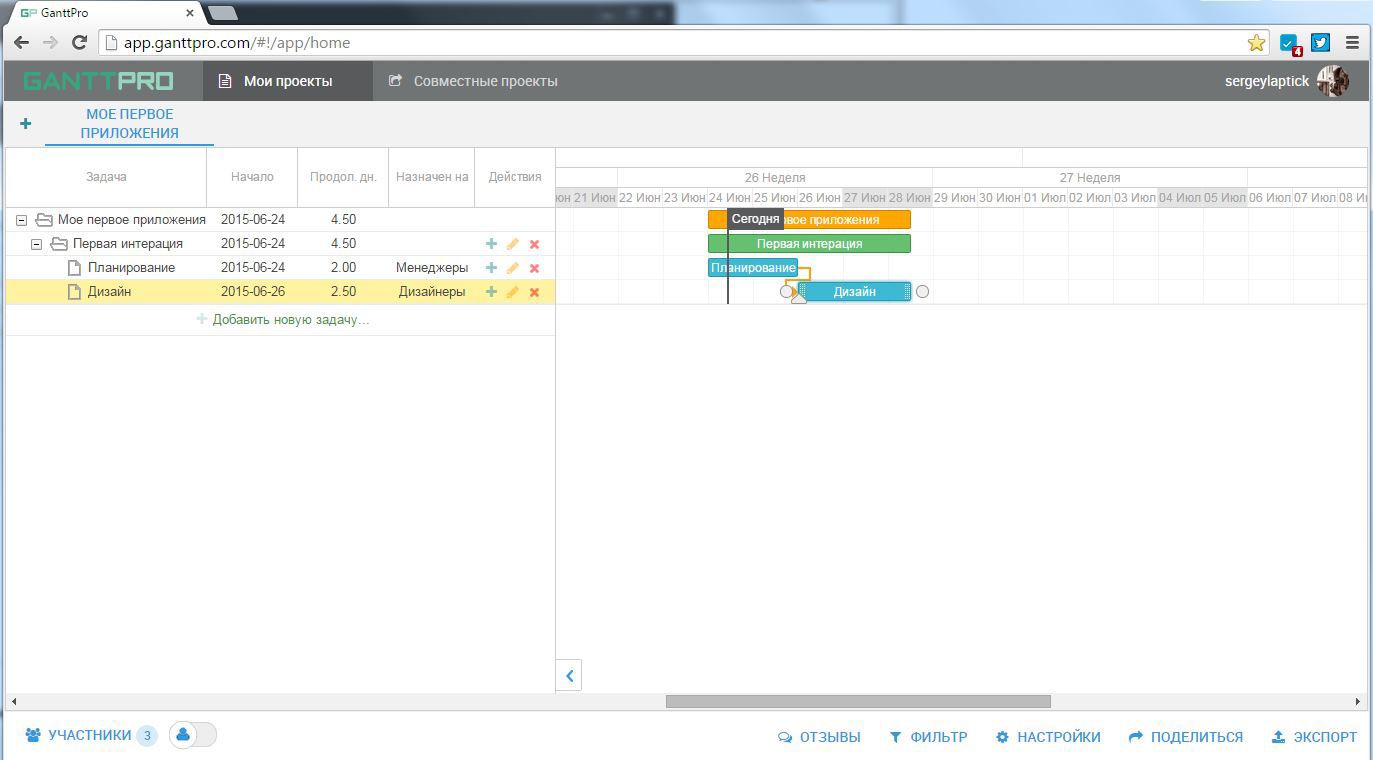
Let's deal with the Tasks now. All available fields (Task, Start, Duration, etc.) can be edited. Just click on any field whose value you want to change, and you will see how simple it is. By clicking, a text box will appear for the task name, a calendar for selecting the start date for the task, the "+" and "-" buttons for changing the duration of the task and a list of available participants for the "Assigned to" field. If you want to change more than one value at a time, use the edit button. It can be found in the column "Actions". Yes, yes, this little pencil. Let's edit the existing tasks to make our project look more like a real one:
Here is the project with the tasks assigned to certain participants:
It looks neat and clear, but, frankly, not very solid. Let's add new tasks and see how dependencies work.
More Tasks. More Dependencies. And a progress bar to see at which stages all
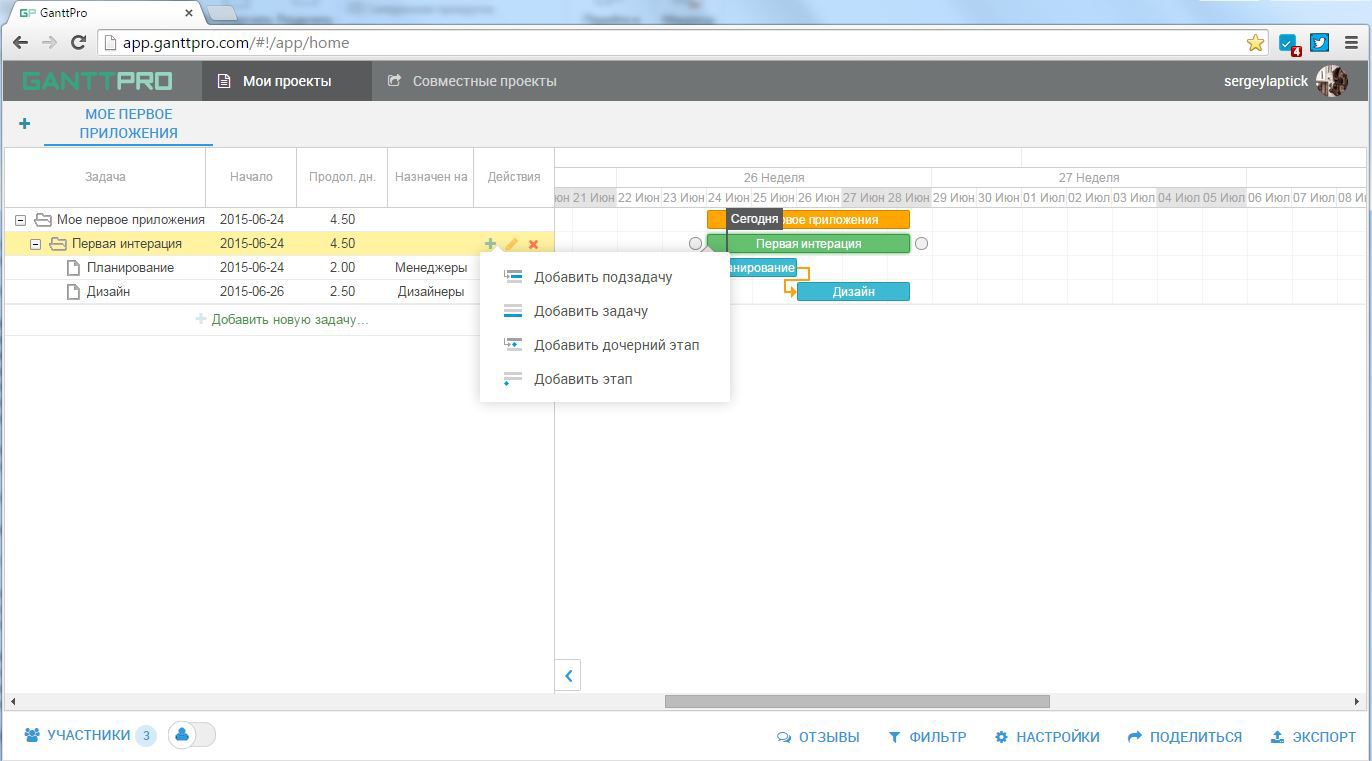
You can add tasks in several ways. Using the button “Add new task ...” you can create a task that is not associated with any other tasks. You can also use the "+" button next to already existing tasks. And here we are given a choice:
What we are interested in at the moment is a new subtask. Here is how it looks by default:
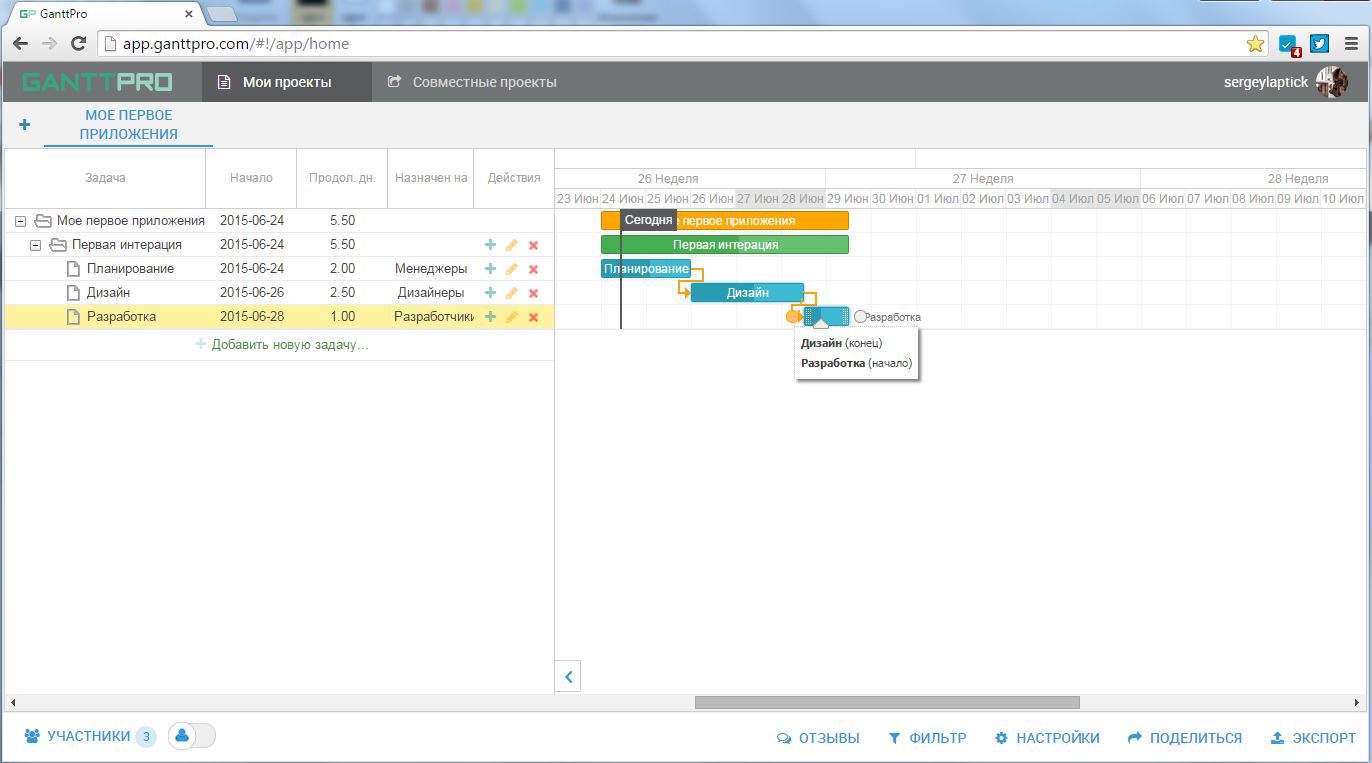
And now is the time to pay attention to the small circles located on both sides of the task, as well as the triangle below, because this is where the magic of drag-and-drop and automatic scheduling begins, which is enabled by default for all new projects.
A triangle is a slider with which you can adjust the progress of a task, and circles are needed to determine the dependencies between them. You can simply drag them, connecting the end of one task with the beginning of another. Once the two tasks are connected by a link, the application recalculates the duration of the project and determines the position of the task, which is very convenient for large projects. Tasks can also be moved horizontally to determine the start date of work on them, as well as change their size to determine the duration of the task. Looks intuitive, right?
Notice how the state of the project and the parent task changed: the size and duration increased automatically after adding a new subtask.
Time to share with others
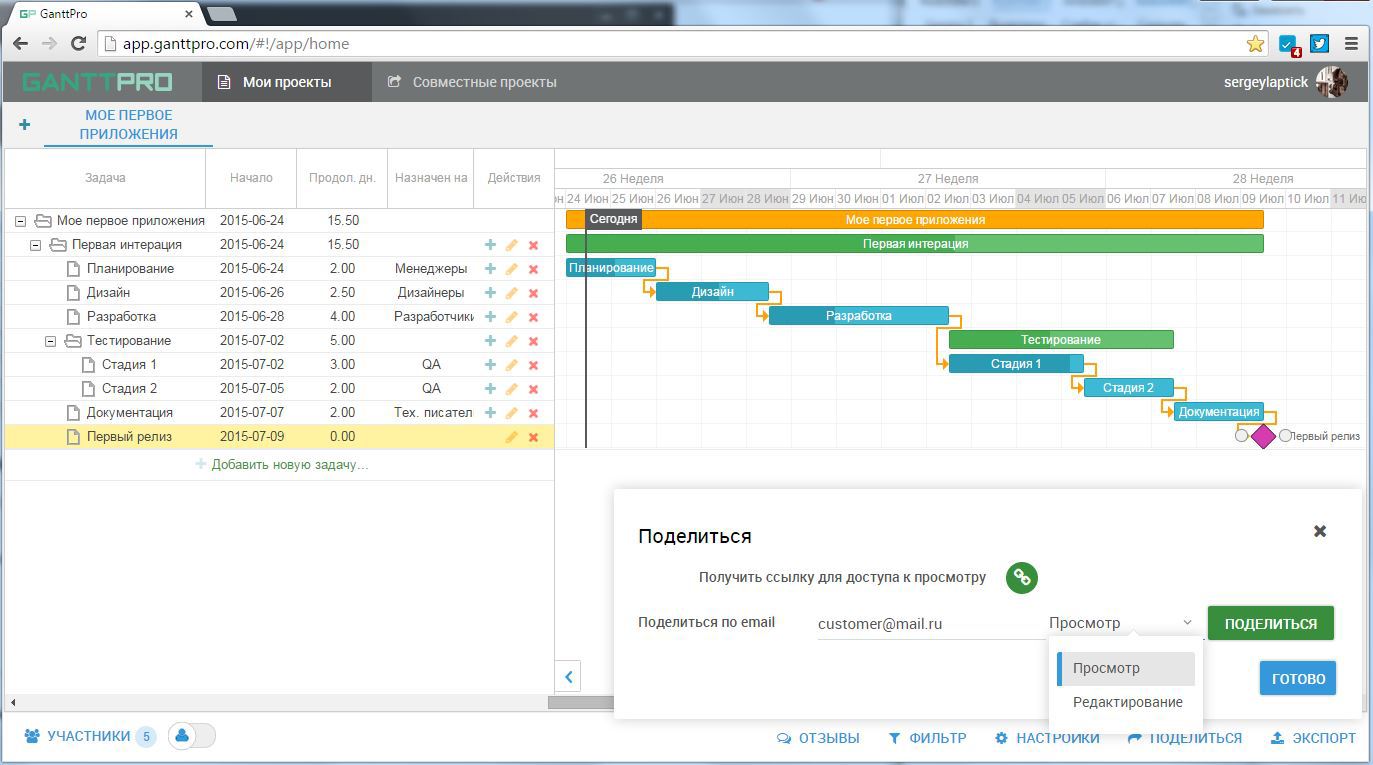
Continuous interaction is one of the cornerstones of the Agile approach. That is why the developers have added several possible ways to collaborate on a project.
After the main tasks are defined, you can share the development plan with the customer. To do this, click the Share button, then assign the necessary rights and enter an email address. You can also get a link to view and send it to the desired recipient:
You can also export the project, for example, to PDF and send the resulting file by mail:
Critical path. Looking for downtime reasons
Fine. Now the customer can follow the development process and make changes as needed. It would be nice to accelerate this process. And here we will help the critical path. It shows the tasks that should be given special attention, because the time of their implementation affects the duration of the project the most. Enable the critical path can be in the "Settings" menu. Let's try:
Wow! Apparently, absolutely every task is critical for a project as small as mine. It would be necessary to return to him soon!
But seriously, the critical path can be extremely useful for complex projects with a large number of tasks and dependencies between them.
You can use the Critical Path along with the ability to group. You may have already noticed a small button to the right of the Participants button. It includes grouping by the teams involved and will help you determine which of them has a greater number of critical tasks.
Letter for you! Make changes on the fly
Now imagine that the release of the first version of your application has already taken place and you have started the second iteration of development. And here you receive a letter from the customer, in which he asks you to improve the usability of your application, as well as add a set of skins. A possible option to make the customer happy in a short time would be to divide the design team into two subcommands (one for usability, one for working on skins) and splitting the design task into two subtasks. It seems we did a good job:
Management process management
We figured out how the fundamentals of project management work. Let's look at other useful tools.
Scale
Changing the scale, you can look at your project “from a bird's eye view”, or consider in detail small tasks lasting several hours.
Working days and working hours
GanttPRO provides the ability to change the working time of a team: days and hours.
But best of all, the application instantly recounts all the tasks created, based on the set project work time, and provides data in effective time and calendar days. Customer satisfied!
We paint the weekdays of the project manager
GanttPRO also allows you to change the appearance of the project. These options are available in Settings.
The display mode allows you to choose between three available options: Auto, Compact and Tablet. The latter increases the size of the project elements, so that it is convenient to edit them manually. Literally.
The view allows you to select one of the four available skins. Here's how, for example, Broadway looks like:
Results
It seems that the developers have set themselves the task of creating a nice-looking and intuitive application. Charts can be edited by dragging tasks along the timeline, and the parent tasks, as well as the entire project, are automatically changed according to your actions. You can quickly install dependencies and change the current progress. The sharing system is quite convenient. And although GanttPRO cannot claim to be a comprehensive agile-oriented program, it performs the quick planning function at the level of a good designer. The ready-made templates or materials on the project’s home page will help you to understand the principles of work. In order to master GanttPRO you do not even need to dive into the documentation. Just spend some time on the application and be able to manage the diagrams with one hand.
Source: https://habr.com/ru/post/291896/
All Articles