What is Hi10P?
In essence, Hi10P is just the profile of the well-known H.264 standard, which uses 10 bits for color transfer , thereby reducing image segmentation (for example, annoying step gradients to many) and reducing the overall file weight. If you do not go into details, it is enough to say that the use of this profile is a big step forward . This text aims to help people choose a player that can play Hi10P video correctly.
There are some changes in the original article, therefore this translation can be considered obsolete, however, the instruction remains operable.
There are several solutions suitable for high-quality playback Hi10P:
Mplayer2 (and SMplayer with the extension) will be optimal for most users, especially for those who want a working solution out of the box. However, for maximum quality, you need to use MPC-HC + madVR as will be shown below.
If you use an operating system other than Windows , for example, GNU / Hurd / Linux / Haiku / BSD / VMX / OS / 2 / MS-DOS / Menuet / BareMetalOS / and so on , all the same thing - get mplayer2 or VLC.
Mac OS X users need to use Mplayer OSX Extended .
')
Technology does not stand still So it was with DVD , Blu-ray and DivX , now the same thing happens with Hi10P. The latest decoders are much faster even when decoding 10 bits compared to 8-bit decoders a year ago, so we have the capacity for a new step forward.
Assuming that you are already familiar with video encoding, get the appropriate x264 build, designated as “10bit depth”. On Linux, simply execute "./configure –bit-depth = 10" before compiling.
Special note: The official x264 build still has bugs and incorrectly converts levels. You can use the unofficial x264 build with fixes ( JEEB's builds ) or patch the official build yourself.
If you use CRF , increase it slightly. If you use a bitrate , then you can reduce it slightly. The release groups are still working on getting the best settings, so only time will tell how much you need to increase / decrease CRF.
Label your releases with the “Hi10P” label. You can freely link to this manual in the section / file descriptions to help people set up their players before they start whining in the forums.
Examples of files encoded in Hi10P can be found here and here .
A good selection of comparisons between 8 and 10 bit compression lies here . It is easy to see that 10-bit compression gives more quality with a lower bit rate.
Here you can also see enough images to compare . Remember that this is not the limit , the encoders are working hard by learning how to choose the right settings.
The need to have a 10-bit (in other words, 32-bit “real” color ) monitor, in order to see the benefits of Hi10P, is completely absent . Even after converting back to 8 bits, video encoded in 10 bits greatly benefits in quality compared to video encoded in 8 bits. And this is not to mention the reduction in file size.
The same 0.01% of people with similar monitors will have to be perverted with unstable drivers for outputting 10 bit video.
If you want a version for easy saving and reading, you can take the instructions in the picture , but note that it is updated irregularly, so there may be outdated information.
This method will end up with a much better picture and better performance than the CCCP Beta (well, everything based on ffdshow), so if you are looking to watch videos in Hi10P, or even normal 1080p, try the following. MadVR is regularly updated and uses the latest version of libav for decoding, yielding a much higher speed than the absurdly outdated ffdshow-tryout, not to mention even more absurd CCCP based on it.
Adding ffdshow will allow you to use its audio decoders (for the sake of filters and a more flexible mixer) and formats other than AVC1 (H.264), VC1 and MPEG-2. Especially for older 480p and even worse files (which are unlikely to be encoded using AVC1), you can use filters to improve quality.
Enjoy watching!
This instruction is provided "as is", without insurance and guarantees of physical, spiritual, as well as astral security. If you don’t like the fact that every sentence is overflowing with links , then blame MediaWiki for everything.
The instruction was created based on Ryuumaru 's work. This text is based on a non-original study, as well as Google . This text (as well as this translation, note of the translation ) is in the public domain, with the exception of the background image of debug information screenshots, which belongs to the creators of Air and HotD .
Specifying the author of the original text and translation is not necessary, as is the back link when copying an article. Nevertheless, it is desirable to indicate a link to the original article, since the material in it will be updated to reflect the latest developments in this area.
There are some changes in the original article, therefore this translation can be considered obsolete, however, the instruction remains operable.
How to watch Hi10P
There are several solutions suitable for high-quality playback Hi10P:
- Download SMplayer or use mplayer2 from the console.
- Install the last CCCP and use the player included in it (CCCP will convert video to 8 bits before displaying, besides, you may encounter poor performance on weak machines)
- Download the latest build of VLC Media Player and install it (we do not advise you to do this)
- If you want to use a different render instead of madVR or you want to use additional post-processing filters * ( example ), you can use LAV filters with any end player (MPC-HC or potplayer is recommended , although the potplayer may have problems displaying subtitles)
* be careful, as they do not perform conversions, so always check that madVR is set to 10 bits (see below) - If you have problems with playing Hi10P due to insufficient performance, then you can use CoreAVC 3 , however there are some problems . And it looks like the solution loses in ffdshow performance
Choose!
Mplayer2 (and SMplayer with the extension) will be optimal for most users, especially for those who want a working solution out of the box. However, for maximum quality, you need to use MPC-HC + madVR as will be shown below.
If you use an operating system other than Windows , for example, GNU / Hurd / Linux / Haiku / BSD / VMX / OS / 2 / MS-DOS / Menuet / BareMetalOS / and so on , all the same thing - get mplayer2 or VLC.
Mac OS X users need to use Mplayer OSX Extended .
')
How not to watch Hi10P
- CoreAVC in CUDA, DXVA, LAV CUVID mode as well as stable versions of VLC and ffdshow do not support Hi10P at the time of writing due to the lack of video cards that support 10-bit decoding
- SVN build ffdshow-tryout now supports Hi10P
- Note: Using VSFilter (otherwise known as DirectVobSub) with Hi10P requires conversion to 8 bits, which can lead to a noticeable loss of quality.
Advantages of Hi10P
- Significantly higher compression levels, resulting in much smaller file sizes. first tests show a decrease in file size by 20-40%
- Much more information is saved from the original, problems such as segmentation and poor detailing in dark scenes are eliminated.
- Less headache for encoders
Hi10P disadvantages
- Lower encoding and decoding speed
- Lack of support for DXVA or CUDA at the time of writing
- Some problems with incompatibility with incomprehensible and outdated hardware, for example, playing video on PS3 , but to everyone ...
Why do we need it?
Technology does not stand still So it was with DVD , Blu-ray and DivX , now the same thing happens with Hi10P. The latest decoders are much faster even when decoding 10 bits compared to 8-bit decoders a year ago, so we have the capacity for a new step forward.
How to encode in Hi10P
Assuming that you are already familiar with video encoding, get the appropriate x264 build, designated as “10bit depth”. On Linux, simply execute "./configure –bit-depth = 10" before compiling.
Special note: The official x264 build still has bugs and incorrectly converts levels. You can use the unofficial x264 build with fixes ( JEEB's builds ) or patch the official build yourself.
If you use CRF , increase it slightly. If you use a bitrate , then you can reduce it slightly. The release groups are still working on getting the best settings, so only time will tell how much you need to increase / decrease CRF.
Label your releases with the “Hi10P” label. You can freely link to this manual in the section / file descriptions to help people set up their players before they start whining in the forums.
Hi10P file examples
Examples of files encoded in Hi10P can be found here and here .
A good selection of comparisons between 8 and 10 bit compression lies here . It is easy to see that 10-bit compression gives more quality with a lower bit rate.
Here you can also see enough images to compare . Remember that this is not the limit , the encoders are working hard by learning how to choose the right settings.
Misconceptions about Hi10P and 10 bit output
The need to have a 10-bit (in other words, 32-bit “real” color ) monitor, in order to see the benefits of Hi10P, is completely absent . Even after converting back to 8 bits, video encoded in 10 bits greatly benefits in quality compared to video encoded in 8 bits. And this is not to mention the reduction in file size.
The same 0.01% of people with similar monitors will have to be perverted with unstable drivers for outputting 10 bit video.
Installation instructions MPC-HC + madVR
If you want a version for easy saving and reading, you can take the instructions in the picture , but note that it is updated irregularly, so there may be outdated information.
This method will end up with a much better picture and better performance than the CCCP Beta (well, everything based on ffdshow), so if you are looking to watch videos in Hi10P, or even normal 1080p, try the following. MadVR is regularly updated and uses the latest version of libav for decoding, yielding a much higher speed than the absurdly outdated ffdshow-tryout, not to mention even more absurd CCCP based on it.
Step Zero: Requirements
- Uninstall ALL copies of MPC-HC, CCCP, ffdshow, madVR, Haali, K-lite, CoreAVC, etc., everything that you can find demolishing without sparing. This instruction has no more requirements, and ideally should not have in the future.
Step One: Download and Install
- Download and install the latest version of MPC-HC (choose the .exe version of the installer). Note: Choose ONLY 32-bit Believe (x86)! 64-bit version (x64) is incompatible with madVR and will not work with it
- Get and install the latest version of Haali's Media Splitter
- Download the latest version of madVR and extract it to the desired directory. Run the install.bat located in the extraction directory. DO NOT DELETE THIS DIRECTORY AFTER THIS , madVR lives in this folder and does not copy itself anywhere else. Move the contents of this directory somewhere before installation , for example in C: \ Program Files \ madVR.
Note: Make sure you are logged in as an Administrator before doing this! Do not click the right mouse button and then select “run as administrator”, log in as administrator and start as usual!
Step two: setup
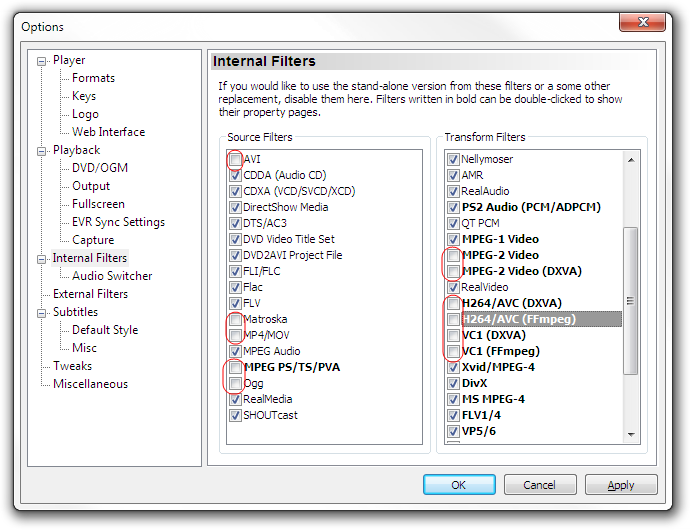
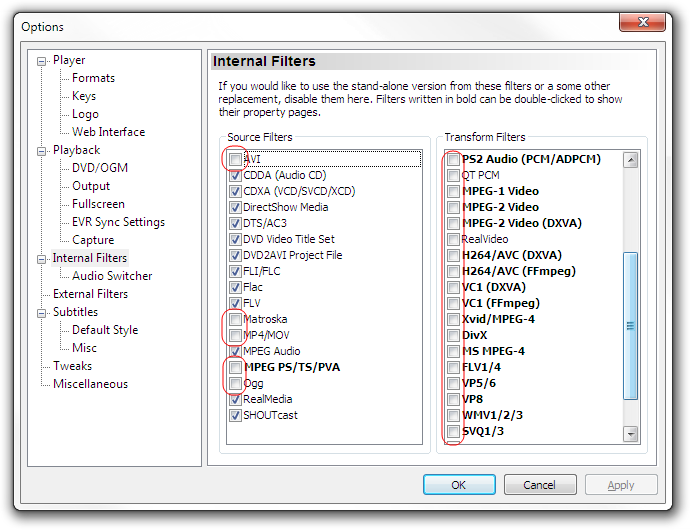
- Open the MPC-HC settings. By selecting Internal Filters, disable the following:
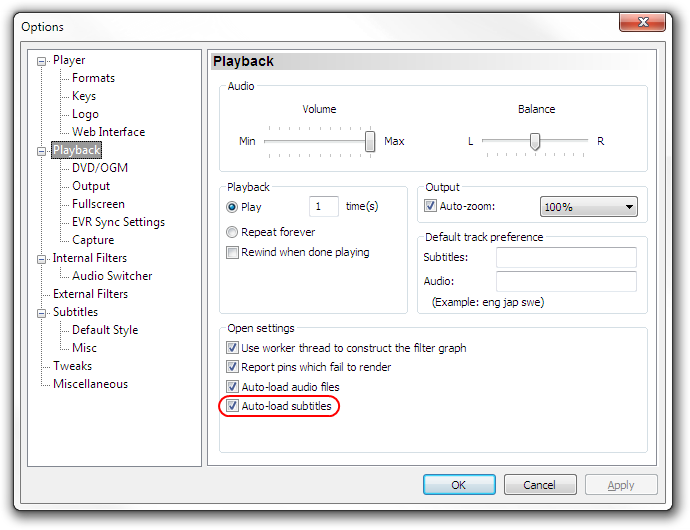
- Select "Playback" (Playback), turn on "Auto-load subtitles" (Auto-load subtitles)
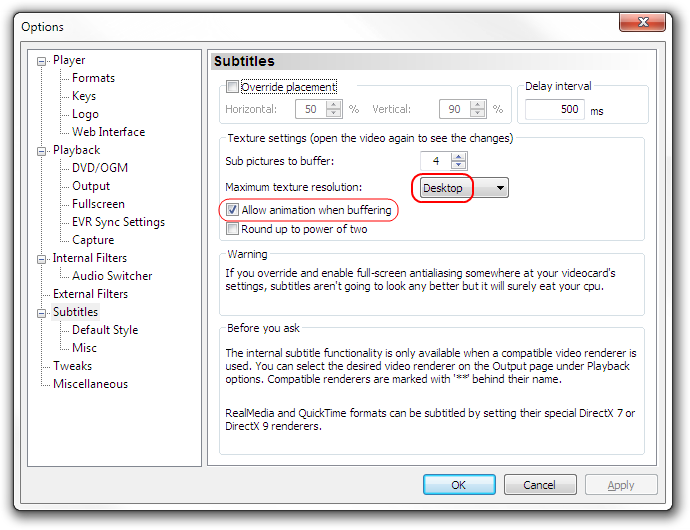
- In Subtitles, make sure that Allow animation when buffering is enabled and that Maximum texture resolution is set to Desktop.
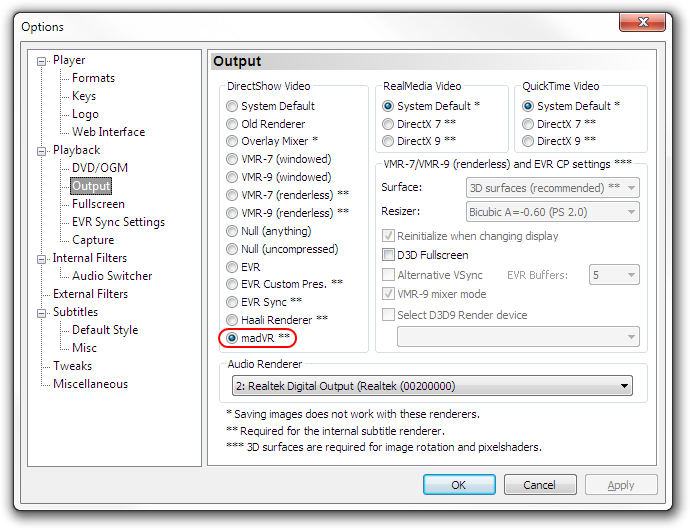
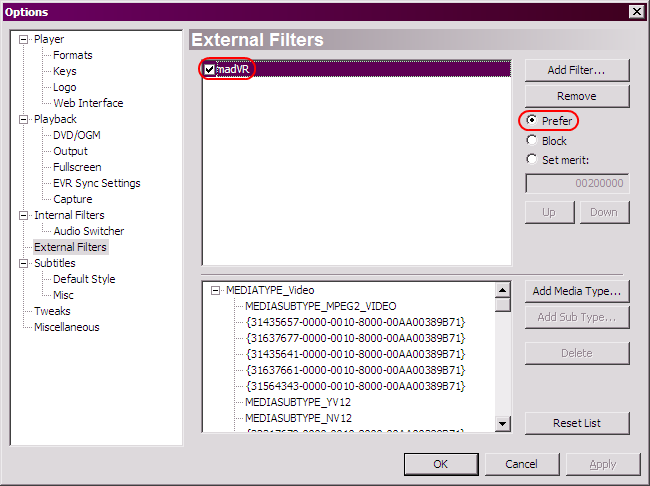
- In the Output item, select madVR as the render.
- Enter madVR settings (the easiest way to do this is to launch a file to play and click on the tray icon) and enable the following settings
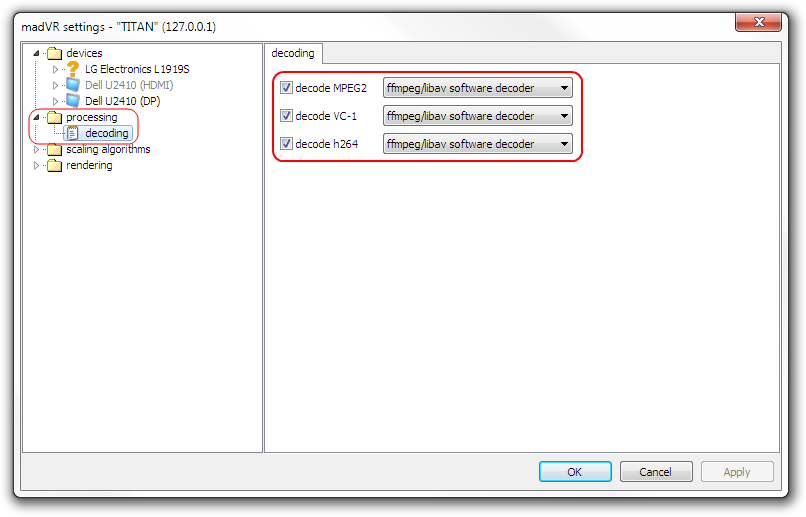
Step Three: Confirmation
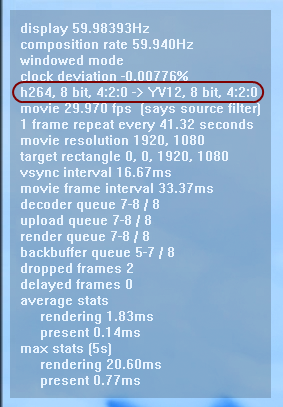
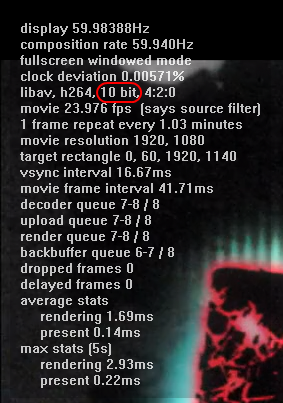
- Play any file and press Ctrl + J to display debug information. (If the output is different from the one shown below - double-check the output settings)
CORRECT: WRONG: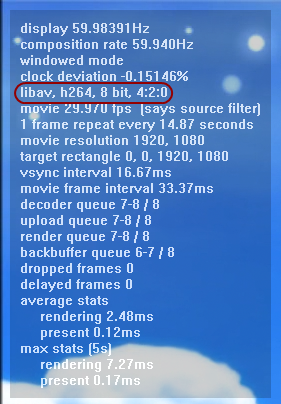
- If possible, play the Hi10P file and make sure you have 10 bit input.
Possible faults
- If you see strange blocks or if there are problems with saturation , but otherwise everything is fine, then you do not use any of the above programs or use their old versions that do not support correct Hi10P playback.
- Do not forget to restart MPC-HC every time after making changes to the settings, since reloading of filters and renders occurs only when the program is started
- If you use the internal render of MPC-HC subtitles and you have problems with animation or with something else - turn on “Allow animation when buffering” (Allow animation when buffering) in the “Subtitles” setting. Note: the internal render of the MPC-HC subtitle uses the same program code as DirectVobSub, with the exception of multifacetedness. Anything DirectVobSub can play, MPC-HC can! It is not buggy and not flawed.
- If you get something different from “libav” in madVR debugging information, then try adding the filter manually as indicated below.
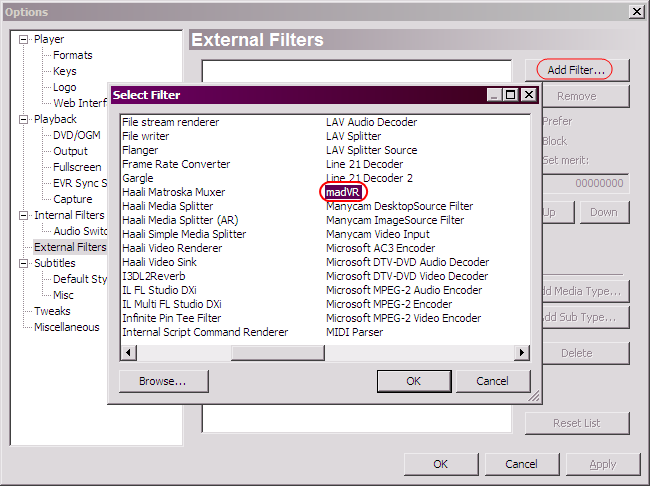
- If you don’t see madVR in the filter list, then make sure you don’t forget to run “install.bat” in the folder into which you unpacked madVR. In addition, if install.bat is not executed for any reason, click “File” (Browse) in the window that appears after clicking the “Add Filter ...” button and select the file named madVR.ax located in the unpack folder madVR
- If after adding madVR subtitles are no longer displayed, update your version of MPC-HC to at least build 3520 (which is still a beta version)! Or do not add a filter and remove / lower the priority of conflicting filters (for example, with ffdshow as shown above)
- If the subtitles still did not appear - check that you installed the 32-bit version of MPC-HC, and not the 64-bit one.
- If you have problems with taking screenshots - remember, the best way to take a screenshot from madVR is to press the PrintScreen key on the keyboard and paste the image into an image editing program, for example mspaint
- If you still have any problems, feel free to ask the community, for example, you can contact the author (not the translator, note of the article) of this article via IRC : irc: //irc.rizon.net/coalgirls
(Bonus / Optional) Adding ffdshow
Adding ffdshow will allow you to use its audio decoders (for the sake of filters and a more flexible mixer) and formats other than AVC1 (H.264), VC1 and MPEG-2. Especially for older 480p and even worse files (which are unlikely to be encoded using AVC1), you can use filters to improve quality.
- Install ffdshow-tryouts
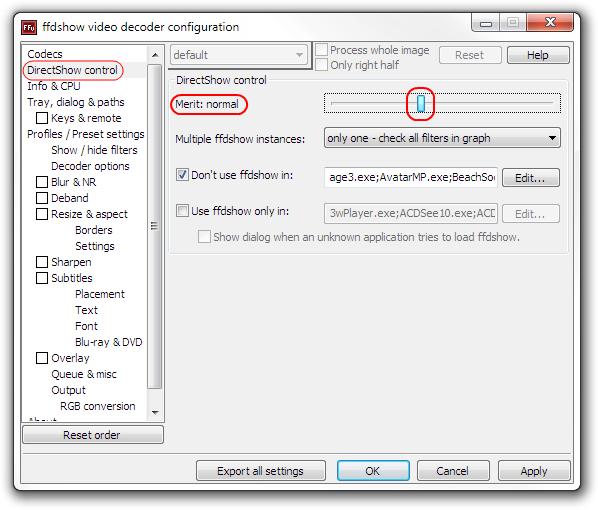
- Open ffdshow settings and in the “DirectShow control” item set the “merit” slider to the “normal” position (Follow the path: Start -> All Programs -> ffdshow -> Video decoder configuration)
- Return to the MPC-HC settings in the item "Internal Filters» (Internal Filters) and disable all remaining filters
- Go through Step Three: Confirmation again to make sure that ffdshow does not touch H.264 video
Enjoy watching!
Disclaimer
This instruction is provided "as is", without insurance and guarantees of physical, spiritual, as well as astral security. If you don’t like the fact that every sentence is overflowing with links , then blame MediaWiki for everything.
The instruction was created based on Ryuumaru 's work. This text is based on a non-original study, as well as Google . This text (as well as this translation, note of the translation ) is in the public domain, with the exception of the background image of debug information screenshots, which belongs to the creators of Air and HotD .
Specifying the author of the original text and translation is not necessary, as is the back link when copying an article. Nevertheless, it is desirable to indicate a link to the original article, since the material in it will be updated to reflect the latest developments in this area.
Source: https://habr.com/ru/post/288878/
All Articles