Tag wall

The tag cloud, in its usual form, is already an eye blister. I want to share with you an excellent design move to display tags in the form of bricks, which change color depending on their density.
Looks great. Since wordpress is the most popular blogging platform, we’ll show it on it.
Living example
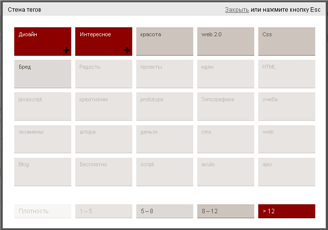
* Unfortunately, the example will not work right on the Habré, click on the picture and look at it on my page.
')
Implementation
For our implementation, we need Jquery and Thickbox addition to it. I gently packed all the necessary scripts and style sheets into one archive which can be downloaded at the end of this note.
To begin with we will connect style sheets and scripts necessary for us. Download the archive and unpack it into the folder with your theme, and then add the following code to the header of your blog between the
< head ></ head > tags:< script type = "text / javascript" src = "<? php bloginfo ( 'stylesheet_directory' );? > /jquery.js"> </ script>
<script type = "text / javascript" src = "<? php bloginfo ('stylesheet_directory');?> / thickbox.js" > </ script >
< link rel = "stylesheet" href = "<? php bloginfo ( 'stylesheet_directory' );? > /thickbox.css" type = "text / css" media = "screen, projection" />
Now let's start creating the wall of tags. Add the following code, for example, to your sidebar:
<!-- Hidden Tag Grid Array Code -->
< div id ="tag_grid_container" >
< div id ="tag_grid_crop" >
< ul id ="tag_grid" >
<? php
$ tags = get_tags ( array ( 'orderby' = > 'count', 'order' = > 'DESC', 'number' = > 25));
foreach ($tags as $tag) {
if ($tag- > count < 5) {
echo(' < li class ="tagclass1" > ');
} else if ($tag- > count < 8) {
echo(' < li class ="tagclass2" > ');
} else if ($tag- > count < 12) {
echo(' < li class ="tagclass3" > ');
} else {
echo(' < li class ="tagclass4" > ');
}
echo(' < a href ="' . get_tag_link ($ tag- > term_id) . '" rel="tag" > ' . $tag- > name . " </ a ></ li > \n");
}
? >
</ ul >
< ul id ="tag_key" >
< li id ="key" > : </ li >
< li id ="key1" > 1 – 5 </ li >
< li id ="key2" > 5 – 8 </ li >
< li id ="key3" > 8 – 12 </ li >
< li id ="key4" >> 12 </ li >
</ ul >
</ div >
</ div >
<!-- End Tag Grid Array Code -->
You can adjust the required number of tags for coloring the bricks by changing the values of
count < or even add more colors by adding new conditions.We now turn to the design of our tags:
/ * Styles for the Tag Grid * /
#tag_grid_container {
display: none;
margin: 0;
}
#tag_grid_crop {
height: 395px;
overflow: hidden;
}
ul # tag_grid {
list-style-type: none;
width: 600px;
height: 320px;
overflow: hidden;
margin: 20px auto 0 auto;
padding: 0 0 0 8px;
line-height: 12px;
}
ul # tag_grid li {
width: 94px;
height: 41px;
padding: 7px 9px;
float: left;
margin: 0 8px 8px 0;
}
ul # tag_grid li a {
font-size: 11px;
}
ul # tag_grid li.tagclass1 {
border-bottom: 1px solid # cbc8bf;
background-color: # e7e4e2;
}
ul # tag_grid li.tagclass1 a {
text-decoration: none;
color: # c0bcb2;
}
ul # tag_grid li.tagclass1 a: hover {
text-decoration: underline;
color: # 000;
}
ul # tag_grid li.tagclass2 {
border-bottom: 1px solid # b5b0a4;
background-color: # ddd9d6;
}
ul # tag_grid li.tagclass2 a {
text-decoration: none;
color: # 5d584d;
}
ul # tag_grid li.tagclass2 a: hover {
text-decoration: underline;
color: # 000;
}
ul # tag_grid li.tagclass3 {
border-bottom: 1px solid # 807b71;
background-color: # cdc4bd;
}
ul # tag_grid li.tagclass3 a {
text-decoration: none;
color: # 5b564d;
}
ul # tag_grid li.tagclass3 a: hover {
text-decoration: underline;
color: # 000;
}
ul # tag_grid li.tagclass4 {
border-bottom: 1px solid # 310000;
background-color: # 8c0000;
}
ul # tag_grid li.tagclass4 a {
text-decoration: none;
color: # e7e4e2;
}
ul # tag_grid li.tagclass4 a: hover {
text-decoration: underline;
color: #FFF;
}
ul # tag_key {
list-style-type: none;
width: 600px;
overflow: hidden;
margin: 28px auto 0 auto;
padding: 0 0 0 8px;
line-height: 12px;
}
ul # tag_key li {
width: 94px;
padding: 7px 9px;
float: left;
margin: 0 8px 8px 0;
}
#key {
border-bottom: 1px solid # e7e4e2;
background-color: # f7f6f5;
color: # cbc8bf;
}
# key1 {
border-bottom: 1px solid # cbc8bf;
background-color: # e7e4e2;
color: # c0bcb2;
}
# key2 {
border-bottom: 1px solid # b5b0a4;
background-color: # ddd9d6;
color: # 5d584d;
}
# key3 {
border-bottom: 1px solid # 807b71;
background-color: # cdc4bd;
color: # 5b564d;
}
# key4 {
border-bottom: 1px solid # 310000;
background-color: # 8c0000;
color: # e7e4e2;
}
For convenience, I added this code to the archive (tags.css).
Now the final touch is to add a link when clicked, which will display a window with tags:
<a href = "# TB_inline? height = 405 & amp; width = 606 & amp; inlineId = tag_grid_container" title = "Wall of tags" class = "thickbox"> ZHMAK! </ a >
That's all. Thanks to all! ~ _ ~
Download the archive with all the necessary files
Peeped here
Source: https://habr.com/ru/post/28415/
All Articles