UI tests: Cucumber + Selenide
Part 2
Continuing the article on writing Cucumber UI tests using Selenide . In the first part, the simplest example of a smoke test for riskmarket.ru was analyzed . In this part, upgrade the test to a full-fledged project with reports, talk about screenshots, custom Condition , annotate the elements, enter PageObject .
The resulting project can be used as a foundation for your UI tests.
Video of test performance on youtube
Project structure:
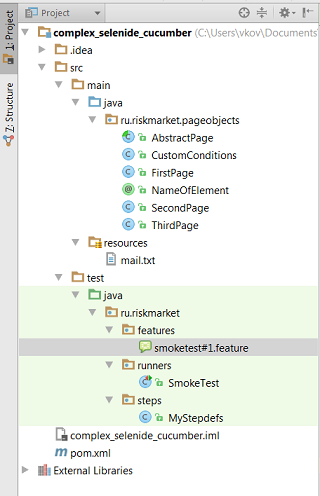
We use Intellij IDEA , Maven and Junit .
Mail.txt contains logins, account passwords for working with the test. ATTENTION: if you start at home, keep in mind that the system will throw out one of the users who will log in with one login / password. Change the mail
Dependency in pom.xml:
<dependencies> <dependency> <groupId>com.codeborne</groupId> <artifactId>selenide</artifactId> <version>3.5</version> </dependency> <dependency> <groupId>info.cukes</groupId> <artifactId>cucumber-java8</artifactId> <version>1.2.3</version> </dependency> <dependency> <groupId>junit</groupId> <artifactId>junit</artifactId> <version>4.12</version> </dependency> <dependency> <groupId>info.cukes</groupId> <artifactId>cucumber-junit</artifactId> <version>1.2.4</version> </dependency> </dependencies> Compared to the first part, cucumber-junit is cucumber-junit - a library for running Junit tests with Cucumber . There is the same, at least for TestNG
Added package runners . It contains the class SmokeTest , which is perceived by Junit as a test that will be launched by the command mvn test . Consider this class in more detail.
@RunWith(Cucumber.class) @CucumberOptions( plugin = {"html:target/cucumber-report/smoketest", "json:target/cucumber.json"}, features = "src/test/java/ru/riskmarket/features", glue = "ru/riskmarket/steps", tags = "@smoketest") public class SmokeTest { @BeforeClass static public void setupTimeout() { Configuration.timeout = 10000; } } @RunWith - annotation responsible for running this JUnit test along with Cucumber
@CucumberOptions - here we set up our Cucumber test
plugin - is responsible for creating test reports (formerly called format ). About reports later
features - the way to features
glue - the way to steppe
tags - tags and even individual scripts can be assigned tags; This parameter specifies which tests will be run.
Tags are written in a line separated by commas: “@smoketest, @alltests, @special” . For example, you have several features, you can add @alltests to @alltests and then the runner with the parameter tags = “@alltests” run all the tests.
Tags are added to features before the keyword Features: a space or a new line
The class body itself can be left empty, but since I run tests with a slow Internet, I’ll set up a Selenid timeout here - I do it through JUnit @BeforeClass , indicating 10c against default 4c. Also in the configuration you can specify, for example, under which browser to run tests
System.setProperty("webdriver.chrome.driver", "src/main/resources/chromedriver.exe"); Configuration.browser = "chrome"; If you decide to change the browser, do not forget to download the driver you need from the Selenium website and indicate its location. Now as an example, I leave the commented lines in the runner.
The steps in the smoketest feature repeat the actions from the feature from the first part, but are written a little differently, because Now we use PageObject .
PageObject is a pattern that implies that there are classes of individual pages that contain the definitions of the elements necessary for the tests, with the specified selectors. Then, in the logic of the steps, it is not the selectors that are used, but the elements previously defined. This is necessary in case the project’s html structure is changed. If a change occurs, then only the selectors in the PageObject change , and you don’t have to search through all the StepDefinition which selectors are now working and which are not.
In our test there are three pages that are listed in the package ru.riskmarket.pageobjects . It is customary to write pageobjects in main / java (in sorts), because pages are not the tests themselves. Each page indicates its own elements with which the test interacts.
Add your own annotation
Now imagine that we have a huge project with several pages, on which there are a hundred elements, dynamic tables, something else, in general, a complex project. In this case, elements of this type appear - “the first cell of the third column in the coordination table” . Given the desire to reuse the steppe, it is necessary to somehow transfer the name of the element to the method that determines the logic of the steppe. Our complex element in PageObject will be defined as
@FindBy(xpath = "") public SelenideElement firstCellAtThirdRowAtAssessmentTable; And then the step, recording something in this cell, could look like this:
And type to firstCellAtThirdRowAtAssessmentTable text: "Hello, Cucumber!" As you can see, the advantage of clarity of steps is lost. I would like the step to look like this:
And type to “First Cell At Third Row At Assessment Table” text: "Hello, Cucumber!" Then you need to somehow match the step method in StepDef to the element with its name from the step itself.
My solution is to add the @NameOfElement annotation.
I will not analyze the annotation, it is a separate topic. The main thing is that writing them is quite simple.
As a result, after adding the annotation, a double work is obtained: instead of directly referring to the element, especially since its name is known, this is done through reflection and annotation. But this is a sacrifice for the sake of beautiful, readable features.
As a result, our element will be defined as:
@NameOfElement("First Cell At Third Row At Assessment Table") @FindBy(xpath = "") public SelenideElement firstCellAtThirdRowAtAssessmentTable; And in StepDef :
@And("^type to input \"([^\"]*)\" text: \"([^\"]*)\"$") public void typeToInputText(String nameOfElement, String text) { somePage.get(nameOfElement).sendKeys(text); } The get(nameOfElement) method uses reflection to find the field in the page class by name, and @FindBy from Selenium is triggered and the element on the page is returned.
The get(nameOfElement) method is defined in the AbstractPage.java class, which is inherited by all pages.
Let's talk about the changes in MyStepDef.
Added fields
FirstPage firstPage = page(FirstPage.class); SecondPage secondPage = page(SecondPage.class); ThirdPage thirdPage = page(ThirdPage.class); page(PageObject.class) is a Selenide method that encapsulates a Selenium PageFactory . Again, a significant reduction in the code. This is necessary in order to run @FindBy when searching for an element on the page.
In the methods of the steps, in contrast to the first version of the project, the selenide $() replaced by the search for an element in the desired page by its name. In the steps common to all pages, the element is searched for all pages.
Read more about should (Condition)
At its core, the Selenid check should/shouldBe/shoudHave/…. (methods do the same thing, but are called differently so that it is easier to read), are analogs of assert' , with the difference that if assert are used, then you need to take care of creating screenshots of the asserts falling. Again, additional code that the tester will have to disassemble, which will come in your place. And in the case of Cucumber still have pretty tricky.
should(Condition) automatically takes a screenshot when it crashes and the report will contain a link to the screenshot. By default, they are stored in the build project folder.
Cut from the log:
Element not found {By.xpath: //button[.=' ']} Expected: visible Screenshot: file:/C:/Users/vkov/Documents/GitHub/RiskMarket/complex_selenide_cucumber/build/reports/tests/1460907962193.0.png As you can see, logging happens by analogy with assertThat - it is written what should have been and what was in fact.
For most cases, the condition you have already written is written, look before using assertThat . In the extreme case, if the necessary Condition not present, and you need to make a screenshot, you can create your own. A simple example of this is in the CustomCondition class. He repeats the actions that Condition.appear performs.
For should() you can add your description, which is logged:
somePage.get(" ").shouldBe(Condition.visible.because(" ...")) In the case of Cucumber , I believe that this is unnecessary, since you exactly repeat the text that you described in the step where this check takes place.
For collections of elements, should() also written. Example from the project:
View in feature:
Then collection of " " should not be empty MyStepdefs view:
@Then("^collection of \"([^\"]*)\" should not be empty$") public void collectionOfShouldNotBeEmpty(String collection) { ElementsCollection selenideElements = secondPage.getCollection(collection); selenideElements.shouldHave(CollectionCondition.sizeGreaterThan(0)); } No explanation, everything is clear from the code.
Let's talk about reports
Returning to the runner class `SmokeTest.java '
@RunWith(Cucumber.class) @CucumberOptions( plugin = {"html:target/cucumber-report/smoketest", "json:target/cucumber.json"}, features = "src/test/java/ru/riskmarket/features", glue = "ru/riskmarket/steps", tags = "@smoketest") public class SmokeTest { @BeforeClass static public void setupTimeout() { Configuration.timeout = 10000; } } If you do not specify in the @CucumberOptions plugin , no report will be created.
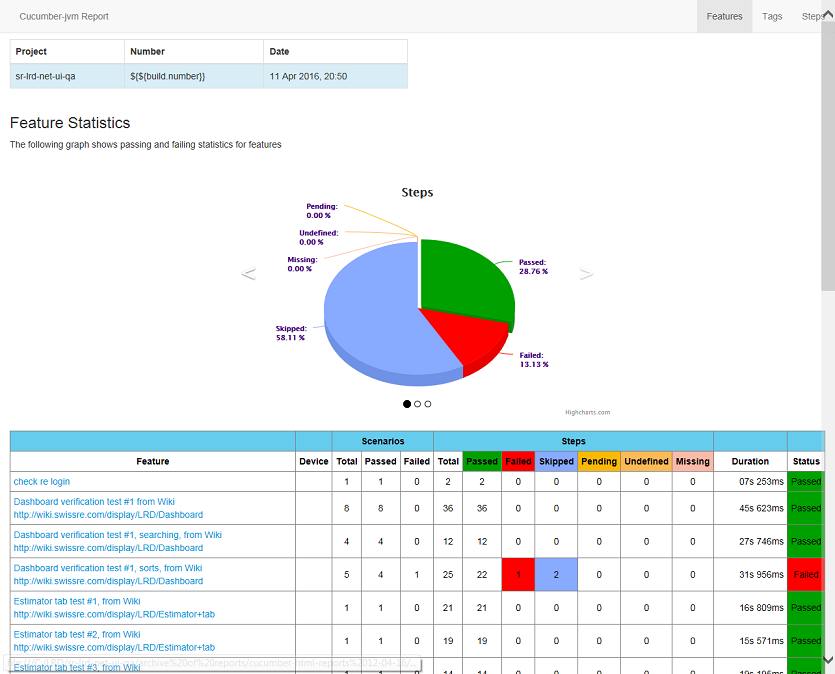
plugin = {“ html:target/cucumber-report/smoketest”} creates reports in the following form:
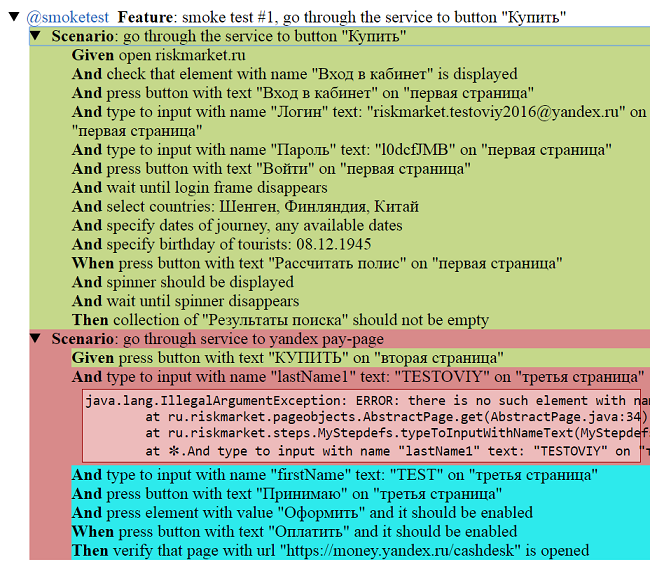
Steps that have passed successfully are marked in green, have fallen in red, turquoise has not begun to be performed. It is still yellow - it means that the step is not defined, a reminder for you. On a red background, you can find a link to the screenshot and the rest of StackTrace .
These reports are good, easy to read, and you can copy-paste them into steps-to-reproduce when making bugs.
But there is even better.
From here: https://github.com/damiansczepanik/maven-cucumber-reporting
Add to pom.xml
<build> <plugins> <plugin> <groupId>org.apache.maven.plugins</groupId> <artifactId>maven-surefire-plugin</artifactId> <configuration> <testFailureIgnore>true</testFailureIgnore> </configuration> </plugin> <plugin> <groupId>net.masterthought</groupId> <artifactId>maven-cucumber-reporting</artifactId> <version>2.0.0</version> <executions> <execution> <id>execution</id> <phase>verify</phase> <goals> <goal>generate</goal> </goals> <configuration> <projectName>cucumber-selenide-example</projectName> <outputDirectory>target/cucumber-html-reports</outputDirectory> <cucumberOutput>target/cucumber.json</cucumberOutput> <parallelTesting>false</parallelTesting> </configuration> </execution> </executions> </plugin> </plugins> </build> At @CucumberOptions specify plugin = {"json:target/cucumber.json"} . This module collects the report from the .json report.
The line <cucumberOutput>target/cucumber.json</cucumberOutput> - sets the place where to get the .json-report
The line <outputDirectory>target/cucumber-html-reports</outputDirectory> - sets where the report will be added.
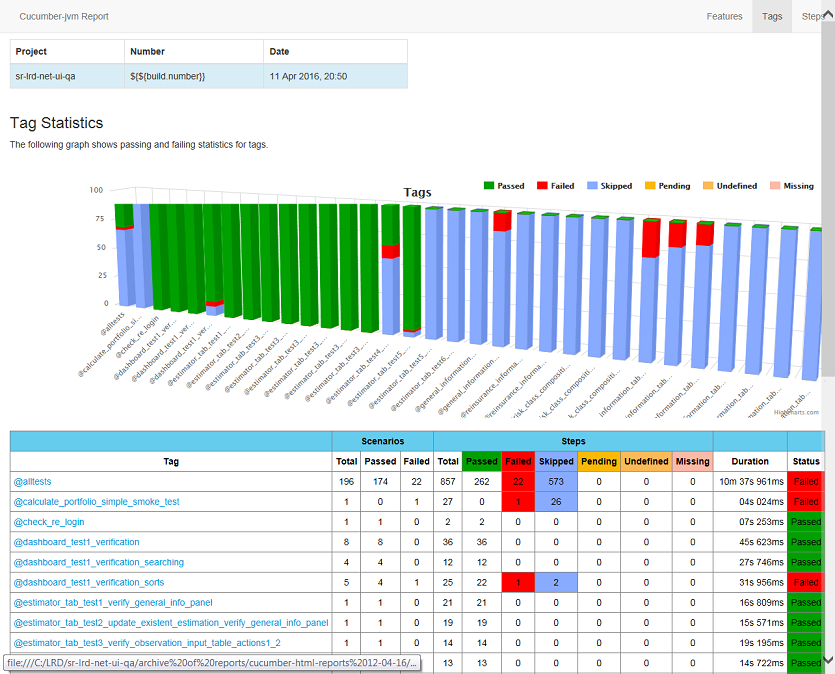
The module works only through mvn clean install . After execution in target / cucumber-html-reports, open feature-overview.html and get these things:
')
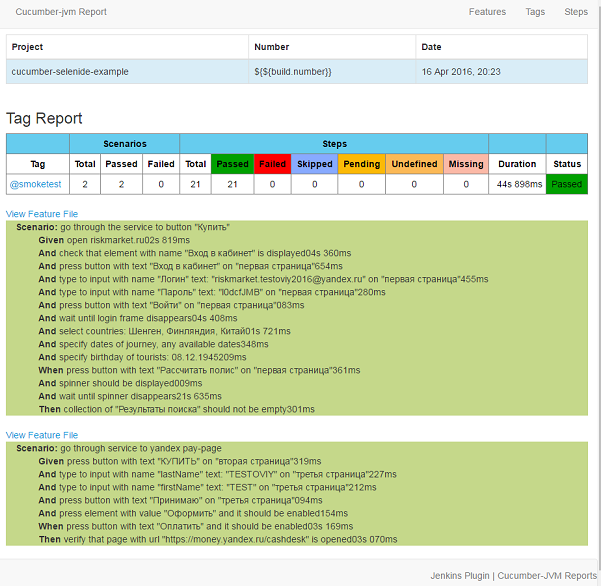
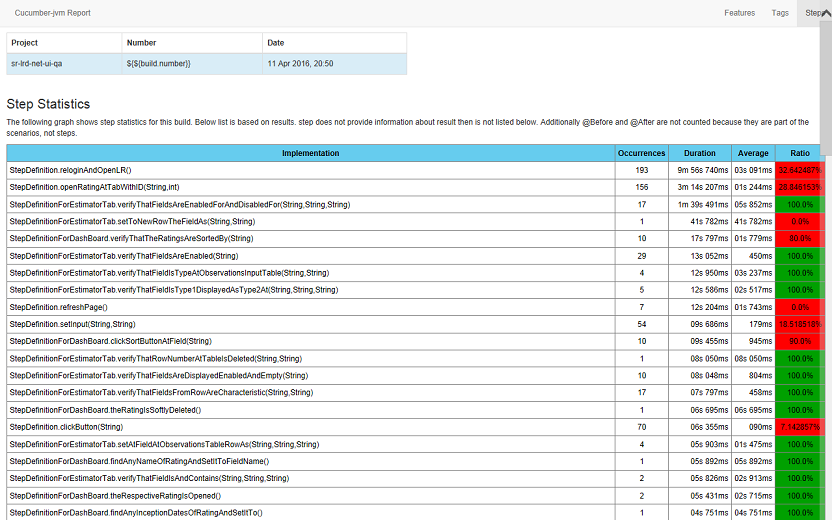
In the Steps tab (last screenshot), time estimates for analyzing steps for refactoring.
In general, the module was written for Jenkins CI . How to get such reports in Jenkins, see here: https://github.com/damianszczepanik/cucumber-reporting
For Bamboo, it is not configured, so you can use the module described in this article and simply specify the location of the report position as an artifact.
That's all. Clear, not falling tests to you!
PS The article does not fit the use of parameterized steps (Scenario Outline :, Examples:) If you decide to use Cucumber in yourself, read about it here .
Source: https://habr.com/ru/post/283422/
All Articles