Test. Checking the entry point in an arbitrary polygon
Introductory
Immediately make a reservation who may be interested in this publication. These are novice Django + jQuery programmers interested in vector graphics in the browser using canvas. Or just people who have received such a task.
So, being in constant scanning of the labor market in my region, I came across a very interesting web developer job at a fairly well-known local company. In the job description, it was said that we need a python + django developer. After sending the resume I received a test task which read:
You need to create a web application on Django, which determines whether a point is in an arbitrary (not convex) polygon. The client part should display an arbitrary polygon in the browser (on the canvas or svg, or on something else, in general, not fundamentally), allow the user to specify a point on the screen, send a request to the server, and receive and display a response. The server part, accordingly, must accept the request, determine whether the point is inside the contour or not, and return the answer to the client. The server part in Python, the client - HTML + JavaScript or CoffeeScript.
Having spent a couple of hours on the assignment and publishing the result on the test server, I ran into a complete ignore on the part of the potential employer. I am not offended, there is anything, especially the task was interesting and its implementation brought a lot of pleasure. To the good did not disappear - publish it here.
Go
First of all, let's prepare the site, I used virtualenv:
')
scherbin@scherbin-pc ~$ cd WebDev/venvs scherbin@scherbin-pc ~/WebDev/venvs/ $ virtualenv test scherbin@scherbin-pc ~/WebDev/venvs/ $ cd test scherbin@scherbin-pc ~/WebDev/venvs/test/ $ source bin/activate Install the necessary software and create a project right here:
(test)scherbin@scherbin-pc ~/WebDev/venvs/test/ $ pip install django (test)scherbin@scherbin-pc ~/WebDev/venvs/test/ $ django-admin startproject mytest (test)scherbin@scherbin-pc ~/WebDev/venvs/test/ $ cd mytest Our project will consist of two applications, start and api . The first will give the user's browser HTML and JavaScript, that is, our frontend, the second will process AJAX requests from the frontend, that is, be our backend. Create them:
(test)scherbin@scherbin-pc ~/WebDev/venvs/test/mytest/ $ django-admin startapp start (test)scherbin@scherbin-pc ~/WebDev/venvs/test/mytest/ $ django-admin startapp api Structure
Now that we have the backbone of the project, we can proceed directly to creativity. To begin with, let's write down the project structure. As mentioned above, it will consist of two parts, the frontend and the backend.
Frontend
It will display an arbitrary polygon in the browser, using canvas, and handle user clicks on it. When a backend is clicked, an AJAX request will send two things in JSON format:
- Polygon coordinate array.
- Coordinates of the point where the user clicked.
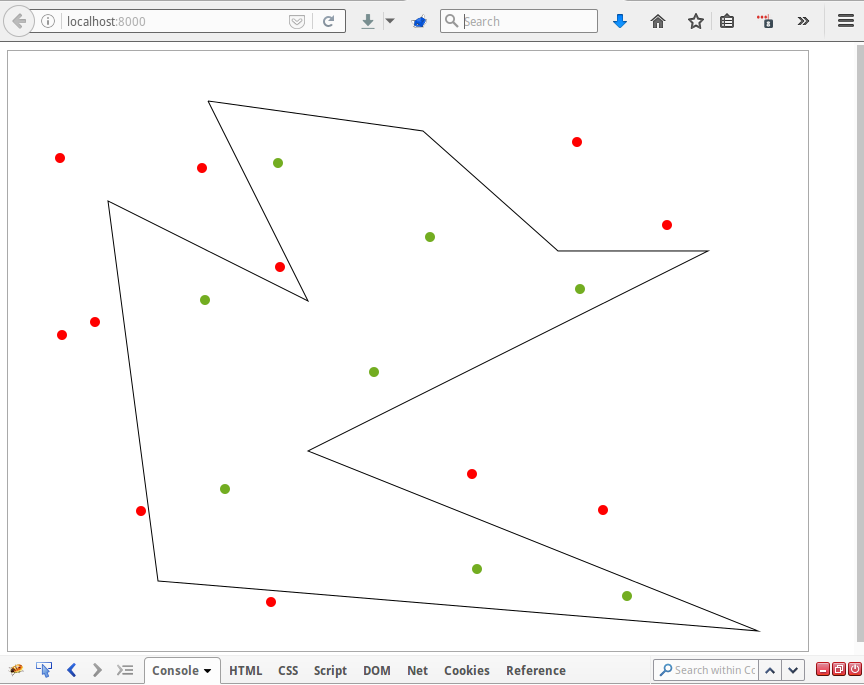
After receiving the answer based on it, a circle with a diameter of 5 pixels will be drawn at the point of the click. green (included in the polygon) or red (not included) color.
Backend
Accepts the request from the frontend, calculates the point belonging to the polygon and returns the result in the form of the coordinates of the point and the boolean sign of the occurrence. As you can see, the polygon is not stored on the server and there is a potential possibility of using the backend in cases when the polygon changes.
Implementation
First we need to display our polygon in the user's browser. We create the main (and only in our mini project) HTML page.
mytest / start / templates / start / index.html :
<!DOCTYPE html> <html lang="en"> <head> <meta charset="UTF-8"> <title> </title> {% load staticfiles %} <script src="{% static 'js/jquery-1.12.0.min.js' %}"></script> <script src="{% static 'js/main.js' %}"></script> </head> <body> <style> canvas#canvas-main { border: 1px solid darkgray; } </style> <canvas id="canvas-main"></canvas> </body> </html> As you can see from the code on the page, the jQuery library version 1.12.0 is used and our main.js file contains JavaScript code that implements the whole routine. Namely, drawing a polygon, handling clicks and communicating with the backend. In fact, this is the main file of our mini project.
mytest / start / static / js / main.js:
$(function() { /** * */ var polygon = [ [200, 50], [415, 80], [550, 200], [700, 200], [300, 400], [750, 580], [150, 530], [100, 150], [300, 250], [200, 50] ]; /** * */ var canvasWidth = 800; var canvasHeight = 600; /** * */ var drawPolygon = function(id, coords) { var canvas = $("#"+id); if (canvas.length) { var context = canvas[0].getContext("2d"); context.canvas.width = canvasWidth; context.canvas.height = canvasHeight; context.beginPath(); for (var i = 0; i < coords.length; i++) { if (i == 0) context.moveTo(coords[i][0], coords[i][1]); else context.lineTo(coords[i][0], coords[i][1]); } context.strokeStyle = '#0000'; context.stroke(); } }; /** * */ $(document).on("click", "#canvas-main", function(event){ // var x = event.pageX-$(this).offset().left; var y = event.pageY-$(this).offset().top; // . var query = { "polygon": polygon, "point": [x, y] }; // var context = $(this)[0].getContext("2d"); // POST $.ajax({ type: "POST", url: '/api/in_polygon', data: JSON.stringify(query), success: function(data) { // p = data['point']; // context.beginPath(); context.arc(p[0], p[1], 5, 0, 2 * Math.PI, false); // if (data['in_polygon']) context.fillStyle = "#73AD21"; else context.fillStyle = "#FF0000"; context.fill(); } }); }); /** * */ drawPolygon("canvas-main", polygon); }); Now you need to implement the check itself of the entry point in the polygon. The simplest algorithm used is the ray tracing. All faces of the polygon are sequentially checked for intersection with the ray coming from the point where the user clicked. An even number of intersections or no intersections at all is a point outside the polygon. The number of intersections is odd - a point inside. Next, the python implementation in the backend api application.
mytest / api / views.py:
# -*- coding: utf-8 -*- import json from django.http import HttpResponse, JsonResponse # Create your views here. def in_polygon(request): if request.method == 'POST': data = json.loads(request.body) in_polygon = False # Main algorithms x = data['point'][0] y = data['point'][1] for i in range(len(data['polygon'])): xp = data['polygon'][i][0] yp = data['polygon'][i][1] xp_prev = data['polygon'][i-1][0] yp_prev = data['polygon'][i-1][1] if (((yp <= y and y < yp_prev) or (yp_prev <= y and y < yp)) and (x > (xp_prev - xp) * (y - yp) / (yp_prev - yp) + xp)): in_polygon = not in_polygon response = {u'in_polygon': in_polygon, u'point': [x, y]} return JsonResponse(response) else: return HttpResponse(u' POST'); Now the main functionality is ready. It remains to make the whole thing work. For this, we rule three files.
mytest / mytest / settings.py
# Application definition INSTALLED_APPS = [ ... 'start', 'api', ] mytest / mytest / urls.py
from django.conf.urls import * from django.contrib import admin from start.views import * urlpatterns = [ url(r'^admin/', admin.site.urls), url(r'^api/', include('api.urls')), url(r'^$', start_index), ] mytest / api / urls.py
from django.conf.urls import * from api.views import * urlpatterns = [ url(r'^in_polygon$', in_polygon, name='in_polygon') ] From this point on, you can run the test web server built into Django:
(test)scherbin@scherbin-pc ~/WebDev/venvs/test/mytest/ $ ./manage.py runserver And play the green and red points by going to the browser at localhost : 8000 /. You should get a picture similar to the one at the beginning of the post.
Source: https://habr.com/ru/post/283294/
All Articles