Transferring a virtual machine image between cloud hosters or installing Windows Server on Digital Ocean
For example, Digital Ocean does not provide the ability to upload your virtual image, moreover, you also cannot connect an ISO image for installation (though there is a KVM - and thanks for that).
So you have to go the tricky way and do everything through ssh. The main idea is to unmount the root file system on the virtual machine, upload files / image from the old one, update the grub settings, update the network settings and fstab, reload.
The most obvious in the first step. You can unmount / and live system, it is real, albeit a chore. It is much easier to add an ssh server and a couple of utilities to the initramdisk and do everything from there, because At this stage of the OS boot, the root system is not yet mounted.
Actually, the whole article is a demonstration of a utility for including an ssh server in a ramdisk + two disassembled examples.

It is important that the virtualka on DigitalOcean be with the ability to change the kernel from the virtual machine itself (In the DigitalOcean control panel, the Kernel tab should say that change the kernel inside the host).
Xen source:

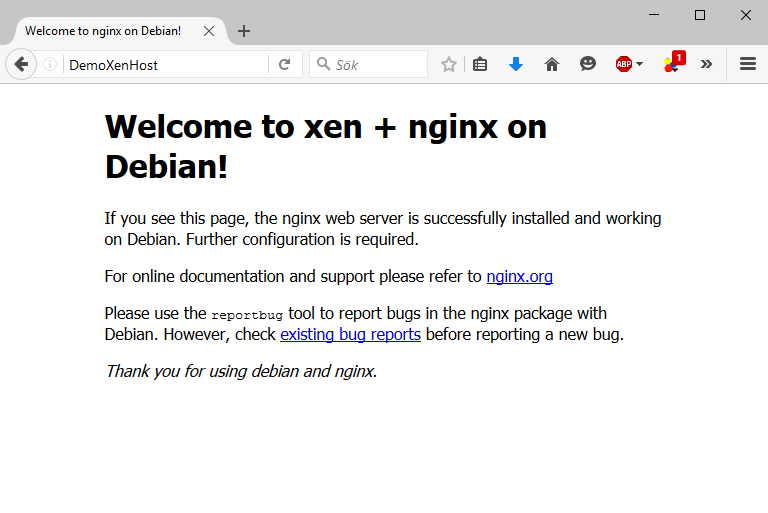
There is a nginx with such a demo page
You can not prepare anything, just turn off the source server and give the files / image from the hypervisor, but this is not interesting and, moreover, the source may well be not on the virtual machine, but on bare hardware. Therefore, the first step is to remount the root filesystem (and, accordingly, also connected FCs, if any) to read-only. It is much easier to remount read-only than unmount it completely — it is enough just to nail demons who can write something.
We look what remains. We are interested in the lines where the FD column ends with w or u

Aha, rsyslog stayed
If it worked out, then it is good; if not, then go on to look who keeps the files open for writing. As a rule, it is enough to turn off all additionally installed daemons + syslog.
')
The recipient will be Ubuntu 16.04. In theory, it is absolutely not important that the recipient will stand before the transfer, since all this will reboot, just a utility to automate the configuration of the initramdisk working with ubuntu / debian.
So, freshly created ubuntu 16.04 on DigitalOcean:
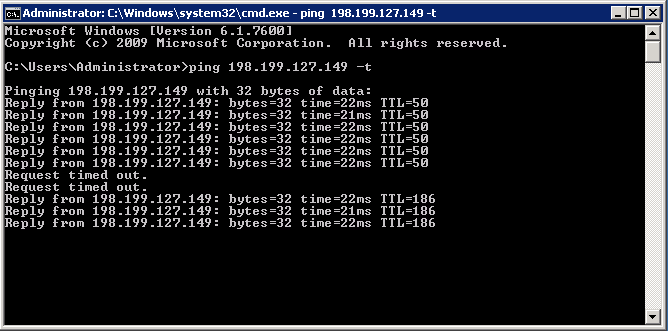
Ping the recipient's IP address and monitor the TTL. As soon as the TLL in the responses changes, this means that the initramdisk has loaded and is waiting for connections. By default, it will not wait long, if after 15 seconds no one is connected, then the download will go on.
Connect via ssh and get the shell. In my case, authorization at root is by key, but it will work with a password, even if sshd_config is 'PermitRootLogin without-password' (because as in initramdisk there is a dropbear, not sshd).
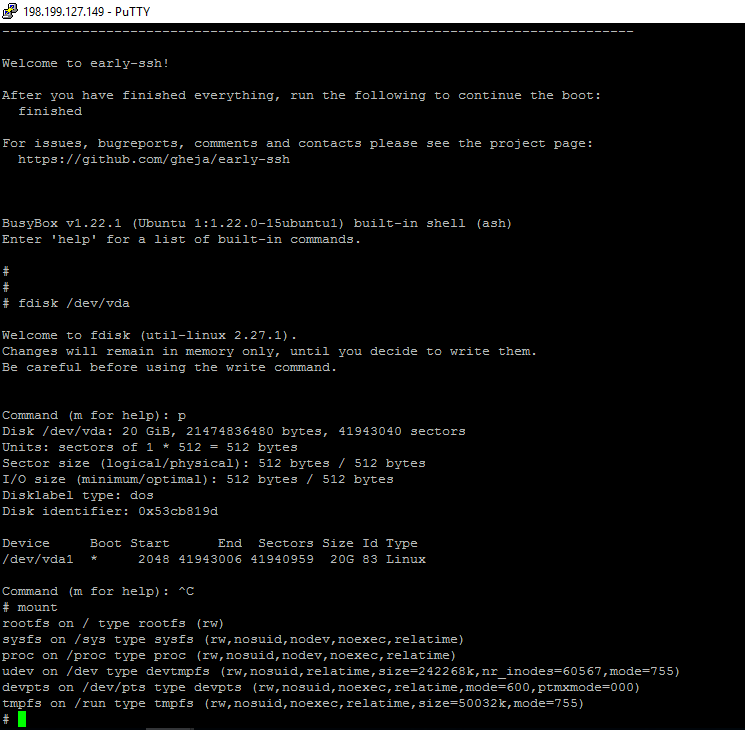
Actually, one section.
You can transfer all the data either through dd (of course, if the recipient's disk size is not less than the source), or through rsync. dd would be preferable if there is not enough free space on the file system or there are a lot of small files.
From the next console, you can constantly send a USR1 signal to dd to see how things are going:
We recreate the file system on the recipient and mount it:
The ext3 file system, not ext4, just because the source is ext3. Now from the source server:
(Be careful with the slashes at the end, they should be)
Mount the freshly copied filesystem on the receiver and chroot there:
Check that the kernel is installed (this is necessary if the source OS was on xen with paravirtualization)
Update network settings in / etc / network / interfaces
There is a small pitfall: in some cases, on some kernels, interfaces may be called differently. For example, in Ubuntu it may be called ens3, and on the Debian kernel it is already eth0. It’s better to just create entries for both options. Or, you can add the kernel settings in / etc / default / grub so that it does not use the ens names (replace / add the GRUB_CMDLINE_LINUX line):
+ delete the /etc/udev/rules.d/70-persistent-net.rules file so that the kernel starts reading interfaces with eth0
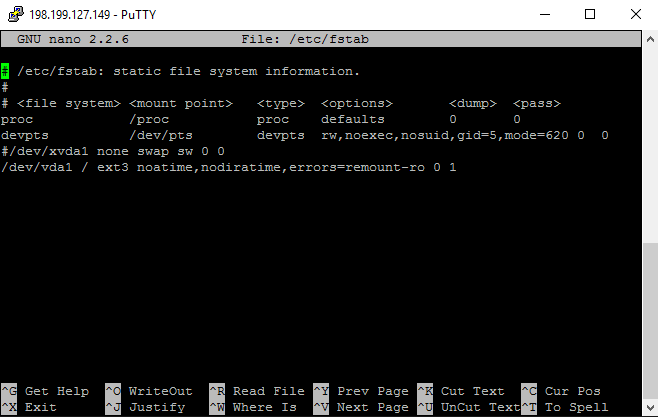
The root fs itself in / etc / fstab (The device is now called vda1 + delete swap)
It is possible to learn through blkid the UUID and enter it:
Well, the bootloader:
Everything, you can unmount everything and reboot:
After rebooting, check that the web page opens from the new IP:

With Windows, things are a little more complicated, so I first made a virtual machine in VmWare, and then I transferred it from the hypervisor. When installing, I indicated that the OS will be Linux, the Lsi SAS disk driver.
Installed Windows server needs to be prepared for migration:
Download fedorapeople.org/groups/virt/virtio-win/direct-downloads/stable-virtio/virtio-win.iso (https://pve.proxmox.com/wiki/Windows_VirtIO_Drivers), unpack, install Tools and for each inf file for our version of perform
(Or immediately for all
Crutches are because, in a good way, you need to do this through unattended.xml. We create the file c: \ firstrun.bat, and we write the following there, replacing mac / ip / mask / gateway / password with what we have on the receiver virtual machine:
Next, in the console, we add this script to autorun and do sysprep in audit:
The image is ready, at the next boot it will start configuring itself.
Boot into ramdisk as in the previous example, move the root file system, create new partitions at the beginning of the disk, update the grub settings:
The first section is 350MB bootable for Windows, the second is Windows itself, the third, respectively, Linux. From where these numbers come from - it will be clear in the next step, so far you can first make two random-sized partitions (but so that the last sector is not less than the size of the Windows image) and then re-create them from Ubuntu when the image is copied to the Ubuntu file system. Ultimately, it is important that the Windows partitions are in the same places and the same size as the source image.
I left so much on the root file system because I’ll temporarily put a vmdk file there. In theory, you can immediately write it through the pipe to the section.
Now we copy Ubuntu (it still lies at the beginning of the disk), 25GB from / dev / vda since sector 2048 to / dev / vda3:
(skip and count are 8 times reduced because the block is not 512, but 4096)
Be sure to update the grub settings and edit / etc / fstab if necessary (replace / dev / vda1 with / dev / vda3):
Well, if the vmdk file immediately represents a disk image (if not, then you need to convert it to raw via "qemu-img convert -p -f vmdk original.vmdk -O raw converted.raw")

Here, in fact, is where the values for / dev / vda1 and / dev / vda2 for the previous step come from.
We copy Windows from an image in sections:
(skip and count also mixed 8 times)
You can try to mount / dev / vda1 and / dev / vda2 in order to check that everything is OK, and, if necessary, correct the settings in the crutch script.
We update grub, we look that he saw Windows:
Now we turn on Windows for the next reboot, it’s convenient if something goes wrong, you can come back by turning off and turning on the virtual machine:
Because an image prepared via sysprep + a crutch script, then Windows will want to reboot 2 times at intervals of several minutes. Those. 2 more times will have to log in to ubuntu and run the last 2 commands.
Instead of turning windows into defaults in grub, it's better to just add to /etc/rc.local:
- if Windows stops loading, you can manage to log in to Ubuntu and make “killall sleep”.
After a reboot, you can go via RDP:
References:
Install any Linux distribution on Digital Ocean
So you have to go the tricky way and do everything through ssh. The main idea is to unmount the root file system on the virtual machine, upload files / image from the old one, update the grub settings, update the network settings and fstab, reload.
The most obvious in the first step. You can unmount / and live system, it is real, albeit a chore. It is much easier to add an ssh server and a couple of utilities to the initramdisk and do everything from there, because At this stage of the OS boot, the root system is not yet mounted.
Actually, the whole article is a demonstration of a utility for including an ssh server in a ramdisk + two disassembled examples.
Moving a Debian server from Xen with para-virtualization to Digital Ocean.
It is important that the virtualka on DigitalOcean be with the ability to change the kernel from the virtual machine itself (In the DigitalOcean control panel, the Kernel tab should say that change the kernel inside the host).
Xen source:
There is a nginx with such a demo page
Step 1. Preparing the source server for migration
You can not prepare anything, just turn off the source server and give the files / image from the hypervisor, but this is not interesting and, moreover, the source may well be not on the virtual machine, but on bare hardware. Therefore, the first step is to remount the root filesystem (and, accordingly, also connected FCs, if any) to read-only. It is much easier to remount read-only than unmount it completely — it is enough just to nail demons who can write something.
/etc/init.d/nginx stop apt-get install lsof rsync lsof / We look what remains. We are interested in the lines where the FD column ends with w or u
Aha, rsyslog stayed
kill 6288 mount -o remount,ro / If it worked out, then it is good; if not, then go on to look who keeps the files open for writing. As a rule, it is enough to turn off all additionally installed daemons + syslog.
')
Step 2. Unmounting the root filesystem on the recipient server
The recipient will be Ubuntu 16.04. In theory, it is absolutely not important that the recipient will stand before the transfer, since all this will reboot, just a utility to automate the configuration of the initramdisk working with ubuntu / debian.
So, freshly created ubuntu 16.04 on DigitalOcean:
apt-get install -y git dropbear && \ git clone https://github.com/roginvs/early-ssh && \ cd early-ssh && \ ./build_deb.sh && \ dpkg -i early-ssh*.deb && \ sed -ie 's/DISABLED=1/DISABLED=0/' /etc/early-ssh/early-ssh.conf && \ update-initramfs -u && \ reboot Ping the recipient's IP address and monitor the TTL. As soon as the TLL in the responses changes, this means that the initramdisk has loaded and is waiting for connections. By default, it will not wait long, if after 15 seconds no one is connected, then the download will go on.
Connect via ssh and get the shell. In my case, authorization at root is by key, but it will work with a password, even if sshd_config is 'PermitRootLogin without-password' (because as in initramdisk there is a dropbear, not sshd).
Actually, one section.
Step 3. Data Transfer
You can transfer all the data either through dd (of course, if the recipient's disk size is not less than the source), or through rsync. dd would be preferable if there is not enough free space on the file system or there are a lot of small files.
Option from dd to ssh:
dd if=/dev/xvda2 bs=65536 | ssh root@198.199.127.149 'dd of=/dev/vda1 bs=65536'
dd if=/dev/xvda2 bs=65536 | ssh root@198.199.127.149 'dd of=/dev/vda1 bs=65536' Option with dd without encryption, but with compression:
# nc -q 1 -l 8000 | gzip -d | dd bs=65536 of=/dev/vda1 # dd if=/dev/xvda2 bs=65536 | gzip | nc -q 1 198.199.127.149 8000 From the next console, you can constantly send a USR1 signal to dd to see how things are going:
while true; do kill -USR1 `pidof dd`; sleep 10; done Option with rsync:
We recreate the file system on the recipient and mount it:
mkfs.ext3 /dev/vda1 mkdir /mnt mount /dev/vda1 /mnt The ext3 file system, not ext4, just because the source is ext3. Now from the source server:
rsync -aAXv --one-file-system --progress / root@198.199.127.149:/mnt/ (Be careful with the slashes at the end, they should be)
Step 4. Checking the kernel, checking / etc / fstab, setting up the network, updating grub settings
Mount the freshly copied filesystem on the receiver and chroot there:
mount /dev/vda1 /mnt mount -o bind /dev/ /mnt/dev/ mount -o bind /proc/ /mnt/proc/ mount -o bind /sys/ /mnt/sys/ chroot /mnt PATH=$PATH:/usr/sbin bash Check that the kernel is installed (this is necessary if the source OS was on xen with paravirtualization)
apt-cache search linux-image apt-get install linux-image-3.16.0-4-amd64 dpkg-reconfigure linux-image-3.16.0-4-amd64 Update network settings in / etc / network / interfaces
nano /etc/network/interfaces There is a small pitfall: in some cases, on some kernels, interfaces may be called differently. For example, in Ubuntu it may be called ens3, and on the Debian kernel it is already eth0. It’s better to just create entries for both options. Or, you can add the kernel settings in / etc / default / grub so that it does not use the ens names (replace / add the GRUB_CMDLINE_LINUX line):
... GRUB_CMDLINE_LINUX="net.ifnames=0 biosdevname=0" ... + delete the /etc/udev/rules.d/70-persistent-net.rules file so that the kernel starts reading interfaces with eth0
The root fs itself in / etc / fstab (The device is now called vda1 + delete swap)
nano /etc/fstab It is possible to learn through blkid the UUID and enter it:
UUID="66bd1995-a4e5-418f-a1f7-0ec2f81ac017" / ext4 errors=remount-ro 0 1 Well, the bootloader:
apt-get install grub2 grub-install /dev/vda update-grub2 Everything, you can unmount everything and reboot:
exit # bash exit # chroot cd / umount /mnt/dev umount /mnt/proc umount /mnt/sys umount /mnt reboot After rebooting, check that the web page opens from the new IP:
Installing Windows Server 2012r2 on DigitalOcean
Step 1. Preparing the source
With Windows, things are a little more complicated, so I first made a virtual machine in VmWare, and then I transferred it from the hypervisor. When installing, I indicated that the OS will be Linux, the Lsi SAS disk driver.
Installed Windows server needs to be prepared for migration:
Download drivers for KVM
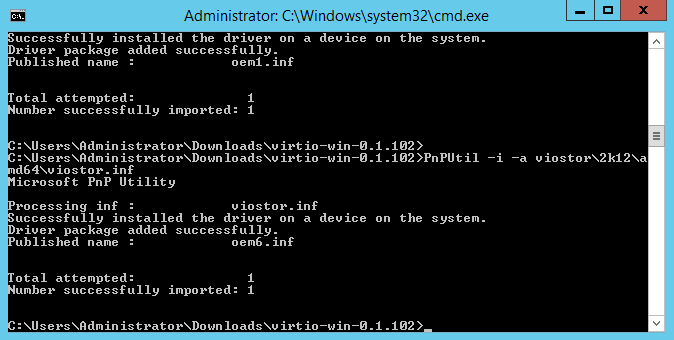
Download fedorapeople.org/groups/virt/virtio-win/direct-downloads/stable-virtio/virtio-win.iso (https://pve.proxmox.com/wiki/Windows_VirtIO_Drivers), unpack, install Tools and for each inf file for our version of perform
PnPUtil -i -a <InfName> .inf
(Or immediately for all
forfiles / S / M * .inf / C "cmd / c pnputil -i -a @Path")
A bit of crutch magic
Crutches are because, in a good way, you need to do this through unattended.xml. We create the file c: \ firstrun.bat, and we write the following there, replacing mac / ip / mask / gateway / password with what we have on the receiver virtual machine:
@Echo Off :: Mac is in Windows format (dashes)! SET MAC=00-50-56-9E-B8-57 SET IP=192.168.2.85 SET MASK=255.255.255.0 SET GW=192.168.2.1 SET ADMINPW=QWEasd123 echo Started >> c:\firstrun.log date /T >> c:\firstrun.log time /T >> c:\firstrun.log ipconfig /all >> c:\firstrun.log echo "Start to search network interface" >> c:\firstrun.log :start_loop For /f "delims=, tokens=1,3 skip=1" %%a In ('getmac /V /FO CSV') Do ( IF /I %%b == "%MAC%" ( echo "Found card" >> firstrun.log echo %%a >> firstrun.log netsh interface ip set address %%a static %IP% %MASK% %GW% 10 netsh interface ip add dns %%a 8.8.8.8 goto :end_loop ) ) ping 127.0.0.1 goto :start_loop :end_loop net user Administrator %ADMINPW% reg add "HKEY_LOCAL_MACHINE\SYSTEM\CurrentControlSet\Control\Terminal Server" /v fDenyTSConnections /t REG_DWORD /d 0 /f NetSh Advfirewall set allprofiles state off reg delete "HKEY_LOCAL_MACHINE\SOFTWARE\Microsoft\Windows\CurrentVersion\Setup\State" /v ImageState /f reg add "HKEY_LOCAL_MACHINE\SYSTEM\Setup" /v OOBEInProgress /t REG_DWORD /d 0 /f reg add "HKEY_LOCAL_MACHINE\SYSTEM\Setup" /v RestartSetup /t REG_DWORD /d 0 /f reg add "HKEY_LOCAL_MACHINE\SYSTEM\Setup" /v SetupPhase /t REG_DWORD /d 0 /f reg add "HKEY_LOCAL_MACHINE\SYSTEM\Setup" /v SetupType /t REG_DWORD /d 0 /f reg delete "HKEY_LOCAL_MACHINE\SOFTWARE\Microsoft\Windows\CurrentVersion\Run" /v DigitalOceanHack /f echo "Ok, reboot" >> c:\firstrun.log shutdown -r -t 20 Next, in the console, we add this script to autorun and do sysprep in audit:
reg add "HKEY_LOCAL_MACHINE\SOFTWARE\Microsoft\Windows\CurrentVersion\Run" /v DigitalOceanHack /t REG_SZ /d "C:\firstrun.bat" /f %WINDIR%\system32\sysprep\sysprep /generalize /audit /shutdown The image is ready, at the next boot it will start configuring itself.
You can do without sysprep
I transferred Windows 10 from ESXi to KVM, before the final shutdown I did: Device Manager -> IDE ATA / ATAPI controller -> on each right Update Driver Software -> Browse my computer ... -> Let me pick ... -> Select "Standart ... "(Of course checkbox" Show compatible hardware "is not removed).
It got normal.
It got normal.
Step 2. Unmounting the root file system in the source, re-partitioning
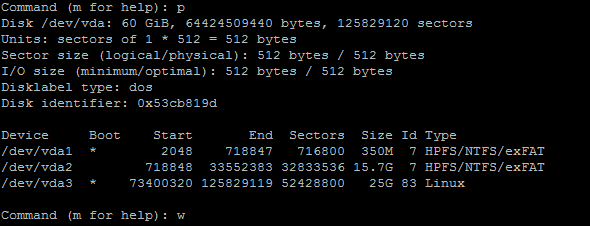
Boot into ramdisk as in the previous example, move the root file system, create new partitions at the beginning of the disk, update the grub settings:
e2fsck -f /dev/vda1 resize2fs /dev/vda1 25G fdisk /dev/vda Command: d Command: n Select (default p): p Partition number: 1 First sector: 2048 Last sector: +716799 ### Windows = 716800 1 Command: n Select (default p): p Partition number: 2 First sector: 718848 Last sector: +32833535 ### 1 Command: n Select (default p): p Partition number: 3 First sector: 73400320 ### 25 = 52428800 125829120 . Last sector: +52428799 # 25 - 1 Command: t Partition number: 1 Partition type: 7 Command: t Partition number: 2 Partition type: 7 Command: a Partition number: 1 Command: a Partition number: 3 Command: w The first section is 350MB bootable for Windows, the second is Windows itself, the third, respectively, Linux. From where these numbers come from - it will be clear in the next step, so far you can first make two random-sized partitions (but so that the last sector is not less than the size of the Windows image) and then re-create them from Ubuntu when the image is copied to the Ubuntu file system. Ultimately, it is important that the Windows partitions are in the same places and the same size as the source image.
I left so much on the root file system because I’ll temporarily put a vmdk file there. In theory, you can immediately write it through the pipe to the section.
Now we copy Ubuntu (it still lies at the beginning of the disk), 25GB from / dev / vda since sector 2048 to / dev / vda3:
dd if=/dev/vda bs=4096 skip=256 count=6553600 of=/dev/vda3 (skip and count are 8 times reduced because the block is not 512, but 4096)
Be sure to update the grub settings and edit / etc / fstab if necessary (replace / dev / vda1 with / dev / vda3):
mkdir /mnt mount /dev/vda3 /mnt mount -o bind /dev/ /mnt/dev/ mount -o bind /proc/ /mnt/proc/ mount -o bind /sys/ /mnt/sys/ chroot /mnt PATH=$PATH:/usr/sbin grub-install /dev/vda update-grub2 nano /etc/fstab exit cd / umount /mnt/dev umount /mnt/proc umount /mnt/sys umount /mnt reboot Step 3. In any way, copy the vmdk file to the newly loaded ubuntu
Well, if the vmdk file immediately represents a disk image (if not, then you need to convert it to raw via "qemu-img convert -p -f vmdk original.vmdk -O raw converted.raw")
fdisk Windows2012r2.vmdk Here, in fact, is where the values for / dev / vda1 and / dev / vda2 for the previous step come from.
We copy Windows from an image in sections:
dd bs=4096 skip=256 count=89600 if=Windows2012r2.vmdk of=/dev/vda1 dd bs=4096 skip=89856 count=4104192 if=Windows2012r2.vmdk of=/dev/vda2 (skip and count also mixed 8 times)
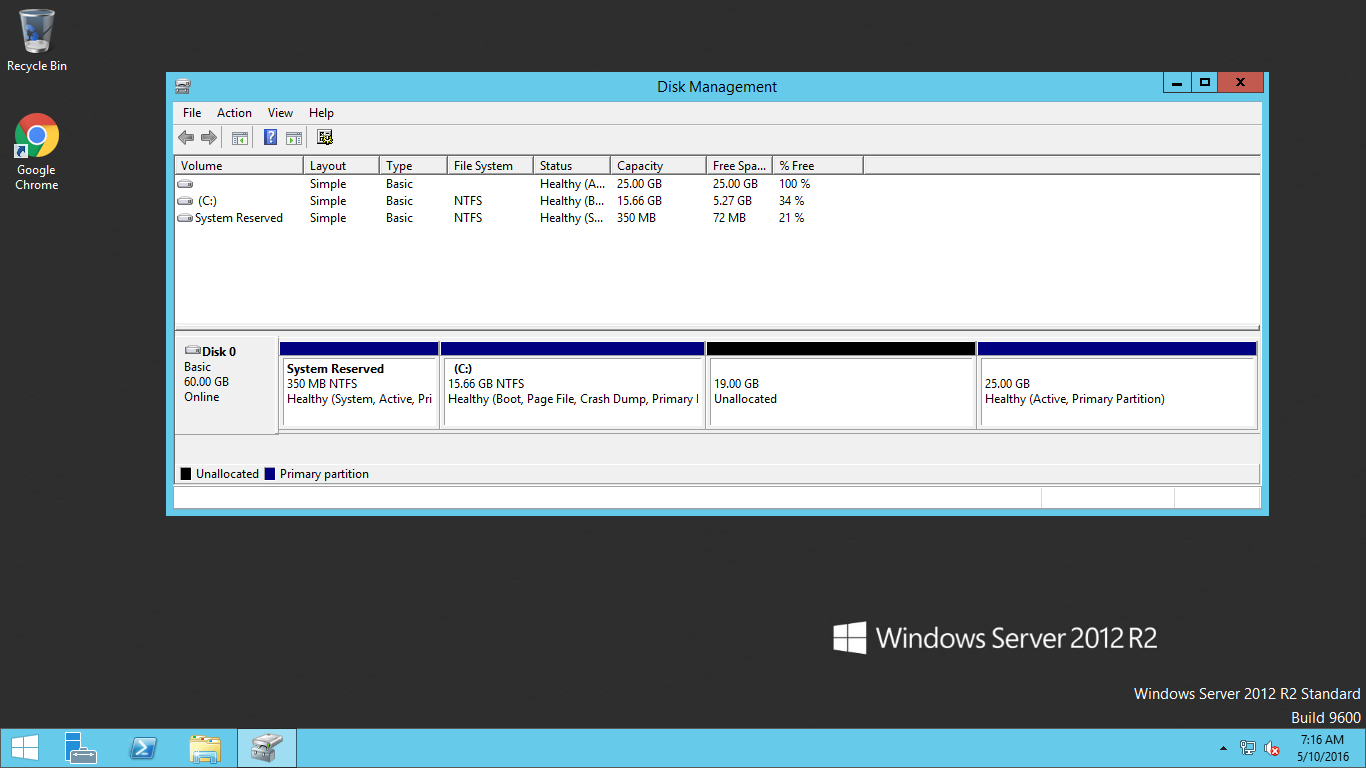
You can try to mount / dev / vda1 and / dev / vda2 in order to check that everything is OK, and, if necessary, correct the settings in the crutch script.
We update grub, we look that he saw Windows:
update-grub2 Now we turn on Windows for the next reboot, it’s convenient if something goes wrong, you can come back by turning off and turning on the virtual machine:
grub-reboot 2 reboot Because an image prepared via sysprep + a crutch script, then Windows will want to reboot 2 times at intervals of several minutes. Those. 2 more times will have to log in to ubuntu and run the last 2 commands.
Step 4. Start Windows by default
Instead of turning windows into defaults in grub, it's better to just add to /etc/rc.local:
sleep 60 && grub-reboot 2 && reboot & - if Windows stops loading, you can manage to log in to Ubuntu and make “killall sleep”.
After a reboot, you can go via RDP:
References:
Install any Linux distribution on Digital Ocean
Source: https://habr.com/ru/post/283200/
All Articles