PostgreSQL in Azure. Part 1
In this article, we begin a series of notes on using PostgreSQL in Microsoft Azure.
The first article will be about installing and configuring a PostgreSQL cluster:
- Discover Azure Resources
- Control through azure cli
- Choosing the right storage
- Build a classic master-slave bundle in the same availability group
The goal of this part is to implement a schema that includes the following components, Azure resources: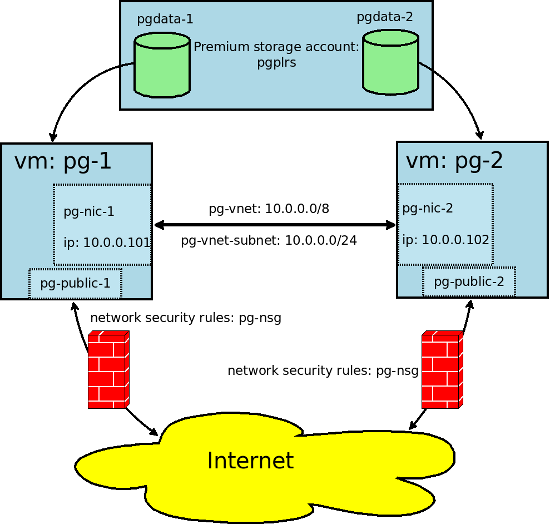
We will do this with the help of azure cli. You can not install azure-cli and do everything through the portal.azure.com web interface, but it seemed to me that the management and creation through cli was more visual.
The azure cli utility is cross-platform and works wherever nodejs works. Install it under linux as follows:
# dnf install npm || apt-get install npm NPM_CONFIG_PREFIX=~/.npm-global npm install -g 'git://github.com/Azure/azure-xplat-cli.git#v0.9.20-April2016' echo 'NPM_PACKAGES="$HOME/.npm-global"' >> ~/.bash_profile echo 'export PATH="$PATH:$NPM_PACKAGES/bin"' >> ~/.bash_profile You can familiarize yourself with the basic commands of the azure cli here . All subsequent azure cli commands run from your work computer. Let's start with the fact that we need to introduce ourselves to the system and get a token:
azure login Read more about authorization methods here .
Create a resource group (resource container) in Northern Europe:
azure group create --name pg-resource-group --location northeurope Create a virtual local network 10.0.0.0/8 and subnet 10.0.0.0/24:
azure network vnet create -g pg-resource-group -l northeurope --address-prefixes 10.0.0.0/8 --name pg-vnet azure network vnet subnet create -g pg-resource-group --vnet-name pg-vnet --address-prefix 10.0.0.0/24 --name pg-vnet-subnet Since we are going to manage via ssh via an external ip-address, we create firewall rules and allow connections from outside to port 22 only:
azure network nsg create -g pg-resource-group -l northeurope --name pg-nsg azure network nsg rule create -g pg-resource-group --nsg-name pg-nsg --name AllowSSH --protocol Tcp --access Allow --destination-port-range 22 --priority 200 --direction Inbound We configure the external ip-address (public-ip), the network adapter with a private network and a subnet for the leader:
azure network public-ip create -g pg-resource-group -l northeurope --allocation-method Static --name pg-public-1 azure network nic create -g pg-resource-group -l northeurope --subnet-name pg-vnet-subnet --subnet-vnet-name pg-vnet --private-ip-address 10.0.0.101 --network-security-group-name pg-nsg --name pg-nic-1 We create accessibility group. In short, this is a cluster of machines divided into groups (domains) that cannot be available at the same time:
azure availset create -g pg-resource-group -l northeurope --name pg-availability-set Read more about accessibility groups here .
It is time to configure the virtual machine. Available types of virtual machines and their limitations can be found through the command:
azure vm sizes -l northeurope The list will have more than 50 types of cars, prices can be found here . Fewer disks can be connected to cheaper ones (the total number of disks can be from 1 to 40). For testing the wizard, Standard_DS4_v2 is selected: 8 CPU, 28GB RAM, to which you can connect up to 16 premium storage disks.
The command to create a virtual machine that implies the pg user with sudo-rights and allowed ssh login using the ssh key:
azure vm create -g pg-resource-group -l northeurope --nic-name pg-nic-1 --os-type Linux --image-urn OpenLogic:CentOS:7.2:latest --admin-username pg --ssh-publickey-file ~/.ssh/id_rsa.pub --vm-size Standard_DS4_v2 --public-ip-name pg-public-1 --availset-name pg-availability-set --name pg-1 You can view the parameters of the created machine, as well as external ip, via the command:
azure vm show -g pg-resource-group --name pg-1 Now we have a virtual machine with CentOS 7.2 installed, running in a private pg-vnet virtual network with an ip-address of 10.0.0.101 and a public pg-public-1, through which we can access ssh from the outside. It is necessary to create a disk on which data of our PostgreSQL will be located. You can read about various types of storage here . To begin with, we will present the results of our repository testing:

Create a Premium LRS storage account named pgplrs (it must be unique within azure):
azure storage account create -g pg-resource-group -l northeurope --type PLRS pgplrs Create a disk and connect it to the virtual machine:
azure vm disk attach-new -g pg-resource-group -l northeurope --vm-name pg-1 --lun 1 --size-in-gb 512 --vhd-name pgdata-1 --host-caching ReadOnly --storage-account-name pgplrs Create and run the pg-2 virtual machine:
azure network public-ip create -g pg-resource-group -l northeurope --allocation-method Static --name pg-public-2 azure network nic create -g pg-resource-group -l northeurope --subnet-name pg-vnet-subnet --subnet-vnet-name pg-vnet --private-ip-address 10.0.0.102 --network-security-group-name pg-nsg --name pg-nic-2 azure vm create -g pg-resource-group -l northeurope --nic-name pg-nic-2 --os-type Linux --image-urn OpenLogic:CentOS:7.2:latest --admin-username pg --ssh-publickey-file ~/.ssh/id_rsa.pub --vm-size Standard_DS4_v2 --public-ip-name pg-public-1 --availset-name pg-availability-set --name pg-2 azure vm disk attach-new -g pg-resource-group -l northeurope --vm-name pg-2 --lun 1 --size-in-gb 512 --vhd-name pgdata-2 --host-caching ReadOnly --storage-account-name pgplrs azure vm start -g pg-resource-group pg-2 Now we can connect via ssh to pg-1 as pg user:
ssh pg-public-1 -l pg -i ~/.ssh/id_rsa All further actions we will perform on the machine pg-1. Immediately after connecting the drive, you need to match it with the physical block device available on the virtual machine. To do this, run the command:
[root@pg-1 ~] $ dmesg | tail -n 10 [ 488.417024] Adjusting hyperv_clocksource more than 11% (1945964553 vs 1862270976) [ 525.969741] scsi 5:0:0:0: Direct-Access Msft Virtual Disk 1.0 PQ: 0 ANSI: 4 [ 526.001471] sd 5:0:0:0: Attached scsi generic sg3 type 0 [ 526.018792] sd 5:0:0:0: [sdc] 1073741824 512-byte logical blocks: (549 GB/512 GiB) [ 526.039690] sd 5:0:0:0: [sdc] 4096-byte physical blocks [ 526.053643] sd 5:0:0:0: [sdc] Write Protect is off [ 526.065818] sd 5:0:0:0: [sdc] Mode Sense: 0f 00 10 00 [ 526.065985] sd 5:0:0:0: [sdc] Write cache: enabled, read cache: enabled, supports DPO and FUA [ 526.091754] sdc: unknown partition table [ 526.105263] sd 5:0:0:0: [sdc] Attached SCSI disk From these messages it can be understood that the name of the block device assigned to the mounted disk is / dev / sdc. Create a file system on it:
[root@pg-1 ~] $ mkfs.ext4 /dev/sdc mke2fs 1.42.9 (28-Dec-2013) /dev/sdc is entire device, not just one partition! Proceed anyway? (y,n) y Now we have to create an entry in fstab. Get the UUID of the device:
[root@pg-1 ~] $ blkid /dev/sdc /dev/sdc: UUID="8cb25a32-175b-4c78-b557-8153327d48ba" TYPE="ext4" And mount the disk, after creating the mount point and adding an entry in fstab:
[root@pg-1 ~] $ mkdir -p /var/lib/pgsql [root@pg-1 ~] $ echo 'UUID=8cb25a32-175b-4c78-b557-8153327d48ba /var/lib/pgsql ext4 defaults 0 0' >> /etc/fstab [root@pg-1 ~] $ mount -a It's time to install the software, connect the repository:
[root@pg-1 ~] $ rpm -ivh http://repo.postgrespro.ru/pgpro-9.5/keys/postgrespro-9.5.centos95.noarch.rpm Install the software:
[root@pg-1 ~] $ yum install postgrespro95-server postgrespro95-contrib We turn on the service and initialize the DBMS instance:
[root@pg-1 ~] $ chkconfig postgresql-9.5 on [root@pg-1 ~] $ service postgresql-9.5 initdb [root@pg-1 ~] $ service postgresql-9.5 start Further commands we will run under the user postgres:
[root@pg-1 ~] $ su -l postgres We allow connection to the server in pg_hba with ip 10.0.0.101-102 for replication:
[postgres@pg-1 ~] $ echo 'host replication replication 10.0.0.101/30 md5' >> /var/lib/pgsql/9.5/data/pg_hba.conf Create a user for replication:
[postgres@pg-1 ~] $ /usr/pgsql-9.5/bin/psql -U postgres postgres postgres=$ CREATE ROLE replication WITH REPLICATION PASSWORD 'password' LOGIN; CREATE ROLE We set the parameters that allow using this machine as a leading server for replication:
[postgres@pg-1 ~] $ /usr/pgsql-9.5/bin/psql -U postgres postgres postgres=$ alter system set listen_addresses to '*'; ALTER SYSTEM postgres=$ alter system set wal_level to hot_standby; ALTER SYSTEM postgres=$ alter system set max_wal_senders to 3; ALTER SYSTEM postgres=$ alter system set wal_keep_segments to 128; ALTER SYSTEM Check if the parameters are applied:
postgres=$ select * from pg_file_settings where not applied; sourcefile | sourceline | seqno | name | setting | applied ----------------------------------------------+------------+-------+------------------+-------------+--------- /var/lib/pgsql/9.5/data/postgresql.auto.conf | 3 | 20 | wal_level | hot_standby | f /var/lib/pgsql/9.5/data/postgresql.auto.conf | 4 | 21 | max_wal_senders | 3 | f /var/lib/pgsql/9.5/data/postgresql.auto.conf | 6 | 23 | listen_addresses | * | f (3 rows) Restart the service:
[postgres@pg-1 ~] $ /usr/pgsql-9.5/bin/pg_ctl restart -D /var/lib/pgsql/9.5/data -w Now we can connect via ssh to pg-2 as pg user:
ssh pg-public-2 -l pg -i ~/.ssh/id_rsa All further commands we run on the machine pg-2. It's time to do a replica: we similarly connect the disk and install postgrespro. And we log in to pg-2 as a postgres user:
[root@pg-2 ~] $ su -l postgres After that, prepare a replica with one command:
[postgres@pg-2 ~] $ /usr/pgsql-9.5/bin/pg_basebackup -U replication -D /var/lib/pgsql/9.5/data -R -x -P -c spread -h 10.0.0.101 -W Password: 38895/38895 kB (100%), 1/1 tablespace Now we have a complete copy in /var/lib/pgsql/9.5/data and the specified recovery.conf file, in which I recommend adding information about the trigger file, during the creation of which this instance of the DBMS will turn from a slave into a full-fledged leading server. Thus, the contents of the file will be as follows:
[postgres@pg-2 ~] $ cat /var/lib/pgsql/9.5/data/recovery.conf standby_mode = 'on' primary_conninfo = 'user=replication password=password host=10.0.0.101 port=5432 sslmode=prefer sslcompression=1 krbsrvname=postgres' trigger_file = '/var/lib/pgsql/stop_replication_trigger' We start an instance with a replica:
[postgres@pg-2 ~] $ /usr/pgsql-9.5/bin/pg_ctl start -w -D /var/lib/pgsql/9.5/data And check if the WAL receiver is running (process wal receiver):
[postgres@pg-2 ~] $ ps axufwwww postgres 29423 0.1 0.2 372920 16564 ? S 09:07 0:00 /usr/pgsql-9.5/bin/postmaster -D /var/lib/pgsql/9.5/data postgres 29425 0.0 0.0 225568 1608 ? Ss 09:07 0:00 \_ postgres: logger process postgres 29426 0.1 0.0 372960 2464 ? Ss 09:07 0:00 \_ postgres: startup process recovering 0000010000000000000003 postgres 29427 0.0 0.0 372920 1964 ? Ss 09:07 0:00 \_ postgres: checkpointer process postgres 29428 0.0 0.0 372920 1976 ? Ss 09:07 0:00 \_ postgres: writer process postgres 29429 0.2 0.0 379640 3360 ? Ss 09:07 0:00 \_ postgres: wal receiver process streaming 0/3000060 In total, we have two virtual machines, between which streaming asynchronous replication is configured, running in the same availability group. In the next part of the article we will discuss backup copies and client balancing.
Wait for the continuation!
')
Source: https://habr.com/ru/post/283156/
All Articles