Intel System Studio for Microcontrollers 2015: First Steps
Introducing the Intel System Studio for Microcontrollers 2015 overview. We’ll talk about how to use this application package to develop and debug applications for the Intel Quark D1000 microcontroller on the Linux platform. In particular, consider the organization of interaction between the developer’s computer and the microcontroller.
In order to download the code (flash device) to Intel Quark D1000, a mini-USB cable is enough. In addition, the same connection is used to start a GDB debug session with an OpenOCD connection and exchange commands with the UART.
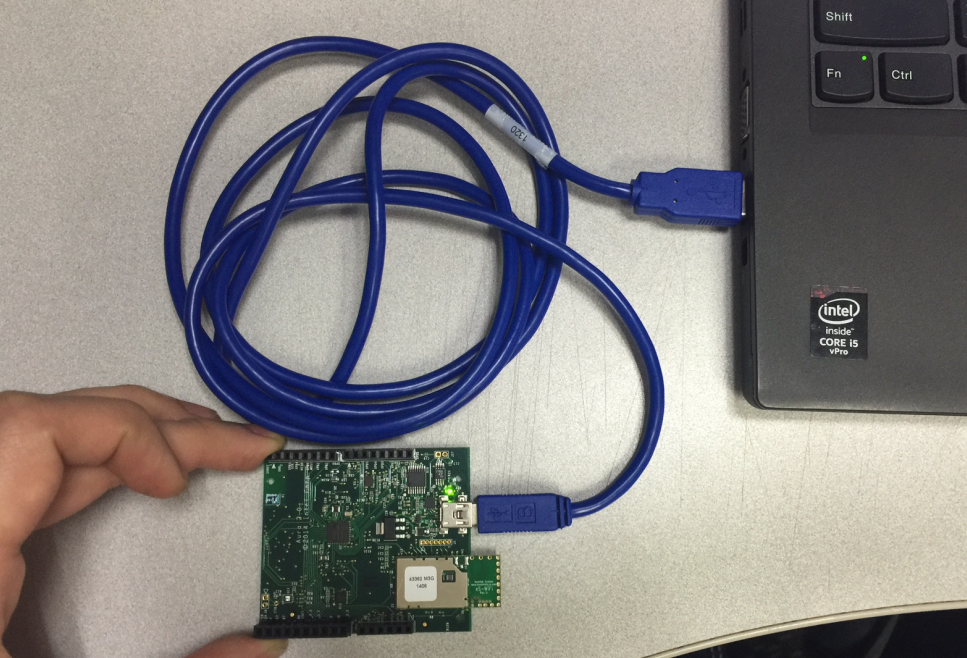
Connecting Intel Quark D1000 to a computer
Intel System Studio for Microcontrollers 2015 is an integrated set of tools that allows you to develop and debug programs for the Intel Quark D1000 microcontroller.
System Studio consists of the following components that support working with the Intel Quark D1000.
')
You can use these tools from the command line and from IDE Eclipse Luna or Mars. Supports work in the following OS:
Here we talk about working in Linux.
For example, if you decide to unpack the archive in the $ HOME directory, you can do this with the following command:
As a result, the directory in which the toolbox is installed will be $ HOME / l_cembd_iqd_p_1.0.n.xxx.
Check if you have a suitable version of the GNU C Library (glibc). If not - you can find distributions here.
On Fedora, this is glibc.i686. To install, execute the following command in the terminal with superuser privileges:
In Ubuntu, this is ia32-libs, this command is used here:
By default, users who do not have root-rights do not have access to JTAG adapters connected via USB. That is, working with a different level of rights, in order to use OpenOCD, you will have to give write access to the corresponding interface in / dev / bus / usb each time.
This process can be automated by adding a udev rule.
In order to check whether everything is installed correctly, whether the system is recognized by the microcontroller, do the following:
 Successful connection of the microcontroller
Now, after the microcontroller is successfully connected to the system, you can start developing applications for it, compiling them, running on the device and debugging. Details can be found in this manual. In particular, it describes how to work with a set of tools from the command line and from the Eclipse IDE. You can also find details about the compiler options, additional information about the product and its technical support.
The Intel System Studio for Microcontrollers 2015 package includes a set of sample projects, or firmware, designed to help developers create their own programs. These examples can be modified as you like, and we strongly recommend that you try them out in order to learn more about the capabilities of Intel System Studio and the microcontroller.
Here, for example, how the launch of the modified version of the PushButton example looks like after writing the corresponding firmware to the microcontroller. Namely, the program detects button presses, and in response to this, through the UART, displays a certain string. First look at the “iron” component. A microcontroller with a button module connected to it is connected to a computer via USB.
 Microcontroller and module with a button
That's what happens if you click on the button.
 The firmware on the microcontroller
We talked about how to take the first steps in the development of firmware for the Intel Quark D1000 in Intel System Studio for Microcontrollers 2015. We believe that the example with the button that we have described here will be interesting to make out in detail. Such analysis is already ready, one of the following publications will be devoted to it.
In order to download the code (flash device) to Intel Quark D1000, a mini-USB cable is enough. In addition, the same connection is used to start a GDB debug session with an OpenOCD connection and exchange commands with the UART.
Connecting Intel Quark D1000 to a computer
Intel System Studio for Microcontrollers 2015 Overview
Intel System Studio for Microcontrollers 2015 is an integrated set of tools that allows you to develop and debug programs for the Intel Quark D1000 microcontroller.
System Studio consists of the following components that support working with the Intel Quark D1000.
')
- A C / C ++ compiler based on LLVM, including linker, assembler, C / C ++ runtime libraries.
- Gdb debugger
- OpenOCD.
You can use these tools from the command line and from IDE Eclipse Luna or Mars. Supports work in the following OS:
- Windows 7, 8.x
- Linux (Fedora 19, Ubuntu * 12.04 LTS and 14.04 LTS).
Here we talk about working in Linux.
Installation
- Before downloading the toolkit, make sure that there is at least 140 MB of free space on the computer.
- Download Intel System Studio for Microcontrollers in the Intel Registration Center. The archive name (for Linux) looks like l_cembd_iqd_p_1.0.n.xxx.tgz, where "n" is the release number of the update, and "xxx" is the build number of the package.
- Install System Studio by unpacking the archive with materials for your OS in the folder to which you have access with write access. Please note that the product does not provide any default installation location. Check that the full path to this folder does not contain spaces.
For example, if you decide to unpack the archive in the $ HOME directory, you can do this with the following command:
tar –xzf l_cembd_iqd_p_1.0.0.001.tgz –C $HOME As a result, the directory in which the toolbox is installed will be $ HOME / l_cembd_iqd_p_1.0.n.xxx.
Install glibc
Check if you have a suitable version of the GNU C Library (glibc). If not - you can find distributions here.
On Fedora, this is glibc.i686. To install, execute the following command in the terminal with superuser privileges:
yum install glibc.i686 In Ubuntu, this is ia32-libs, this command is used here:
apt-get install ia32-libs Installing USB driver
By default, users who do not have root-rights do not have access to JTAG adapters connected via USB. That is, working with a different level of rights, in order to use OpenOCD, you will have to give write access to the corresponding interface in / dev / bus / usb each time.
This process can be automated by adding a udev rule.
- Create a text file in the rules directory
sudo vim /etc/udev/rules.d/99-openocd.rules - Add the following line to this file:
SUBSYSTEM=="usb", ATTR{idVendor}=="0403", ATTR{idProduct}=="6010",MODE="0666" - Disconnect the device from the computer and reconnect (or restart the computer). If you do not do this, you may encounter a situation where OpenOCD does not start and displays the following error messages:
Error: libusb_open() failed with LIBUSB_ERROR_ACCESS Error: no device found Error: unable to open ftdi device with vid 0403, pid 6010, description '*' and serial '*'
In order to check whether everything is installed correctly, whether the system is recognized by the microcontroller, do the following:
- Disconnect the device from the computer.
- Run the command sudo dmesg –c.
- Connect the device to the computer.
- Run the sudo dmesg –c command again.
- If everything works correctly, you will see the following messages:
Development, compilation and debugging of applications
Now, after the microcontroller is successfully connected to the system, you can start developing applications for it, compiling them, running on the device and debugging. Details can be found in this manual. In particular, it describes how to work with a set of tools from the command line and from the Eclipse IDE. You can also find details about the compiler options, additional information about the product and its technical support.
Sample application
The Intel System Studio for Microcontrollers 2015 package includes a set of sample projects, or firmware, designed to help developers create their own programs. These examples can be modified as you like, and we strongly recommend that you try them out in order to learn more about the capabilities of Intel System Studio and the microcontroller.
Here, for example, how the launch of the modified version of the PushButton example looks like after writing the corresponding firmware to the microcontroller. Namely, the program detects button presses, and in response to this, through the UART, displays a certain string. First look at the “iron” component. A microcontroller with a button module connected to it is connected to a computer via USB.
That's what happens if you click on the button.
findings
We talked about how to take the first steps in the development of firmware for the Intel Quark D1000 in Intel System Studio for Microcontrollers 2015. We believe that the example with the button that we have described here will be interesting to make out in detail. Such analysis is already ready, one of the following publications will be devoted to it.
Source: https://habr.com/ru/post/283074/
All Articles