Means of data collection in computer technical expertise

In this article I will talk about some of the features of the various ways of creating copies (images) of information carriers in computer forensics (forsensike). The article will be useful to employees of information security departments who respond to security incidents and conduct internal investigations. I hope that forensic experts conducting computer and technical expertise (hereinafter referred to as KTE) will find something new in it.
To begin with a quote:
The author believes (and many researchers agree with this) that it is generally undesirable to investigate the original of the carrier during KET. In order to guarantee that the information remains unchanged, as well as to leave the possibility of a repeated or additional examination, the original must be left untouched. And all the research carried out with his copy. This is not only more reliable, but also more convenient, since a copy can be made on a carrier that is better suited for the tools available to the expert, more reliable, faster.
N.N. Fedotov. Forensic - computer forensics
In order for the created image to be forensically reliable, it is necessary, firstly, in the process of creation not to change the contents of the studied carrier, and secondly, after extraction, the image must match the investigated carrier bit by bit. Such an image will contain not only live files, but also service data, free areas of file systems and areas not partitioned by file systems.
If you, like an elephant in a china shop, connect the examined media to a normal operating system (OS), then the irreversible happens: in the standard configuration, the OS activates the device immediately after detection, installs file systems and, without asking you, changes its contents. Windows, for example, without a demand, changes timestamps in file attributes (in some cases), creates hidden Recycle folders, saves configuration information.
There are two ways to prevent changes to the information on the media: hardware or software.
Recording hardware blockers
I did not work with hardware solutions, but I will give a little theory from the Internet. There are record blockers (bridge), through which the studied media are connected to a computer, and there are duplicators that can autonomously create full copies and images of the disks under study.
The write blockers intercept write commands from the OS and prevent them from being transferred to the storage medium. When possible, they inform the OS that the device is connected in read-only mode, otherwise the OS just reports write errors. Some devices use the built-in memory to cache the recorded data and create for the OS the appearance that the data on the disk has really changed.

Hardware solutions certainly have their advantages, but they also have disadvantages:
They are not cheap. For example, the T35u record lock has a recommended retail price of $ 349.00, a Tableau TD2u duplicator - $ 1,599.00.
- And they are not perfect. There have been cases where hardware devices have skipped writing commands to a device ( example ).
Boot disks for computer forensics
Software is inevitable in companies with a distributed territorial structure (especially if you do not want to spend half the IT budget on hardware that you may never need). Software solutions will save you time in case of massive incidents: you can create as many bootable flash drives as you need to investigate computers, and then start creating images on all computers at the same time. It remains only to determine what software should be on these bootable flash drives.
Linux distros
You can remove the image with one of the numerous specialized Linux distributions, here are some of them: Rip Linux, DEFT Linux, CAINE, Paladin, Helix, Kali. In some, you need to choose the mode forensic mode (or something like that) when loading. Some of these distributions already contain software for image analysis.
Some problems of the read-only mode for Linux distributions are described here . But the main problem of Linux is the relative difficulty in using, and, as a result, the lack of personnel with sufficient expertise. In Linux, to capture an image, you will have to use the command line (for example, ftk imager under linux only exists in the console version), where one typo can destroy all the evidence (even if this story turned out to be viral advertising, but not just many believed it).
Windows boot disks
To be able to entrust the creation of an image to any ordinary IT employee, you need to minimize the probability of error. A special build of Windows Forensic Environment (WinFE), which has a graphical interface in many respects similar to ordinary Windows, while being limited only by necessary functions, copes well with this. WinFE was created by a computer forensic scientist working at Microsoft. The build is based on WinPE and works by analogy with “forensically sound” Linux distributions that do not mount partitions during the boot process.
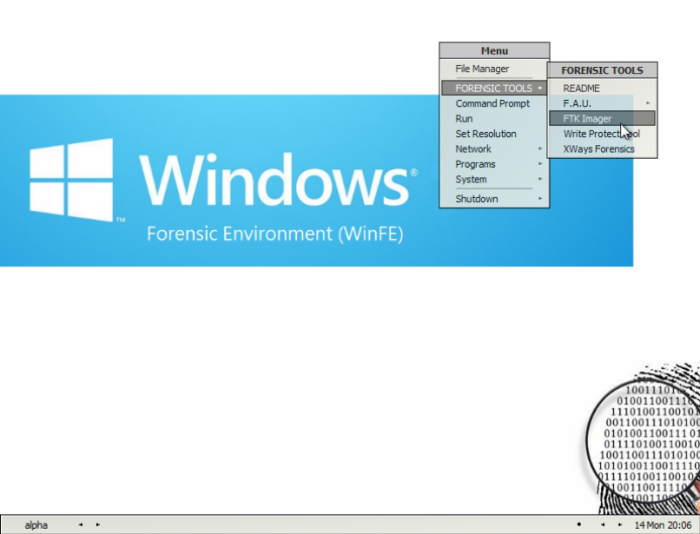
Here are a few WinFE strengths:
- You can use Windows forensic applications (portable versions)
- Most forensic experts are already using Windows.
- Free (if you have a Windows license)
- Relatively easy to build and customize.
- Less opportunity for serious use errors
The easiest way to build WinFE is a utility from the WinBuilder Mini-WinFE project . You will need a Windows distribution and software that you want to include in the assembly. At the output, you will receive an ISO file that can be burned to CD or USB (using Rufus ).
The main scenario using WinFE:
- Create a bootable WinFE disk.
- Download WinFE on the analyzed computer.
- Removing the image of the disks of the investigated computer. Images are recorded on WinFE media or any other media.
Supported applications include - CloneDisk (included)
DMDE (included)
Forensic Acquisition Utilities (included)
FTK Imager (copied from local install)
HWiNFO (included)
LinuxReader (downloaded automatically)
MW Snap (included)
NT Password Edit (included)
Opera (included)
Sumatra PDF Reader (included)
WinHex (copied from local install)
X-Ways Forensics (copied from local install)
Write Protect Tool (included)
For the special behavior of WinFE in the procedure for connecting disks, two registry parameters are responsible:
- HKEY_LOCAL_MACHINE \ system \ ControlSet001 \ Services \ MountMgr . The DWord NoAutoMount parameter is set to 1 . After this, the Mount Manager service does not automatically mount any storage device .
- HKEY_LOCAL_MACHINE \ system \ ControlSet001 \ Services \ partmgr \ Parameters The SanPolicy parameter is set to "3" or "4" depending on the version of Windows.
There are at least seven versions of WinFE, each available in versions 32 and 64 bits.
Windows FE 2.0 (6.0.6000 - Vista) Windows FE 2.1 (6.0.6001 - Vista SP1/Server 2008) Windows FE 3.0 (6.1.7600 - 7/Server 2008 R2) Windows FE 3.1 (6.1.7601 - 7 SP1/Server 2008 R2 SP1) Windows FE 4.0 (6.2.9200 - 8/Server 2012) Windows FE 5.0 (6.3.9600 - 8.1) Windows FE 5.1 (6.3.9600 - 8.1 Update 1) Each version has its own set of features, a detailed comparison , but I recommend the 32-bit version of Windows FE 5.x (details below).
So, while booting, WinFE does not mount partitions, but suggests that the user do it himself using the special utility Write Protect Tool (WProtect.exe, by Colin Ramsden). As the name suggests, this utility prevents writing to disk.

However, WinFE also had cases of unintentional writing. It is important that these cases are well studied, refer to older versions of Windows <4.0 and do not affect user data, because affect only the so-called disk signature - this is 4 bytes in the master boot record (MBR), which Windows adds when you connect the disk, if it has not previously connected to NT-systems. You can learn more about what a disk signature is in this article by Mark Russinovich, and this post describes in detail when Windows changes the disk signature.
The main WinFE blog is now located here .
Image creation
After we have downloaded our trusted OS, you can start creating an image. The yellow jersey of the leader is in E01 (Encase) format and there are several reasons for this:
- recognized by experts format - this is important if it comes to court.
- Most forensic utilities have support for this format — you will not have to convert an image during the analysis phase.
- arbitrary compression ratio - it depends on the final size and the time required to create an image, you can choose the desired degree depending on the situation.
- arbitrary fragment size — so that it is convenient to copy the image over the network or save the image on FAT32 file systems, you can split the image into 4000 MB fragments.
- service fields in which you can save various data (for example, the name of the expert who performs the image removal, the time difference on the examined computer with the actual time, the serial number of the disk from which the image is taken, etc.).
- integrity control - at the creation stage, the checksum of the image is calculated.
To create an image in E01 format, it is best to use the time-tested and free FTK Imager Lite , which can be included in the WinFE boot disk. By the way, there is not much point in using the Use AD Encryption function (image protection with a password), since This protection is easily removed.
Conclusion
A must-have for those who don’t have time to read this article: use the WinFE bundled with FTK Imager Lite and save the image in E01 format to capture the image from the computer under investigation.
PS Outside this article there are tools for flash memory drives ( Flash memory: problems for computer forensics , Erase cannot be recovered ), as well as tools for removing the memory dump from a running system.
If Habra is interested, then I will talk about how you can analyze the images obtained using open source software.
')
Source: https://habr.com/ru/post/283036/
All Articles