Code examples for the Internet of things: smart sprinkler
We recently published educational code examples for various projects that form the Internet of things. Today we will talk about the automatic irrigation system. It was built using the Intel IoT Developer Kit, Intel Edison, it uses cloud platforms, various APIs and other technologies.

These are the capabilities of the automatic irrigation system that we will create based on Intel Edison:
The watering system allows you to set the watering schedule by opening a web page using a smartphone or other suitable device, which is stored on Intel Edison. It automatically polls the humidity sensor and displays the data on a web page.
If it is assumed that the water pump is turned on, but the water flow sensor indicates that the water does not move through the pipes, a text message will be sent to the specified number via Twilio. Thus, the irrigation system, which has failed, can be promptly repaired.
Additionally, the system can log events using code from Intel IoT Examples Datastore, which runs in the Microsoft Azure environment.
The hardware of the project is the Grove Environment & Agriculture Kit, which includes:
To get started, copy the Intel IoT Code Samples How-To repository to a Git computer using the following command:
If it is more convenient for you to download a ZIP archive with the necessary materials, open this page and click on the Download ZIP button to the right. After downloading the archive, unpack it and find the folder with the code for this project (watering-system).
On the Intel XDK IoT Edition, select the Import Your Node.js Project command:

Import Node.js Project
Then go to the folder where the study project files are located and select it.

Select the folder with the project code
Now you need to connect the Intel Edison board to the computer and download the program to the board. To do this, you can use the IoT Device menu (IoT-device), which is located in the lower left part of the window. If the system automatically recognized the connected board, select the appropriate line in the menu.

Intel Edison Connection
If the card was not automatically recognized, select the Add Manual Connection option, in the window that appears, in the Address field, enter 192.168.2.15, in the Port field, enter 58888. Save the button with the Connect button. connection
In addition, the program can be installed on Intel Edison manually. To do this, connect to the board via SSH and run the following command:
Then go to the example folder. If Git is not already installed on Edison, you can do this by connecting to the board via SSL and running the following command:
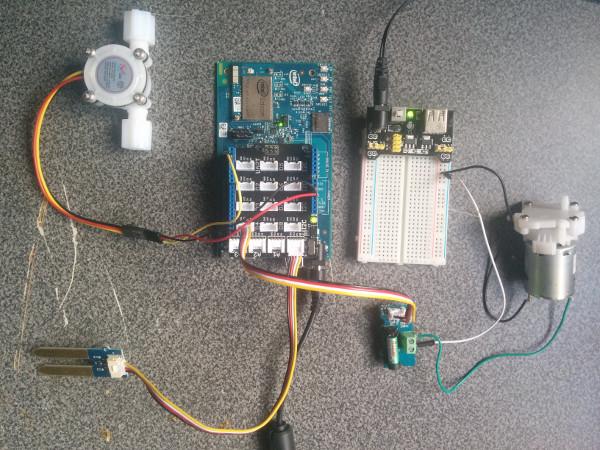
Prototype Irrigation System Assembly
It is necessary that the Groove (Grove Shield) expansion board be connected to the Arduino switching card, to which the sensors and actuators will be connected. Make sure the small VCC switch on the Grove expansion board is in the 5V position.
You must power up the Intel Edison from the external adapter that came with the Starter Kit, or replace it with a suitable external power supply (12 V, 1.5 A). You can also use a 5V USB battery.
In addition, you will need a prototype board and an additional 5 V power supply for the water pump. Note that the pump needs a separate power supply. You cannot use the same source for both Intel Edison and the pump, that is, you need either two batteries or two adapters.
To connect the water pump will need a relay with a dry reed switch Groove. The connection is as follows:
If you chose to run the sample code yourself on Intel Edison, you will need to resolve some dependencies.
To get the Node.js modules needed for the example to run on Edison, run the following command:
In order for the system to send text messages, you need a Twilio account and an API key. No message can be sent without a key. The example will work without sending messages, but in real projects this feature is very useful.
In order to set up an example to work with your Twilio account, in the config.json file, set the values for “
If you wish, you can store the data that is generated by the example in question in a database deployed using Microsoft Azure, Node.js, and Redis data storage. Details on how to configure the cloud server, see here .
If you have a Microsoft Azure account and there is a server ready to receive data, you need to make changes in config.json, namely, write the data for connecting to the server in the
In the event that in your version of the example both Twilio sending text messages and Microsoft Azure data storage are used, the settings will look like this:
Before starting the program, save the changes made to the files. After that, click on the Upload icon to upload the code to Intel Edison.

Upload project to Intel Edison
After unloading, run the program on the device using the Run icon.
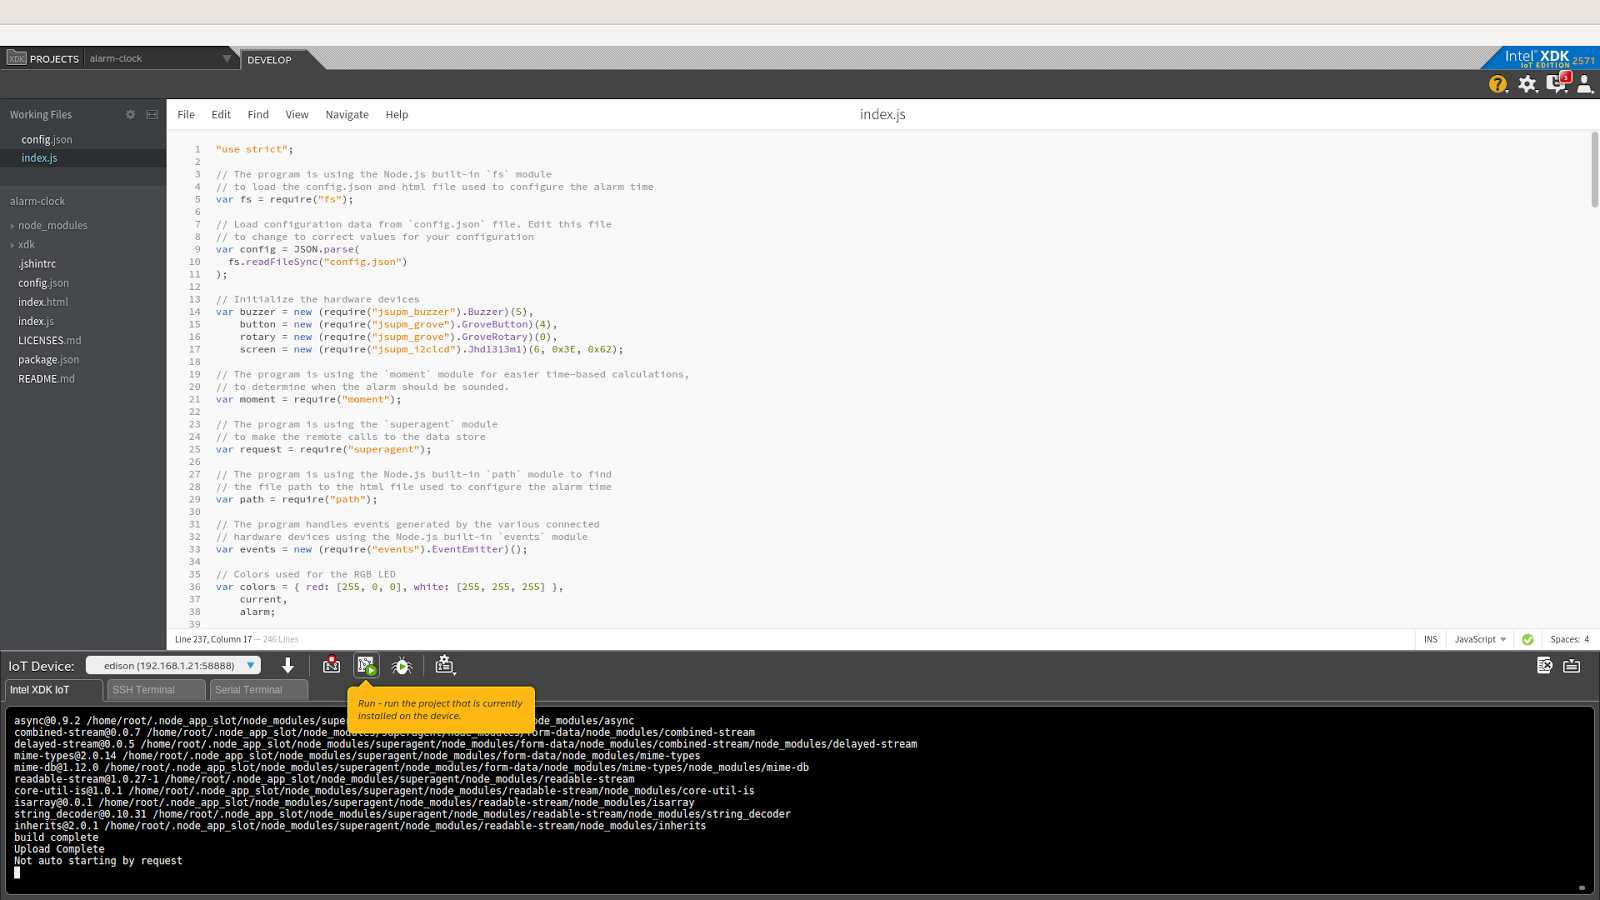
Launch of the project
If you made changes to the code while working on a project, you can use the Upload and Run command. The latest version of the program will be uploaded and run on Intel Edison. During the execution of the program on Edison, you will see messages similar to those shown in the figure below.
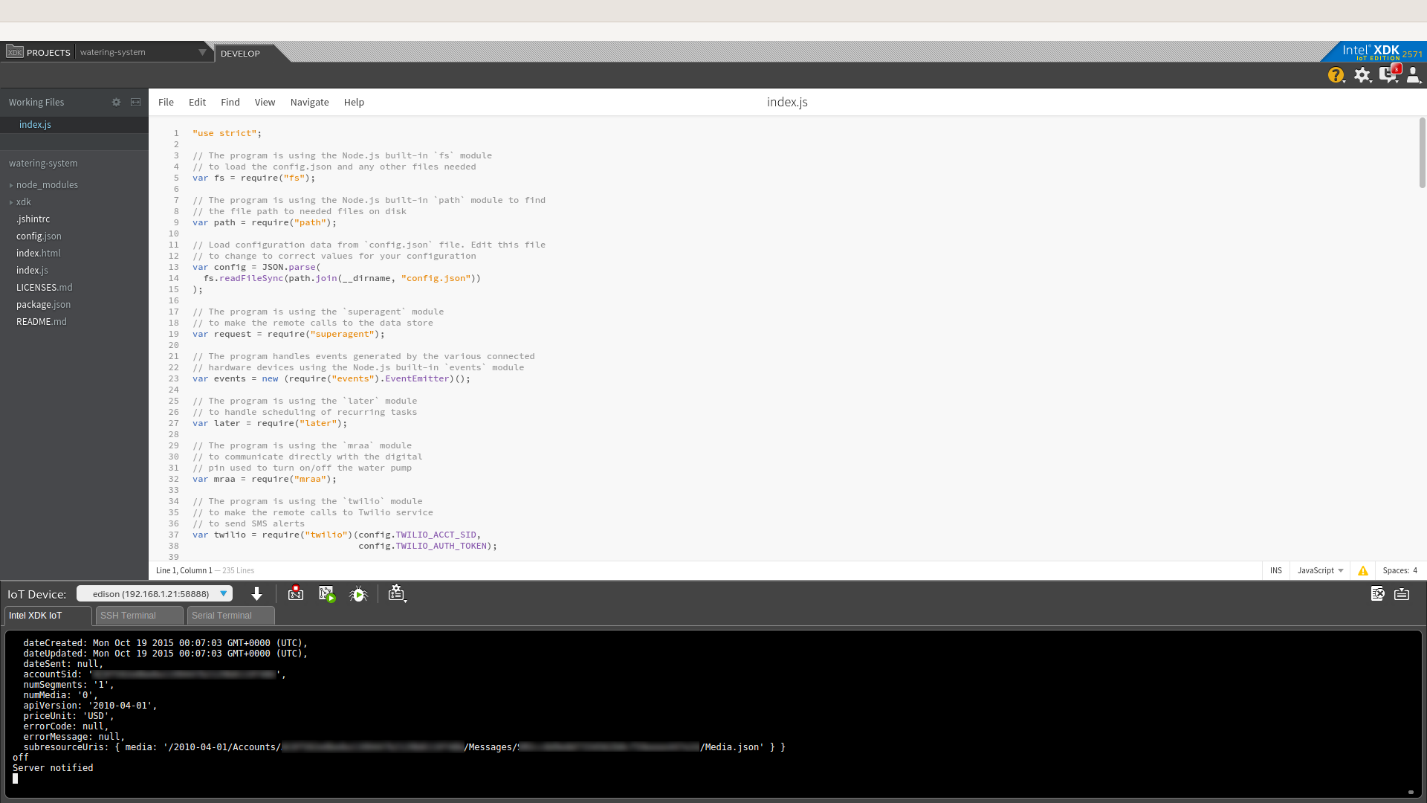
Messages from a program that runs on Intel Edison
To start the program manually, connect to Intel Edison via SSH and run the following command:
To set up a watering schedule, a one-page web interface is used. This page can be opened by requesting it from a web server that runs on the same Intel Edison board on which the main program runs.
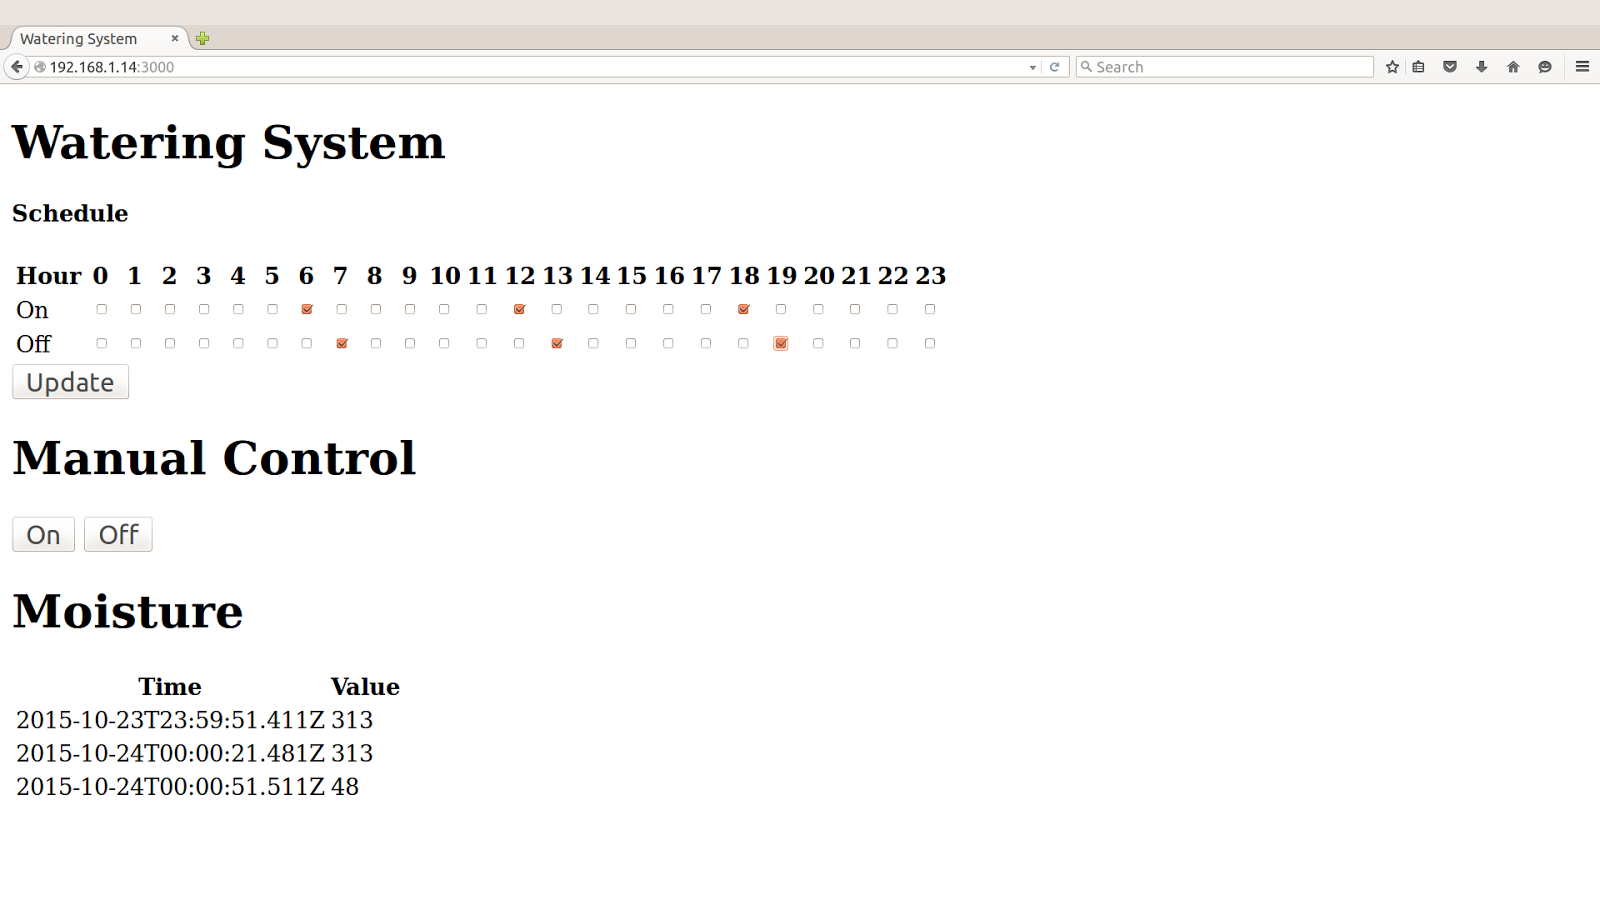
Page for setting the schedule of watering
The server is assigned port 3000. Thus, if Intel Edison is connected to a Wi-Fi network and assigned an IP address 192.168.1.13, the server address (provided that you connect to it from the same local network) will be http: / /192.168.1.13a000 .
To find the IP address of Intel Edison, you can use the following command:
After its execution, you will see something like the following:
An Intel Edison address can be found after “inet”. In our case, this is 192.168.1.13.
We talked about how to build an irrigation system based on Intel Edison, which includes a set of sensors and a water pump. A system connected to the Internet can be controlled from any device that can open web pages. If you use cloud services in the above example to store data and send messages, you can collect statistics on the operation of the device, and, in the event of an emergency, get a text message to the specified mobile phone number and quickly fix the breakdown.
Other code examples from the How-To series of Intel IoT Code Samples can be found at the Intel Developer Zone . The complete code for the example discussed here can be found on GitHub .
- How to connect to Intel Edison - a platform designed for prototyping and developing wearable computing solutions and IoT devices.
- How to interact with the Edison I / O interface and sensors with MRAA and UPM from the Intel IoT Developer Kit, a self-contained hardware and software solution designed to help developers explore the power of the Internet of things and create innovative products.
') - How to run example code in Intel XDK IoT Edition, an IDE to create applications that interact with sensors and actuators. This development environment allows you to quickly begin developing applications for Intel Edison and Intel Galileo.
- How to set up a web application server that will store watering system data using Azure Redis Cache in Microsoft Azure. This is a set of cloud services for IoT solutions that support data analysis, machine learning, and many useful tools that make it easy to connect devices to the cloud and allow you to quickly bring an IoT project to work.
- How to call the Twilio API service to send text messages to mobile phones.
System features
These are the capabilities of the automatic irrigation system that we will create based on Intel Edison:
- Turn the water pump on and off according to a custom schedule.
- Check whether the pump actually pumps water when the corresponding command is given to it. For this, a water flow sensor is used.
- Organization of access to the system using the integrated web interface that allows you to set the schedule for watering.
- Storing information about the system in the cloud storage.
- Sending text messages to notify consumers that the system has failed.
Work features
The watering system allows you to set the watering schedule by opening a web page using a smartphone or other suitable device, which is stored on Intel Edison. It automatically polls the humidity sensor and displays the data on a web page.
If it is assumed that the water pump is turned on, but the water flow sensor indicates that the water does not move through the pipes, a text message will be sent to the specified number via Twilio. Thus, the irrigation system, which has failed, can be promptly repaired.
Additionally, the system can log events using code from Intel IoT Examples Datastore, which runs in the Microsoft Azure environment.
Hardware
The hardware of the project is the Grove Environment & Agriculture Kit, which includes:
- Intel Edison Arduino Switchboard
- Grove humidity sensor .
- Water pump
- Water flow sensor .
- Relay with dry reed switch Grove.
Software
- Intel XDK IoT Edition
- Microsoft Azure Account
- Twilio Account
Preliminary preparations
To get started, copy the Intel IoT Code Samples How-To repository to a Git computer using the following command:
$ git clone https://github.com/intel-iot-devkit/how-to-code-samples.git If it is more convenient for you to download a ZIP archive with the necessary materials, open this page and click on the Download ZIP button to the right. After downloading the archive, unpack it and find the folder with the code for this project (watering-system).
Adding an Application to Intel XDK IoT Edition
On the Intel XDK IoT Edition, select the Import Your Node.js Project command:
Import Node.js Project
Then go to the folder where the study project files are located and select it.
Select the folder with the project code
Now you need to connect the Intel Edison board to the computer and download the program to the board. To do this, you can use the IoT Device menu (IoT-device), which is located in the lower left part of the window. If the system automatically recognized the connected board, select the appropriate line in the menu.
Intel Edison Connection
If the card was not automatically recognized, select the Add Manual Connection option, in the window that appears, in the Address field, enter 192.168.2.15, in the Port field, enter 58888. Save the button with the Connect button. connection
Manual installation of the program on Intel Edison
In addition, the program can be installed on Intel Edison manually. To do this, connect to the board via SSH and run the following command:
$ git clone https://github.com/intel-iot-devkit/how-to-code-samples.git Then go to the example folder. If Git is not already installed on Edison, you can do this by connecting to the board via SSL and running the following command:
$ opkg install git Connecting Grove Sensors
Prototype Irrigation System Assembly
It is necessary that the Groove (Grove Shield) expansion board be connected to the Arduino switching card, to which the sensors and actuators will be connected. Make sure the small VCC switch on the Grove expansion board is in the 5V position.
You must power up the Intel Edison from the external adapter that came with the Starter Kit, or replace it with a suitable external power supply (12 V, 1.5 A). You can also use a 5V USB battery.
In addition, you will need a prototype board and an additional 5 V power supply for the water pump. Note that the pump needs a separate power supply. You cannot use the same source for both Intel Edison and the pump, that is, you need either two batteries or two adapters.
To connect the water pump will need a relay with a dry reed switch Groove. The connection is as follows:
- Connect one end of the Grove cable to the relay, the other to the D4 port on the Grove expansion card.
- Connect one of the wires of the water pump to the 5 V power supply for the pump.
- Connect the other wire of the pump to one of the power connectors of the relay.
- Connect the other power connector of the relay to the "ground" of the pump power supply.
- Connect the water flow sensor by connecting the red wire to the “5V” output, the black to the “GND” output, and the yellow to the digital output 2 on the Grove expansion board.
- Connect one end of the Grove cable to the humidity sensor and the other end to the A0 port on the Grove expansion card.
Manual installation on Intel Edison
If you chose to run the sample code yourself on Intel Edison, you will need to resolve some dependencies.
To get the Node.js modules needed for the example to run on Edison, run the following command:
npm install Settings: sending messages and cloud storage
In order for the system to send text messages, you need a Twilio account and an API key. No message can be sent without a key. The example will work without sending messages, but in real projects this feature is very useful.
In order to set up an example to work with your Twilio account, in the config.json file, set the values for “
TWILIO_ACCT_SID ” and “ TWILIO_AUTH_TOKEN ”. In them, respectively, you need to specify the API key and authentication token. { "TWILIO_ACCT_SID": "YOURAPIKEY", "TWILIO_AUTH_TOKEN": "YOURTOKEN" } If you wish, you can store the data that is generated by the example in question in a database deployed using Microsoft Azure, Node.js, and Redis data storage. Details on how to configure the cloud server, see here .
If you have a Microsoft Azure account and there is a server ready to receive data, you need to make changes in config.json, namely, write the data for connecting to the server in the
SERVER and AUTH_TOKEN parameters. { "SERVER": "http://intel-examples.azurewebsites.net/logger/watering-system", "AUTH_TOKEN": "s3cr3t" } In the event that in your version of the example both Twilio sending text messages and Microsoft Azure data storage are used, the settings will look like this:
{ "TWILIO_ACCT_SID": "YOURAPIKEY", "TWILIO_AUTH_TOKEN": "YOURTOKEN", "SERVER": "http://intel-examples.azurewebsites.net/logger/watering-system", "AUTH_TOKEN": "s3cr3t" } Running the program from Intel XDK IoT Edition
Before starting the program, save the changes made to the files. After that, click on the Upload icon to upload the code to Intel Edison.
Upload project to Intel Edison
After unloading, run the program on the device using the Run icon.
Launch of the project
If you made changes to the code while working on a project, you can use the Upload and Run command. The latest version of the program will be uploaded and run on Intel Edison. During the execution of the program on Edison, you will see messages similar to those shown in the figure below.
Messages from a program that runs on Intel Edison
Manual start of the program
To start the program manually, connect to Intel Edison via SSH and run the following command:
node index.js Setting watering schedule
To set up a watering schedule, a one-page web interface is used. This page can be opened by requesting it from a web server that runs on the same Intel Edison board on which the main program runs.
Page for setting the schedule of watering
The server is assigned port 3000. Thus, if Intel Edison is connected to a Wi-Fi network and assigned an IP address 192.168.1.13, the server address (provided that you connect to it from the same local network) will be http: / /192.168.1.13a000 .
How to determine the IP address of Intel Edison
To find the IP address of Intel Edison, you can use the following command:
ip addr show | grep wlan After its execution, you will see something like the following:
3: wlan0: <BROADCAST,MULTICAST,UP,LOWER_UP> mtu 1500 qdisc pfifo_fast qlen 1000 inet 192.168.1.13/24 brd 192.168.1.255 scope global wlan0 An Intel Edison address can be found after “inet”. In our case, this is 192.168.1.13.
findings
We talked about how to build an irrigation system based on Intel Edison, which includes a set of sensors and a water pump. A system connected to the Internet can be controlled from any device that can open web pages. If you use cloud services in the above example to store data and send messages, you can collect statistics on the operation of the device, and, in the event of an emergency, get a text message to the specified mobile phone number and quickly fix the breakdown.
Other code examples from the How-To series of Intel IoT Code Samples can be found at the Intel Developer Zone . The complete code for the example discussed here can be found on GitHub .
Source: https://habr.com/ru/post/282756/
All Articles