Mobile application against fraudsters and paperwork in auto insurance
Today we want to share our experience in the analysis of cars. No, we are not planning to launch Top Gear. We have another topic for you - how to translate paperwork around voluntary auto insurance with the help of a mobile application - well-known hull insurance.
The topic will be of interest primarily to those involved in the development of mobile business applications and automation of business processes. We will tell interesting technical moments on the example of development for iOS.

So, to the problematic. CASCO is the second largest service of insurance companies for individuals. The most popular, of course, CTP, and then immediately CASCO. That's just to issue a CTP can be literally at every step, and you still have to sweat for CASCO: not only choose an insurance agent, but wait for an agent, fill a pile of pieces of paper, spend an inspection of the car with the agent, wait for him to take all the papers and photos to the office the underwriter will check everything, give the go-ahead, after that you sign the documents, you are ready to accept the money, and your machine is finally protected. Hallelujah!
')

But insurance, of course, understand that the bureaucratic system, paperwork, poor quality of work of specialists really prevent them from developing the service and attracting new customers. And what to do?
We responded to this call from the mobile application for insurance agents for iOS and Android, the server part and the workplace of the underwriter. Through the application, company representatives receive orders and they can also conduct a full inspection and photofixing procedure with instant data sending to the insurance company, where the underwriter checks them and makes a verdict.

A single application solves a number of problems of the insurance company:
As a result, the insurance company at the same time got the opportunity to reduce the costs of concluding a CASCO contract, improve the quality of agents' work and protect themselves from fraud.
As usual, a lot was fairly standard. But there were also interesting technical problems, the implementation of which we want to share with you.
After registration in the application (and later - after login), the user (insurance agent) sees a list of requests for inspection. On request, he can schedule a visit to the future or start it immediately.
To schedule an inspection, the user specifies the date and time of the inspection, and can optionally specify an address. For inspection, an event is automatically created in the calendar of the smartphone, and a reminder is set one hour before the inspection. If the user changes the scheduled time - the event in the calendar is also updated.

To implement this synchronization, we used the standard EventKit calendar library:
eventStore is just [[EKEventStore alloc] init];
surveysCalendar is a bit more complicated:
When the inspection is set to dateScheduled, it synchronizes with the calendar. In our application, this happens when you save a scheduled inspection.
To conduct an inspection, the user selects an object from the list of scheduled or recently uploaded inspection requests and clicks on the “Inspect” button. The inspection itself consists of two parts - the inspection of the vehicle and the addition of documents.

The "Documents" block is simply a list of documents that, if necessary, can be photographed and sent to the server. This part is not mandatory, and there are no restrictions on it either.
In the inspection of the car is much more interesting. It consists of several blocks:
To prevent the "fake" photo in the application has several limitations:
As soon as the user clicks the “Start Inspection” button, a countdown starts. And on all screens of the application in the mode of inspection, a timer is displayed. If the vehicle inspection (TC) was not carried out in 30 minutes, all photos taken for this inspection are deleted, and the inspection must be started anew. This restriction prevents fraudulent photographing of different cars for a single inspection.
Also, to prevent fraud, at first we wanted to interrupt the inspection if the user retired more than 500 meters from the point of the beginning of the inspection. We even implemented it like this:
At the start of the inspection, the application saves the current geolocation as the starting one and subscribes to notifications on geolocation changes for the next 30 minutes. When receiving new coordinates, it is compared whether the distance to the starting point has exceeded 500 meters. In case of removal from the point of the beginning of inspection more than 500 meters, the inspection ends and it needs to be started anew.
So it was intended. But this idea had to be abandoned, because the accuracy of obtaining coordinates strongly depends on the source of the signal. In some situations, when the mobile device determines the geolocation by Wi-Fi points, when reconnecting between them, the application can receive information about a distance change of more than 500 meters, although the user has not passed three. Due to such surges, the inspection was interrupted. We cannot limit the location of the inspection, as well as the sources of information about geo-location, therefore we had to refuse from this restriction.
However, security is maintained. Geodata are added to all photos taken during the inspection process, which are transmitted to the server. And without determining geolocation, the possibility of conducting an inspection is blocked.
Photos that are used in the application are created and stored only in the application. There is no way to save photos to the library or transfer them to anywhere other than the insurance company's server. This means that the agent will not be able to fake the photo, and the photo of the vehicle will not fall into the wrong hands.
In the course of the inspection, the agent photographs all the elements of the car, following the procedure by which the application conducts it. Each inspection element for which you need to take a photo has a name: “Windshield”, “Vehicle on the right side”, “Diagonal Vehicle on the right corner of the rear bumper”. In order to make it easier to choose the right angle of shooting, masks and prompts are implemented in the application. On the mask, which is displayed in the photographing mode, marked by the frame position of the wheels of the car. A hint is also available from the photographing mode, which contains an example of the finished photo in the appropriate perspective.

And finally, in the application, the agent points out and separately photographs all the detected damage to the car. The part on which there is damage should be noted on the diagram. After the part is selected, the user can specify the specific part of the part and the type of damage and take two photos: a detailed photo of the damage and a photo of the defect in the general plan of the part of the car.

In the application on the auto layout, the agent selects the part of the vehicle on which there is damage, it is highlighted in color, and then the application proceeds to the photographing stage of the damage.
To realize the selection on the diagram of curvilinear elements (and the details of the car are all like that), we used Bezier curves obtained from the SVG (Scalable Vector Graphics) format.
Bezier curves allow you to set the equation for complex curves, and in our case, the contours of car parts, and SVG, a two-dimensional vector image format based on XML. Curiously, the Bezier curves were developed specifically for the design of body parts of cars.
More information about the curves and the SVG format can be found here:
ru.wikipedia.org/wiki/Kriva_Bezier
en.wikipedia.org/wiki/Scalable_Vector_Graphics
And our recipe for selecting parts on the diagram looks like this:
First, the designers drew a diagram of the car in three projections in the SVG. We converted the image from the SVG format into a set of individual parts files in the form of Bezier curves (you can use PocketSVG - github.com/arielelkin/PocketSVG for this).
All .bezier files were added to the project and used on the screen with the scheme: the background image with the car is used, and the details from the UIBezierPath are added from above:
For the convenience of selecting parts on the diagram, a “magnifying glass” is used (for example, cocoapods.org/pods/iOS-MagnifyingGlass ).
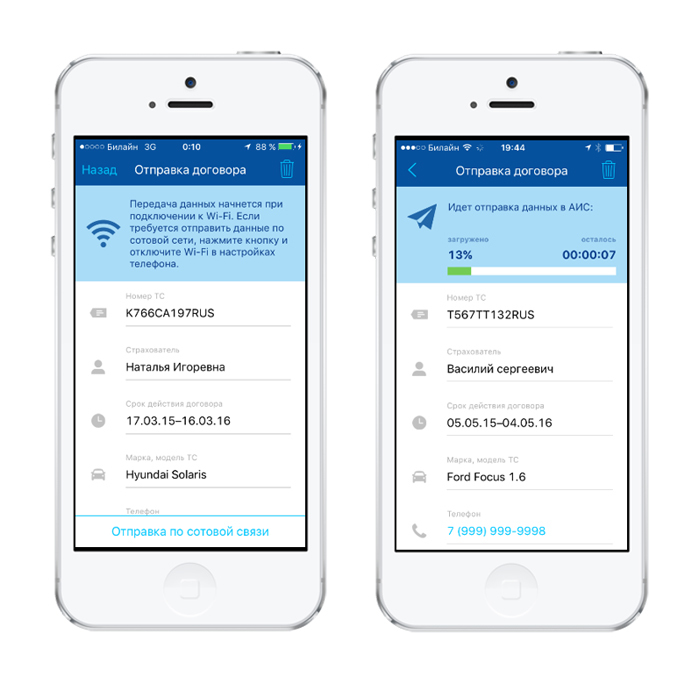
After all the necessary photos have been taken, the application prompts the user to complete the inspection and send the data to the server. The user presses the magic button, and the inspection is transferred to the send queue.
Sending inspections is made in the background. And when the application is running, and when the application is in the background. In the UploadManager singleton, FetchResultsController is used, which selects objects in the “To Send” status from the list of inspections. When translating some inspection for shipment, Fetcher tells the manager what to download. The manager downloads the inspection data to the server, and changes the status of the object. After that, a check is made about the presence of other inspections for shipment. If there are no other contracts at this time, the download manager will wait for the next notification from the fetcher.
That the application sent the data on inspections in a background, we added backgroud task:
In the Info.plist of the project, you must specify Required background modes: “App downloads content from the network”
A more detailed description of running processes in the background can be found here:
developer.apple.com/library/ios/documentation/iPhone/Conceptual/iPhoneOSProgrammingGuide/BackgroundExecution/BackgroundExecution.html#//apple_ref/doc/uid/TP40007072-CH5-SW6
It is important to remember that tasks in backgrund have a time limit. In order to effectively use the download in the background, it must be done in small portions and save the current state in order to restore sending the next time you run the background task. To meet these limitations, we process the dispatch of inspections in turn. First, photographs related to the inspection are sent separately, and then a special request with a list of photographic identifiers that link them to the inspection on the relevant task. Only after this inspection is considered sent.
To save mobile traffic, the application implements a check of the type of Internet connection. In the settings of the application, you can enable the option "Do not transfer data via cellular communication in automatic mode". When this setting is enabled, information on inspections will be sent to the server only when the smartphone is connected to the Wi-Fi network. In addition, you can enable cell phone sending for a separate contract.
For cases when the inspection needs to be sent urgently, and Wi-Fi is not available, you can turn on the setting for one contract: if Wi-Fi is available, any inspection is sent, and if mobile communication, then only contracts with the cellphone setting enabled.
So thanks to us, car owners were able to arrange hull insurance as easily as possible.
For the insurance company, we have made a convenient tool that solves a complex of tasks:
And we solved some interesting problems and we hope that it was also interesting for you to learn how:
See you again!
The topic will be of interest primarily to those involved in the development of mobile business applications and automation of business processes. We will tell interesting technical moments on the example of development for iOS.
So, to the problematic. CASCO is the second largest service of insurance companies for individuals. The most popular, of course, CTP, and then immediately CASCO. That's just to issue a CTP can be literally at every step, and you still have to sweat for CASCO: not only choose an insurance agent, but wait for an agent, fill a pile of pieces of paper, spend an inspection of the car with the agent, wait for him to take all the papers and photos to the office the underwriter will check everything, give the go-ahead, after that you sign the documents, you are ready to accept the money, and your machine is finally protected. Hallelujah!
')
But insurance, of course, understand that the bureaucratic system, paperwork, poor quality of work of specialists really prevent them from developing the service and attracting new customers. And what to do?
We responded to this call from the mobile application for insurance agents for iOS and Android, the server part and the workplace of the underwriter. Through the application, company representatives receive orders and they can also conduct a full inspection and photofixing procedure with instant data sending to the insurance company, where the underwriter checks them and makes a verdict.
A single application solves a number of problems of the insurance company:
- Provides easier "entry to the profession." Instead of full-time training of agents, providing them with cameras, it is now enough to give the agent a link to download the application.
- This increases the quality of the agents. Due to the multiple “protection against fool” sewn into the application, the procedure involves strict adherence to the technology.
- And at the same time, this technology effectively protects against all sorts of scams and fraud at the expense of control measures and restrictions provided for in the application.
As a result, the insurance company at the same time got the opportunity to reduce the costs of concluding a CASCO contract, improve the quality of agents' work and protect themselves from fraud.
And now to the implementation
As usual, a lot was fairly standard. But there were also interesting technical problems, the implementation of which we want to share with you.
1. Inspection planning
After registration in the application (and later - after login), the user (insurance agent) sees a list of requests for inspection. On request, he can schedule a visit to the future or start it immediately.
To schedule an inspection, the user specifies the date and time of the inspection, and can optionally specify an address. For inspection, an event is automatically created in the calendar of the smartphone, and a reminder is set one hour before the inspection. If the user changes the scheduled time - the event in the calendar is also updated.
To implement this synchronization, we used the standard EventKit calendar library:
Sync with standard calendar
- (void)syncEventForSurvey:(Survey *)survey completion:(void (^)(NSError *))completion { if (!survey.dateScheduled) return; [self.eventStore requestAccessToEntityType:EKEntityTypeEvent completion:^(BOOL granted, NSError *error) { dispatch_async(dispatch_get_main_queue(), ^{ if (!granted || error) { if (completion) completion(error); return; } NSTimeInterval oneHour = 60*60; EKEvent *event = nil; if (survey.eventIdentifier) { event = [self.eventStore eventWithIdentifier:survey.eventIdentifier]; } if (!event) { event = [EKEvent eventWithEventStore:self.eventStore]; event.calendar = [self surveysCalendar]; event.title = survey.title; NSTimeInterval alarmOffset = -oneHour; EKAlarm *alarm = [EKAlarm alarmWithRelativeOffset:alarmOffset]; event.alarms = @[alarm]; } event.startDate = survey.dateScheduled; NSTimeInterval surveyDuration = oneHour; event.endDate = [event.startDate dateByAddingTimeInterval:surveyDuration]; NSError *saveError = nil; [self.eventStore saveEvent:event span:EKSpanThisEvent commit:YES error:&saveError]; if (!saveError) { survey.eventIdentifier = event.eventIdentifier; } if (completion) completion(saveError); }); }]; } eventStore is just [[EKEventStore alloc] init];
surveysCalendar is a bit more complicated:
surveysCalendar
- (EKCalendar *)surveysCalendar { NSString *calendarTitle = @" "; EKCalendar *calendar = nil; if (self.surveysCalendarIdentifier) { calendar = [self.eventStore calendarWithIdentifier:self.surveysCalendarIdentifier]; } if (!calendar) { NSArray *allCalendars = [self.eventStore calendarsForEntityType:EKEntityTypeEvent]; calendar = [allCalendars etr_filter:^BOOL(EKCalendar *obj) { return [obj.title isEqualToString:calendarTitle]; }].firstObject; } if (!calendar) { calendar = [EKCalendar calendarForEntityType:EKEntityTypeEvent eventStore:self.eventStore]; calendar.source = self.eventStore.defaultCalendarForNewEvents.source; calendar.title = calendarTitle; [self.eventStore saveCalendar:calendar commit:YES error:nil]; self.surveysCalendarIdentifier = calendar.calendarIdentifier; } return calendar; } When the inspection is set to dateScheduled, it synchronizes with the calendar. In our application, this happens when you save a scheduled inspection.
2. Inspection
To conduct an inspection, the user selects an object from the list of scheduled or recently uploaded inspection requests and clicks on the “Inspect” button. The inspection itself consists of two parts - the inspection of the vehicle and the addition of documents.
The "Documents" block is simply a list of documents that, if necessary, can be photographed and sent to the server. This part is not mandatory, and there are no restrictions on it either.
In the inspection of the car is much more interesting. It consists of several blocks:
- mandatory vehicle photography block,
- optional blocks for specifying additional equipment and damage.
To prevent the "fake" photo in the application has several limitations:
- inspection time limit - 30 minutes,
- fixing the geolocation of each photo,
- There is no possibility to add photos from the library of the smartphone.
2.1. Timer, or have time for 30 minutes
As soon as the user clicks the “Start Inspection” button, a countdown starts. And on all screens of the application in the mode of inspection, a timer is displayed. If the vehicle inspection (TC) was not carried out in 30 minutes, all photos taken for this inspection are deleted, and the inspection must be started anew. This restriction prevents fraudulent photographing of different cars for a single inspection.
2.2 Restriction on geolocation
Also, to prevent fraud, at first we wanted to interrupt the inspection if the user retired more than 500 meters from the point of the beginning of the inspection. We even implemented it like this:
At the start of the inspection, the application saves the current geolocation as the starting one and subscribes to notifications on geolocation changes for the next 30 minutes. When receiving new coordinates, it is compared whether the distance to the starting point has exceeded 500 meters. In case of removal from the point of the beginning of inspection more than 500 meters, the inspection ends and it needs to be started anew.
So it was intended. But this idea had to be abandoned, because the accuracy of obtaining coordinates strongly depends on the source of the signal. In some situations, when the mobile device determines the geolocation by Wi-Fi points, when reconnecting between them, the application can receive information about a distance change of more than 500 meters, although the user has not passed three. Due to such surges, the inspection was interrupted. We cannot limit the location of the inspection, as well as the sources of information about geo-location, therefore we had to refuse from this restriction.
However, security is maintained. Geodata are added to all photos taken during the inspection process, which are transmitted to the server. And without determining geolocation, the possibility of conducting an inspection is blocked.
2.3. Correct photofixation
Photos that are used in the application are created and stored only in the application. There is no way to save photos to the library or transfer them to anywhere other than the insurance company's server. This means that the agent will not be able to fake the photo, and the photo of the vehicle will not fall into the wrong hands.
In the course of the inspection, the agent photographs all the elements of the car, following the procedure by which the application conducts it. Each inspection element for which you need to take a photo has a name: “Windshield”, “Vehicle on the right side”, “Diagonal Vehicle on the right corner of the rear bumper”. In order to make it easier to choose the right angle of shooting, masks and prompts are implemented in the application. On the mask, which is displayed in the photographing mode, marked by the frame position of the wheels of the car. A hint is also available from the photographing mode, which contains an example of the finished photo in the appropriate perspective.
2.4. Damage photos
And finally, in the application, the agent points out and separately photographs all the detected damage to the car. The part on which there is damage should be noted on the diagram. After the part is selected, the user can specify the specific part of the part and the type of damage and take two photos: a detailed photo of the damage and a photo of the defect in the general plan of the part of the car.
In the application on the auto layout, the agent selects the part of the vehicle on which there is damage, it is highlighted in color, and then the application proceeds to the photographing stage of the damage.
To realize the selection on the diagram of curvilinear elements (and the details of the car are all like that), we used Bezier curves obtained from the SVG (Scalable Vector Graphics) format.
Bezier curves allow you to set the equation for complex curves, and in our case, the contours of car parts, and SVG, a two-dimensional vector image format based on XML. Curiously, the Bezier curves were developed specifically for the design of body parts of cars.
More information about the curves and the SVG format can be found here:
ru.wikipedia.org/wiki/Kriva_Bezier
en.wikipedia.org/wiki/Scalable_Vector_Graphics
And our recipe for selecting parts on the diagram looks like this:
First, the designers drew a diagram of the car in three projections in the SVG. We converted the image from the SVG format into a set of individual parts files in the form of Bezier curves (you can use PocketSVG - github.com/arielelkin/PocketSVG for this).
All .bezier files were added to the project and used on the screen with the scheme: the background image with the car is used, and the details from the UIBezierPath are added from above:
Work with Bezier curves
- (void)awakeFromNib { [super awakeFromNib]; NSArray *carParts = [SurveyStructure sharedStructure].carParts; NSMutableArray *newLayers = [NSMutableArray array]; for (SurveyStructureCarPart* part in carParts) { @autoreleasepool { NSString *filepath = [[NSBundle mainBundle] pathForResource:part.identifier ofType:@"bezier"]; UIBezierPath *bezier = [NSKeyedUnarchiver unarchiveObjectWithFile:filepath]; CarPartLayer* layer = [[CarPartLayer alloc] initWithCarPart:part]; layer.anchorPoint = CGPointZero; layer.path = bezier.CGPath; layer.actions = @{@"fillColor": [NSNull null], @"opacity": [NSNull null]}; [newLayers addObject:layer]; [self.layersContainer.layer insertSublayer:layer atIndex:0]; } } self.carPartLayers = newLayers; } : - (void)hightlightPartAtPoint:(CGPoint)point { for (CarPartLayer *layer in self.carPartLayers) { if (CGPathContainsPoint(layer.path, NULL, point, false)) { if (self.highlightedLayer != layer) { self.highlightedLayer = layer; } return; } } if (self.highlightedLayer != nil) { self.highlightedLayer = nil; } } For the convenience of selecting parts on the diagram, a “magnifying glass” is used (for example, cocoapods.org/pods/iOS-MagnifyingGlass ).
3. Data transfer
After all the necessary photos have been taken, the application prompts the user to complete the inspection and send the data to the server. The user presses the magic button, and the inspection is transferred to the send queue.
3.1. Sending in the background
Sending inspections is made in the background. And when the application is running, and when the application is in the background. In the UploadManager singleton, FetchResultsController is used, which selects objects in the “To Send” status from the list of inspections. When translating some inspection for shipment, Fetcher tells the manager what to download. The manager downloads the inspection data to the server, and changes the status of the object. After that, a check is made about the presence of other inspections for shipment. If there are no other contracts at this time, the download manager will wait for the next notification from the fetcher.
That the application sent the data on inspections in a background, we added backgroud task:
Synchronization in the background
- (void)applicationDidEnterBackground:(UIApplication *)application { if ([[UploadSurveysManager sharedManager] isNeedUpload]) { self.bgTask = [application beginBackgroundTaskWithExpirationHandler:^{ [application endBackgroundTask:self.bgTask]; self.bgTask = UIBackgroundTaskInvalid; }]; [[UploadSurveysManager sharedManager] uploadIfNeeded]; } } In the Info.plist of the project, you must specify Required background modes: “App downloads content from the network”
A more detailed description of running processes in the background can be found here:
developer.apple.com/library/ios/documentation/iPhone/Conceptual/iPhoneOSProgrammingGuide/BackgroundExecution/BackgroundExecution.html#//apple_ref/doc/uid/TP40007072-CH5-SW6
It is important to remember that tasks in backgrund have a time limit. In order to effectively use the download in the background, it must be done in small portions and save the current state in order to restore sending the next time you run the background task. To meet these limitations, we process the dispatch of inspections in turn. First, photographs related to the inspection are sent separately, and then a special request with a list of photographic identifiers that link them to the inspection on the relevant task. Only after this inspection is considered sent.
3.2. Mobile traffic optimization
To save mobile traffic, the application implements a check of the type of Internet connection. In the settings of the application, you can enable the option "Do not transfer data via cellular communication in automatic mode". When this setting is enabled, information on inspections will be sent to the server only when the smartphone is connected to the Wi-Fi network. In addition, you can enable cell phone sending for a separate contract.
For cases when the inspection needs to be sent urgently, and Wi-Fi is not available, you can turn on the setting for one contract: if Wi-Fi is available, any inspection is sent, and if mobile communication, then only contracts with the cellphone setting enabled.
Conclusion
So thanks to us, car owners were able to arrange hull insurance as easily as possible.
For the insurance company, we have made a convenient tool that solves a complex of tasks:
- increase work efficiency
- standardization of the inspection process,
- fraud protection.
And we solved some interesting problems and we hope that it was also interesting for you to learn how:
- to realize the choice of an element in a diagram based on a vector image,
- set up synchronization with the system calendar,
- and implement data loading in the background.
See you again!
Source: https://habr.com/ru/post/282658/
All Articles