Rendering drops with transparency and reflections on OpenGL
In this article we will look at how to render drops on OpenGL and calculate the normal for reflection and transparency on the fly. As well as Metaballs, graphics chipset bugs and optimization tricks you can apply for 60 FPS on mobile devices.
Content
Part 1. Mobile cross-platform engine
Part 2. Rendering UTF-8 text using an SDF font
Part 3. Rendering drops with transparency and reflections.
Metaballs
At the heart of the drop rendering is the Metaballs technique.
The text is difficult to convey the meaning of this technique, so I will show it clearly. Moreover, this technique is very similar to the one we used with SDF fonts in the previous article .
So open any graphics editor:


- Draw a point with a blurred brush.
- Add some more such points so that they overlap a little.
- Twisting levels (Levels) to the desired effect.
In the simplest form, Metaballs is ready. As you probably guessed, the fluid consists of many such points, to which it only remains to fasten the physics and add a shader for beauty.
In the rendering of a separate drop there is a trick. If we render a drop with an ordinary radial gradient, we get an ever-round pea, which in dynamics will look very strange. Therefore, we take into account the speed of each individual drop and slightly shift the center of the gradient towards acceleration. As a result, even lonely drops will be slightly stretched when moving, which will noticeably revive the picture.
Prepare OpenGL
To render drops, we first need to render intermediate stages into texture. This can be done using FBO ( Framebuffer Object ). At what you can use a smaller texture 1/2 or even 1/4 of the screen size. The quality of this is almost not affected.
width= ; height= ; // FBO glGenFramebuffers(1, &framebuffer); glBindFramebuffer(GL_FRAMEBUFFER, framebuffer); // glGenTextures(1, &texture); glBindTexture(GL_TEXTURE_2D, texture); glTexParameteri(GL_TEXTURE_2D, GL_TEXTURE_WRAP_S, GL_CLAMP_TO_EDGE); glTexParameteri(GL_TEXTURE_2D, GL_TEXTURE_WRAP_T, GL_CLAMP_TO_EDGE); glTexParameteri(GL_TEXTURE_2D, GL_TEXTURE_MIN_FILTER, GL_LINEAR); glTexParameteri(GL_TEXTURE_2D, GL_TEXTURE_MAG_FILTER, GL_LINEAR); glTexImage2D(GL_TEXTURE_2D, 0, GL_RGBA, width, height, 0, GL_RGBA, GL_UNSIGNED_BYTE, NULL); // FBO glFramebufferTexture2D(GL_FRAMEBUFFER, GL_COLOR_ATTACHMENT0, GL_TEXTURE_2D, texture, 0); Next, to switch to rendering into texture, we do:
glBindFramebuffer (GL_FRAMEBUFFER, framebuffer);
glClear (GL_COLOR_BUFFER_BIT);
And to render again on the screen:
glBindFramebuffer (GL_FRAMEBUFFER, 0);
 It would be logical to use RGB texture without transparency to save resources. And in most cases, everything will be fine. But not on Androids with Adreno chipsets. On rare devices, noise or solid black will be displayed in the texture. Therefore, it is better to use the GL_RGBA format.
Render drops
With the first pass, we render all the drops into the texture, taking into account their speed and material.
Below is the pseudocode. In the original code, there are too many references to specific engine functions.
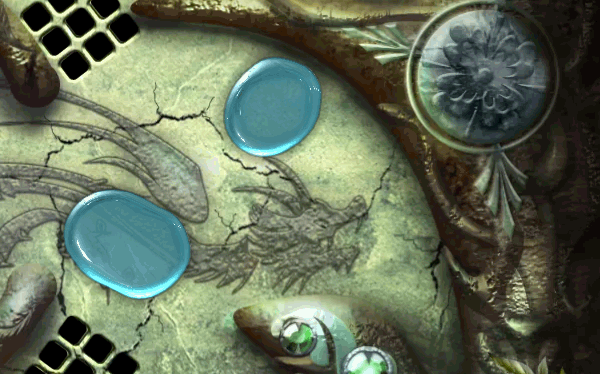
glBindFramebuffer(GL_FRAMEBUFFER, framebuffer); glClear(GL_COLOR_BUFFER_BIT); bindShader(metaBalls); for( - ){ // "" vx = ; vy = Y; vLength = length(vx, vy); if(vLength > vMax) { // "", vx *= vMax/vLength; vy *= vMax/vLength; } setUniforms( vx, vy, . ); renderQuadAt( .x, .y ); } You should get something like this:
An attentive reader will ask:
"Why is it red? Where did green come from? And what are these curbs?"
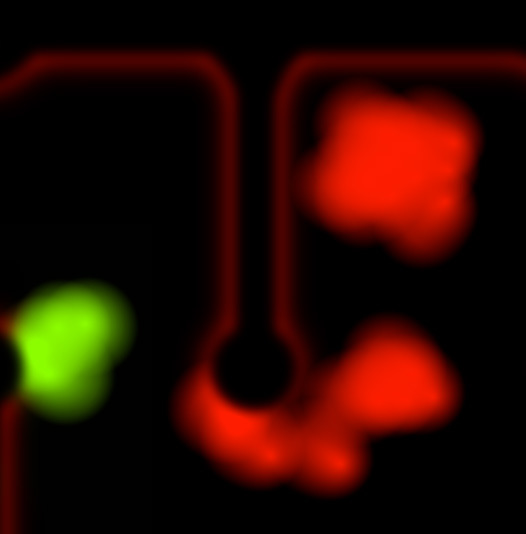
Material
Suppose you want to drop a few materials at once. And so that they can blend seamlessly. For this, together with the speed, we also transfer the drop material. This is a normal float from 0 to 1, which will mean a transition from one material to another. In the RED texture channel, we write the gradient itself, and in GREEN we write the material.
Border
Look again at the gif-ku from the article header. You will see that next to the curb the drop spreads out a bit, but it does not climb onto the curb itself. For such an effect, it is necessary to impose a pre-created mask on top, where information is stored in the R and G channels - what to add and what to take away.
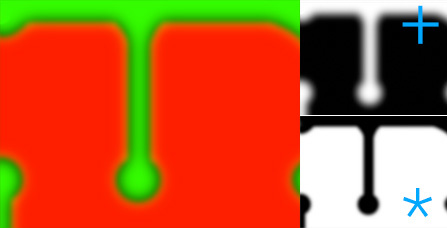
The formula can be written like this: (texture with drops + RED) * BLUE.
Those. along the blurred edges of the border, we slightly increase the drops, and directly on the border, on the contrary, we remove the drops.

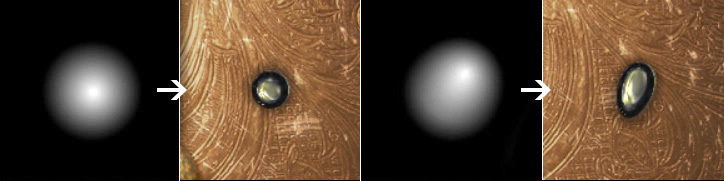
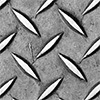 Try painting on top of any contrasting grayscale texture. For example:
Your drops suddenly begin to flow around the protrusions on the texture.
Of course, this has nothing to do with physics, it is only a visual trick.
Head shader
Now we need to display one quad (two triangles / polygons) the size of the entire screen. In this shader, you need to use the Metaballs technique so that you get a bit blurry edges. This will give us a 3D effect at the edges of the drop.
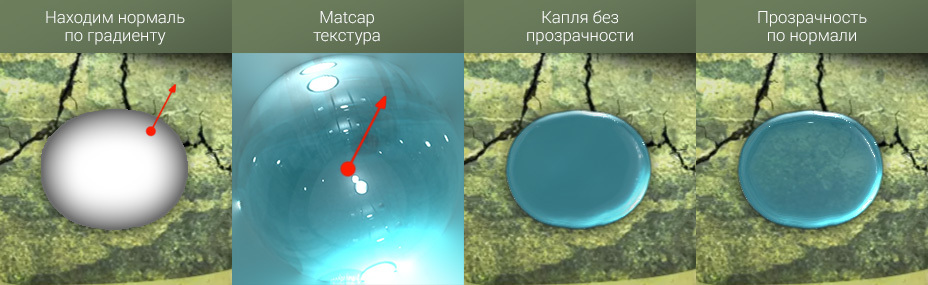
Next, read the adjacent gradient texels and calculate the normal for the reflection, from which we take the value from the Matcap texture.
Below is a cleaned shader code for better perception:
// OpenGL ES precision #ifdef DEFPRECISION precision mediump float; #endif varying mediump vec2 outTexCord; //FBO , uniform lowp sampler2D tex0; //Matcap uniform lowp sampler2D tex1; #define limitMin 0.4 #define limitMax 1.6666 #define levels(a,b,c) (ab)*c void main(void){ // Metaballs float tex = texture2D(tex0, outTexCord).r; float gradient = levels(tex, limitMin, limitMax); // , Adreno #ifndef ADRENO if(gradient<=0.0){ discard; } #endif // 4 vec2 step=vec2(0.002, 0.002); vec2 cord=outTexCord; cord.x+=step.x; float right=texture2D(tex0, cord).r; cord.x-=step.x*2.0; float left=texture2D(tex0, cord).r; cord+=step; float bottom=texture2D(tex0, cord).r; cord.y-=step.y*2.0; float top=texture2D(tex0, cord).r; // vec3 normal; normal.z=gradient; normal.x=(right-left)*(1.0-gradient); normal.y=(bottom-top)*(1.0-gradient); normal=normalize(normal); // vec3 ref=vec3(outTexCord-0.5, 0.5); ref = normalize(reflect(ref, normal)); // Matcap cord=(ref.xy+0.5)*0.5; vec4 matcap=texture2D(tex1, cord); // matcap.a*=min(1.0, gradient*10.0); // , matcap.a*=1.0-gradient*0.2; gl_FragColor = matcap; } Adreno
Most of the problems were brought by Android devices with Adreno chipset.
- On Adreno, you cannot do discard before all textures are read. And it is better to refuse from discard at all.
- For FBO, you must use only RGBA texture. On RGB, either noise or black will be displayed.
Is discard necessary then?
Yes I need it. Especially the increase in FPS is noticeable on tablets, where a large filrate should be fought for every pixel.
Transparency
For transparency, we use a simple trick: the closer to the edge of the drop, the more the normal deviates, which means that the transparency at the edges decreases. A sort of the most simplified Fresnel Effect .
Matcap
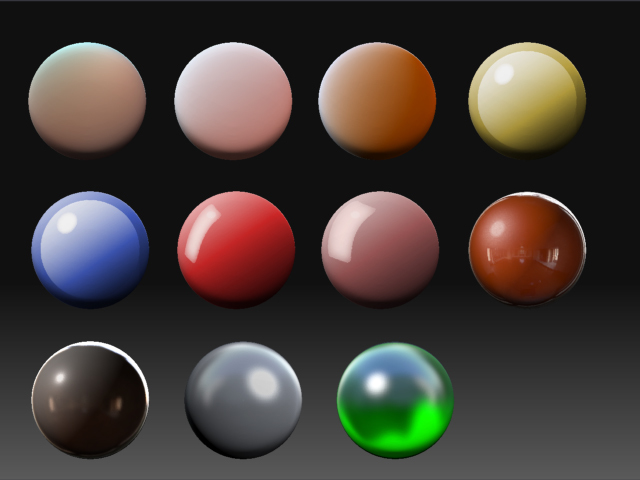
Only by replacing the Matcap texture, we can get completely different materials - water, silver, gold, lava, milk, coffee, etc.
It's good that there is enough free Matcap textures on the Internet. The truth is worth considering that in large drops the center of the texture will be very stretched. Therefore, for a good result, you will have to sort out a lot of Matcap textures.
Several materials
Remember, when rendering drops in FBO, we also recorded the value of the material?
Add small changes to the shader and get a smooth transition from one material to another.
// GREEN vec2 tex = texture2D(tex0, outTexCord).rg; ... // Matcap vec4 matcap=mix( texture2D(tex1, cord), texture2D(tex2, cord), tex.g); 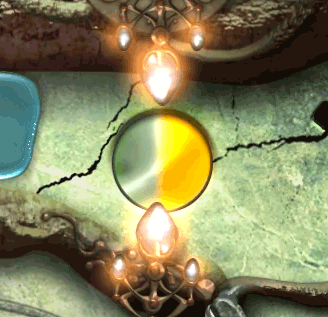 And since the value of the material is tied to each individual drop, then changing the material of each drop in turn, we get the effect of flowing or mixing fluids.
By the way, we are not limited to only two materials. If you record one more material transfer to the BLUE channel, then you can interpolate four materials at once.
Optimization
 In the current form, getting 60 FPS on all devices will fail. Especially hard was the main shader on iPad2. Discard did not save, although it worked at 80% of the pixels. Let's try to get rid of these empty 80%.
We divide the screen into cells. For me, the screen cell size was screenWidth / 20. Smashed quad into cells, made up the index of these small squares. Then we just have to look at which cells are filled with drops (plus add neighboring cells) and update the index with any grid change:
glBufferData (GL_ELEMENT_ARRAY_BUFFER, size, data, GL_DYNAMIC_DRAW);
Only cells really containing drops will be displayed.
Physics
I will touch upon physics only occasionally. This is a very interesting, but extensive topic for a single article.
The basis is the integration of Verlet with minor modifications. All that concerns Verla is enclosed in such a block of code:
//fric - , float dt2,tmp; dt2=dt*dt; tmp = 2.0f * x - prevX + accelX * dt2; prevX += (x - prevX)*fric; x = tmp; tmp = 2.0f * y - prevY + accelY * dt2; prevY += (y - prevY)*fric; y = tmp; We can only check the distance between the drops, handle the collisions with the walls and take into account the surface tension so that the drops do not spread.
With the surface tension had to cheat. Each frame we look at which drops are in contact with each other, thus dividing them into groups. Next we get the center of each group and “pull” every drop to the center of the group. This gave quite acceptable and quick results.
 Bun!
Bun!
To make a drop fit well into the background, it is worth adding a shadow. We can also get it in the main shader without a special load on the GPU.
For the shadow, take the Metaballs a bit larger. At the edges we darken a drop, beyond the edges we get black color and slightly expand the alpha mask. Like that:
float shadow = levels(tex, ); float body=min(1.0, gradient*10.0); matcap.rgb*=min(1.0, body*5.0); matcap.a*=body+shadow; ')
Source: https://habr.com/ru/post/282590/
All Articles