Mobx - managing the status of your application
MobX is a simple, battle-tested solution for managing the state of your application. This tutorial will teach you the basic concepts of MobX. MobX is a standalone library, but most use it in conjunction with React and this tutorial will focus on this combination.
main idea
The state (state orig.) Is the heart of each application and there is no faster way to create a messy, unmanaged application, like the lack of state consistency. Or a condition that is inconsistent with local variables around. Therefore, many state management solutions are trying to limit the ways in which it can be changed, for example, to make the state immutable. But this creates new problems, the data needs to be normalized, there is no guarantee of referential integrity and it becomes almost impossible to use such powerful concepts as prototypes (prototypes orig.) .
MobX allows you to make state management simple again by returning to the root of the problem: it makes it impossible for the state to be inconsistent. The strategy to achieve this is quite simple: make sure that everything that can be removed from the state will be removed. Automatically.
Conceptually, MobX treats your application as a spreadsheet (referring to an office program for working with spreadsheets) .
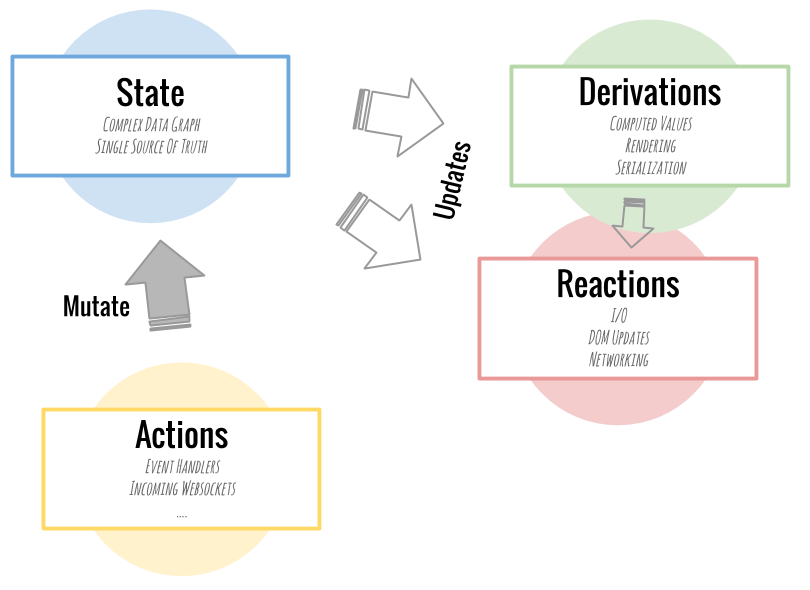
First, there is the state of the application. Graphs of objects, arrays, primitives, links that form the model of your application.
Secondly there are Derivations produced. Usually, this is any value that can be automatically calculated from the state data of your application.
Reactions reactions are very similar to Derivations derivatives. The main difference is that they do not return a value, but start automatically to do some work. This is usually associated with I / O. They verify that the DOM has been updated or network requests have been completed on time.
- Finally, there are Actions Actions . Actions are all those things that change state. MobX will ensure that all changes in the state of the application caused by the actions are automatically processed by all derivatives and reactions. Synchronously and without interference.
Simple todo store ...
Enough theory, consider it in action, will be much clearer than carefully read the above. For originality, let's start with a very simple Todo repository. Below is a very simple TodoStore that manages the todo collection. MobX is not yet involved.
import shortid from 'shortid'; class TodoStore { todos = []; get completedTodosCount() { return this.todos.filter( todo => todo.completed === true ).length; } report() { if (this.todos.length === 0) return "<none>"; return `Next todo: "${this.todos[0].task}". ` + `Progress: ${this.completedTodosCount}/${this.todos.length}`; } addTodo(task) { this.todos.push({ id: shortid.generate(), task: task, completed: false, assignee: null }); } } const todoStore = new TodoStore(); We have just created a todoStore instance with a todos collection. Now you need to fill the todoStore some objects. To ensure that our changes have an effect, we call todoStore.report after each change:
todoStore.addTodo("read MobX tutorial"); console.log(todoStore.report()); todoStore.addTodo("try MobX"); console.log(todoStore.report()); todoStore.todos[0].completed = true; console.log(todoStore.report()); todoStore.todos[1].task = "try MobX in own project"; console.log(todoStore.report()); todoStore.todos[0].task = "grok MobX tutorial"; console.log(todoStore.report()); Becoming Reactive
Until now, our code was not unusual. But what if we don’t want to call report explicitly, but declare that we need to call this method for every state change? This will free us from the obligation to call this method in our code. We must be sure that the last result of the call to report will be displayed. But we do not want to worry about how this will be done.
Fortunately, MobX can do it for us. Automatically call code that depends on state. So our report function will be called automatically. To achieve this, the TodoStore needs to be tracked (observable orig.) So that MobX can monitor all changes. Let's change our class a bit.
Also, the completedTodosCount property will be calculated automatically from the todos property. We can achieve this using @observable and @computed decorators.
import shortid from 'shortid'; class ObservableTodoStore { @observable todos = []; @observable pendingRequests = 0; constructor() { mobx.autorun(() => console.log(this.report)); } @computed get completedTodosCount() { return this.todos.filter( todo => todo.completed === true ).length; } @computed get report() { if (this.todos.length === 0) return "<none>"; return `Next todo: "${this.todos[0].task}". ` + `Progress: ${this.completedTodosCount}/${this.todos.length}`; } addTodo(task) { this.todos.push({ id: shortid.generate(), task: task, completed: false, assignee: null }); } } const observableTodoStore = new ObservableTodoStore(); That's all! We marked some properties as @observable so that MobX knew that they could change over time. The calculations are labeled with @computed decorators to know that they can be calculated based on the state.
The pendingRequests and assignee are not yet used, but we will see them in action just below. For brevity, all examples use ES6, JSX and decorators. But don't worry, all MobX decorators have ES5 counterparts.
In the class constructor, we created a small function that displays the report and wrapped it in autorun . It will create a reaction that runs once, and after that it will automatically restart whenever the monitored data within the function changes. Since report uses the todos monitored property, it will output the result of the report as needed.
observableTodoStore.addTodo("read MobX tutorial"); observableTodoStore.addTodo("try MobX"); observableTodoStore.todos[0].completed = true; observableTodoStore.todos[1].task = "try MobX in own project"; observableTodoStore.todos[0].task = "grok MobX tutorial"; Cool, is not it? report is called automatically, synchronously, without leakage of intermediate values. If you carefully examine the output in the log, you will see that the fourth line in the code will not lead to a new entry in the log. Because the report has not actually changed as a result of renaming the task, but the data inside has changed. On the other hand, the change in the name attribute of the first todo updated the output of the report , since name actively used in the output of the report . This demonstrates that not only the todos array is monitored, but also individual values in it.
Making React Reactive
Well, so far we have been doing “silly” reports reactive. Now it is time to make a reactive interface around the same storage. Components from React (despite its name) , not reactive out of the box. @observer decorator @observer decorator fixes this by wrapping the render method in autorun , automatically making your components synchronized with state. This is conceptually no different from what we did with the report before.
The following listing defines several React components. From MobX, only @observer decorator is here. This is enough to make sure that each component is redrawn when its relevant data changes. You no longer need to call setState , and you do not need to figure out how to subscribe to parts of your application using selectors or high order components (hello Redux) that need to be configured. Basically, all components become smart. If they are not defined in a "stupid" declarative manner.
@observer class TodoList extends React.Component { render() { const store = this.props.store; return ( <div> { store.report } <ul> { store.todos.map( (todo, idx) => <TodoView todo={ todo } key={ todo.id } /> ) } </ul> { store.pendingRequests > 0 ? <marquee>Loading...</marquee> : null } <button onClick={ this.onNewTodo }>New Todo</button> <small> (double-click a todo to edit)</small> <RenderCounter /> </div> ); } onNewTodo = () => { this.props.store.addTodo(prompt('Enter a new todo:','coffee plz')); } } class TodoView extends React.Component { render() { const todo = this.props.todo; return ( <li onDoubleClick={ this.onRename }> <input type='checkbox' checked={ todo.completed } onChange={ this.onToggleCompleted } /> { todo.task } { todo.assignee ? <small>{ todo.assignee.name }</small> : null } <RenderCounter /> </li> ); } onToggleCompleted = () => { const todo = this.props.todo; todo.completed = !todo.completed; } onRename = () => { const todo = this.props.todo; todo.task = prompt('Task name', todo.task) || ""; } } ReactDOM.render( <TodoList store={ observableTodoStore } />, document.getElementById('reactjs-app') ); The following listing shows that we just need to change our data. MobX will automatically compute and update the relevant parts of your user interface from the state in your repository.
const store = observableTodoStore; store.todos[0].completed = !store.todos[0].completed; store.todos[1].task = "Random todo " + Math.random(); store.todos.push({ task: "Find a fine cheese", completed: true }); // etc etc.. add your own statements here... Work with links
So far, we have created traceable objects (with and without a prototype), arrays and primitives. But it may seem interesting to you how links are processed in MobX? In previous listings, you might have noticed the assignee property of todos . Let's give it some other value by creating another repository (well, it's just an array) containing people, and assign them to the tasks.
var peopleStore = mobx.observable([ { name: "Michel" }, { name: "Me" } ]); observableTodoStore.todos[0].assignee = peopleStore[0]; observableTodoStore.todos[1].assignee = peopleStore[1]; peopleStore[0].name = "Michel Weststrate"; Now we have two independent repositories. One with people, another with tasks. To assign the assignee property assignee person from the person storage, we just need to assign a value via a link. These values will TodoView up TodoView automatically. With MobX, there is no need to normalize data and write selectors so that our components are updated. In fact, it doesn't matter where the data is stored. While objects are “observable,” MobX will track them. Real JavaScript links work too. MobX tracks them automatically if they are relevant to derived values.
Asynchronous actions
Since everything in our small todo application is derived from the state, it does not matter where this state will be changed. This allows you to simply create asynchronous actions.
We start by updating the pendingRequests property pendingRequests that the interface displays the current download status. After the download is complete, we will update the todo list and reduce the pendingRequests counter. Just compare this piece of code with what we saw above to see how the pendingRequests property is pendingRequests .
observableTodoStore.pendingRequests++; setTimeout(function() { observableTodoStore.addTodo('Random Todo ' + Math.random()); observableTodoStore.pendingRequests--; }, 2000); Devtools
The mobx-react-devtools provides developer tools that can be used in any MobX + React application.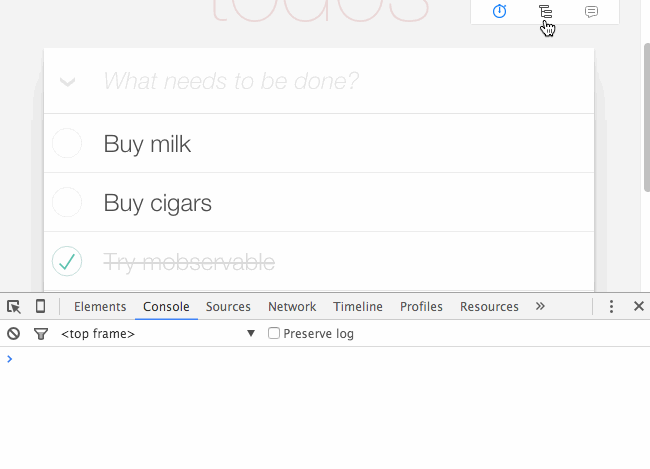
Conclusion
That's all! No boilerplate. Simple and declarative components that form the UI is easy and simple. Fully updated from state. You are now ready to start using mobx and mobx-react in your application.
A brief summary of the things you learned today:
- Use the
@observabledecorator orobservable( )function to make your objects traceable to MobX - The
@computeddecorator can be used to create functions that calculate their value from the state - Use
autorunto automatically launch your functions based on the monitored state. This is applicable for logging or network requests. - Use the
mobx-reactdecorator@observerto give your React components reactive power. They will automatically be updated most effectively. Even in large and complex applications with large amounts of data.
MobX is not a state container
People often use MobX as an alternative to Redux. But please note that this is just a library for solving a specific problem and not an architecture or state container. In this sense, the examples given above are far-fetched and it is recommended to use the correct architectural solutions, like encapsulating logic in methods, organizing them in repositories or controllers, etc. Or as someone wrote on Hacker News:
"Using MobX means using controllers, dispatchers, actions, supervisors, or any other form of data flow control, this leads us to design your application yourself, rather than using what is used by default for something more than the Todo application "
Still
Intrigued? Here are some helpful links .
- Mobx on github
- Api documentation
- (Blog) React reactive life , easily maintainedable React apps
- (Blog) Becoming fully responsive: an in-depth explanation of Mobservable
- JSFiddle with a simple todo application
- MobX, React, TypeScript boilerplate
- MobX, React, Babel boilerplate
- MobX demo from Reactive2015 conference
- MobX + React TodoMVC
')
Source: https://habr.com/ru/post/282578/
All Articles