We create a game for the smallest on Phaser in Intel XDK
Kids love modern technology. I’m sure you’ve all watched, either on your own or on video , how the kids use smartphones and tablets. These children are aptly called the “ moth generation ”. They "flock" to the light displays of mobile devices like butterflies in the night. Many kids play games are very easy to create. But even such simple applications can grow into serious projects.

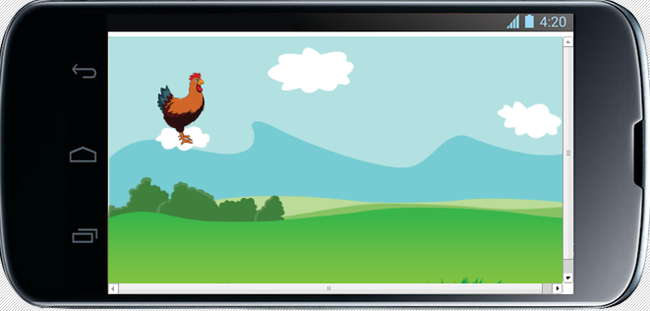
In this guide, I'm going to talk about how to make a slider game about animals and birds that live on a farm, using the Phaser HTML5 library. The source of inspiration for this project was the game for Android Animal Sounds for Baby from the company Fisher-Price.
Phaser is a free, interesting and easy-to-use HTML5 framework for developing 2D games. It was created by Richard Davey (Richard Davey), around Phaser formed a wonderful community of developers. Usually they chat on the HTML5 Game Devs forums .
Game screen
')
You can download the code and resources of the project, which we will be developing here, from here . And here is the GitHub repository .
It should be noted that the graphics for the game was created by my company, Zenva . You can use images for commercial and non-commercial projects, no attribution is required (although if you make the next hit like Candy Crash out of all of this, please buy me a big mansion).
In this guide, we will create a cross-platform game for kids using the Phaser. Also consider the export of applications for the Android platform using Apache Cordova and Intel XDK .
It is assumed that you, starting reading, have the basic skills of developing in JavaScript. If this is not the case, then first it is advisable to understand the basics of JS. You can, for example, take my JavaScript course at Zenva Academy and quickly get the necessary knowledge.
In order to master this manual, no experience with Phaser, Cordova, Android is required. The same goes for game development knowledge.
Games based on Phaser cannot be started simply by opening the Index.html file in a browser. For their normal operation, you need a web server. Phaser games, if you do not use the Cordova API in them, can be run using regular local web servers. For example, WAMP for Windows, MAMP on Mac. You can use a simple HTTP server in Python or the http-server package for Node.js.
In addition, some development environments, such as Intel XDK and Brackets editor, come with an embedded web server, so you don’t need to install a separate server using these tools.
The basis of the considered Phaser-project is presented in the form of an Index.html file, to which the Phaser library and the script are connected, which will contain the game code. This is what the Index.html file looks like.
Here is the code for the main.js file. Here, for the time being, only billet methods.
If you are using the latest version of Intel XDK, you can generate a start-up project using the Phaser pattern. To do this, on the Projects tab, execute the Start a new project command, expand the Templates group, select Games, select Phaser from the list of templates. What we start working with looks a little different than in the Intel XDK, but this does not change the essence of what is happening.
If you load Index.html in a browser using a local web server (we talked about this above), and open the browser console, you can see information about the successful initialization of Phaser.

Successful Phaser Initialization
Images, or, as they are called in the gaming industry, "sprites" - this is the daily bread of 2D games. Phaser uses sprites to display the background, the characters of the game, and almost all of the game graphics. Consider a few examples of working with sprites.
Before you bring the sprite to the screen, you need to download the image file that is associated with this sprite. Downloading a file from the disk takes some time, but loading an image from the device’s RAM is almost instantaneous. Preloading game resources is loading everything you need from the disk and placing it in RAM. As a result, when an image or something else is needed, it can be displayed on the screen, or, in the case of a sound, reproduced in no time.
Noticed how sometimes web pages are not fully loaded, but so that you can see the text and only some images? This is due to the fact that the images, before they become visible, must be downloaded from the server. This is normal for websites, everyone is used to it, but in games like this is simply unacceptable! Imagine your favorite game with a black rectangle instead of a character whose image did not have time to load.
Therefore, let's start with the preloading of images and other game resources, such as sounds, in the preload () method of the GameState object. Here is what it looks like.
The this.load command calls an object called the Loader, initialized with the Phaser engine. This object is equipped with various methods for loading game resources of different types. See the documentation for details. The first parameter is the key (key) of the resource. The key can be any, the main thing is not to set the same key to different resources. The keys will be used in the game code in order to access specific resources.
In order to display sprites on the screen, you need to add the corresponding code to the create () method of the GameState object. This method is executed once after all the necessary game resources are loaded.
Sprites on the screen are located in given coordinates, determined by the values of X and Y. The coordinate system begins in the upper left corner of the game world. Y values increase from top to bottom, X - from left to right.
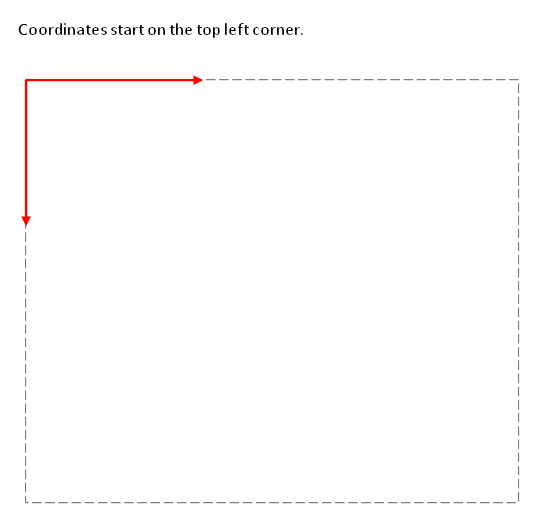
The origin is in the upper left corner.
Displaying sprites, which are initialized by the above code, looks like this.
Sprites are displayed on the Intel XDK emulator
The point of the sprite, which is placed in the coordinate (x, y) given to it, is called the anchor point. By default, the sprite's anchor point corresponds to its upper left corner. Thus, setting the position of the sprite, for example, in (10.10), means that its left upper corner will be in the specified position.
If the sprite is rotated, the pivot point will be the center of rotation. In addition, if you change the size of the sprite, scale it, the sprite will increase or decrease, but the pivot point will remain where it was before the start of the transformation.
Sometimes the sprite's anchor point needs to be changed. For example, if it became necessary to set the position of the sprite with reference to its center. This can be done as shown below (after showing the sprite).

Sprite after changing the pivot point
Rotate the sprite is very simple. To do this, it is enough to change its angle property (rotation angle). Rotation is performed around the pivot point (in our case, around the center of the sprite). The angle of rotation is given in degrees. Here, for example, how to rotate the sprite by 90 degrees.

90 degree rotation of the sprite
The scale sprite property allows you to resize it. Below are examples of scaling (the sprite was previously returned to the state in which it was before the turn).
Stretch the sprite vertically.
Sprite stretched vertically
Reduce the size of the sprite in half:
Sprite reduced by half
If the sprite needs to be reflected along the X or Y axis, this can be done by setting negative values when setting its scale property. If, for example, to give a value of -1 on the X axis, the sprite will be reflected on this axis, but the size will not change. If you use negative values that are different from -1, this will have a double effect: reflection and resizing.
Reflect the sprite on the X axis.

Sprite reflected along the X axis
The easiest way to place the sprite in the center of the game world is to set the reference point of the sprite in its center and specify the center of the screen as the new coordinates of the sprite. For example, you can do it like this.
The location of the sprite on the screen can always be changed by editing the value of its x and y properties.
Details about the Sprite class and its methods and properties, some of which we discussed above, can be found in the documentation .
No matter for which platform or platforms the game is being developed, in any case you will have to deal with different resolutions and aspect ratios of the screens. That is the reality. In the recent past, this was a real nightmare for developers of HTML5 games, but most of the game engines take on the problems associated with different screens. Phaser is not an exception, it contains built-in capabilities for supporting various screens and allows you to create games that work correctly on various devices. All this in the Phaser is the Scale Manager object.
Our game screen will resize to fit the screen size of the device, keeping the aspect ratio. This mode in the scaling manager is called SHOW_ALL. Settings are made in the init () method.
The game on the screen, the parameters of which are different from the parameters of the game screen
Add arrows to the game screen, with which you can switch between the inhabitants of the farm. When the user touches the arrow, the creature displayed on the screen moves to the right or left, and his place, in the center of the screen, takes a new one.
Now add sprites arrows and configure some of their properties. First, let's preload the texture in the preload () method.
Now, in the create () method, let's do the following.
Here we create a couple of sprites - one for each arrow. Both of them use the same texture that we loaded, indicating “arrow” as the key. Notice how the sprites are placed strictly along the center of the Y axis of the game world, that their pivot points are set on the center of the sprite, and how the first arrow has been flipped so that it points to the left using the scale property.
I want to create an additional parameter for arrows sprites, which contains information about the direction of the arrow along the X axis. In order to set your own, not provided by the system property, you can use the construction of this.rightArrow.anythingHere. However, I prefer to keep these additional properties in a separate object, giving it the name "customParams". Why am I doing this? For example, what if someone is not familiar enough with Phaser and decides to create an additional property of an object called “scale”? As we know, scale is one of the standard properties of sprites, and creating another one is the same, we will simply replace the standard one, giving it some value. As a result, incomprehensible problems and errors that are very difficult to detect. That is why I prefer to save all the additional data in a separate object, with full confidence that its name does not match anything that the sprite object already has.

Arrows on the game screen
Now the screen has a pair of arrows and a fixed chicken. Later, instead of her there will be a whole farm. But we’ll leave the chicken where it is and figure out the input processing.
To begin, let's make the bird interactive, responsive to touch and mouse clicks.
Now we need to create the animateAnimal method in the GameState object. This is where the animation will start and the sound will play.
Enable input event handling for both arrows.
Add the switchAnimal method while it is empty.
Now, if you click on the arrows or on the chicken, the corresponding messages will appear in the console.
Working with sets of sprites is a common technique used in game development. For example, a game about a spacecraft, in which there are many enemies. New enemies appear on the screen, they are destroyed, enemy ships interact in the same way with the game world. It is logical to assume that it is more convenient to perform many operations not for each enemy individually, but immediately for some of their groups.
The game has a set of animals and birds. Using the arrow keys, you can switch to the next farm occupant or return to the previous one. In order to work with game objects, we will use groups.
The data unique for each creature (name, texture, sound, animation) will be represented in the game as an array of objects. Such an array, theoretically, can be downloaded already in finished form from a certain web server or from local storage. Using this data, we create sprites and merge them into a group.
Say goodbye to the chicken, with a separate sprite, and move on to working with a group of objects. Let's start with preloading images for them.
In the create method, you need to remove everything, up to the code related to the arrows, and insert the following into it.
Here is what we have done.
Details about the Group class we use can be found here .
Interpolation animation, which is often referred to as “tweening”, is an approach to animation, which consists in defining a start and end frame, and intermediate frames are generated by the system automatically. Hence the term “tweening”, which is derived from “in-between”, which can be translated as “in between”.
For example, the ball is in the position x = 10. We decided that at the end of the 10-second animated movement it should be in the position x = 100. As a result, the ball for the specified time will smoothly move from the initial position to the final one. At the same time, we set only its initial and final position, as well as the duration of the animation.
Phaser contains an embedded interpolation animation subsystem (take a look at the Tween class description from the documentation). You can animate almost any property of an object of the Sprite class, or even several properties at the same time.
We will animate the movement of the inhabitants of the farm from the initial to the final position. In addition, you can specify a callback function that will be executed when the animation ends.
Turn off the ability to click on the arrows while moving an animal or bird on the screen. As a result, the user will not be able to click on the arrows during the animation (although if this is not done, it turns out quite funny, you can try).
The switchAnimal method, the skeleton of which is created above, will now look like this.
As you can see from the code, the usual procedure for working with interpolation animation consists of several steps.
Interpolation animation
Another type of animation that can be used in the game is called frame-by-frame animation. With this approach, we need the so-called spritesheet (spritesheet), containing various animation frames. Sprite lists involved in this project are in the materials for it.

Sprite list
Let's start with the preloading of sprite lists. Instead of uploading individual images, we load the sprite lists and set their sizes and the number of frames.
, Loader .
create() . . , , , , ( 0). , - . «0» — , .
, Phaser, :
, :
B , «animal». («animate» ), . – , , . , , , – . – . (3 ) . , «false», , , . «true», , , . – «false», , , , , .
. animateAnimal.
. , , preload().
mp3 ogg. , , HTML5, . MP3 OGG . , , Audacity . Linux, Windows Mac.
animalData . customParams .
C , :
, , , , animateAnimal.
!
Freesound.org , . Audacity . Freesound.org – , . , . , .
: , .
, , , animalData, .
, . .
, . , , Text, , .
create – , . . , currentAnimal, , .
, , . visibility. .

! . , – . , .
HTML5- : , , . , , , . , – , , .
, Android- Cordova Intel XDK . Cordova « How to Build a Virtual Pet Game with HTML5 and Cordova ». API Cordova.
Intel XDK, , . , Projects () Start a New Project > Import Your HTML5 Code Base ( > HTML5-).
, , . , , Test () ( Intel, App Preview, ).
, Android, , Build (). Android, . «Android», – «Crosswalk for Android». , , Crosswalk , , webview, Chrome. Android-, ( , Android 4+). – Crosswalk. , . – APK . , Android-, Intel XDK, APK- 1 , , Crosswalk, 20 .
, Android , APK- Google Amazon.
, , .
. Phaser, , , . How to Make a Virtual Pet Game with HTML5 and Cordova , How to Make a Sidescroller Game with HTML5 , HTML5 Phaser Tutorial – SpaceHipster , HTML5 Phaser Tutorial – Top-down Games . – HTML5- Zenva Academy.
, - , – ! , – GameDev Academy . .
Phaser
In this guide, I'm going to talk about how to make a slider game about animals and birds that live on a farm, using the Phaser HTML5 library. The source of inspiration for this project was the game for Android Animal Sounds for Baby from the company Fisher-Price.
Phaser is a free, interesting and easy-to-use HTML5 framework for developing 2D games. It was created by Richard Davey (Richard Davey), around Phaser formed a wonderful community of developers. Usually they chat on the HTML5 Game Devs forums .
Game screen
')
Code and game resources
You can download the code and resources of the project, which we will be developing here, from here . And here is the GitHub repository .
It should be noted that the graphics for the game was created by my company, Zenva . You can use images for commercial and non-commercial projects, no attribution is required (although if you make the next hit like Candy Crash out of all of this, please buy me a big mansion).
Project Background and Prerequisites
In this guide, we will create a cross-platform game for kids using the Phaser. Also consider the export of applications for the Android platform using Apache Cordova and Intel XDK .
It is assumed that you, starting reading, have the basic skills of developing in JavaScript. If this is not the case, then first it is advisable to understand the basics of JS. You can, for example, take my JavaScript course at Zenva Academy and quickly get the necessary knowledge.
In order to master this manual, no experience with Phaser, Cordova, Android is required. The same goes for game development knowledge.
Games based on Phaser cannot be started simply by opening the Index.html file in a browser. For their normal operation, you need a web server. Phaser games, if you do not use the Cordova API in them, can be run using regular local web servers. For example, WAMP for Windows, MAMP on Mac. You can use a simple HTTP server in Python or the http-server package for Node.js.
In addition, some development environments, such as Intel XDK and Brackets editor, come with an embedded web server, so you don’t need to install a separate server using these tools.
Hello World!
The basis of the considered Phaser-project is presented in the form of an Index.html file, to which the Phaser library and the script are connected, which will contain the game code. This is what the Index.html file looks like.
<!DOCTYPE html> <html> <head> <meta charset="utf-8" /> <meta name="viewport" content="width=device-width, initial-scale=1, maximum-scale=1, minimum-scale=1, user-scalable=no" /> <title>Learn Game Development at ZENVA.com</title> <script type="text/javascript" src="js/phaser.js"></script> <style> body { padding: 0px; margin: 0px; background: black; } </style> </head> <body> <!-- --> <script src="js/main.js"></script> </body> </html> Here is the code for the main.js file. Here, for the time being, only billet methods.
// var GameState = { // init: function() { }, // preload: function() { }, // , create: function() { }, // update: function() { } }; // Phaser var game = new Phaser.Game(640, 360, Phaser.AUTO); // game.state.add('GameState', GameState); // game.state.start('GameState'); If you are using the latest version of Intel XDK, you can generate a start-up project using the Phaser pattern. To do this, on the Projects tab, execute the Start a new project command, expand the Templates group, select Games, select Phaser from the list of templates. What we start working with looks a little different than in the Intel XDK, but this does not change the essence of what is happening.
If you load Index.html in a browser using a local web server (we talked about this above), and open the browser console, you can see information about the successful initialization of Phaser.
Successful Phaser Initialization
Sprites
Images, or, as they are called in the gaming industry, "sprites" - this is the daily bread of 2D games. Phaser uses sprites to display the background, the characters of the game, and almost all of the game graphics. Consider a few examples of working with sprites.
Texture preloading
Before you bring the sprite to the screen, you need to download the image file that is associated with this sprite. Downloading a file from the disk takes some time, but loading an image from the device’s RAM is almost instantaneous. Preloading game resources is loading everything you need from the disk and placing it in RAM. As a result, when an image or something else is needed, it can be displayed on the screen, or, in the case of a sound, reproduced in no time.
Noticed how sometimes web pages are not fully loaded, but so that you can see the text and only some images? This is due to the fact that the images, before they become visible, must be downloaded from the server. This is normal for websites, everyone is used to it, but in games like this is simply unacceptable! Imagine your favorite game with a black rectangle instead of a character whose image did not have time to load.
Therefore, let's start with the preloading of images and other game resources, such as sounds, in the preload () method of the GameState object. Here is what it looks like.
preload: function() { this.load.image('background', 'assets/images/background.png'); this.load.image('chicken', 'assets/images/chicken.png'); } The this.load command calls an object called the Loader, initialized with the Phaser engine. This object is equipped with various methods for loading game resources of different types. See the documentation for details. The first parameter is the key (key) of the resource. The key can be any, the main thing is not to set the same key to different resources. The keys will be used in the game code in order to access specific resources.
Sprite output to screen
In order to display sprites on the screen, you need to add the corresponding code to the create () method of the GameState object. This method is executed once after all the necessary game resources are loaded.
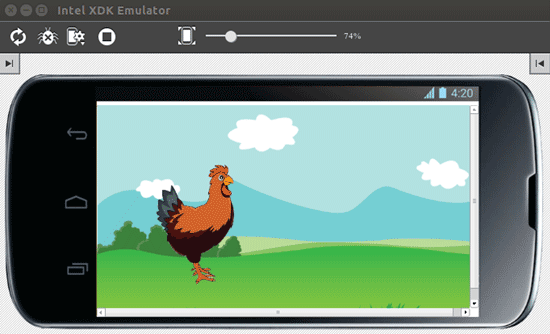
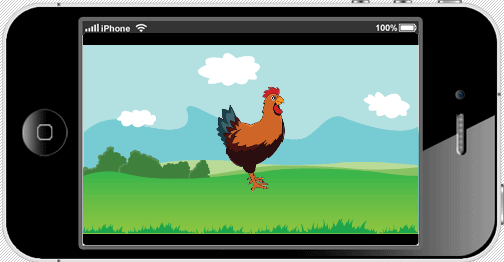
// , create: function() { this.background = this.game.add.sprite(0, 0, 'background'); this.chicken = this.game.add.sprite(100, 100, 'chicken'); }, Sprites on the screen are located in given coordinates, determined by the values of X and Y. The coordinate system begins in the upper left corner of the game world. Y values increase from top to bottom, X - from left to right.
The origin is in the upper left corner.
Displaying sprites, which are initialized by the above code, looks like this.
Sprites are displayed on the Intel XDK emulator
Pivot point
The point of the sprite, which is placed in the coordinate (x, y) given to it, is called the anchor point. By default, the sprite's anchor point corresponds to its upper left corner. Thus, setting the position of the sprite, for example, in (10.10), means that its left upper corner will be in the specified position.
If the sprite is rotated, the pivot point will be the center of rotation. In addition, if you change the size of the sprite, scale it, the sprite will increase or decrease, but the pivot point will remain where it was before the start of the transformation.
Sometimes the sprite's anchor point needs to be changed. For example, if it became necessary to set the position of the sprite with reference to its center. This can be done as shown below (after showing the sprite).
// // : this.chicken.achor.setTo(0.5); this.chicken.anchor.setTo(0.5, 0.5); Sprite after changing the pivot point
Sprite Rotation
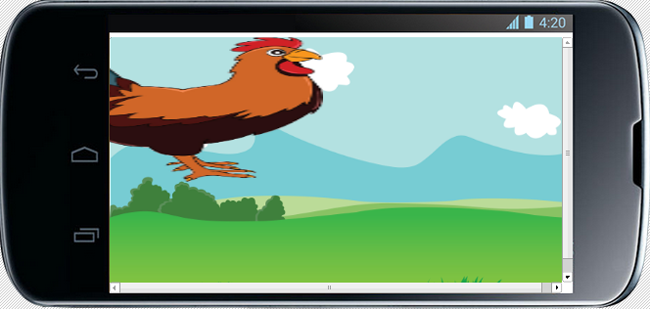
Rotate the sprite is very simple. To do this, it is enough to change its angle property (rotation angle). Rotation is performed around the pivot point (in our case, around the center of the sprite). The angle of rotation is given in degrees. Here, for example, how to rotate the sprite by 90 degrees.
this.chicken.angle = 90; 90 degree rotation of the sprite
Sprite resizing
The scale sprite property allows you to resize it. Below are examples of scaling (the sprite was previously returned to the state in which it was before the turn).
Stretch the sprite vertically.
this.chicken.scale.setTo(3,1); // X Y Sprite stretched vertically
Reduce the size of the sprite in half:
this.chicken.scale.setTo(0.5) // 50% x, y Sprite reduced by half
Sprite reflection
If the sprite needs to be reflected along the X or Y axis, this can be done by setting negative values when setting its scale property. If, for example, to give a value of -1 on the X axis, the sprite will be reflected on this axis, but the size will not change. If you use negative values that are different from -1, this will have a double effect: reflection and resizing.
Reflect the sprite on the X axis.
this.chicken.scale.setTo(-1,1); // x Sprite reflected along the X axis
Sprite placement in the center of the game world.
The easiest way to place the sprite in the center of the game world is to set the reference point of the sprite in its center and specify the center of the screen as the new coordinates of the sprite. For example, you can do it like this.
// this.chicken = this.game.add.sprite(this.game.world.centerX, this.game.world.centerY, 'chicken'); // this.chicken.anchor.setTo(0.5, 0.5); The location of the sprite on the screen can always be changed by editing the value of its x and y properties.
Details about the Sprite class and its methods and properties, some of which we discussed above, can be found in the documentation .
Adjusting the size of the game screen to the screen size of the device
No matter for which platform or platforms the game is being developed, in any case you will have to deal with different resolutions and aspect ratios of the screens. That is the reality. In the recent past, this was a real nightmare for developers of HTML5 games, but most of the game engines take on the problems associated with different screens. Phaser is not an exception, it contains built-in capabilities for supporting various screens and allows you to create games that work correctly on various devices. All this in the Phaser is the Scale Manager object.
Our game screen will resize to fit the screen size of the device, keeping the aspect ratio. This mode in the scaling manager is called SHOW_ALL. Settings are made in the init () method.
// init: function() { // this.scale.scaleMode = Phaser.ScaleManager.SHOW_ALL; // this.scale.pageAlignHorizontally = true; this.scale.pageAlignVertically = true; }, The game on the screen, the parameters of which are different from the parameters of the game screen
Add arrows
Add arrows to the game screen, with which you can switch between the inhabitants of the farm. When the user touches the arrow, the creature displayed on the screen moves to the right or left, and his place, in the center of the screen, takes a new one.
Now add sprites arrows and configure some of their properties. First, let's preload the texture in the preload () method.
this.load.image('arrow', 'assets/images/arrow.png'); Now, in the create () method, let's do the following.
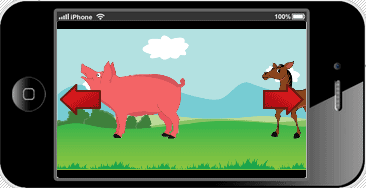
// this.leftArrow = this.game.add.sprite(60, this.game.world.centerY, 'arrow'); this.leftArrow.anchor.setTo(0.5); this.leftArrow.scale.x = -1; this.leftArrow.customParams = {direction: -1}; // this.rightArrow = this.game.add.sprite(580, this.game.world.centerY, 'arrow'); this.rightArrow.anchor.setTo(0.5); this.rightArrow.customParams = {direction: 1}; Here we create a couple of sprites - one for each arrow. Both of them use the same texture that we loaded, indicating “arrow” as the key. Notice how the sprites are placed strictly along the center of the Y axis of the game world, that their pivot points are set on the center of the sprite, and how the first arrow has been flipped so that it points to the left using the scale property.
Additional sprite options
I want to create an additional parameter for arrows sprites, which contains information about the direction of the arrow along the X axis. In order to set your own, not provided by the system property, you can use the construction of this.rightArrow.anythingHere. However, I prefer to keep these additional properties in a separate object, giving it the name "customParams". Why am I doing this? For example, what if someone is not familiar enough with Phaser and decides to create an additional property of an object called “scale”? As we know, scale is one of the standard properties of sprites, and creating another one is the same, we will simply replace the standard one, giving it some value. As a result, incomprehensible problems and errors that are very difficult to detect. That is why I prefer to save all the additional data in a separate object, with full confidence that its name does not match anything that the sprite object already has.
Arrows on the game screen
Input processing
Now the screen has a pair of arrows and a fixed chicken. Later, instead of her there will be a whole farm. But we’ll leave the chicken where it is and figure out the input processing.
To begin, let's make the bird interactive, responsive to touch and mouse clicks.
this.chicken = this.game.add.sprite(this.game.world.centerX, this.game.world.centerY, 'chicken'); // this.chicken.anchor.setTo(0.5, 0.5); // , – this.chicken.inputEnabled = true; // this.chicken.input.pixelPerfectClick = true; // this.chicken.events.onInputDown.add(this.animateAnimal, this); Now we need to create the animateAnimal method in the GameState object. This is where the animation will start and the sound will play.
// animateAnimal: function(sprite, event) { console.log('animate animal and play sound'); }, Enable input event handling for both arrows.
// this.leftArrow = this.game.add.sprite(60, this.game.world.centerY, 'arrow'); this.leftArrow.anchor.setTo(0.5); this.leftArrow.scale.x = -1; this.leftArrow.customParams = {direction: -1}; // this.leftArrow.inputEnabled = true; this.leftArrow.input.pixelPerfectClick = true; this.leftArrow.events.onInputDown.add(this.switchAnimal, this); // this.rightArrow = this.game.add.sprite(580, this.game.world.centerY, 'arrow'); this.rightArrow.anchor.setTo(0.5); this.rightArrow.customParams = {direction: 1}; // this.rightArrow.inputEnabled = true; this.rightArrow.input.pixelPerfectClick = true; this.rightArrow.events.onInputDown.add(this.switchAnimal, this); Add the switchAnimal method while it is empty.
// , sprite , switchAnimal: function(sprite, event) { console.log('switch animal'); } Now, if you click on the arrows or on the chicken, the corresponding messages will appear in the console.
Groups
Working with sets of sprites is a common technique used in game development. For example, a game about a spacecraft, in which there are many enemies. New enemies appear on the screen, they are destroyed, enemy ships interact in the same way with the game world. It is logical to assume that it is more convenient to perform many operations not for each enemy individually, but immediately for some of their groups.
The game has a set of animals and birds. Using the arrow keys, you can switch to the next farm occupant or return to the previous one. In order to work with game objects, we will use groups.
The data unique for each creature (name, texture, sound, animation) will be represented in the game as an array of objects. Such an array, theoretically, can be downloaded already in finished form from a certain web server or from local storage. Using this data, we create sprites and merge them into a group.
Say goodbye to the chicken, with a separate sprite, and move on to working with a group of objects. Let's start with preloading images for them.
preload: function() { this.load.image('background', 'assets/images/background.png'); this.load.image('arrow', 'assets/images/arrow.png'); this.load.image('chicken', 'assets/images/chicken.png'); this.load.image('horse', 'assets/images/horse.png'); this.load.image('pig', 'assets/images/pig.png'); this.load.image('sheep', 'assets/images/sheep.png'); }, In the create method, you need to remove everything, up to the code related to the arrows, and insert the following into it.
// this.background = this.game.add.sprite(0, 0, 'background'); // var animalData = [ {key: 'chicken', text: 'CHICKEN',}, {key: 'horse', text: 'HORSE'}, {key: 'pig', text: 'PIG'}, {key: 'sheep', text: 'SHEEP'} ]; // – this.animals = this.game.add.group(); // var self = this; var animal; animalData.forEach(function(element){ // , animal = self.animals.create(-1000, self.game.world.centerY, element.key, 0); // , Phaser, animal.customParams = {text: element.text, sound: 'to be added..'}; // animal.anchor.setTo(0.5); // , animal.inputEnabled = true; animal.input.pixelPerfectClick = true; animal.events.onInputDown.add(self.animateAnimal, this); }); // this.currentAnimal = this.animals.next(); this.currentAnimal.position.set(this.game.world.centerX, this.game.world.centerY); Here is what we have done.
- We gave all the data of the inhabitants of the farm in the form of a JSON object. Such an object can be downloaded from a web server or from local storage, or, for some games, generate software
- Created a group of objects.
- We went through the cycle according to the inhabitants of the farm, created a sprite for each of them and added what we had to the group.
- For each of the sprites included input processing and set the callback function, which should work when the user interacts with the game object.
- We got the first creature from the group using the next () method and placed it in the center of the screen. The group allows you to access objects included in it using the next () and previous () commands.
Details about the Group class we use can be found here .
Interpolation animation
Interpolation animation, which is often referred to as “tweening”, is an approach to animation, which consists in defining a start and end frame, and intermediate frames are generated by the system automatically. Hence the term “tweening”, which is derived from “in-between”, which can be translated as “in between”.
For example, the ball is in the position x = 10. We decided that at the end of the 10-second animated movement it should be in the position x = 100. As a result, the ball for the specified time will smoothly move from the initial position to the final one. At the same time, we set only its initial and final position, as well as the duration of the animation.
Phaser contains an embedded interpolation animation subsystem (take a look at the Tween class description from the documentation). You can animate almost any property of an object of the Sprite class, or even several properties at the same time.
We will animate the movement of the inhabitants of the farm from the initial to the final position. In addition, you can specify a callback function that will be executed when the animation ends.
Turn off the ability to click on the arrows while moving an animal or bird on the screen. As a result, the user will not be able to click on the arrows during the animation (although if this is not done, it turns out quite funny, you can try).
The switchAnimal method, the skeleton of which is created above, will now look like this.
// switchAnimal: function(sprite, event) { // , if(this.isMoving) { return false; } this.isMoving = true; var newAnimal, endX; //, , if(sprite.customParams.direction > 0) { newAnimal = this.animals.next(); newAnimal.x = -newAnimal.width/2; endX = 640 + this.currentAnimal.width/2; } else { newAnimal = this.animals.previous(); newAnimal.x = 640 + newAnimal.width/2; endX = -this.currentAnimal.width/2; } // , x var newAnimalMovement = game.add.tween(newAnimal); newAnimalMovement.to({ x: this.game.world.centerX }, 1000); newAnimalMovement.onComplete.add(function() { this.isMoving = false; }, this); newAnimalMovement.start(); var currentAnimalMovement = game.add.tween(this.currentAnimal); currentAnimalMovement.to({ x: endX }, 1000); currentAnimalMovement.start(); this.currentAnimal = newAnimal; }, As you can see from the code, the usual procedure for working with interpolation animation consists of several steps.
- Create a Tween object that will do the animation.
- Set animation properties and, if necessary, a callback function.
- Run the animation in the right place of the program.
Interpolation animation
Frame animation
Another type of animation that can be used in the game is called frame-by-frame animation. With this approach, we need the so-called spritesheet (spritesheet), containing various animation frames. Sprite lists involved in this project are in the materials for it.
Sprite list
Let's start with the preloading of sprite lists. Instead of uploading individual images, we load the sprite lists and set their sizes and the number of frames.
// preload: function() { this.load.image('background', 'assets/images/background.png'); this.load.image('arrow', 'assets/images/arrow.png'); this.load.spritesheet('chicken', 'assets/images/chicken_spritesheet.png', 131, 200, 3); this.load.spritesheet('horse', 'assets/images/horse_spritesheet.png', 212, 200, 3); this.load.spritesheet('pig', 'assets/images/pig_spritesheet.png', 297, 200, 3); this.load.spritesheet('sheep', 'assets/images/sheep_spritesheet.png', 244, 200, 3); }, , Loader .
create() . . , , , , ( 0). , - . «0» — , .
animalData.forEach(function(element){ // , animal = self.animals.create(-1000, self.game.world.centerY, element.key, 0); // , Phaser, :
animal.customParams = {text: element.text}; // animal.anchor.setTo(0.5); // animal.animations.add('animate', [0, 1, 2, 1, 0, 1], 3, false); // , animal.inputEnabled = true; animal.input.pixelPerfectClick = true; animal.events.onInputDown.add(self.animateAnimal, this); }); , :
animal.animations.add('animate', [0, 1, 2, 1, 0, 1], 3, false); B , «animal». («animate» ), . – , , . , , , – . – . (3 ) . , «false», , , . «true», , , . – «false», , , , , .
. animateAnimal.
// animateAnimal: function(sprite, event) { sprite.play('animate'); }, . , , preload().
this.load.audio('chickenSound', ['assets/audio/chicken.ogg', 'assets/audio/chicken.mp3']); this.load.audio('horseSound', ['assets/audio/horse.ogg', 'assets/audio/horse.mp3']); this.load.audio('pigSound', ['assets/audio/pig.ogg', 'assets/audio/pig.mp3']); this.load.audio('sheepSound', ['assets/audio/sheep.ogg', 'assets/audio/sheep.mp3']); mp3 ogg. , , HTML5, . MP3 OGG . , , Audacity . Linux, Windows Mac.
animalData . customParams .
// var animalData = [ {key: 'chicken', text: 'CHICKEN', audio: 'chickenSound'}, {key: 'horse', text: 'HORSE', audio: 'horseSound'}, {key: 'pig', text: 'PIG', audio: 'pigSound'}, {key: 'sheep', text: 'SHEEP', audio: 'sheepSound'} ]; // this.animals = this.game.add.group(); var self = this; var animal; animalData.forEach(function(element){ // C , :
animal = self.animals.create(-1000, self.game.world.centerY, element.key, 0); // , Phaser, animal.customParams = {text: element.text, sound: self.game.add.audio(element.audio)}; // animal.anchor.setTo(0.5); // animal.animations.add('animate', [0, 1, 2, 1, 0, 1], 3, false); // , animal.inputEnabled = true; animal.input.pixelPerfectClick = true; animal.events.onInputDown.add(self.animateAnimal, this); }); , , , , animateAnimal.
// animateAnimal: function(sprite, event) { sprite.play('animate'); sprite.customParams.sound.play(); }, !
?
Freesound.org , . Audacity . Freesound.org – , . , . , .
: , .
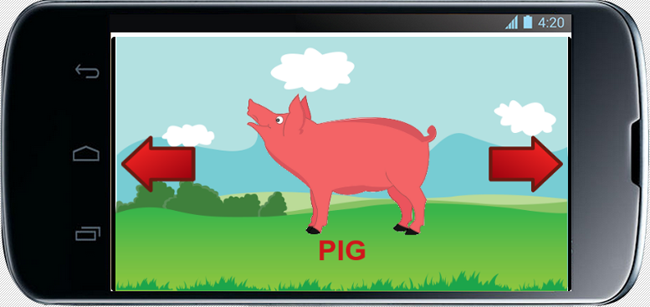
, , , animalData, .
, . .
showText: function(animal) { // if(!this.animalText) { var style = {font: "bold 30pt Arial", fill: "#D0171B", align: "center"}; this.animalText = this.game.add.text(this.game.width/2, this.game.height * 0.85, 'asdfasfd' , style); this.animalText.anchor.setTo(0.5); } this.animalText.setText(animal.customParams.text); this.animalText.visible = true; } , . , , Text, , .
create – , . . , currentAnimal, , .
// this.currentAnimal = this.animals.next(); this.currentAnimal.position.set(this.game.world.centerX, this.game.world.centerY); this.showText(this.currentAnimal); , , . visibility. .
// switchAnimal: function(sprite, event) { // , if(this.isMoving) { return false; } this.isMoving = true; // this.animalText.visible = false; var newAnimal, endX; // , , if(sprite.customParams.direction > 0) { newAnimal = this.animals.next(); newAnimal.x = -newAnimal.width/2; endX = 640 + this.currentAnimal.width/2; } else { newAnimal = this.animals.previous(); newAnimal.x = 640 + newAnimal.width/2; endX = -this.currentAnimal.width/2; } // , x var newAnimalMovement = game.add.tween(newAnimal); newAnimalMovement.to({ x: this.game.world.centerX }, 1000); newAnimalMovement.onComplete.add(function() { this.isMoving = false; // this.showText(newAnimal); }, this); newAnimalMovement.start(); var currentAnimalMovement = game.add.tween(this.currentAnimal); currentAnimalMovement.to({ x: endX }, 1000); currentAnimalMovement.start(); this.currentAnimal = newAnimal; }, ! . , – . , .
HTML5- : , , . , , , . , – , , .
, Android- Cordova Intel XDK . Cordova « How to Build a Virtual Pet Game with HTML5 and Cordova ». API Cordova.
Intel XDK, , . , Projects () Start a New Project > Import Your HTML5 Code Base ( > HTML5-).
, , . , , Test () ( Intel, App Preview, ).
, Android, , Build (). Android, . «Android», – «Crosswalk for Android». , , Crosswalk , , webview, Chrome. Android-, ( , Android 4+). – Crosswalk. , . – APK . , Android-, Intel XDK, APK- 1 , , Crosswalk, 20 .
, Android , APK- Google Amazon.
, , .
- . , , , , .
- .
- .
- Phaser.
- .
- .
- .
- HTML5- Android-.
. Phaser, , , . How to Make a Virtual Pet Game with HTML5 and Cordova , How to Make a Sidescroller Game with HTML5 , HTML5 Phaser Tutorial – SpaceHipster , HTML5 Phaser Tutorial – Top-down Games . – HTML5- Zenva Academy.
, - , – ! , – GameDev Academy . .
Source: https://habr.com/ru/post/282536/
All Articles