Extending Splunk functionality is just

My name is Konstantin Tkachev, I work as an application architect.
Foreword
I want to talk about how you can extend the existing functionality of the Splunk platform using the example of the scikit-learn (sklearn) machine learning library implemented in Python. In our example, we will use the decision tree algorithm. This algorithm is not included in the standard delivery of Splunk and below I will show that you can connect it for the implementation of an applied task by performing quite simple steps.
Purpose of work
So, first we define the objectives of the work. Objective: To identify ways to extend the functionality of Splunk for solving individual applied tasks. In this case, importantly, we want:
')
- use Splunk as a data source;
- and also output the results of our calculations to the Splunk interface.
Restrictions
The implementation of the work will be done using Python. The choice was made in favor of Python, because it is included in the standard Splunk distribution and is one of the most common programming languages used in machine learning. In addition, this programming language is included in the vast majority of distributions of Linux and MacOS.
Application Description
As possible applied tasks I propose to consider the following options:
1. Classification of clients depending on the parameters:
a. Last customer visit time to retailer’s outlets. Let's call this parameter R (Recency).
b. The frequency of customer purchases in retail outlets retailer. Let's call this parameter F (Frequency).
Given:
There is a dependence (distribution law) of the time of the last visit R (recency) on the frequency of purchases F (frequency).
In accordance with this law of distribution, customers are divided into three categories: "Perspective", "Normal", "Unpromising".
Task:
It is necessary to determine the category of client based on the data on the time of his last visit R (recency) and the frequency of purchases F (frequency) for those clients whose category is not specified.
2. Classification of the status of the payment gateway, depending on the parameters: time of day (frequency - 1 hour), the number of requests per hour.
Given:
There is a dependency (distribution law) on the number of requests for a payment gateway per hour of time of day (grouped by hour).
In accordance with this law of distribution, the state can be: “Quiet”, “Normal”, “Critical”.
Task:
It is necessary to determine the status of the payment gateway on the basis of information on the time of day and the number of requests per hour for those values whose state is unknown.
The implementation of the classification task, of course, can be performed by other methods. Our goal is to show how to quickly and easily add Splunk functionality with our own algorithms. In particular, using the classification of the “decision trees” method.
Implementation
Description of the approach
Recall that Splunk includes a Python interpreter, which is used to develop your own SPL (Splunk Processing Language) search commands, and the Python SDK to interact with the Splunk API.
One of the main ideas of implementation is to “separate” the execution of your own algorithm from the Python interpreter, which is part of Splunk. To do this, we implement two separate Python modules:
1. A “module wrapper” that Splunk will use (more precisely, his Python interpreter). Functions of this module:
a. Implementing your Splunk SPL search command;
b. Organizing interaction with Splunk and a module that implements your unique algorithm.
2. The module in which the implementation of your unique algorithm will be implemented. For the execution of this module, your Python system installation will be used.

The advantages and disadvantages of this approach are given below.
Advantages:
- Reduction of the “strong” connectivity of Splunk and your algorithm, due to the separate implementation of the “wrapper module”, which processes your SPL command, and the module that implements your algorithm.
- You can separate from Splunk to develop and test your algorithms within your system Python.
- Updating Splunk will not affect the functioning of your algorithm.
- Splunk will not be "overloaded" with specific Python libraries.
Disadvantages:
- Small code redundancy, which is necessary for interaction between modules. The need to perform additional transformations with data that is passed between modules as parameters (arguments).
- A possible decrease in the performance of a general solution associated with additional data transformations used as parameters (arguments).
In the future, perhaps I will connect the necessary external libraries to the Python interpreter used by Splunk.
Implementation steps
Terms and conditions
1. An example implementation is given for the Ubuntu OS.
2. We will carry out the task within the framework of the standard Splunk application - “Search & Reporting”. In my case, the files required for execution will be located in the following path - “/ opt / splunk / etc / apps / search”.
System Python Setup
As a “starting point,” we set up our Python system environment in which our unique algorithm will run. To do this, import the necessary libraries. Let me remind you that in our case we use the “decision trees” algorithm. In Ubuntu, this can be done using the apt-get command. The example I used is shown below.
apt-get install python-numpy python-scipy python-pandas In the end, I received a prepared system Python environment for implementing a classification algorithm using “decision trees”.
Splunk Setup
All Splunk settings are to create / modify the commands.conf configuration file. In this file, you must specify the name of the Splunk command and the Python “wrapper module” that will implement this command. The configuration file must be located in the / opt / splunk / etc / apps / search / local folder.
Python module development
Here I will give a brief description of the work and requirements for the original data formats. The launch of modules is initiated from Splunk by calling the "| dtree" command, to the input of which the following structure should be transferred: X, Y, Class. Where X and Y are the distribution law (see examples in the section “Description of the applied task”), Class is the classification. The model is trained on the existing values of the “Class” field, then the model determines the classification for records with empty values of the Class field. Calling the "| dtree" command in Splunk runs the corresponding "wrapper script" (dtree.py), which, in turn, calls the script with the implementation of the classification algorithm (dtree_lib.py).
The code of the “module-wrapper” and the module that implements your algorithm are given in the “Appendix”.
It should be noted that the code does not contain the necessary constructions for managing exceptions, error handling, etc. The examples show the minimum required steps to demonstrate the approach.
Splunk Reboot
After completing the above steps, you must restart Splunk. After that we can proceed to the use of the team we have created.
Using
To use the command we created, you need to type in the search box Splunk'a the name of our team - “| dtree”, having previously prepared data for it.
As a source of data you can use the results of the search query Splunk. As a result, our team needs to submit the data format, which is specified in the "Development of Python modules" section, to the "input".
I prepared the initial data in a csv-file in advance. They are presented below in tabular form and as a graph of distribution.
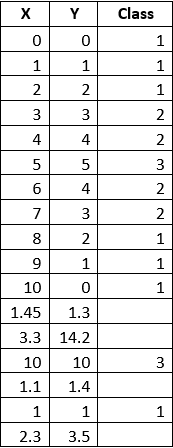
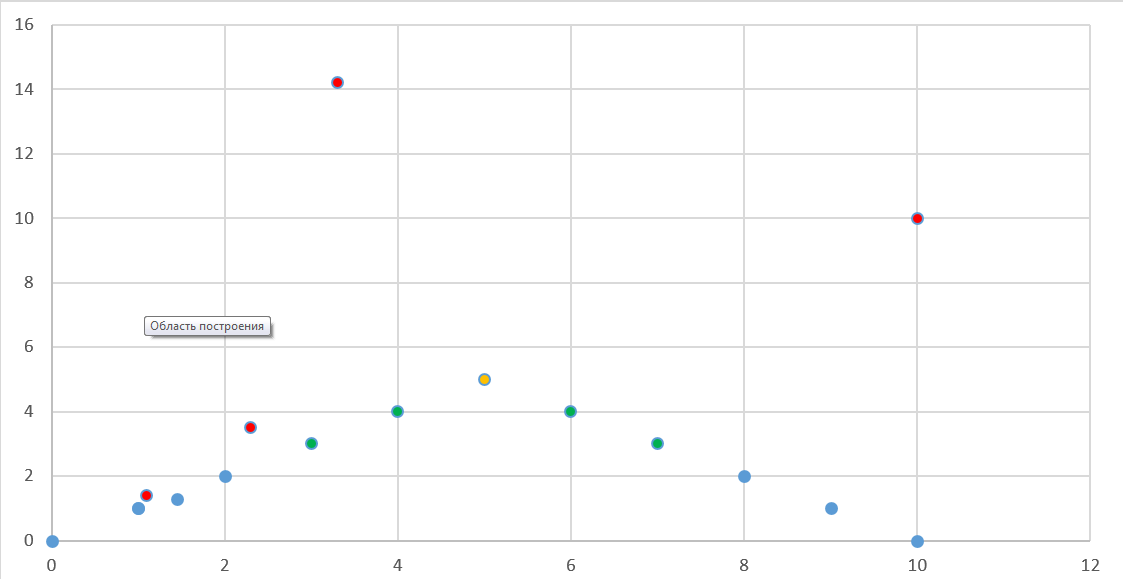
For empty values of the “Class” field (there are red dots on the chart) we will determine the classification using the “decision trees” method.
To view data in Splunk, you must run the command "| inputlookup dtree.csv". Previously, the csv file was placed in the / opt / splunk / etc / apps / search / lookups folder.

Splunk’s distribution chart below.

We execute our algorithm by running the "| inputlookup dtree.csv | dtree" command. The result of her work is presented below. A class has been defined (see the “Predicted” field) for those X and Y whose “Class” field has not been filled.

Standard Splunk features in Machine Learning
In addition, I want to note the existing Splunk features in the Machine Learning area. Splunk contains a rich library of commands for performing predictive analytics and machine learning functions:
> correlation;
> clustering (k means, cluster);
> association rules;
> classification and forecasting (Bayesian classification, linear and logistic regression, SVM);
> search for anomalies;
> principal component method (PCA).
Some of the commands I gave in the table below.
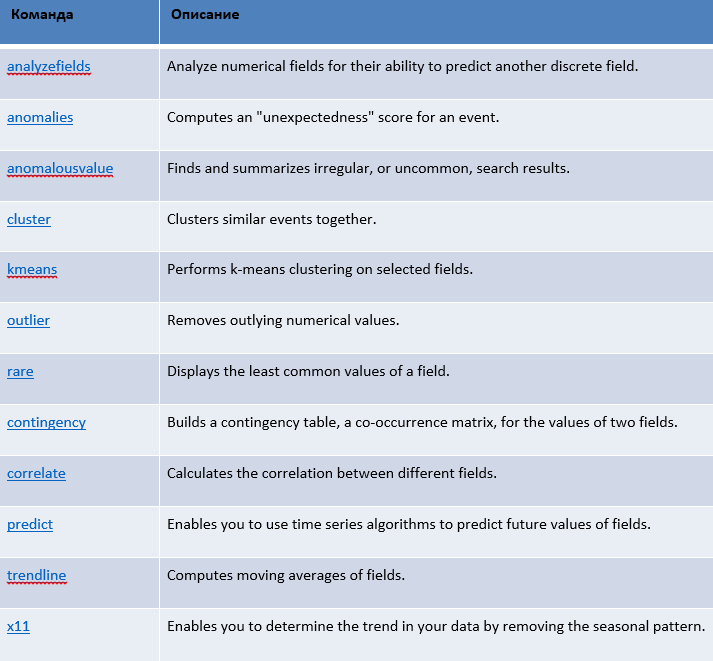
Also available is the application - ML Toolkit and Showcase, which in a convenient interface provides users with the ability to perform machine learning functions, and also contains a set of ready-made examples.

Conclusion
Thanks for attention. I hope that this article will be useful for you. Link to the video on this publication - www.youtube.com/watch?v=uVPaLWbXW1E&feature=youtu.be .
application
commands.conf
The contents of the commands.conf file is shown below.
[dtree]
type = python
filename = dtree.py
generating = false
streaming = false
retainsevents = false
Source codes
Wrap Module (dtree.py)
import os import sys import subprocess import splunk.Intersplunk #---Get data from Splunk--- results,unused1,unused2 = splunk.Intersplunk.getOrganizedResults() #---Prepare data--- str_X="" str_Y="" str_Class="" predict_X="" predict_Y="" cnt=0 delim="" for result in results: if result["Class"]=="": predict_X=predict_X+","+result["X"] predict_Y=predict_Y+","+result["Y"] else: if cnt>=1: delim="," str_X=str_X+delim+result["X"] str_Y=str_Y+delim+result["Y"] str_Class=str_Class+delim+result["Class"] cnt=cnt+1 #---Call python module with required functionality _NEW_PYTHON_PATH = '/usr/bin/python' os.environ['PYTHONPATH'] = '/opt/splunk/lib/python2.7' _SPLUNK_PYTHON_PATH = os.environ['PYTHONPATH'] os.environ['PYTHONPATH'] = _NEW_PYTHON_PATH my_process = os.path.join(os.getcwd(), '/home/konstantin/Documents/dtree_lib.py') p = subprocess.Popen([os.environ['PYTHONPATH'], my_process, _SPLUNK_PYTHON_PATH,str_X,str_Y,str_Class,predict_X,predict_Y], stdin=subprocess.PIPE, stdout=subprocess.PIPE, stderr=subprocess.STDOUT) output = p.communicate()[0] #---Print results--- #splunk.Intersplunk.outputResults(results) print output Module with the implementation of the decision tree algorithm (dtree_lib.py)
import sys from sklearn import tree #---Get data--- X=sys.argv[2] Y=sys.argv[3] Class=sys.argv[4] predict_X=sys.argv[5] predict_Y=sys.argv[6] #---Prepare data--- X=X.split(",") Y=Y.split(",") Class=Class.split(",") predict_X=predict_X.split(",") predict_Y=predict_Y.split(",") predict=list(zip(predict_X,predict_Y)) new_X=list(zip(X,Y)) new_Y=Class #---Call Machine Learning function--- clf = tree.DecisionTreeClassifier() clf = clf.fit(new_X, new_Y) result=clf.predict(predict[1:]) #---Print results--- print '{},{},{}'.format("Predicted","X","Y") for line,(x,y) in zip(result,predict[1:]): print '{},{},{}'.format(line, x, y) Source: https://habr.com/ru/post/282423/
All Articles