Restore in 60 seconds (or how to speed up data recovery using Arcserve UDP)

Sometimes, looking from the porch to the courtyard and the pond, he would talk about how nice it would be if you suddenly made an underground passage from the house or built a stone bridge across the pond ...
N.V. Gogol
Dead Souls
It would also be nice if any restoration could be performed instantly.
')
Imagine that our server has failed, taking 1 terabyte of useful information with it. If we restore its data using traditional methods, that is, by transferring them from a backup copy over the network, then at a recovery rate of, say, 8 GB per minute, we will get at least two hours of nervous waiting, annoyed user calls, and possibly lost due to idle profit.
However, there are ways that allow you to recover data in minutes, and sometimes seconds. About them, and will be discussed in the article.
Method 1. Restore in advance
Immediately after creating the backup, we will get a virtual machine from it (we migrate). In case the working server fails, we launch its virtual twin instead.
When we have repaired the working server, we’ll fill it with not the backup copy, but the latest data from this virtual server. This technology is called “Virtual Standby” and has existed in Arcserve UDP (and its predecessor, Arcserve D2D) for several years. Virtual machines from backups can be created in vSphere and Hyper-V environments.
The advantage of this method is the low recovery time, in fact, this is the start time of the virtual machine.
The disadvantage is the need to sacrifice storage space for virtual machines.
For Arcserve practitioners: how to do it
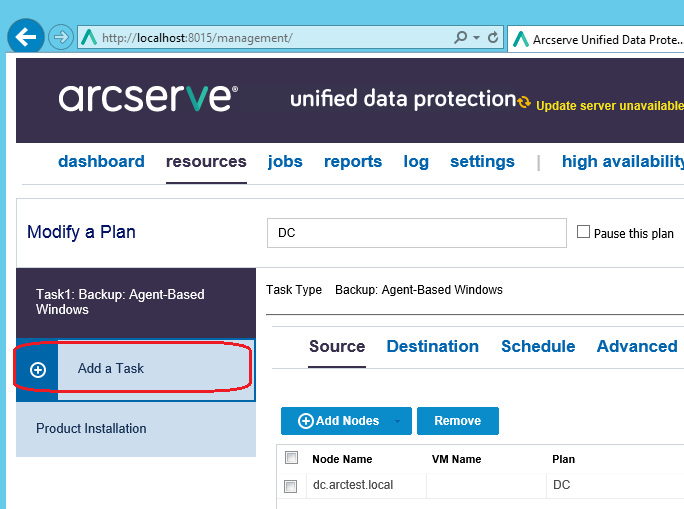
Add one more step to the backup plan of the servers you need by clicking on the “Add a Task” button:
The type of this step will be “Virtual Standby”:
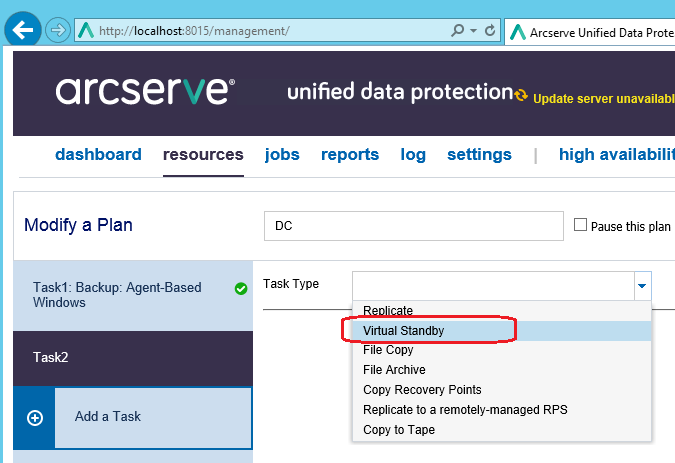
As a virtualization environment, you can use vSphere or Hyper-V.
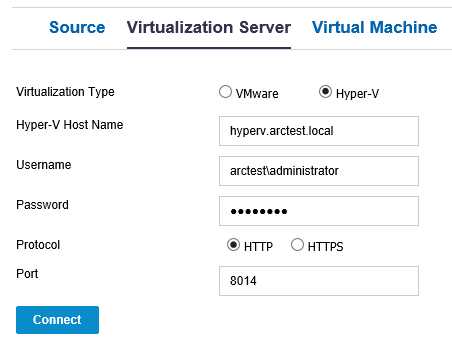
In the case of Hyper-V, fill in the “Virtualization Server” section like the one below:
In the case of vSphere, otherwise:
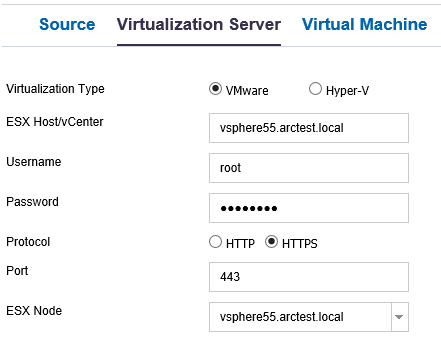
For the vSphere virtual environment, we also need to specify a machine with an installed Arcserve UDP agent that will monitor the availability of the server we reserve. We call this tracking agent a monitor.
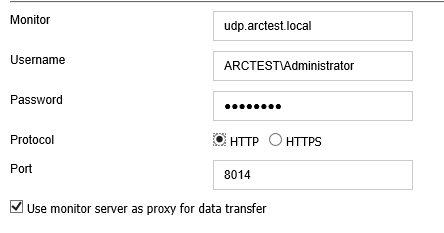
In the case of Hyper-V, the monitor is an agent on the Hyper-V host.
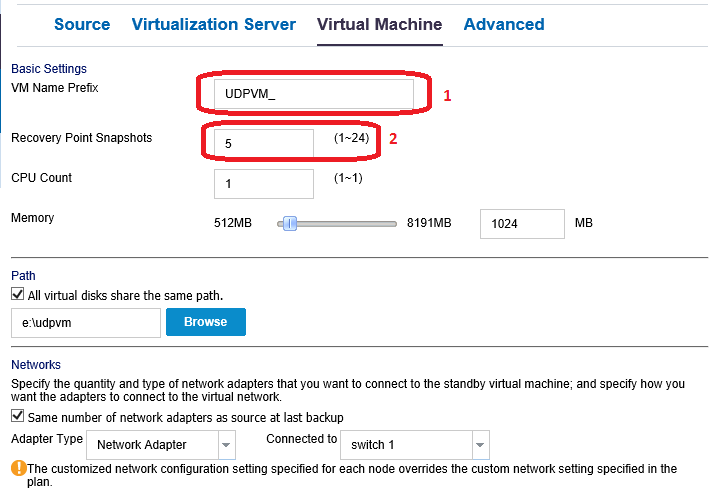
On the “Virtual Machine” tab, we define how the names of servers that we reserve will be converted into virtual machine names. Usually, the UDPVM_ (1) prefix is added.
We indicate how many snapshots of this virtual machine we need to store (each new backup creates a new snapshot) (2). The remaining parameters specify the number of processors, the amount of RAM and the network configuration of the virtual machine.
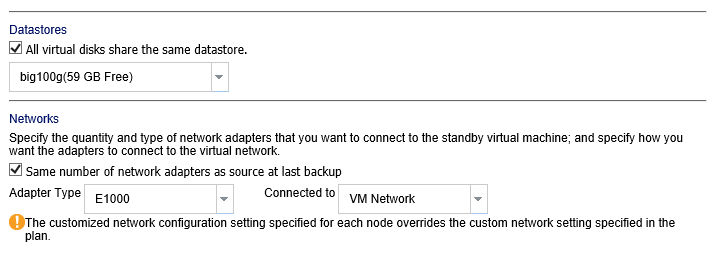
When choosing a vSphere virtualization environment, the part of the screen that defines the location of the virtual machine files and the virtual network is slightly different:
Finally, on the “Advanced” tab, you can specify whether the monitor should start the virtual machine if it cannot reach the reserved server during the specified time interval:

After the next backup is completed, the “Virtual Standby” task will start to update the virtual machine:

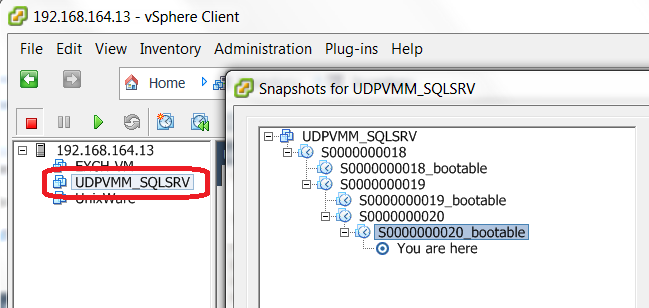
The virtual machine will soon be visible in the appropriate virtual environment. Here:
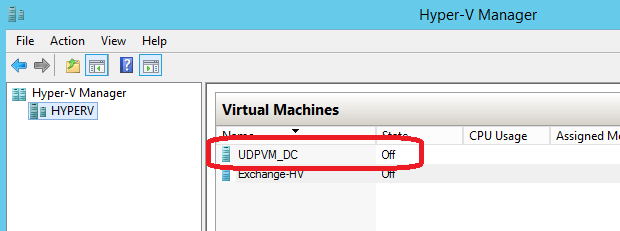
Or here:
The type of this step will be “Virtual Standby”:
As a virtualization environment, you can use vSphere or Hyper-V.
In the case of Hyper-V, fill in the “Virtualization Server” section like the one below:
In the case of vSphere, otherwise:
For the vSphere virtual environment, we also need to specify a machine with an installed Arcserve UDP agent that will monitor the availability of the server we reserve. We call this tracking agent a monitor.
In the case of Hyper-V, the monitor is an agent on the Hyper-V host.
On the “Virtual Machine” tab, we define how the names of servers that we reserve will be converted into virtual machine names. Usually, the UDPVM_ (1) prefix is added.
We indicate how many snapshots of this virtual machine we need to store (each new backup creates a new snapshot) (2). The remaining parameters specify the number of processors, the amount of RAM and the network configuration of the virtual machine.
When choosing a vSphere virtualization environment, the part of the screen that defines the location of the virtual machine files and the virtual network is slightly different:
Finally, on the “Advanced” tab, you can specify whether the monitor should start the virtual machine if it cannot reach the reserved server during the specified time interval:
After the next backup is completed, the “Virtual Standby” task will start to update the virtual machine:
The virtual machine will soon be visible in the appropriate virtual environment. Here:
Or here:
Method 2. Mount Backup
In some cases, it is enough not to restore the data, but mount the backup as a network drive in read-only mode.
In this case, the data remains to lie on the server that stores the backup copies, and only what we explicitly read, for example, individual files, is transmitted over the network.
The disk is mounted instantly, although the speed of reading data over the network, of course, will be lower than if we read these files locally.
For Arcserve practitioners: how to do it
In the context menu of the agent icon, select “Mount Recovery Point”:
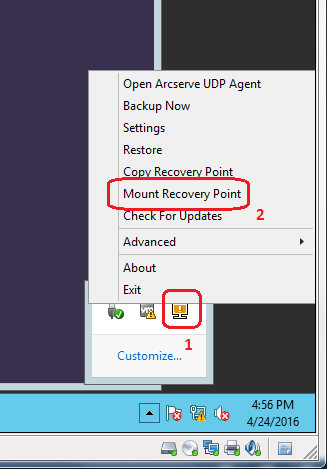
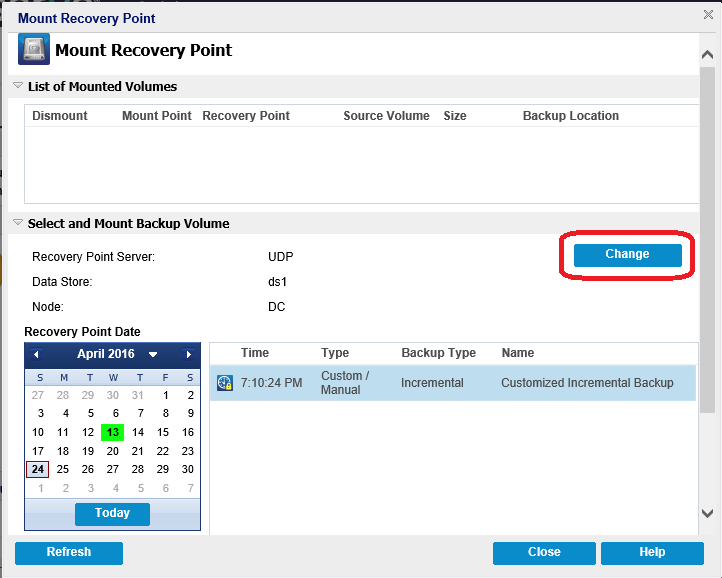
The agent will offer you to mount your own backup copies. If this does not suit you, click the “Change” button to see backup copies of other servers:
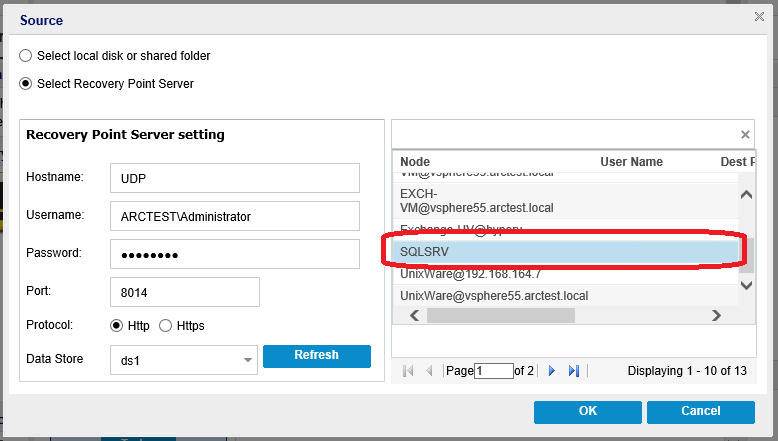
Select the server of interest to us and click “OK”:
Then we select the date (1) and time (2) of the backup copy we are interested in, as well as the server disk (3) of interest to us:
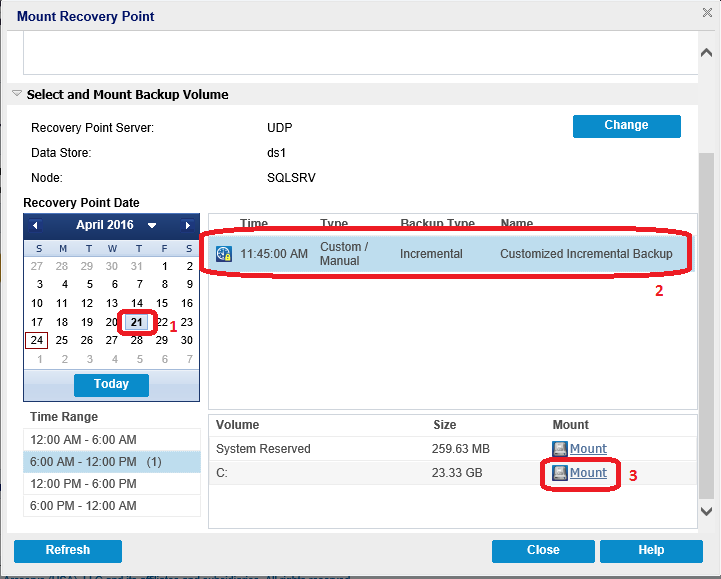
Finally, select the letter to be assigned to the disk:

Click “OK” and you can use the disk Z :.
The agent will offer you to mount your own backup copies. If this does not suit you, click the “Change” button to see backup copies of other servers:
Select the server of interest to us and click “OK”:
Then we select the date (1) and time (2) of the backup copy we are interested in, as well as the server disk (3) of interest to us:
Finally, select the letter to be assigned to the disk:
Click “OK” and you can use the disk Z :.
Method 3: Continuous Backup
If you track everything that a computer writes to a disk, you can notify another computer about these changes so that it can repeat these changes on its own disk.
Thus we get two computers with the same data on the disks. (To be precise, the data of the second computer is lagging behind during transmission over the network).
In the case when the main computer fails, the backup computer is able to replace it with current data on the disk.
It would seem that the main drawback of such a system is the need to duplicate all servers, with each working server needing one more backup one. However, virtual servers may also be backup. Moreover, in the case of Windows servers, their backup twins remain turned off until changes are copied to them, that is, they are simply .vmdk or .vhdx files that will turn into running virtual machines only at the moment they are really needed.
The great advantage of this technology is that data loss is minimal compared to periodic backups, when we can, for example, recover data on the evening before yesterday, but lost everything we did after that. With continuous backup, we will return the data to the point in time immediately preceding the server failure. This technology is implemented in the module Arcserve Replication and High Availability, available as a separate product, as well as a component of Arcserve UDP in the Premium Plus edition.
A detailed description of working with Arcserve Raplication and High Availability requires a separate article, which we will publish soon.
Method 4: Starting physical Linux machines still at the recovery stage
First, restore the files needed to start the machine (bootloader, kernel, etc.). Add another driver that will intercept disk access. Everything. Reboot the machine.
The car started and breathed, however, it has not yet been fully restored. Only a small part of it has been restored, and the restoration continues.
But look, it took the car to turn to that part of the disk that has not yet been restored! What to do? This is where the driver we introduced starts to work. It intercepts the read operation from the disk and restores exactly the requested data block, changing the standard sequence of recovery blocks.
Yes, the work of the machine will be slowed down every time when the requested data block has not yet been restored. Yes, the machine will run slower than usual until fully recovered.
But it earned already when we uploaded the first hundreds of megabytes to it. A couple of minutes - and the server came to life! In some cases, recovery time is paramount.
For Arcserve practitioners: how it is done.
Just when restoring a Linux-machine, put a tick in the box “Enable Instant BMR” and it will start to recover as described above.

Method 5: Instant recovery in a virtual machine image
We have already seen (in section 2) how it is possible to see the disks of the machine, without actually restoring them. Is it possible to make these disks bootable and start the machine with them? It turns out you can. This technology appeared in Arcserve UDP version 6.0 and was called Instant VM (Instant Virtual Machine).
It is a virtual machine (in a vSphere or Hyper-V environment) that can boot from a disk that is not actually a disk. So, in the vSphere environment, the hypervisor is mounted on the NFS network storage, which detects virtual machine files, including .vmdk, which is a disk image. In reality, this file is obtained on the fly by conversion from backup data.
On the Hyper-V-host, no network storage is not mounted, it just appears on its local disk .vhdx-file, which is also not a regular file, but is converted on the fly from a backup.
The advantage of this method is the ability to turn a backup into a virtual machine almost instantly, without sacrificing the expensive disk space for virtual machines and without wasting computing resources on the preliminary migration.
I will make a special emphasis on the fact that the technology is suitable for restoring both physical and virtual servers.
The disadvantages include a slower speed of the virtual machine located on the disk, connected via the network and obtained from the backup on the fly. However, the ability to instantly restore without additional resource costs outweighs everything.
If the virtual machine that replaces the failed server is planned to be used for a long time, you can transfer it to the real high-speed storage by means of the hypervisor.
For Arcserve practitioners: how it is done.
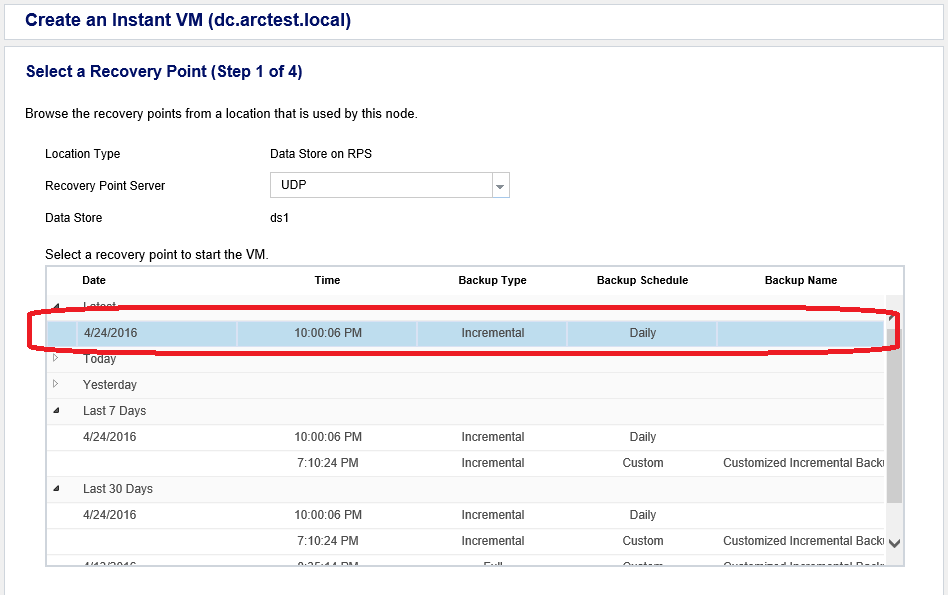
Find the server of interest in the server list. Click on it with the right mouse button and select “Create an Instant VM” in the context menu:

Select the backup we are interested in, for example, the last one:
We indicate in which virtual environment we will deploy a copy of the server.
This could be a vSphere:
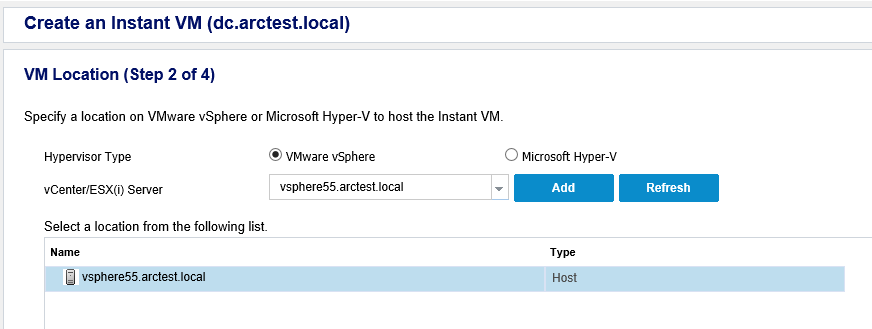
Or it could be Hyper-V:

In the case of vSphere, we need to assign a machine that will convert the backup to a virtual machine disk image on the fly. It is quite reasonable to choose a server as such a machine where this backup is stored:

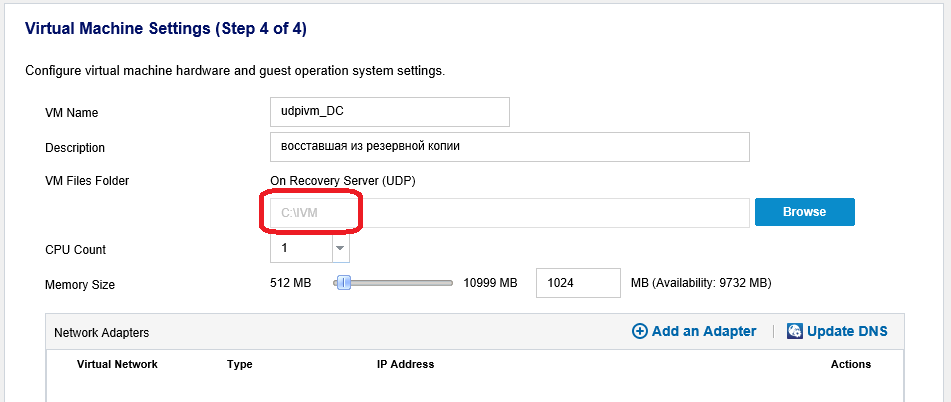
On the next screen, you first need to specify in which directory the virtual machine files will be generated. Also there you can set the number of processors, the amount of RAM and the network configuration of the virtual machine.
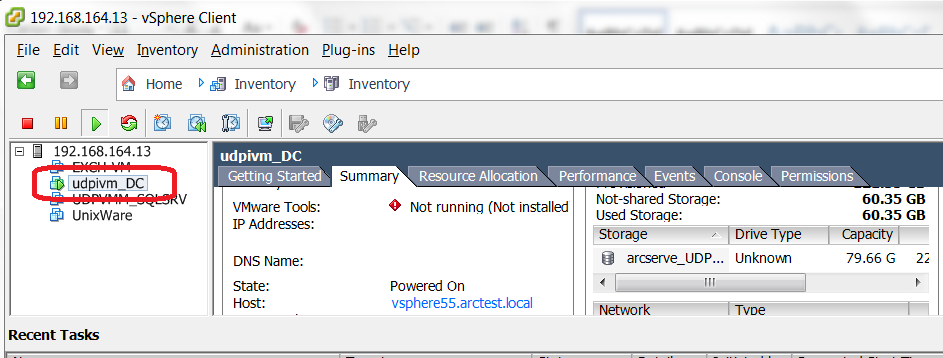
Now click the “Finish” button and wait for the virtual appearance of the virtual machine. If we chose Boot Now, the machine will start soon.
Hyper-V:
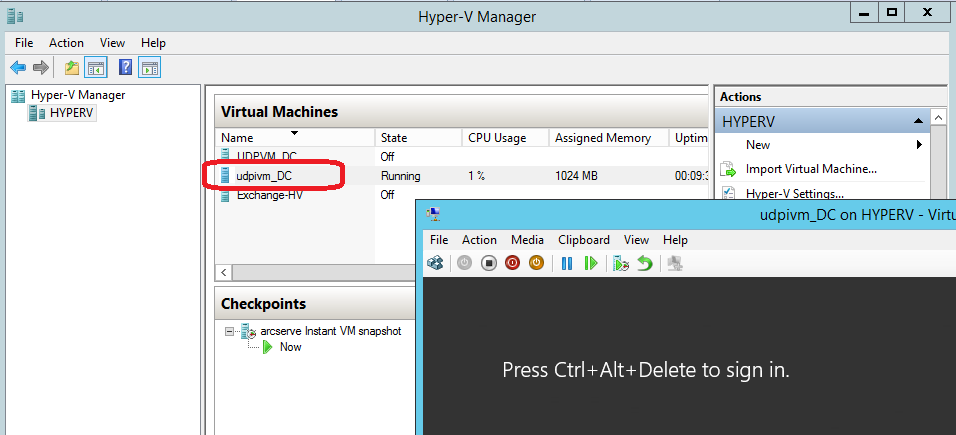
vSphere:
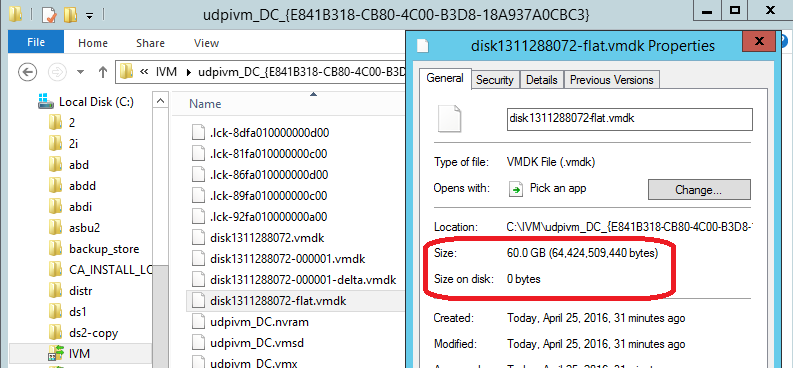
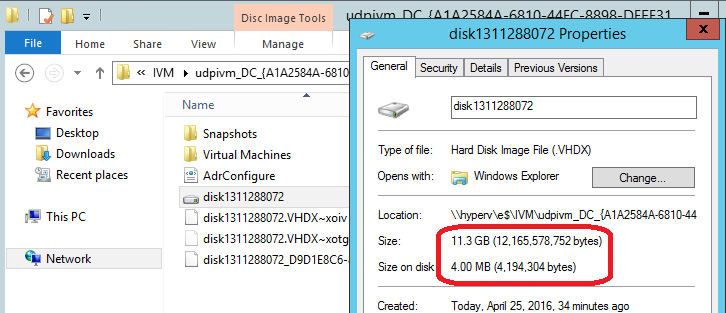
In the vSphere environment, we will see that another NFS mounted repository has appeared:

Interestingly, the virtual machine hard disk file can be quite weighty, but occupy almost nothing on the disk:
For vSphere:
For Hyper-V:
Virtual machines obtained in this way can be seen from the Arcserve UDP console in the “resources-> Infrastructure-> Instant Virtual Machines” section.

If you plan to use these machines for a long time, you can transfer them to real storage by means of the hypervisor.
Select the backup we are interested in, for example, the last one:
We indicate in which virtual environment we will deploy a copy of the server.
This could be a vSphere:
Or it could be Hyper-V:
In the case of vSphere, we need to assign a machine that will convert the backup to a virtual machine disk image on the fly. It is quite reasonable to choose a server as such a machine where this backup is stored:
On the next screen, you first need to specify in which directory the virtual machine files will be generated. Also there you can set the number of processors, the amount of RAM and the network configuration of the virtual machine.
Now click the “Finish” button and wait for the virtual appearance of the virtual machine. If we chose Boot Now, the machine will start soon.
Hyper-V:
vSphere:
In the vSphere environment, we will see that another NFS mounted repository has appeared:
Interestingly, the virtual machine hard disk file can be quite weighty, but occupy almost nothing on the disk:
For vSphere:
For Hyper-V:
Virtual machines obtained in this way can be seen from the Arcserve UDP console in the “resources-> Infrastructure-> Instant Virtual Machines” section.
If you plan to use these machines for a long time, you can transfer them to real storage by means of the hypervisor.
***
Arcserve UDP is a modern tool that allows you to efficiently organize backup and recovery of data using the most advanced technologies. Thanks to Arcserve UDP, you can achieve your goals within your budget:
- data recovery time
- backup storage history depths
- observance of volume limits for storing backups
- Compliance with network traffic limits and backup windows
- backups in a distributed environment (central office and branch offices)
For those who want to try the product Arcserve UDP below is the download link (requires filling out the form):
arcserve.com/free-backup-software-trial/?src=RU/AR//MMitroshin
You can always find more information about Arcserve products in Russian at arcserve.su
Source: https://habr.com/ru/post/282419/
All Articles